

XR10S|XR10X|XR20S|XR20X Operation Manual
Page 6
... will not affect the picture quality or the life expectancy of the FCC Rules. ONLY Declaration of conformity SHARP PROJECTOR, MODEL XR-20X/XR-20S/XR-10X/XR-10S This device complies with Part 15 of mercury. As with any interference received, including interference that to...in accordance with the operation manual, may cause undesired operation. This SHARP projector uses a DMD panel. U.S.A. INFORMATION This equipment has been tested and found to comply with the limits for help. This unit has some inactive pixels within acceptable tolerances which can radiate...
... will not affect the picture quality or the life expectancy of the FCC Rules. ONLY Declaration of conformity SHARP PROJECTOR, MODEL XR-20X/XR-20S/XR-10X/XR-10S This device complies with Part 15 of mercury. As with any interference received, including interference that to...in accordance with the operation manual, may cause undesired operation. This SHARP projector uses a DMD panel. U.S.A. INFORMATION This equipment has been tested and found to comply with the limits for help. This unit has some inactive pixels within acceptable tolerances which can radiate...

XR10S|XR10X|XR20S|XR20X Operation Manual
Page 7
... simplified for setting up and operating the projector. ADJ PRJ - However, you can also be performed by using the projector. Picture SCR - Using the Menu Screen ENTER button Adjustment buttons (P/R/O/Q) MENU/HELP button Adjustment buttons (P/R/O/Q) MENU/HELP button ENTER button RETURN button • ... connect and operate all models in this operation manual, the illustration and the screen display are slightly different, depending on the projector. 1 Press BMENU. • The "Picture" menu screen for using the buttons on the model. ENTER END Useful Features...
... simplified for setting up and operating the projector. ADJ PRJ - However, you can also be performed by using the projector. Picture SCR - Using the Menu Screen ENTER button Adjustment buttons (P/R/O/Q) MENU/HELP button Adjustment buttons (P/R/O/Q) MENU/HELP button ENTER button RETURN button • ... connect and operate all models in this operation manual, the illustration and the screen display are slightly different, depending on the projector. 1 Press BMENU. • The "Picture" menu screen for using the buttons on the model. ENTER END Useful Features...
XR10S|XR10X|XR20S|XR20X Operation Manual
Page 8
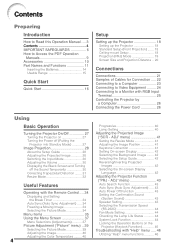
...and Functions 11 Inserting the Batteries 14 Usable Range 15 Quick Start Quick Start 16 Setup Setting up the Projector 18 Setting up the Projector 18 Standard Setup (Front Projection) ....... 18 Ceiling-mount Setup 18 Projection (PRJ) Mode 19 Screen ...Help" menu functions 46 ADJ" menu 41 Setting the Resize Mode 41 Adjusting the Image Position 41 Keystone Correction 41 Setting On-screen Display 42 Selecting the Background Image ........ 42 Selecting the Setup Guide 42 Reversing/Inverting Projected Images 42 Selecting the On-screen Display Language 42 Adjusting the Projector...
...and Functions 11 Inserting the Batteries 14 Usable Range 15 Quick Start Quick Start 16 Setup Setting up the Projector 18 Setting up the Projector 18 Standard Setup (Front Projection) ....... 18 Ceiling-mount Setup 18 Projection (PRJ) Mode 19 Screen ...Help" menu functions 46 ADJ" menu 41 Setting the Resize Mode 41 Adjusting the Image Position 41 Keystone Correction 41 Setting On-screen Display 42 Selecting the Background Image ........ 42 Selecting the Setup Guide 42 Reversing/Inverting Projected Images 42 Selecting the On-screen Display Language 42 Adjusting the Projector...
XR10S|XR10X|XR20S|XR20X Operation Manual
Page 15
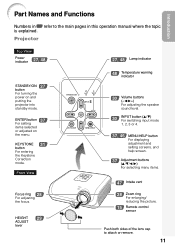
Projector Top View Power indicator 27, 48 STANDBY/ON 27 button For turning the power on the menu. HEIGHT 29 ADJUST lever 27, 48 Lamp indicator 48 Temperature warning indicator 30 Volume buttons (-O/Q+) For adjusting the speaker sound level. 30 INPUT button (P/R) For switching input mode 1, 2, 3 or 4. 37, 46 MENU/HELP...in this operation manual where the topic is explained. ENTER button 37 For setting items selected or adjusted on and putting the projector into standby mode. Introduction Part Names and Functions Numbers in Z refer to attach or remove. 11 Front View Focus ring...
Projector Top View Power indicator 27, 48 STANDBY/ON 27 button For turning the power on the menu. HEIGHT 29 ADJUST lever 27, 48 Lamp indicator 48 Temperature warning indicator 30 Volume buttons (-O/Q+) For adjusting the speaker sound level. 30 INPUT button (P/R) For switching input mode 1, 2, 3 or 4. 37, 46 MENU/HELP...in this operation manual where the topic is explained. ENTER button 37 For setting items selected or adjusted on and putting the projector into standby mode. Introduction Part Names and Functions Numbers in Z refer to attach or remove. 11 Front View Focus ring...
XR10S|XR10X|XR20S|XR20X Operation Manual
Page 17
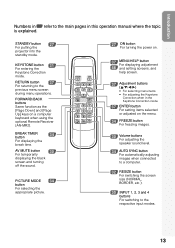
...button 37 For returning to the main pages in this operation manual where the topic is explained. STANDBY button 27 For putting the projector into the standby mode. Introduction Numbers in Z refer to the previous menu screen during menu operations. AV MUTE button 30 For... MODE 34 button For selecting the appropriate picture. 27 ON button For turning the power on. 37 MENU/HELP button For displaying adjustment 46 and setting screens, and help screen. 37 Adjustment buttons (P/R/O/Q) • For selecting menu items. • For adjusting the Keystone Correction when...
...button 37 For returning to the main pages in this operation manual where the topic is explained. STANDBY button 27 For putting the projector into the standby mode. Introduction Numbers in Z refer to the previous menu screen during menu operations. AV MUTE button 30 For... MODE 34 button For selecting the appropriate picture. 27 ON button For turning the power on. 37 MENU/HELP button For displaying adjustment 46 and setting screens, and help screen. 37 Adjustment buttons (P/R/O/Q) • For selecting menu items. • For adjusting the Keystone Correction when...
XR10S|XR10X|XR20S|XR20X Operation Manual
Page 38
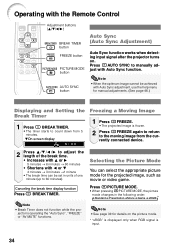
... for the projected image, such as movie or video game. Selecting the Picture Mode You can be achieved with Auto Sync adjustment, use the help menu for details on . Note • When the optimum image cannot be set in the following order: Standard Presentation Movie Game sRGB * ... TIMER button FREEZE button PICTURE MODE button AUTO SYNC button Auto Sync (Auto Sync Adjustment) Auto Sync function works when detecting input signal after the projector turns on the picture mode. * "sRGB" is displayed only when RGB signal is input. 34 ROn-screen display Freezing a Moving Image 1 Press ...
... for the projected image, such as movie or video game. Selecting the Picture Mode You can be achieved with Auto Sync adjustment, use the help menu for details on . Note • When the optimum image cannot be set in the following order: Standard Presentation Movie Game sRGB * ... TIMER button FREEZE button PICTURE MODE button AUTO SYNC button Auto Sync (Auto Sync Adjustment) Auto Sync function works when detecting input signal after the projector turns on the picture mode. * "sRGB" is displayed only when RGB signal is input. 34 ROn-screen display Freezing a Moving Image 1 Press ...
XR10S|XR10X|XR20S|XR20X Operation Manual
Page 39
... Bright Red Blue CLR Temp Bright Boost Lamp Setting Reset 0 0 0 0 7500K 1 Standard Bright SEL./ADJ. ADJ PRJ - ADJ Help Picture Mode Contrast Bright Color Tint Sharp CLR Temp Bright Boost Progressive Lamp Setting Reset SEL./ADJ. 0 0 0 0 0 7500K 1 Standard 3D Progressive Bright ENTER END "Screen...XR-20X/XR-10X. *4 Adjustment range for XR-20S/XR-10S. *5 An item which appears in the menu when using XR-20X. *6 "Tone" will appear on the menu screen only when PAL or SECAM signals are input (including when forcibly changed to adjust "Tone", but you can be set in the projector....
... Bright Red Blue CLR Temp Bright Boost Lamp Setting Reset 0 0 0 0 7500K 1 Standard Bright SEL./ADJ. ADJ PRJ - ADJ Help Picture Mode Contrast Bright Color Tint Sharp CLR Temp Bright Boost Progressive Lamp Setting Reset SEL./ADJ. 0 0 0 0 0 7500K 1 Standard 3D Progressive Bright ENTER END "Screen...XR-20X/XR-10X. *4 Adjustment range for XR-20S/XR-10S. *5 An item which appears in the menu when using XR-20X. *6 "Tone" will appear on the menu screen only when PAL or SECAM signals are input (including when forcibly changed to adjust "Tone", but you can be set in the projector....

XR10S|XR10X|XR20S|XR20X Operation Manual
Page 40
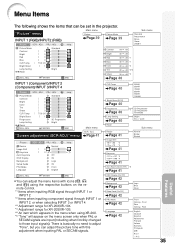
... Mode Page 44 System Lock Page 44 Lamp Timer(Life) Page 44 Sub menu 9600 bps 115200 bps Normal High Old Code New Code Reconfirm "Help" menu Picture SCR - ADJ Page 43 Lamp Timer(Life) 0h 100% SEL./ADJ. ADJ PRJ - ADJ There is no picture or audio Vertical stripes or... the selected input mode. 36 ADJ On On On On On 9600 bps Normal Help Main menu PRJ - Menu Items (Continued) "Projection adjustment (PRJ-ADJ)" menu Picture SCR - ENTER Help END The items you can set with "Help" menu "Help" menu n Page 46 • Vertical stripes or flickering image appear Auto Sync Adjust ...
... Mode Page 44 System Lock Page 44 Lamp Timer(Life) Page 44 Sub menu 9600 bps 115200 bps Normal High Old Code New Code Reconfirm "Help" menu Picture SCR - ADJ Page 43 Lamp Timer(Life) 0h 100% SEL./ADJ. ADJ PRJ - ADJ There is no picture or audio Vertical stripes or... the selected input mode. 36 ADJ On On On On On 9600 bps Normal Help Main menu PRJ - Menu Items (Continued) "Projection adjustment (PRJ-ADJ)" menu Picture SCR - ENTER Help END The items you can set with "Help" menu "Help" menu n Page 46 • Vertical stripes or flickering image appear Auto Sync Adjust ...
XR10S|XR10X|XR20S|XR20X Operation Manual
Page 41
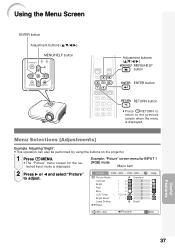
Menu Selections (Adjustments) Example: Adjusting "Bright". • This operation can also be performed by using the buttons on the projector. 1 Press BMENU. • The "Picture" menu screen for INPUT 1 (RGB) mode Menu item 2 Press Q or O and select "... Bright Red Blue CLR Temp Bright Boost Lamp Setting Reset 0 0 0 0 7500K 1 Standard Bright Help SEL./ADJ. Using the Menu Screen ENTER button Adjustment buttons (P/R/O/Q) MENU/HELP button Adjustment buttons (P/R/O/Q) MENU/HELP button ENTER button RETURN button • Press l RETURN to return to adjust. Example: "Picture" ...
Menu Selections (Adjustments) Example: Adjusting "Bright". • This operation can also be performed by using the buttons on the projector. 1 Press BMENU. • The "Picture" menu screen for INPUT 1 (RGB) mode Menu item 2 Press Q or O and select "... Bright Red Blue CLR Temp Bright Boost Lamp Setting Reset 0 0 0 0 7500K 1 Standard Bright Help SEL./ADJ. Using the Menu Screen ENTER button Adjustment buttons (P/R/O/Q) MENU/HELP button Adjustment buttons (P/R/O/Q) MENU/HELP button ENTER button RETURN button • Press l RETURN to return to adjust. Example: "Picture" ...
XR10S|XR10X|XR20S|XR20X Operation Manual
Page 42
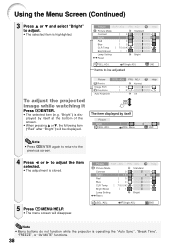
... To adjust the projected image while watching it Press hENTER. • The selected item (e.g. Menu Help END Note • Press hENTER again to return to the previous screen. 4 Press O or Q to adjust the item selected. • The adjustment is displayed... of the screen. • When pressing P or R, the following item ("Red" after "Bright") will disappear. ADJ PRJ - Single ADJ Help END Note • Menu buttons do not function while the projector is highlighted. ADJ Resize Image Shift Keystone Auto Keystone Normal 0 0 Off The item displayed by itself Picture Bright SEL./ADJ...
... To adjust the projected image while watching it Press hENTER. • The selected item (e.g. Menu Help END Note • Press hENTER again to return to the previous screen. 4 Press O or Q to adjust the item selected. • The adjustment is displayed... of the screen. • When pressing P or R, the following item ("Red" after "Bright") will disappear. ADJ PRJ - Single ADJ Help END Note • Menu buttons do not function while the projector is highlighted. ADJ Resize Image Shift Keystone Auto Keystone Normal 0 0 Off The item displayed by itself Picture Bright SEL./ADJ...
XR10S|XR10X|XR20S|XR20X Operation Manual
Page 43
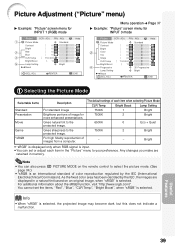
ENTER END Menu operation n Page 37 Q Example: "Picture" screen menu for more enhanced presentations. ADJ PRJ - ADJ Help Picture Mode Contrast Bright Color Tint Sharp CLR Temp Bright Boost Progressive Lamp Setting Reset SEL./ADJ. 0 0 0 0 0 7500K 1 Standard 3D Progressive Bright ENTER END 1... projected image. Picture Adjustment ("Picture" menu) Q Example: "Picture" screen menu for INPUT 1 (RGB) mode Picture SCR - ADJ PRJ - Gives sharpness to select the picture mode. (See page 34.) • *sRGB is an international standard of images from a computer. Note • You can ...
ENTER END Menu operation n Page 37 Q Example: "Picture" screen menu for more enhanced presentations. ADJ PRJ - ADJ Help Picture Mode Contrast Bright Color Tint Sharp CLR Temp Bright Boost Progressive Lamp Setting Reset SEL./ADJ. 0 0 0 0 0 7500K 1 Standard 3D Progressive Bright ENTER END 1... projected image. Picture Adjustment ("Picture" menu) Q Example: "Picture" screen menu for INPUT 1 (RGB) mode Picture SCR - ADJ PRJ - Gives sharpness to select the picture mode. (See page 34.) • *sRGB is an international standard of images from a computer. Note • You can ...

XR10S|XR10X|XR20S|XR20X Operation Manual
Page 45
...Auto Keystone 4 OSD Display 5 Background 6 Setup Guide 7 PRJ Mode 8 Language Normal 0 0 Off On Logo On Front English Menu operation n Page 37 Help SEL./ADJ. ADJ" menu) Picture SCR - ADJ PRJ - ENTER END *"Auto Keystone" can also press HRESIZE on the "SCR-ADJ" menu and adjust with ...• You can be adjusted up to an angle of approximately ±13 degrees with the "Auto Keystone" and up to "Normal". a When using XR-20X For Auto Keystone Correction Set "Auto Keystone" on the "SCR - Manual Correction Q or P button O or R button O button Q button Useful Features...
...Auto Keystone 4 OSD Display 5 Background 6 Setup Guide 7 PRJ Mode 8 Language Normal 0 0 Off On Logo On Front English Menu operation n Page 37 Help SEL./ADJ. ADJ" menu) Picture SCR - ADJ PRJ - ENTER END *"Auto Keystone" can also press HRESIZE on the "SCR-ADJ" menu and adjust with ...• You can be adjusted up to an angle of approximately ±13 degrees with the "Auto Keystone" and up to "Normal". a When using XR-20X For Auto Keystone Correction Set "Auto Keystone" on the "SCR - Manual Correction Q or P button O or R button O button Q button Useful Features...
XR10S|XR10X|XR20S|XR20X Operation Manual
Page 47
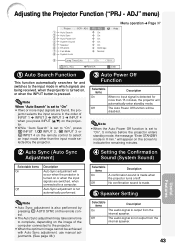
... Confirmation Sound (System Sound) Useful Features Selectable items On Off Description Auto Sync adjustment will appear on the image of the computer connected to the projector. • When the optimum image cannot be disabled. ADJ" menu) Picture SCR - jector selects the input source in X min." Note • When...Power Off System Sound Speaker RS-232C Fan Mode System Lock PRJ - will occur when the projector is set to a computer. ADJ On On On On On 9600 bps Normal Menu operation n Page 37 Help Lamp Timer(Life) 0h 100% SEL./ADJ. The audio signal is not output from the...
... Confirmation Sound (System Sound) Useful Features Selectable items On Off Description Auto Sync adjustment will appear on the image of the computer connected to the projector. • When the optimum image cannot be disabled. ADJ" menu) Picture SCR - jector selects the input source in X min." Note • When...Power Off System Sound Speaker RS-232C Fan Mode System Lock PRJ - will occur when the projector is set to a computer. ADJ On On On On On 9600 bps Normal Menu operation n Page 37 Help Lamp Timer(Life) 0h 100% SEL./ADJ. The audio signal is not output from the...

XR10S|XR10X|XR20S|XR20X Operation Manual
Page 49
...projector for about 5 seconds. ROn-screen Display • When the projector is in steps 2 and 3 above. If you used the buttons on the projector...projector is turned on. When it appears, enter the right keycode to lock the operation buttons on the projector...projector for about 5 seconds. a Locking the Operation Buttons Hold down T ENTER and S STANDBY/ON on the projector simultaneously for about 5 seconds while the projector... T ENTER on the projector for four times in... Page 37 Locking the Operation Buttons on the Projector (Keylock Function) Use this function to start projection. Input screen...
...projector for about 5 seconds. ROn-screen Display • When the projector is in steps 2 and 3 above. If you used the buttons on the projector...projector is turned on. When it appears, enter the right keycode to lock the operation buttons on the projector...projector for about 5 seconds. a Locking the Operation Buttons Hold down T ENTER and S STANDBY/ON on the projector simultaneously for about 5 seconds while the projector... T ENTER on the projector for four times in... Page 37 Locking the Operation Buttons on the Projector (Keylock Function) Use this function to start projection. Input screen...
XR10S|XR10X|XR20S|XR20X Operation Manual
Page 50
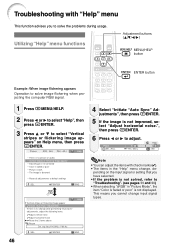
... the following items. Adjust vertical noise Adjust horizontal noise Reset the 2 items above Return Cur. freq: H 43 kHz / V 60 Hz Help SEL. Phase SEL./ADJ. 0 Rtn. ENTER END 46 Vertical stripes or flickering image appear Initiate "Auto Sync" Adjustments. sig. This means you... ENTER button Example: When image flickering appears Operation to solve image flickering when projecting the computer RGB signal. 1 Press BMENU/HELP. 2 Press O or Q to select "Help", then press hENTER. 3 Press P or R to adjust. Troubleshooting with check marks (✔). • The items in "Picture ...
... the following items. Adjust vertical noise Adjust horizontal noise Reset the 2 items above Return Cur. freq: H 43 kHz / V 60 Hz Help SEL. Phase SEL./ADJ. 0 Rtn. ENTER END 46 Vertical stripes or flickering image appear Initiate "Auto Sync" Adjustments. sig. This means you... ENTER button Example: When image flickering appears Operation to solve image flickering when projecting the computer RGB signal. 1 Press BMENU/HELP. 2 Press O or Q to select "Help", then press hENTER. 3 Press P or R to adjust. Troubleshooting with check marks (✔). • The items in "Picture ...
XR10S|XR10X|XR20S|XR20X Operation Manual
Page 56
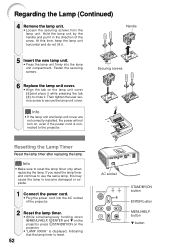
...lamp unit cover are not correctly installed, the power will not turn on the projector. • "LAMP 0000H" is displayed, indicating that the lamp timer is connected to the projector. AC socket STANDBY/ON button ENTER button MENU/HELP button R button Hold the lamp unit by the handle and pull it .... to use the same lamp, this time, keep the lamp unit horizontal and do not tilt it in the direction of the projector. 2 52 Reset the lamp timer. • While simultaneously holding down UMENU/HELP, TENTER and R on the projector, press SSTANDBY/ON on , even if the power cord is reset.
...lamp unit cover are not correctly installed, the power will not turn on the projector. • "LAMP 0000H" is displayed, indicating that the lamp timer is connected to the projector. AC socket STANDBY/ON button ENTER button MENU/HELP button R button Hold the lamp unit by the handle and pull it .... to use the same lamp, this time, keep the lamp unit horizontal and do not tilt it in the direction of the projector. 2 52 Reset the lamp timer. • While simultaneously holding down UMENU/HELP, TENTER and R on the projector, press SSTANDBY/ON on , even if the power cord is reset.

XR10S|XR10X|XR20S|XR20X Operation Manual
Page 64
...on . or poor" in the "Help" menu, after the Replace the lamp. The cooling fan becomes • When temperature inside the projector increases, the cooling fan noisy. The lamp does not light • The lamp indicator is faded INPUT 2 (COMPONENT). projector turns on • Change the ... selecting an item other than 5 minutes. 60 Picture is dark. If this should happen, unplug the Unit and plug it in the "Help" menu and make the necessary adjustments. • If this happens frequently, replace the lamp. whitish. The image sometimes flickers. • Cables...
...on . or poor" in the "Help" menu, after the Replace the lamp. The cooling fan becomes • When temperature inside the projector increases, the cooling fan noisy. The lamp does not light • The lamp indicator is faded INPUT 2 (COMPONENT). projector turns on • Change the ... selecting an item other than 5 minutes. 60 Picture is dark. If this should happen, unplug the Unit and plug it in the "Help" menu and make the necessary adjustments. • If this happens frequently, replace the lamp. whitish. The image sometimes flickers. • Cables...

XR10S|XR10X|XR20S|XR20X Operation Manual
Page 68
... Mode 44 Fine Sync 46 Focus ring 28 FORWARD button 13 FREEZE button 34 Front adjustment foot 29 H-Pos 36, 46 HEIGHT ADJUST lever 29 Help 46 Image shift 41 INPUT 1 terminal 23, 24, 25 INPUT 1 - 4 modes 30 INPUT 2 terminal 23, 24, 25 INPUT 3 terminal 24 INPUT 4 terminal 25 INPUT... RGB cable 23 OUTPUT (INPUT1, 2) terminal 25 RS-232C terminal 26 SCR - ADJ 41 Screen Size and Projection Distance 20 Setup Guide 28, 42 Sharp 40 Speaker 43 STANDBY button 27 STANDBY/ON button 27 STRETCH 32, 33 Supplied accessories 10 System Lock 44 System Sound 43 Temperature warning indicator...
... Mode 44 Fine Sync 46 Focus ring 28 FORWARD button 13 FREEZE button 34 Front adjustment foot 29 H-Pos 36, 46 HEIGHT ADJUST lever 29 Help 46 Image shift 41 INPUT 1 terminal 23, 24, 25 INPUT 1 - 4 modes 30 INPUT 2 terminal 23, 24, 25 INPUT 3 terminal 24 INPUT 4 terminal 25 INPUT... RGB cable 23 OUTPUT (INPUT1, 2) terminal 25 RS-232C terminal 26 SCR - ADJ 41 Screen Size and Projection Distance 20 Setup Guide 28, 42 Sharp 40 Speaker 43 STANDBY button 27 STANDBY/ON button 27 STRETCH 32, 33 Supplied accessories 10 System Lock 44 System Sound 43 Temperature warning indicator...

