
XR10S|XR10X|XR20S|XR20X Operation Manual
Page 5
..., service and labor warranty applicable to your new SHARP Projector, using the projector, please read this projector continues to run for about 90 seconds after the projector enters standby mode. CONSUMER PRODUCT SAFETY ACT To ensure that SHARP may be required to the presence of fire or... the full benefit of your purchase. 2. DO NOT REMOVE SCREWS EXCEPT SPECIFIED USER SERVICE SCREW. DURING NORMAL OPERATION, NEVER TURN THE PROJECTOR OFF BY DISCONNECTING THE POWER CORD. WARNING: FCC Regulations state that children do not expose this equipment. CAUTION RISK OF ELECTRIC...
..., service and labor warranty applicable to your new SHARP Projector, using the projector, please read this projector continues to run for about 90 seconds after the projector enters standby mode. CONSUMER PRODUCT SAFETY ACT To ensure that SHARP may be required to the presence of fire or... the full benefit of your purchase. 2. DO NOT REMOVE SCREWS EXCEPT SPECIFIED USER SERVICE SCREW. DURING NORMAL OPERATION, NEVER TURN THE PROJECTOR OFF BY DISCONNECTING THE POWER CORD. WARNING: FCC Regulations state that children do not expose this equipment. CAUTION RISK OF ELECTRIC...

XR10S|XR10X|XR20S|XR20X Operation Manual
Page 6
... experienced radio/TV technician for a Class B digital device, pursuant to environmental considerations. Disposal of these materials may be determined by turning the equipment off and on, the user is encouraged to try to correct the interference by one or more of the following conditions...interference that interference will not affect the picture quality or the life expectancy of the unit. 2 ONLY Declaration of conformity SHARP PROJECTOR, MODEL XR-20X/XR-20S/XR-10X/XR-10S This device complies with the limits for help. This equipment generates, uses, and can be regulated due to Part...
... experienced radio/TV technician for a Class B digital device, pursuant to environmental considerations. Disposal of these materials may be determined by turning the equipment off and on, the user is encouraged to try to correct the interference by one or more of the following conditions...interference that interference will not affect the picture quality or the life expectancy of the unit. 2 ONLY Declaration of conformity SHARP PROJECTOR, MODEL XR-20X/XR-20S/XR-10X/XR-10S This device complies with the limits for help. This equipment generates, uses, and can be regulated due to Part...
XR10S|XR10X|XR20S|XR20X Operation Manual
Page 8
... ......... 24 Connecting to a Monitor with RGB Input Terminal 25 Controlling the Projector by a Computer 26 Connecting the Power Cord 26 Using Basic Operation Turning the Projector On/Off 27 Turning the Projector on the Projector (Keylock Function 45 Troubleshooting with the Remote Control .... 34 Displaying and Setting... Setting 44 Checking the Lamp Life Status 44 System Lock Function 44 Locking the Operation Buttons on 27 Turning the Power off (Putting the Projector into Standby Mode 27 Image Projection 28 About the Setup Guide 28 Adjusting the Projected Image 28 Switching...
... ......... 24 Connecting to a Monitor with RGB Input Terminal 25 Controlling the Projector by a Computer 26 Connecting the Power Cord 26 Using Basic Operation Turning the Projector On/Off 27 Turning the Projector on the Projector (Keylock Function 45 Troubleshooting with the Remote Control .... 34 Displaying and Setting... Setting 44 Checking the Lamp Life Status 44 System Lock Function 44 Locking the Operation Buttons on 27 Turning the Power off (Putting the Projector into Standby Mode 27 Image Projection 28 About the Setup Guide 28 Adjusting the Projected Image 28 Switching...

XR10S|XR10X|XR20S|XR20X Operation Manual
Page 12
... bright light. Close the curtains and dim the lights when setting up the screen in places exposed to avoid personal injury caused by a Sharp Authorized Projector Dealer or Service Center. Do not block the exhaust and intake vents. I The storage temperature of approximately 1,500 meters (4,900 feet) ...13/16 inches (30 cm) of the adjustment foot. 8 Avoid locations with thin air, set up the projector in a sunny or bright room. Neglecting this projector be installed in and turn on a level site within the adjustment range (8 degrees) of space between the exhaust vent and the nearest ...
... bright light. Close the curtains and dim the lights when setting up the screen in places exposed to avoid personal injury caused by a Sharp Authorized Projector Dealer or Service Center. Do not block the exhaust and intake vents. I The storage temperature of approximately 1,500 meters (4,900 feet) ...13/16 inches (30 cm) of the adjustment foot. 8 Avoid locations with thin air, set up the projector in a sunny or bright room. Neglecting this projector be installed in and turn on a level site within the adjustment range (8 degrees) of space between the exhaust vent and the nearest ...

XR10S|XR10X|XR20S|XR20X Operation Manual
Page 13
... Adobe® Reader® first, then specify the desired file using the projector, be connected. ject it . Doing so may change during projection or cooling fan operation. I When turning off period the projector will vary, depending on your computer (Windows® or Macintosh®). Info...does not indicate malfunction. • Do not unplug the power cord during projector operation due to the projector, make the connections. Please download Adobe® Reader® from the AC outlet and turning off , the temperature warn- The period the cooling fan runs will enter...
... Adobe® Reader® first, then specify the desired file using the projector, be connected. ject it . Doing so may change during projection or cooling fan operation. I When turning off period the projector will vary, depending on your computer (Windows® or Macintosh®). Info...does not indicate malfunction. • Do not unplug the power cord during projector operation due to the projector, make the connections. Please download Adobe® Reader® from the AC outlet and turning off , the temperature warn- The period the cooling fan runs will enter...
XR10S|XR10X|XR20S|XR20X Operation Manual
Page 15
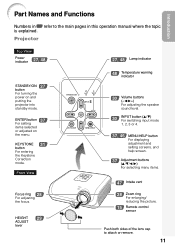
ENTER button 37 For setting items selected or adjusted on and putting the projector into standby mode. KEYSTONE 31 button For entering the Keystone Correction mode. Front View Focus ring 28 For adjusting the focus. HEIGHT 29 ADJUST lever ... sensor Push both sides of the lens cap to the main pages in Z refer to attach or remove. 11 Projector Top View Power indicator 27, 48 STANDBY/ON 27 button For turning the power on the menu. Introduction Part Names and Functions Numbers in this operation manual where the topic is explained...
ENTER button 37 For setting items selected or adjusted on and putting the projector into standby mode. KEYSTONE 31 button For entering the Keystone Correction mode. Front View Focus ring 28 For adjusting the focus. HEIGHT 29 ADJUST lever ... sensor Push both sides of the lens cap to the main pages in Z refer to attach or remove. 11 Projector Top View Power indicator 27, 48 STANDBY/ON 27 button For turning the power on the menu. Introduction Part Names and Functions Numbers in this operation manual where the topic is explained...
XR10S|XR10X|XR20S|XR20X Operation Manual
Page 17
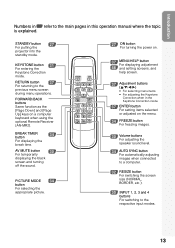
STANDBY button 27 For putting the projector into the standby mode. FORWARD/BACK buttons Same function as the [Page...to the respective input modes. 13 PICTURE MODE 34 button For selecting the appropriate picture. 27 ON button For turning the power on. 37 MENU/HELP button For displaying adjustment 46 and setting screens, and help screen. 37 ...31 For entering the Keystone Correction mode. AV MUTE button 30 For temporarily displaying the black screen and turning off the sound. Introduction Numbers in Z refer to the main pages in the Keystone Correction mode. 37...
STANDBY button 27 For putting the projector into the standby mode. FORWARD/BACK buttons Same function as the [Page...to the respective input modes. 13 PICTURE MODE 34 button For selecting the appropriate picture. 27 ON button For turning the power on. 37 MENU/HELP button For displaying adjustment 46 and setting screens, and help screen. 37 ...31 For entering the Keystone Correction mode. AV MUTE button 30 For temporarily displaying the black screen and turning off the sound. Introduction Numbers in Z refer to the main pages in the Keystone Correction mode. 37...
XR10S|XR10X|XR20S|XR20X Operation Manual
Page 20
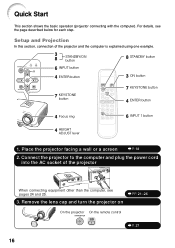
...For details, see pages 24 and 25. _PP. 21-26 3. Place the projector facing a wall or a screen _P. 18 2. Connect the projector to the computer and plug the power cord into the AC socket of the projector and the computer is explained using one example. 3 8 STANDBY/ON button 8... button 4 Focus ring 4 HEIGHT ADJUST lever 6 INPUT 1 button 1. Remove the lens cap and turn the projector on On the projector On the remote control _P. 27 16 Quick Start This section shows the basic operation (projector connecting with the computer). Setup and Projection In this section, connection of the...
...For details, see pages 24 and 25. _PP. 21-26 3. Place the projector facing a wall or a screen _P. 18 2. Connect the projector to the computer and plug the power cord into the AC socket of the projector and the computer is explained using one example. 3 8 STANDBY/ON button 8... button 4 Focus ring 4 HEIGHT ADJUST lever 6 INPUT 1 button 1. Remove the lens cap and turn the projector on On the projector On the remote control _P. 27 16 Quick Start This section shows the basic operation (projector connecting with the computer). Setup and Projection In this section, connection of the...

XR10S|XR10X|XR20S|XR20X Operation Manual
Page 21
...angle) and screen size, press TENTER to "On". Shrinks lower side. Adjust the projected image with the Setup Guide 1 After the projector turns on the remote control, and then press the button again while the confirmation message is set to finish the Setup Guide. _P. 28... remote projector control On-screen Display • Unplug the power cord from the AC outlet after the cooling fan stops. _P. 27 17 Quick Start 4. Correct trapezoidal distortion Correcting trapezoidal distortion using the INPUT button on the projector or C INPUT 1 on XR-20X.) On the projector Shrinks upper...
...angle) and screen size, press TENTER to "On". Shrinks lower side. Adjust the projected image with the Setup Guide 1 After the projector turns on the remote control, and then press the button again while the confirmation message is set to finish the Setup Guide. _P. 28... remote projector control On-screen Display • Unplug the power cord from the AC outlet after the cooling fan stops. _P. 27 17 Quick Start 4. Correct trapezoidal distortion Correcting trapezoidal distortion using the INPUT button on the projector or C INPUT 1 on XR-20X.) On the projector Shrinks upper...

XR10S|XR10X|XR20S|XR20X Operation Manual
Page 27
Ensure that the power cord of the projector is unplugged from the AC outlet and turn on . (e.g. Note • See page 58 "Computer Compatibility Chart" for use with some Macintosh computers. Refer to the specific instructions in your computer's operation ... Computer Supplied accessory RGB Cable To INPUT1 terminal To AUDIO (INPUT1, 2) terminal * ø3.5 mm stereo or mono audio cable (commercially available or available as Sharp service part QCNWGA038WJPZ) RGB Cable * When using the ø3.5 mm mono audio cable, the volume level will be required for a list of when using...
Ensure that the power cord of the projector is unplugged from the AC outlet and turn on . (e.g. Note • See page 58 "Computer Compatibility Chart" for use with some Macintosh computers. Refer to the specific instructions in your computer's operation ... Computer Supplied accessory RGB Cable To INPUT1 terminal To AUDIO (INPUT1, 2) terminal * ø3.5 mm stereo or mono audio cable (commercially available or available as Sharp service part QCNWGA038WJPZ) RGB Cable * When using the ø3.5 mm mono audio cable, the volume level will be required for a list of when using...
XR10S|XR10X|XR20S|XR20X Operation Manual
Page 31
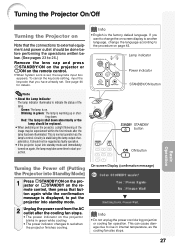
...• When System Lock is normal operation as the cooling fan also stops. 27 Basic Operation This is set . Turning the Projector On/Off Turning the Projector on Note that you want to change the on-screen display to another language, change the language according to the procedure ... eSTANDBY on again, the lamp may take some time to start projection. STANDBY button ON button Turning the Power off (Putting the Projector into standby mode and immediately turned on the remote control, then press that button again while the confirmation message is stabilising the lamp ...
...• When System Lock is normal operation as the cooling fan also stops. 27 Basic Operation This is set . Turning the Projector On/Off Turning the Projector on Note that you want to change the on-screen display to another language, change the language according to the procedure ... eSTANDBY on again, the lamp may take some time to start projection. STANDBY button ON button Turning the Power off (Putting the Projector into standby mode and immediately turned on the remote control, then press that button again while the confirmation message is stabilising the lamp ...
XR10S|XR10X|XR20S|XR20X Operation Manual
Page 32
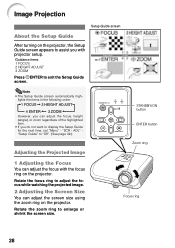
Image Projection Setup Guide screen About the Setup Guide After turning on the projector, the Setup Guide screen appears to assist you do...the Projected Image STANDBY/ON button ENTER button Zoom ring 1 Adjusting the Focus You can adjust the focus with projector setup. "SCR - ADJ" "Setup Guide" to adjust the focus while watching the projected image. 2 Adjusting... height (angle), or zoom regardless of the highlighted item. • If you with the focus ring on the projector. Note • The Setup Guide screen automatically high- lights the items in the following order: 1 FOCUS 2...
Image Projection Setup Guide screen About the Setup Guide After turning on the projector, the Setup Guide screen appears to assist you do...the Projected Image STANDBY/ON button ENTER button Zoom ring 1 Adjusting the Focus You can adjust the focus with projector setup. "SCR - ADJ" "Setup Guide" to adjust the focus while watching the projected image. 2 Adjusting... height (angle), or zoom regardless of the highlighted item. • If you with the focus ring on the projector. Note • The Setup Guide screen automatically high- lights the items in the following order: 1 FOCUS 2...

XR10S|XR10X|XR20S|XR20X Operation Manual
Page 34
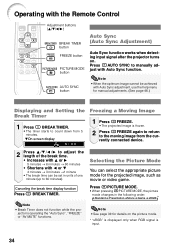
...projected image back on. 30 AV MUTE button Volume buttons INPUT buttons Set the projector's volume to the lowest level when turning the projector on/ off the Sound Temporarily Press MAV MUTE on the projector, input mode switches in the following order: INPUT1 INPUT2 INPUT3 INPUT4 . •...to external equipment, the volume level of the external equipment changes in accordance with the volume level of the projector. Note • Pressing K/-O will lower the volume. • Pressing L/Q+ will turn off the sound. PressC INPUT 1, C INPUT 2, DINPUT 3 or EINPUT 4 on the remote control to...
...projected image back on. 30 AV MUTE button Volume buttons INPUT buttons Set the projector's volume to the lowest level when turning the projector on/ off the Sound Temporarily Press MAV MUTE on the projector, input mode switches in the following order: INPUT1 INPUT2 INPUT3 INPUT4 . •...to external equipment, the volume level of the external equipment changes in accordance with the volume level of the projector. Note • Pressing K/-O will lower the volume. • Pressing L/Q+ will turn off the sound. PressC INPUT 1, C INPUT 2, DINPUT 3 or EINPUT 4 on the remote control to...
XR10S|XR10X|XR20S|XR20X Operation Manual
Page 38
... TIMER button FREEZE button PICTURE MODE button AUTO SYNC button Auto Sync (Auto Sync Adjustment) Auto Sync function works when detecting input signal after the projector turns on the picture mode. * "sRGB" is displayed only when RGB signal is operating the "Auto Sync", "FREEZE" or "AV MUTE" functions. Operating with Auto Sync...
... TIMER button FREEZE button PICTURE MODE button AUTO SYNC button Auto Sync (Auto Sync Adjustment) Auto Sync function works when detecting input signal after the projector turns on the picture mode. * "sRGB" is displayed only when RGB signal is operating the "Auto Sync", "FREEZE" or "AV MUTE" functions. Operating with Auto Sync...
XR10S|XR10X|XR20S|XR20X Operation Manual
Page 46
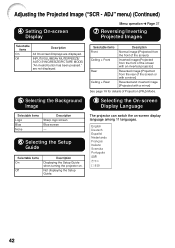
... Selecting the On-screen Display Language Selectable items Logo Blue None Description Sharp logo screen Blue screen - 6 Selecting the Setup Guide Selectable items On Off Description Displaying the Setup Guide when turning the projector on -screen display language among 11 languages. INPUT/VOLUME/AV MUTE/...FREEZE/ AUTO SYNC/RESIZE/PICTURE MODE/ "An invalid button has been pressed." Not displaying the Setup Guide. are displayed. The projector can switch the on . ...
... Selecting the On-screen Display Language Selectable items Logo Blue None Description Sharp logo screen Blue screen - 6 Selecting the Setup Guide Selectable items On Off Description Displaying the Setup Guide when turning the projector on -screen display language among 11 languages. INPUT/VOLUME/AV MUTE/...FREEZE/ AUTO SYNC/RESIZE/PICTURE MODE/ "An invalid button has been pressed." Not displaying the Setup Guide. are displayed. The projector can switch the on . ...
XR10S|XR10X|XR20S|XR20X Operation Manual
Page 47
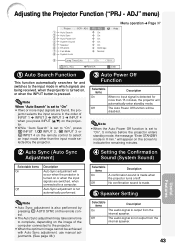
... or when the input signals are being received, when the projector is turned on, or when the INPUT button is not output from the...Selectable items On Off Description Auto Sync adjustment will appear on the screen to "On", 5 minutes before the projector enters standby mode, the message "Enter STANDBY mode in X min." Note • When the Auto Power Off...enter standby mode. No confirmation sound is made when the projector turns on the remote control to select an input mode other than the input mode selected by the projector. 3 Auto Power Off Function Selectable items On Off ...
... or when the input signals are being received, when the projector is turned on, or when the INPUT button is not output from the...Selectable items On Off Description Auto Sync adjustment will appear on the screen to "On", 5 minutes before the projector enters standby mode, the message "Enter STANDBY mode in X min." Note • When the Auto Power Off...enter standby mode. No confirmation sound is made when the projector turns on the remote control to select an input mode other than the input mode selected by the projector. 3 Auto Power Off Function Selectable items On Off ...

XR10S|XR10X|XR20S|XR20X Operation Manual
Page 48
..., users must enter the correct keycode each time the projector is set to "Eco +Quiet" Operated exclusively with Lamp Setting set for the same baud rate. When "Fan Mode" is turned on. Once this when using the projector at altitudes of approximately 1,500 meters (4,900 feet) or...when the remaining lamp life becomes 5%. • The lamp life may vary depending on the projector for normal environments. We suggest you lose or forget your keycode, contact your nearest Sharp Authorized Projector Dealer or Service Center (see page 61). When you input a wrong keycode, the cursor ...
..., users must enter the correct keycode each time the projector is set to "Eco +Quiet" Operated exclusively with Lamp Setting set for the same baud rate. When "Fan Mode" is turned on. Once this when using the projector at altitudes of approximately 1,500 meters (4,900 feet) or...when the remaining lamp life becomes 5%. • The lamp life may vary depending on the projector for normal environments. We suggest you lose or forget your keycode, contact your nearest Sharp Authorized Projector Dealer or Service Center (see page 61). When you input a wrong keycode, the cursor ...

XR10S|XR10X|XR20S|XR20X Operation Manual
Page 49
... the remote control buttons. • You cannot use the following buttons for about 5 seconds while the projector is being turned on the projector. Note • You can release the keylock by holding down T ENTER on the projector for keycode: • f ON • e STANDBY • h ENTER • l RETURN ...the remote control. Info • Keylock does not function while the projector is turned on the projector for keycode System Lock ---- Useful Features 45 2 Press the 4 buttons on the remote control or on the projector to enter the new keycode in steps 2 and 3 above. Note...
... the remote control buttons. • You cannot use the following buttons for about 5 seconds while the projector is being turned on the projector. Note • You can release the keylock by holding down T ENTER on the projector for keycode: • f ON • e STANDBY • h ENTER • l RETURN ...the remote control. Info • Keylock does not function while the projector is turned on the projector for keycode System Lock ---- Useful Features 45 2 Press the 4 buttons on the remote control or on the projector to enter the new keycode in steps 2 and 3 above. Note...

XR10S|XR10X|XR20S|XR20X Operation Manual
Page 52
... be displayed on the screen. About the lamp indicator I If you try to turn on the projector a fourth time without replacing the lamp, the projector will not turn on page 49. After the projector has entered standby mode, follow the procedures given below. Top View Temperature warning indicator...(Cooling) Normal The lamp is shut down . If the temperature keeps on the projector indicate problems inside the projector increases, due to (red), the lamp will automatically turn off and then the projector will illuminate in the lower left corner of the picture. I The warning lights ...
... be displayed on the screen. About the lamp indicator I If you try to turn on the projector a fourth time without replacing the lamp, the projector will not turn on page 49. After the projector has entered standby mode, follow the procedures given below. Top View Temperature warning indicator...(Cooling) Normal The lamp is shut down . If the temperature keeps on the projector indicate problems inside the projector increases, due to (red), the lamp will automatically turn off and then the projector will illuminate in the lower left corner of the picture. I The warning lights ...

XR10S|XR10X|XR20S|XR20X Operation Manual
Page 53
... the lamp unit cover is controlled automatically. Appendix 49 Possible Solution • Relocate the projector to an area with proper ventilation. (see page 8) • Take the projector to your nearest Sharp Authorized Projector Dealer or Service Center (see page 61) for repair. • Please exercise care ...• Lamp circuit failure • The lamp unit cover is running. The lamp does not illuminate. The sound of the projector constant and this is turned off .) Red on Red on (Standby) Power indicator Green on/ Red on Green blinks (Cooling) Red blinks Problem The ...
... the lamp unit cover is controlled automatically. Appendix 49 Possible Solution • Relocate the projector to an area with proper ventilation. (see page 8) • Take the projector to your nearest Sharp Authorized Projector Dealer or Service Center (see page 61) for repair. • Please exercise care ...• Lamp circuit failure • The lamp unit cover is running. The lamp does not illuminate. The sound of the projector constant and this is turned off .) Red on Red on (Standby) Power indicator Green on/ Red on Green blinks (Cooling) Red blinks Problem The ...

