XR-32S | XR-32X Operation Manual
Page 6
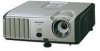
...local authorities, the Electronics Industries Alliance: www.eiae.org, the lamp recycling organization www.lamprecycle.org, or Sharp at 1-800-BE-SHARP. This SHARP projector uses a DLP® chip. This will not occur in accordance with the operation manual, may cause harmful interference to... in inactive dots on the picture screen. These limits are certain acceptable tolerances that interference will not affect the picture quality or the life expectancy of the FCC Rules. ONLY Declaration of conformity SHARP PROJECTOR, MODEL XR-32X/XR-32S This device complies with any...
...local authorities, the Electronics Industries Alliance: www.eiae.org, the lamp recycling organization www.lamprecycle.org, or Sharp at 1-800-BE-SHARP. This SHARP projector uses a DLP® chip. This will not occur in accordance with the operation manual, may cause harmful interference to... in inactive dots on the picture screen. These limits are certain acceptable tolerances that interference will not affect the picture quality or the life expectancy of the FCC Rules. ONLY Declaration of conformity SHARP PROJECTOR, MODEL XR-32X/XR-32S This device complies with any...
XR-32S | XR-32X Operation Manual
Page 7
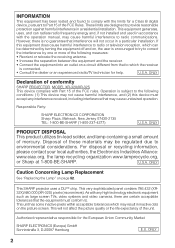
..., depending on the projector. 1 Press MENU/HELP. • The "Picture" menu screen for using the buttons on the model. Introduction How to adjust. However, you can also be performed by using the projector. The examples used in the same manner. • In this manual are based on the XR-32X model. Example: "Picture" screen menu for...
..., depending on the projector. 1 Press MENU/HELP. • The "Picture" menu screen for using the buttons on the model. Introduction How to adjust. However, you can also be performed by using the projector. The examples used in the same manner. • In this manual are based on the XR-32X model. Example: "Picture" screen menu for...

XR-32S | XR-32X Operation Manual
Page 8
...Background Image ........ 44 Selecting the Setup Guide 44 Reversing/Inverting Projected Images 44 Selecting the On-screen Display Language 44 Adjusting the Projector Function ("PRJ - ADJ" Menu 45 Auto Sync (Auto Sync Adjustment) ..... 45 Auto Power Off Function 45 Auto Restart Function... as the Wireless Computer Mouse 34 Menu Items 35 Using the Menu Screen 38 Menu Selections (Adjustments 38 Picture Adjustment ("Picture" Menu) ... 40 Selecting the Picture Mode 40 Adjusting the Image 41 Adjusting the Color Temperature ......... 41 Adjusting the Colors 41 Progressive 42 Reducing...
...Background Image ........ 44 Selecting the Setup Guide 44 Reversing/Inverting Projected Images 44 Selecting the On-screen Display Language 44 Adjusting the Projector Function ("PRJ - ADJ" Menu 45 Auto Sync (Auto Sync Adjustment) ..... 45 Auto Power Off Function 45 Auto Restart Function... as the Wireless Computer Mouse 34 Menu Items 35 Using the Menu Screen 38 Menu Selections (Adjustments 38 Picture Adjustment ("Picture" Menu) ... 40 Selecting the Picture Mode 40 Adjusting the Image 41 Adjusting the Color Temperature ......... 41 Adjusting the Colors 41 Progressive 42 Reducing...

XR-32S | XR-32X Operation Manual
Page 13
... equipment ■ When connecting a computer or other cables connected to rise, the lamp will illuminate in the lower left corner of the picture. Refer to heat sources. If the temperature continues to it. ■ If the power cord is unplugged while the cooling fan is ..."File", "Open" menu. 9 Info • The cooling fan regulates the internal temperature, and its performance is running, some parts of the projector may change during projector operation due to access the pro- To utilize these manuals, you need to setup problems or blockage of the air vents, " " and ...
... equipment ■ When connecting a computer or other cables connected to rise, the lamp will illuminate in the lower left corner of the picture. Refer to heat sources. If the temperature continues to it. ■ If the power cord is unplugged while the cooling fan is ..."File", "Open" menu. 9 Info • The cooling fan regulates the internal temperature, and its performance is running, some parts of the projector may change during projector operation due to access the pro- To utilize these manuals, you need to setup problems or blockage of the air vents, " " and ...

XR-32S | XR-32X Operation Manual
Page 15
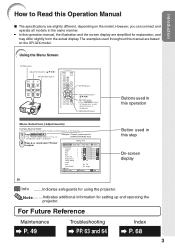
KEYSTONE 28 button For entering the Keystone Correction mode. Front View Zoom ring 26 For enlarging/ reducing the picture. Remote control 15 sensor Exhaust vent 49 25, 50 Lamp indicator 50 Temperature warning indicator 32 ECO+QUIET button For lowering the noise of the ... cap to the main pages in Z refer to attach or remove. 11 ENTER button For setting 38 items selected or adjusted on and putting the projector into standby mode. Push both sides of the cooling fan and extending the lamp life. 29 VOL (Volume) buttons (-O/Q+) For adjusting the speaker sound level...
KEYSTONE 28 button For entering the Keystone Correction mode. Front View Zoom ring 26 For enlarging/ reducing the picture. Remote control 15 sensor Exhaust vent 49 25, 50 Lamp indicator 50 Temperature warning indicator 32 ECO+QUIET button For lowering the noise of the ... cap to the main pages in Z refer to attach or remove. 11 ENTER button For setting 38 items selected or adjusted on and putting the projector into standby mode. Push both sides of the cooling fan and extending the lamp life. 29 VOL (Volume) buttons (-O/Q+) For adjusting the speaker sound level...
XR-32S | XR-32X Operation Manual
Page 17
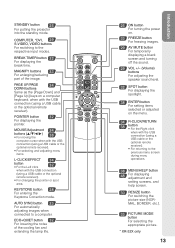
STANDBY button 25 For putting the projector into the standby mode. BREAK TIMER button 32 For displaying the break time. PAGE UP/PAGE 34 DOWN buttons Same as the [Page Down] and [... MENU/HELP button 48 For displaying adjustment and setting screens, and help screen. 30 RESIZE button For switching the picture size (NORMAL, BORDER, etc.). 33 PICTURE MODE button For selecting the appropriate picture. * XR-32X only 13 Introduction ECO+QUIET button 32 For lowering the noise of the image. MAGNIFY buttons 33 For enlarging/reducing...
STANDBY button 25 For putting the projector into the standby mode. BREAK TIMER button 32 For displaying the break time. PAGE UP/PAGE 34 DOWN buttons Same as the [Page Down] and [... MENU/HELP button 48 For displaying adjustment and setting screens, and help screen. 30 RESIZE button For switching the picture size (NORMAL, BORDER, etc.). 33 PICTURE MODE button For selecting the appropriate picture. * XR-32X only 13 Introduction ECO+QUIET button 32 For lowering the noise of the image. MAGNIFY buttons 33 For enlarging/reducing...
XR-32S | XR-32X Operation Manual
Page 21
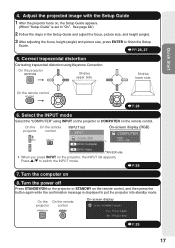
... On-screen display (RGB) COMPUTER RGB * 1024 × 768 D DVI-D Video *XR-32X only • When you press INPUT on 8. Correct trapezoidal distortion Correcting trapezoidal distortion using INPUT on the projector or COMPUTER on , the Setup Guide appears. (When "Setup Guide" is displayed to switch... 29 7. Press '/" to put the projector into standby mode. Adjust the projected image with the Setup Guide 1 After the projector turns on the remote control. See page 44.) 2 Follow the steps in the Setup Guide and adjust the focus, picture size, and height (angle). 3 After...
... On-screen display (RGB) COMPUTER RGB * 1024 × 768 D DVI-D Video *XR-32X only • When you press INPUT on 8. Correct trapezoidal distortion Correcting trapezoidal distortion using INPUT on the projector or COMPUTER on , the Setup Guide appears. (When "Setup Guide" is displayed to switch... 29 7. Press '/" to put the projector into standby mode. Adjust the projected image with the Setup Guide 1 After the projector turns on the remote control. See page 44.) 2 Follow the steps in the Setup Guide and adjust the focus, picture size, and height (angle). 3 After...
XR-32S | XR-32X Operation Manual
Page 22
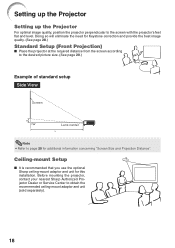
Before mounting the projector, contact your nearest Sharp Authorized Projector Dealer or Service Center to the screen with the projector's feet flat and level. Setting up the Projector Setting up the Projector For optimal image quality, position the projector perpendicular to obtain the recommended ceiling-mount adaptor and ...provide the best image quality. (See page 28.) Standard Setup (Front Projection) ■ Place the projector at the required distance from the screen according to the desired picture size. (See page 20.) Example of standard setup Side View Screen H Lens center L Note &#...
Before mounting the projector, contact your nearest Sharp Authorized Projector Dealer or Service Center to the screen with the projector's feet flat and level. Setting up the Projector Setting up the Projector For optimal image quality, position the projector perpendicular to obtain the recommended ceiling-mount adaptor and ...provide the best image quality. (See page 28.) Standard Setup (Front Projection) ■ Place the projector at the required distance from the screen according to the desired picture size. (See page 20.) Example of standard setup Side View Screen H Lens center L Note &#...

XR-32S | XR-32X Operation Manual
Page 23
... the mode most appropriate for the projection setting in use. (You can use any of the Projection Image Size and Projection Distance Example: NORMAL Mode (4:3) Picture Size 300" 200" 100" 80" 60" 240"×180" 160"×120" 48"×6346"8×"04"8×"60" 7'4("2-.82'm6"- 29.6'1m(03)."0-1m1...-'43".51m2)'(33."7-1m4-'24".32m4)'(77."5-2m8-'48".6 m) 36'(1110."2 m) Projection Distance 19 Projection (PRJ) Mode The projector can set the PRJ mode in "SCR-ADJ" menu.
... the mode most appropriate for the projection setting in use. (You can use any of the Projection Image Size and Projection Distance Example: NORMAL Mode (4:3) Picture Size 300" 200" 100" 80" 60" 240"×180" 160"×120" 48"×6346"8×"04"8×"60" 7'4("2-.82'm6"- 29.6'1m(03)."0-1m1...-'43".51m2)'(33."7-1m4-'24".32m4)'(77."5-2m8-'48".6 m) 36'(1110."2 m) Projection Distance 19 Projection (PRJ) Mode The projector can set the PRJ mode in "SCR-ADJ" menu.

XR-32S | XR-32X Operation Manual
Page 24
...(cm) = 0.064χ L1 (ft) = 0.03745χ / 0.3048 L2 (ft) = 0.04323χ / 0.3048 H (in) = 0.064χ / 2.54 STRETCH Mode (16:9) Picture (Screen) size Diag. [χ] Width Height Projection distance [L] Distance from the lens center to Minimum [L1] Maximum [L2] the bottom of the image [H] 250Љ... image (cm/in) S: Adjustable range of error in the values in ) See page 43. Setting up the Projector (Continued) Screen Size and Projection Distance NORMAL Mode (4:3) Picture (Screen) size Projection distance [L] Diag. [χ] Width Height Minimum [L1] Maximum [L2] 300Љ (...
...(cm) = 0.064χ L1 (ft) = 0.03745χ / 0.3048 L2 (ft) = 0.04323χ / 0.3048 H (in) = 0.064χ / 2.54 STRETCH Mode (16:9) Picture (Screen) size Diag. [χ] Width Height Projection distance [L] Distance from the lens center to Minimum [L1] Maximum [L2] the bottom of the image [H] 250Љ... image (cm/in) S: Adjustable range of error in the values in ) See page 43. Setting up the Projector (Continued) Screen Size and Projection Distance NORMAL Mode (4:3) Picture (Screen) size Projection distance [L] Diag. [χ] Width Height Minimum [L1] Maximum [L2] 300Љ (...

XR-32S | XR-32X Operation Manual
Page 30
...Setup Guide screen appears to assist you with the focus ring on the projector. lights the items in the following order: 1 FOCUS 2 HEIGHT ADJUST 4 ENTER 3 ZOOM However, you can adjust the picture size using the zoom ring on the projector. ADJ" "Setup Guide" to "Off". (See page 44.) ...STANDBY/ON button ENTER button Adjusting the Projected Image 1 Adjusting the Focus You can adjust the focus with projector setup. Zoom ring Focus ring 26
...Setup Guide screen appears to assist you with the focus ring on the projector. lights the items in the following order: 1 FOCUS 2 HEIGHT ADJUST 4 ENTER 3 ZOOM However, you can adjust the picture size using the zoom ring on the projector. ADJ" "Setup Guide" to "Off". (See page 44.) ...STANDBY/ON button ENTER button Adjusting the Projected Image 1 Adjusting the Focus You can adjust the focus with projector setup. Zoom ring Focus ring 26

XR-32S | XR-32X Operation Manual
Page 36
... minutes • Shortens with the Remote Control BREAK TIMER button FREEZE button Displaying the Pointer MAGNIFY buttons POINTER button SPOT button Adjustment buttons (P/R/O/Q) EFFECT button PICTURE MODE button ECO+QUIET button AUTO SYNC button 1 Press POINTER and press P/R/ O/Q on and off. • When the Eco+Quiet Mode is operating the "Auto...
... minutes • Shortens with the Remote Control BREAK TIMER button FREEZE button Displaying the Pointer MAGNIFY buttons POINTER button SPOT button Adjustment buttons (P/R/O/Q) EFFECT button PICTURE MODE button ECO+QUIET button AUTO SYNC button 1 Press POINTER and press P/R/ O/Q on and off. • When the Eco+Quiet Mode is operating the "Auto...

XR-32S | XR-32X Operation Manual
Page 37
...8226; Enlarges the image. • Pressing or MAGNIFY enlarges or reduces the projected image. When the Resize mode is changed . - Selecting the Picture Mode You can change . - When the input signal resolution and refresh rate (vertical frequency) change the location of the enlarged image using P,... R, O and Q. 2 Press RETURN on . When the Picture mode is changed . - Graphs, tables and other portions of an Image Auto Sync function works when detecting input signal after the projector turns on the remote control to cancel the operation. • The magnification...
...8226; Enlarges the image. • Pressing or MAGNIFY enlarges or reduces the projected image. When the Resize mode is changed . - Selecting the Picture Mode You can change . - When the input signal resolution and refresh rate (vertical frequency) change the location of the enlarged image using P,... R, O and Q. 2 Press RETURN on . When the Picture mode is changed . - Graphs, tables and other portions of an Image Auto Sync function works when detecting input signal after the projector turns on the remote control to cancel the operation. • The magnification...

XR-32S | XR-32X Operation Manual
Page 39
... "Picture" menu PAGE 1 Picture Picture Mode Contrast Bright Color Tint Sharp Red Blue SCR - ADJ Standard 0 0 0 0 0 0 0 Help SEL./ADJ. M. Return ENTER END *1 Items when inputting RGB signal through COMPUTER or DVI (XR-32X only). *2 Items when inputting component signal through COMPUTER or DVI (XR-32X only... sRGB*1 Contrast -30 +30 Bright -30 +30 Color -30 +30 *2 Tint -30 +30 *2 Sharp -30 +30 *2 Red -30 +30 Blue -30 +30 Page 41 PAGE 2 Picture SCR - ADJ Picture Mode PRJ - S. ADJ Help Standard CLR Temp Bright Boost C.M.S. M. Setting [On/Off] Page 41 C.M.S....
... "Picture" menu PAGE 1 Picture Picture Mode Contrast Bright Color Tint Sharp Red Blue SCR - ADJ Standard 0 0 0 0 0 0 0 Help SEL./ADJ. M. Return ENTER END *1 Items when inputting RGB signal through COMPUTER or DVI (XR-32X only). *2 Items when inputting component signal through COMPUTER or DVI (XR-32X only... sRGB*1 Contrast -30 +30 Bright -30 +30 Color -30 +30 *2 Tint -30 +30 *2 Sharp -30 +30 *2 Red -30 +30 Blue -30 +30 Page 41 PAGE 2 Picture SCR - ADJ Picture Mode PRJ - S. ADJ Help Standard CLR Temp Bright Boost C.M.S. M. Setting [On/Off] Page 41 C.M.S....

XR-32S | XR-32X Operation Manual
Page 40
...Rear Ceiling + Rear English Deutsch Español Nederlands Français Italiano Svenska Português polski Magyar Türkçe "Projector adjustment (PRJ-ADJ)" menu Picture SCR - ADJ PRJ - ADJ Help Auto Sync Auto Power Off Auto Restart STANDBY Mode System Sound Speaker Audio Input RS-232C Fan... On Standard On On Audio 1 9600bps Normal Disable 0 min 100% Main menu PRJ - ADJ PRJ - ENTER END *3 Adjustment range for XR-32X. *4 Adjustment range for XR-32X only. 36 Auto Sync [On/Off] Page 45 Auto Power Off [On/Off] Page 45 Auto Restart [On/Off] Page 45 STANDBY ...
...Rear Ceiling + Rear English Deutsch Español Nederlands Français Italiano Svenska Português polski Magyar Türkçe "Projector adjustment (PRJ-ADJ)" menu Picture SCR - ADJ PRJ - ADJ Help Auto Sync Auto Power Off Auto Restart STANDBY Mode System Sound Speaker Audio Input RS-232C Fan... On Standard On On Audio 1 9600bps Normal Disable 0 min 100% Main menu PRJ - ADJ PRJ - ENTER END *3 Adjustment range for XR-32X. *4 Adjustment range for XR-32X only. 36 Auto Sync [On/Off] Page 45 Auto Power Off [On/Off] Page 45 Auto Restart [On/Off] Page 45 STANDBY ...

XR-32S | XR-32X Operation Manual
Page 41
... audio Vertical stripes or flickering image appear Data image is not centered Color is faded or poor Picture is dark The image is faded or poor COMPUTER/COMPONENT or DVI (XR-32X only) input Signal type: Auto/RGB/Component S-VIDEO or VIDEO input Video System: Auto/PAL/SECAM/ NTSC3.58/NTSC4.43/ ...PAL-M/PAL-N/PAL-60 DVI (Digital) input (XR-32X only) Dynamic range: Auto/Standard/Enhanced * The selectable items vary depending on the input signal and the selected input mode. ADJ PRJ - ENTER END The...
... audio Vertical stripes or flickering image appear Data image is not centered Color is faded or poor Picture is dark The image is faded or poor COMPUTER/COMPONENT or DVI (XR-32X only) input Signal type: Auto/RGB/Component S-VIDEO or VIDEO input Video System: Auto/PAL/SECAM/ NTSC3.58/NTSC4.43/ ...PAL-M/PAL-N/PAL-60 DVI (Digital) input (XR-32X only) Dynamic range: Auto/Standard/Enhanced * The selectable items vary depending on the input signal and the selected input mode. ADJ PRJ - ENTER END The...

XR-32S | XR-32X Operation Manual
Page 42
...Setting C.M.S. Example: "Picture" screen menu for the selected input mode is displayed. DNR Lamp Setting Reset Standard 0 0 0 0 0 1 On Off Bright SEL./ADJ. ADJ PRJ - MENU/HELP button Menu Selections (Adjustments) Example: Adjusting "Bright". • This operation can also be performed by using the buttons on the projector. 1 Press MENU.../HELP. • The "Picture" menu screen for COMPUTER (RGB) input Menu item...
...Setting C.M.S. Example: "Picture" screen menu for the selected input mode is displayed. DNR Lamp Setting Reset Standard 0 0 0 0 0 1 On Off Bright SEL./ADJ. ADJ PRJ - MENU/HELP button Menu Selections (Adjustments) Example: Adjusting "Bright". • This operation can also be performed by using the buttons on the projector. 1 Press MENU.../HELP. • The "Picture" menu screen for COMPUTER (RGB) input Menu item...

XR-32S | XR-32X Operation Manual
Page 43
... is displayed by itself at the bottom of the screen. • When pressing P or R, the following item ("Red" after "Bright") will disappear. Picture SCR - vious screen. Setting C.M.S. DNR Lamp Setting Reset 0 0 0 1 On Off Bright SEL./ADJ. "Bright") is stored. 5 Press MENU/HELP... Features Note • Menu buttons do not function while the projector is highlighted. ADJ PRJ - Menu END 4 Press O or Q to the pre- The item displayed by itself Picture Bright SEL./ADJ. 0 Rtn. ADJ Help Picture Mode Contrast Bright Standard 0 15 Red Blue CLR Temp Bright Boost...
... is displayed by itself at the bottom of the screen. • When pressing P or R, the following item ("Red" after "Bright") will disappear. Picture SCR - vious screen. Setting C.M.S. DNR Lamp Setting Reset 0 0 0 1 On Off Bright SEL./ADJ. "Bright") is stored. 5 Press MENU/HELP... Features Note • Menu buttons do not function while the projector is highlighted. ADJ PRJ - Menu END 4 Press O or Q to the pre- The item displayed by itself Picture Bright SEL./ADJ. 0 Rtn. ADJ Help Picture Mode Contrast Bright Standard 0 15 Red Blue CLR Temp Bright Boost...

XR-32S | XR-32X Operation Manual
Page 44
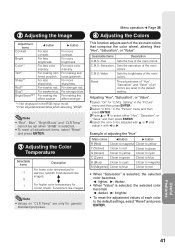
... - ADJ PRJ - Movie Gives natural tint to your preference. Game Gives sharpness to select the picture mode. (See page 33.) • *sRGB is selected. For additional information about the sRGB function, visit "http://www.srgb.com/". ADJ...may become dark, but this does not indicate a malfunction. 40 ADJ Help 1 Picture Mode Standard Contrast 0 Bright 0 Color 0 2 Tint 0 Sharp 0 Red 0 Blue 0 Q PAGE2 Menu operation n Page 38 Picture SCR - ENTER END 1 Selecting the Picture Mode Selectable items Description The default settings of each item in a natural tint based ...
... - ADJ PRJ - Movie Gives natural tint to your preference. Game Gives sharpness to select the picture mode. (See page 33.) • *sRGB is selected. For additional information about the sRGB function, visit "http://www.srgb.com/". ADJ...may become dark, but this does not indicate a malfunction. 40 ADJ Help 1 Picture Mode Standard Contrast 0 Bright 0 Color 0 2 Tint 0 Sharp 0 Red 0 Blue 0 Q PAGE2 Menu operation n Page 38 Picture SCR - ENTER END 1 Selecting the Picture Mode Selectable items Description The default settings of each item in a natural tint based ...
XR-32S | XR-32X Operation Manual
Page 45
...weaker red. For making the effect weaker. For making skin tones purplish. For making the effect stronger. *1 Not displayed in the "Picture" menu and then press ENTER. 2Select "C.M.S." For stronger red. Note • "Red", "Blue", "Bright Boost" and "CLR ...Selectable items -1 0 1 Description For lower color temperature for general standard purposes. 2 Adjusting the Image Adjustment items Contrast Bright Color*1 Tint*1 Sharp*1 Red*2 Blue*2 Bright Boost™*2 O button For less contrast. Setting" in the RGB input mode. *2 Not adjustable/selectable when ...
...weaker red. For making the effect weaker. For making skin tones purplish. For making the effect stronger. *1 Not displayed in the "Picture" menu and then press ENTER. 2Select "C.M.S." For stronger red. Note • "Red", "Blue", "Bright Boost" and "CLR ...Selectable items -1 0 1 Description For lower color temperature for general standard purposes. 2 Adjusting the Image Adjustment items Contrast Bright Color*1 Tint*1 Sharp*1 Red*2 Blue*2 Bright Boost™*2 O button For less contrast. Setting" in the RGB input mode. *2 Not adjustable/selectable when ...


