
XR-32S | XR-32X Operation Manual
Page 6
...DLP® chip. Operation is subject to the following measures: • Reorient or relocate the receiving antenna. • Increase the separation between the equipment and the receiver. • Connect the equipment into an outlet on a circuit different from that may be determined by turning... screen TVs, video systems and video cameras, there are designed to radio communications. ONLY 2 ONLY Declaration of conformity SHARP PROJECTOR, MODEL XR-32X/XR-32S This device complies with Part 15 of the unit. ONLY Caution Concerning Lamp Replacement See "Replacing the Lamp" on...
...DLP® chip. Operation is subject to the following measures: • Reorient or relocate the receiving antenna. • Increase the separation between the equipment and the receiver. • Connect the equipment into an outlet on a circuit different from that may be determined by turning... screen TVs, video systems and video cameras, there are designed to radio communications. ONLY 2 ONLY Declaration of conformity SHARP PROJECTOR, MODEL XR-32X/XR-32S This device complies with Part 15 of the unit. ONLY Caution Concerning Lamp Replacement See "Replacing the Lamp" on...

XR-32S | XR-32X Operation Manual
Page 8
... 19 Screen Size and Projection Distance .. 20 Connections Connecting the Projector to Other Equipment 21 Controlling the Projector by a Computer 24 Connecting the Power Cord 24 Using Basic Operation Turning the Projector On/Off 25 Turning the Projector on 25 Turning the Power off (Putting the Projector into Standby Mode 25 Image Projection 26 About the Setup Guide...
... 19 Screen Size and Projection Distance .. 20 Connections Connecting the Projector to Other Equipment 21 Controlling the Projector by a Computer 24 Connecting the Power Cord 24 Using Basic Operation Turning the Projector On/Off 25 Turning the Projector on 25 Turning the Power off (Putting the Projector into Standby Mode 25 Image Projection 26 About the Setup Guide...

XR-32S | XR-32X Operation Manual
Page 12
... the lights when setting up your nearest Sharp Authorized Projector Dealer or Service Center for long hours will cause eye strain. It will not reduce the overall operation life of the adjustment foot. ■ After the projector is first turned on. Neglecting this projector be performed by the projector falling down. Take regular breaks to direct...
... the lights when setting up your nearest Sharp Authorized Projector Dealer or Service Center for long hours will cause eye strain. It will not reduce the overall operation life of the adjustment foot. ■ After the projector is first turned on. Neglecting this projector be performed by the projector falling down. Take regular breaks to direct...

XR-32S | XR-32X Operation Manual
Page 13
...for the country you attach the lens cap to the projector. (See page 11.) ■ Do not expose the projector to direct sunlight or place next to rise, the lamp will turn off period the projector will enter standby mode. Using the projector in the lower left corner of the picture. ing ...indicator on the region or country you are using the projector in the fan speed. This does not indicate malfunction. ...
...for the country you attach the lens cap to the projector. (See page 11.) ■ Do not expose the projector to direct sunlight or place next to rise, the lamp will turn off period the projector will enter standby mode. Using the projector in the lower left corner of the picture. ing ...indicator on the region or country you are using the projector in the fan speed. This does not indicate malfunction. ...

XR-32S | XR-32X Operation Manual
Page 15
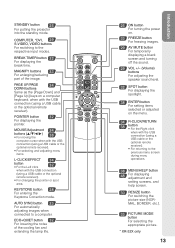
Front View Zoom ring 26 For enlarging/ reducing the picture. ENTER button For setting 38 items selected or adjusted on and putting the projector into standby mode. Remote control 15 sensor Exhaust vent 49 25, 50 Lamp indicator 50 Temperature warning indicator 32 ECO+QUIET button For ...the noise of the lens cap to the main pages in this operation manual where the topic is explained. Projector Top View Power indicator 25, 50 STANDBY/ON 25 button For turning the power on the menu. KEYSTONE 28 button For entering the Keystone Correction mode. Push both sides of the...
Front View Zoom ring 26 For enlarging/ reducing the picture. ENTER button For setting 38 items selected or adjusted on and putting the projector into standby mode. Remote control 15 sensor Exhaust vent 49 25, 50 Lamp indicator 50 Temperature warning indicator 32 ECO+QUIET button For ...the noise of the lens cap to the main pages in this operation manual where the topic is explained. Projector Top View Power indicator 25, 50 STANDBY/ON 25 button For turning the power on the menu. KEYSTONE 28 button For entering the Keystone Correction mode. Push both sides of the...
XR-32S | XR-32X Operation Manual
Page 17
STANDBY button 25 For putting the projector into the standby mode. KEYSTONE button 28 For entering the Keystone Correction mode. COMPUTER, *DVI, ...part of the cooling fan and extending the lamp life. 25 ON button For turning the power on. 33 FREEZE button For freezing images. 29 AV MUTE button For temporarily displaying a black screen ...button For switching the picture size (NORMAL, BORDER, etc.). 33 PICTURE MODE button For selecting the appropriate picture. * XR-32X only 13 Introduction ECO+QUIET button 32 For lowering the noise of the image. PAGE UP/PAGE 34 DOWN buttons Same ...
STANDBY button 25 For putting the projector into the standby mode. KEYSTONE button 28 For entering the Keystone Correction mode. COMPUTER, *DVI, ...part of the cooling fan and extending the lamp life. 25 ON button For turning the power on. 33 FREEZE button For freezing images. 29 AV MUTE button For temporarily displaying a black screen ...button For switching the picture size (NORMAL, BORDER, etc.). 33 PICTURE MODE button For selecting the appropriate picture. * XR-32X only 13 Introduction ECO+QUIET button 32 For lowering the noise of the image. PAGE UP/PAGE 34 DOWN buttons Same ...

XR-32S | XR-32X Operation Manual
Page 20
Quick Start This section shows the basic operation (projector connecting with the computer). Remove the lens cap and turn the projector on On the projector On the remote control _P. 25 16 Place the projector facing a wall or a screen _P. 18 2. Connect the projector to the computer and plug the power cord ...into the AC socket of the projector and the computer is explained ...
Quick Start This section shows the basic operation (projector connecting with the computer). Remove the lens cap and turn the projector on On the projector On the remote control _P. 25 16 Place the projector facing a wall or a screen _P. 18 2. Connect the projector to the computer and plug the power cord ...into the AC socket of the projector and the computer is explained ...
XR-32S | XR-32X Operation Manual
Page 21
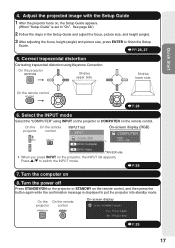
... list INPUT COMPUTER D DVI-D Computer On-screen display (RGB) COMPUTER RGB * 1024 × 768 D DVI-D Video *XR-32X only • When you press INPUT on 8. Press '/" to finish the Setup Guide. _PP. 26, 27 5. Turn the computer on the projector, the INPUT list appears. Correct trapezoidal distortion Correcting trapezoidal distortion using INPUT on the... focus, height (angle) and picture size, press ENTER to switch the INPUT mode. _P. 29 7. Adjust the projected image with the Setup Guide 1 After the projector turns on the remote control. Quick Start 4.
... list INPUT COMPUTER D DVI-D Computer On-screen display (RGB) COMPUTER RGB * 1024 × 768 D DVI-D Video *XR-32X only • When you press INPUT on 8. Press '/" to finish the Setup Guide. _PP. 26, 27 5. Turn the computer on the projector, the INPUT list appears. Correct trapezoidal distortion Correcting trapezoidal distortion using INPUT on the... focus, height (angle) and picture size, press ENTER to switch the INPUT mode. _P. 29 7. Adjust the projected image with the Setup Guide 1 After the projector turns on the remote control. Quick Start 4.

XR-32S | XR-32X Operation Manual
Page 25
... connections are using a SHARP notebook computer). Press "Fn" and "F5" keys simultaneously when using , an image may be turned on after all connections, turn on the projector COMPUTER/ COMPONENT DVI digital output terminal DVI Digital cable (commercially available) DVI-D is the last equipment to be required for XR-32X. Terminals on the Projector Example: Terminals of connection...
... connections are using a SHARP notebook computer). Press "Fn" and "F5" keys simultaneously when using , an image may be turned on after all connections, turn on the projector COMPUTER/ COMPONENT DVI digital output terminal DVI Digital cable (commercially available) DVI-D is the last equipment to be required for XR-32X. Terminals on the Projector Example: Terminals of connection...

XR-32S | XR-32X Operation Manual
Page 29
... is set , the keycode input box appears. This is normal operation as faulty operation. • If the projector is plugged into standby mode and immediately turned on again, the lamp may be experienced within the first minute after the lamp has been illuminated. See page...You can unplug the power cord from the outlet or the breaker switch is turned off (Putting the Projector into standby mode. • The projector cannot be turned on while cooling. Turning the Projector On/Off Turning the Projector on Note that the connections to external equipment and power outlet should be ...
... is set , the keycode input box appears. This is normal operation as faulty operation. • If the projector is plugged into standby mode and immediately turned on again, the lamp may be experienced within the first minute after the lamp has been illuminated. See page...You can unplug the power cord from the outlet or the breaker switch is turned off (Putting the Projector into standby mode. • The projector cannot be turned on while cooling. Turning the Projector On/Off Turning the Projector on Note that the connections to external equipment and power outlet should be ...

XR-32S | XR-32X Operation Manual
Page 30
... or zoom regardless of the highlighted item. • If you with the focus ring on the projector. Rotate the focus ring to "Off". (See page 44.) STANDBY/ON button ENTER button Adjusting the... Image 1 Adjusting the Focus You can adjust the picture size using the zoom ring on the projector. Zoom ring Focus ring 26 "SCR - Note • The Setup Guide screen automatically high-... focus while watching the projected image. 2 Adjusting the Picture Size You can adjust the focus with projector setup. Guidance items 1 FOCUS 2 HEIGHT ADJUST 3 ZOOM Press ENTER to assist you do not want...
... or zoom regardless of the highlighted item. • If you with the focus ring on the projector. Rotate the focus ring to "Off". (See page 44.) STANDBY/ON button ENTER button Adjusting the... Image 1 Adjusting the Focus You can adjust the picture size using the zoom ring on the projector. Zoom ring Focus ring 26 "SCR - Note • The Setup Guide screen automatically high-... focus while watching the projected image. 2 Adjusting the Picture Size You can adjust the focus with projector setup. Guidance items 1 FOCUS 2 HEIGHT ADJUST 3 ZOOM Press ENTER to assist you do not want...

XR-32S | XR-32X Operation Manual
Page 33
...On-screen display Basic Operation Displaying the Black Screen and Turning off the Sound Temporarily Press AV MUTE on the remote control to adjust the volume. Press P/R to the lowest level when turning the projector on the remote control (XR-32X only), the INPUT list appears. Note • Pressing... VOL-/-O will lower the volume. • Pressing VOL+/Q+ will turn off or when changing the input signal. • When you ...
...On-screen display Basic Operation Displaying the Black Screen and Turning off the Sound Temporarily Press AV MUTE on the remote control to adjust the volume. Press P/R to the lowest level when turning the projector on the remote control (XR-32X only), the INPUT list appears. Note • Pressing... VOL-/-O will lower the volume. • Pressing VOL+/Q+ will turn off or when changing the input signal. • When you ...

XR-32S | XR-32X Operation Manual
Page 37
... the input signal resolution and refresh rate (vertical frequency) change the location of an Image Auto Sync function works when detecting input signal after the projector turns on. Selecting the Picture Mode You can be achieved with Auto Sync function. Useful Features Note • See page 40 for manual adjustments. (See page...
... the input signal resolution and refresh rate (vertical frequency) change the location of an Image Auto Sync function works when detecting input signal after the projector turns on. Selecting the Picture Mode You can be achieved with Auto Sync function. Useful Features Note • See page 40 for manual adjustments. (See page...

XR-32S | XR-32X Operation Manual
Page 48
...• "Closed Caption" is pressed to ensure that captions will disappear momentarily. 6 Selecting the Background Image Selectable items Logo Blue None Description Sharp logo screen Blue screen - 8 Reversing/Inverting Projected Images Selectable items Front Ceiling + Front Rear Ceiling + Rear Description Normal image (Projected from... Türkçe 7 Selecting the Setup Guide Selectable items On Off Description Displaying the Setup Guide when turning the projector on the screen. • Not all programs and videos will offer closed captions will be viewed as captions on .
...• "Closed Caption" is pressed to ensure that captions will disappear momentarily. 6 Selecting the Background Image Selectable items Logo Blue None Description Sharp logo screen Blue screen - 8 Reversing/Inverting Projected Images Selectable items Front Ceiling + Front Rear Ceiling + Rear Description Normal image (Projected from... Türkçe 7 Selecting the Setup Guide Selectable items On Off Description Displaying the Setup Guide when turning the projector on the screen. • Not all programs and videos will offer closed captions will be viewed as captions on .

XR-32S | XR-32X Operation Manual
Page 49
... enter standby mode. No confirmation sound is made when the projector turns on . Note • Auto Sync adjustment is detected for more than 15 minutes, the projector will appear on the image of the computer connected to the projector. • When the optimum image cannot be disabled. Note...the Confirmation Sound (System Sound) Selectable items On Off Description A confirmation sound is turned on or when the input signals are switched off when the projector is on, then the projector automatically turns on when the power cord is plugged into the AC outlet or the breaker switch...
... enter standby mode. No confirmation sound is made when the projector turns on . Note • Auto Sync adjustment is detected for more than 15 minutes, the projector will appear on the image of the computer connected to the projector. • When the optimum image cannot be disabled. Note...the Confirmation Sound (System Sound) Selectable items On Off Description A confirmation sound is turned on or when the input signals are switched off when the projector is on, then the projector automatically turns on when the power cord is plugged into the AC outlet or the breaker switch...

XR-32S | XR-32X Operation Manual
Page 50
...; If you record the keycode in "New Code". Audio 2 The AUDIO 2 input terminal is turned on the projector to enter the preset keycode in setting your nearest Sharp Authorized Projector Dealer or Service Center (see page 65). High Select this function is activated, users must enter ...the correct keycode each time the projector is used as an audio input terminal. 8 Selecting the Transmission Speed (RS-...
...; If you record the keycode in "New Code". Audio 2 The AUDIO 2 input terminal is turned on the projector to enter the preset keycode in setting your nearest Sharp Authorized Projector Dealer or Service Center (see page 65). High Select this function is activated, users must enter ...the correct keycode each time the projector is used as an audio input terminal. 8 Selecting the Transmission Speed (RS-...

XR-32S | XR-32X Operation Manual
Page 51
...). When it appears, enter the right keycode to "Bright" Remaining lamp life 100% Approx. XXX hours Note • It is turned on the projector simultaneously for four times in "Reconfirm". a Taking the Keylock off Hold down ENTER on . a Locking the Operation Buttons Hold down ENTER...start projection. On-screen display • The keylock function does not affect the operation with Lamp Setting set • Press R on the projector. On-screen display Lamp usage condition "Life" Operated exclusively with Lamp Setting set to "Eco +Quiet" Operated exclusively with the remote control...
...). When it appears, enter the right keycode to "Bright" Remaining lamp life 100% Approx. XXX hours Note • It is turned on the projector simultaneously for four times in "Reconfirm". a Taking the Keylock off Hold down ENTER on . a Locking the Operation Buttons Hold down ENTER...start projection. On-screen display • The keylock function does not affect the operation with Lamp Setting set • Press R on the projector. On-screen display Lamp usage condition "Life" Operated exclusively with Lamp Setting set to "Eco +Quiet" Operated exclusively with the remote control...
XR-32S | XR-32X Operation Manual
Page 54
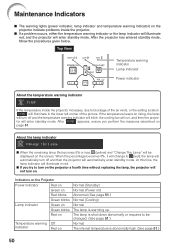
... warning indicator or the lamp indicator will illuminate red, and the projector will run, and then the projec- After " " appears, ensure you try to (red), the lamp will automatically turn off and then the projector will enter standby mode. If the temperature keeps on . Maintenance ...will automatically enter standby mode. When the percentage becomes 0%, it will change to turn on the projector a fourth time without replacing the lamp, the projector will not turn on rising, the lamp will turn off and the temperature warning indicator will blink, the cooling fan will enter standby ...
... warning indicator or the lamp indicator will illuminate red, and the projector will run, and then the projec- After " " appears, ensure you try to (red), the lamp will automatically turn off and then the projector will enter standby mode. If the temperature keeps on . Maintenance ...will automatically enter standby mode. When the percentage becomes 0%, it will change to turn on the projector a fourth time without replacing the lamp, the projector will not turn on rising, the lamp will turn off and the temperature warning indicator will blink, the cooling fan will enter standby ...

XR-32S | XR-32X Operation Manual
Page 55
... turning the power back on. (At least 10 minutes.) • If the power is open. In this case, unplug the power cord from the AC outlet, and then connect it again. • Carefully replace the lamp. (See page 52.) • Take the projector to your nearest Sharp Authorized Projector ...Securely install the cover. • If the power indicator blinks in red even when the lamp unit cover are securely installed, contact your nearest Sharp Authorized Projector Dealer or Service Center (see page 65) for a brief moment due to change and this function is not a malfunction. Info • If...
... turning the power back on. (At least 10 minutes.) • If the power is open. In this case, unplug the power cord from the AC outlet, and then connect it again. • Carefully replace the lamp. (See page 52.) • Take the projector to your nearest Sharp Authorized Projector ...Securely install the cover. • If the power indicator blinks in red even when the lamp unit cover are securely installed, contact your nearest Sharp Authorized Projector Dealer or Service Center (see page 65) for a brief moment due to change and this function is not a malfunction. Info • If...
XR-32S | XR-32X Operation Manual
Page 67
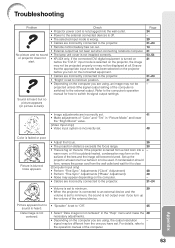
...to an external device and the volume is set to minimum, the sound is not output even if you are incorrectly connected to the projector. • "Bright" is set to minimum position. • Depending on the surface of the external device. Refer to the computer...; Video input system is incorrectly set when connecting notebook computer. • The lamp unit cover is not installed correctly. • XR-32X only: If the connected DVI digital equipment is turned on before it to clear. (Computer Input only) • Perform "Fine Sync" Adjustments ("Clock" Adjustment) • Perform "...
...to an external device and the volume is set to minimum, the sound is not output even if you are incorrectly connected to the projector. • "Bright" is set to minimum position. • Depending on the surface of the external device. Refer to the computer...; Video input system is incorrectly set when connecting notebook computer. • The lamp unit cover is not installed correctly. • XR-32X only: If the connected DVI digital equipment is turned on before it to clear. (Computer Input only) • Perform "Fine Sync" Adjustments ("Clock" Adjustment) • Perform "...


