
Operating Instructions
Page 6
..., causing picture degradation or damage to install the projector in operation. Never pull the cord itself has been turned off . Never use a damp cloth, detergent solution, or thinner. • Clean the filter at regular intervals. Adjust the powered tilt adjuster carefully after its automatic operation is manufactured using high-precision technology. Caution The projector is on the LCD data projector. You may be changed to direct lighting or sunlight. • Ceiling-mounted spot lighting is...
..., causing picture degradation or damage to install the projector in operation. Never pull the cord itself has been turned off . Never use a damp cloth, detergent solution, or thinner. • Clean the filter at regular intervals. Adjust the powered tilt adjuster carefully after its automatic operation is manufactured using high-precision technology. Caution The projector is on the LCD data projector. You may be changed to direct lighting or sunlight. • Ceiling-mounted spot lighting is...
Operating Instructions
Page 8
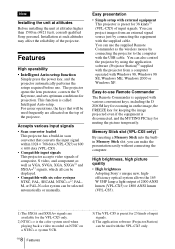
... control the projector by using the application software (Projector Station)4) supplied with the projector from an external signal source just by connecting the projector to -use Remote Commander The Remote Commander is equipped with external equipment This projector is preset for muting the picture temporarily. Easy-to the computer with the USB cable. Installation at altitudes higher than 1500 m (4921 feet), consult qualified Sony personel. Features High operability • Intelligent Auto-setup function Simply press the power...
... control the projector by using the application software (Projector Station)4) supplied with the projector from an external signal source just by connecting the projector to -use Remote Commander The Remote Commander is equipped with external equipment This projector is preset for muting the picture temporarily. Easy-to the computer with the USB cable. Installation at altitudes higher than 1500 m (4921 feet), consult qualified Sony personel. Features High operability • Intelligent Auto-setup function Simply press the power...

Operating Instructions
Page 10
... qd qf 9 0 qg qa qh qs qj t 1 I / 1 key) Lights up the ON/STANDBY indicator with the I / 1 key. For details on the LAMP/COVER and the TEMP/FAN indicators, see on page 41. 3 TILT adjustment key For details, see "To turn on . Location and Function of Controls During this time, you cannot light up or flashes under the following the message on page 11. 4 INPUT key Selects the input signal.
... qd qf 9 0 qg qa qh qs qj t 1 I / 1 key) Lights up the ON/STANDBY indicator with the I / 1 key. For details on the LAMP/COVER and the TEMP/FAN indicators, see on page 41. 3 TILT adjustment key For details, see "To turn on . Location and Function of Controls During this time, you cannot light up or flashes under the following the message on page 11. 4 INPUT key Selects the input signal.

Operating Instructions
Page 11
.... • To maintain optimal performance, clean the air filter every 300 hours. Powered tilt adjuster 2 Press f or F of the projector. The adjuster stops at its previously adjusted position. qh Zoom ring Adjusts the picture size. How to an optional security cable (Kensington's). Overview 5 Lens protector (lens cover) The lens protector automatically opens when the power is turned on. 6 Front remote control detector 7 Ventilation holes (exhaust) 8 Connector/Control panel For details, see "Cleaning the Air Filter" on page 37.
.... • To maintain optimal performance, clean the air filter every 300 hours. Powered tilt adjuster 2 Press f or F of the projector. The adjuster stops at its previously adjusted position. qh Zoom ring Adjusts the picture size. How to an optional security cable (Kensington's). Overview 5 Lens protector (lens cover) The lens protector automatically opens when the power is turned on. 6 Front remote control detector 7 Ventilation holes (exhaust) 8 Connector/Control panel For details, see "Cleaning the Air Filter" on page 37.

Operating Instructions
Page 12
... end of Controls 5 TEMP (Temperature)/FAN indicator Lights up or flashes under the following conditions: - Flashes when the lamp cover or air filter cover is pressed. Connects to external equipment such as a computer. The power saving mode is canceled when a signal is input or any key does not function for the first 60 seconds after the lamp goes out. 2 MENU key Displays the on-screen menu. Lights up when temperature inside the projector becomes unusually high. - For...
... end of Controls 5 TEMP (Temperature)/FAN indicator Lights up or flashes under the following conditions: - Flashes when the lamp cover or air filter cover is pressed. Connects to external equipment such as a computer. The power saving mode is canceled when a signal is input or any key does not function for the first 60 seconds after the lamp goes out. 2 MENU key Displays the on-screen menu. Lights up when temperature inside the projector becomes unusually high. - For...

Operating Instructions
Page 13
... lamp Lights during having access to the Memory Stick. Remote Commander The keys that have the same names as a VCR. • VIDEO (phono type): Connects to the composite video output of video equipment. • S VIDEO (mini DIN 4-pin): Connects to the audio output of Controls GB qg qf qd FREEZE MS SLIDE I / 1 (on/standby) key 2 APA (Auto Pixel Alignment) key Adjusts a picture clearest automatically while a signal is displayed...
... lamp Lights during having access to the Memory Stick. Remote Commander The keys that have the same names as a VCR. • VIDEO (phono type): Connects to the composite video output of video equipment. • S VIDEO (mini DIN 4-pin): Connects to the audio output of Controls GB qg qf qd FREEZE MS SLIDE I / 1 (on/standby) key 2 APA (Auto Pixel Alignment) key Adjusts a picture clearest automatically while a signal is displayed...

Operating Instructions
Page 14
... and the HELP file supplied with the projector. Note These keys function as the right button on page 18". 7 RESET key Resets the value of input signals. • Adjust the items "Dot Phase," "H Size" and "Shift" in the INPUT SETTING menu when you want to enlarge. Note Connect a computer to the projector using the USB cable to the FUNCTION key by using the supplied Remote Commander" on page 25. 6 FUNCTION 1, 2 keys (VPL-CX5 only...
... and the HELP file supplied with the projector. Note These keys function as the right button on page 18". 7 RESET key Resets the value of input signals. • Adjust the items "Dot Phase," "H Size" and "Shift" in the INPUT SETTING menu when you want to enlarge. Note Connect a computer to the projector using the USB cable to the FUNCTION key by using the supplied Remote Commander" on page 25. 6 FUNCTION 1, 2 keys (VPL-CX5 only...
Operating Instructions
Page 17
... is compatible with a DDC2B (Digital Data Channel 2B). Setting Up and Projecting Connecting the Projector When you set the output mode of your computer to XGA mode (VPL-CX5) or SVGA mode (VPL-CS5) for the external monitor. • If you connect the projector, make sure to: • Turn off all equipment before making any connections. • Use the proper cables for each connection. • Insert the cable plugs firmly; When pulling out...
... is compatible with a DDC2B (Digital Data Channel 2B). Setting Up and Projecting Connecting the Projector When you set the output mode of your computer to XGA mode (VPL-CX5) or SVGA mode (VPL-CS5) for the external monitor. • If you connect the projector, make sure to: • Turn off all equipment before making any connections. • Use the proper cables for each connection. • Insert the cable plugs firmly; When pulling out...
Operating Instructions
Page 25
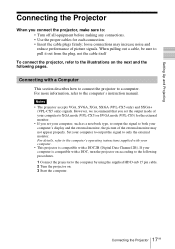
In this case, adjust it manually. Press the KEYSTONE key on the Remote Commander until "V Keystone" appears on the room temperature or the screen angle. Setting Up and Projecting Note The auto keystone adjustment may not correct the trapezoidal distortion perfectly, depending on the screen, and adjust the value with the M/m/
In this case, adjust it manually. Press the KEYSTONE key on the Remote Commander until "V Keystone" appears on the room temperature or the screen angle. Setting Up and Projecting Note The auto keystone adjustment may not correct the trapezoidal distortion perfectly, depending on the screen, and adjust the value with the M/m/

Operating Instructions
Page 28
... "Video GBR." B Adjustments and Settings Using the Menu Using the MENU The projector is input. Display items Input signal indicator Video NTSC 3.58 Input signal setting indicator Picture adjustment menu Contrast Input signal indicator Shows the selected input channel. The selected menu appears. 3 Select an item. For Video/S Video input: Shows "Auto" or the "Color System" setting in a sub menu. If you select an item name followed by dots (...), a sub menu with an on page 21. The menu presently selected is shown as a yellow button. You can change the menu...
... "Video GBR." B Adjustments and Settings Using the Menu Using the MENU The projector is input. Display items Input signal indicator Video NTSC 3.58 Input signal setting indicator Picture adjustment menu Contrast Input signal indicator Shows the selected input channel. The selected menu appears. 3 Select an item. For Video/S Video input: Shows "Auto" or the "Color System" setting in a sub menu. If you select an item name followed by dots (...), a sub menu with an on page 21. The menu presently selected is shown as a yellow button. You can change the menu...
Operating Instructions
Page 31
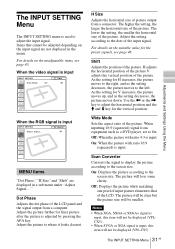
... 45. Dot Phase Adjusts the dot phase of the LCD panel and the signal output from equipment such as a DVD player, set to adjust the input signal. The higher the setting, the larger the horizontal size of the picture. Shift Adjusts the position of the picture. Off: When the picture with ratio 16:9 (squeezed) is input, this item will not be displayed (VPL-CS5). When the video signal is input INPUT SETTING Wide Mode: Off Video When...
... 45. Dot Phase Adjusts the dot phase of the LCD panel and the signal output from equipment such as a DVD player, set to adjust the input signal. The higher the setting, the larger the horizontal size of the picture. Shift Adjusts the position of the picture. Off: When the picture with ratio 16:9 (squeezed) is input, this item will not be displayed (VPL-CS5). When the video signal is input INPUT SETTING Wide Mode: Off Video When...

Operating Instructions
Page 32
... adjusts "Dot Phase," "H Size" and "Shift" in black. It GB 32 The SET SETTING Menu If more than 4:3, a part of the screen is used for the signal from a computer, the APA functions automatically so that signal are displayed in the INFORMATION menu (See page 35). SIZE Super Mac-2 23 1312 SGI-1 23 1320 Macintosh 19" 25 1328 The following order: Input-A/ MS(VPL-CX5 only)/Video/S-Video. You can use...
... adjusts "Dot Phase," "H Size" and "Shift" in black. It GB 32 The SET SETTING Menu If more than 4:3, a part of the screen is used for the signal from a computer, the APA functions automatically so that signal are displayed in the INFORMATION menu (See page 35). SIZE Super Mac-2 23 1312 SGI-1 23 1320 Macintosh 19" 25 1328 The following order: Input-A/ MS(VPL-CX5 only)/Video/S-Video. You can use...

Operating Instructions
Page 33
Input-A Signal Sel. If you do not operate the unit for 10 minutes with no signal input. Off: Turns off the power, and warning messages. If the picture is used in the menu and on -screen display. The MENU SETTING Menu The MENU SETTING menu is distorted or colorless, select the color system according to "On," the projector goes into power saving mode if you select "Auto," the projector detects the color system of the menu from the INPUT A connector...
Input-A Signal Sel. If you do not operate the unit for 10 minutes with no signal input. Off: Turns off the power, and warning messages. If the picture is used in the menu and on -screen display. The MENU SETTING Menu The MENU SETTING menu is distorted or colorless, select the color system according to "On," the projector goes into power saving mode if you select "Auto," the projector detects the color system of the menu from the INPUT A connector...

Operating Instructions
Page 34
... the screen when no signal is input to "blue." Note When the Image Flip is set to the projector. Select "Auto" for automatic correction, or "Manual" for changing the settings of the projected image will be lower compared with "Low" setting. V Keystone: Image Flip: Background: Lamp Mode: Auto Off Blue Low Input A Menu Items Tilt... HV: Flips the image horizontally and vertically. V: Flips the image vertically. Normally set to "HV" or "V", the Lamp Mode works with the "High" setting. 34 GB The INSTALL SETTING Menu Low: Reduces fan...
... the screen when no signal is input to "blue." Note When the Image Flip is set to the projector. Select "Auto" for automatic correction, or "Manual" for changing the settings of the projected image will be lower compared with "Low" setting. V Keystone: Image Flip: Background: Lamp Mode: Auto Off Blue Low Input A Menu Items Tilt... HV: Flips the image horizontally and vertically. V: Flips the image vertically. Normally set to "HV" or "V", the Lamp Mode works with the "High" setting. 34 GB The INSTALL SETTING Menu Low: Reduces fan...
Operating Instructions
Page 36
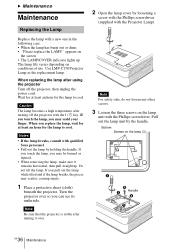
... screws on conditions of use. appears on the screen • The LAMP/COVER indicator lights up . Pull out the lamp unit by holding the handle. Bottom Screws on the lamp (3) Handle GB 36 Maintenance Wait for at least an hour for the lamp to cool. Notes • If the lamp breaks, consult with the Projector Lamp). Turn the projector over . 2 Open the lamp cover by loosening a screw with the Phillips screwdriver (supplied...
... screws on conditions of use. appears on the screen • The LAMP/COVER indicator lights up . Pull out the lamp unit by holding the handle. Bottom Screws on the lamp (3) Handle GB 36 Maintenance Wait for at least an hour for the lamp to cool. Notes • If the lamp breaks, consult with the Projector Lamp). Turn the projector over . 2 Open the lamp cover by loosening a screw with the Phillips screwdriver (supplied...
Operating Instructions
Page 37
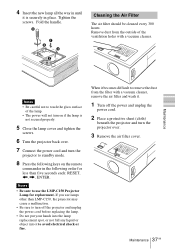
... lamp cover and tighten the screws. 6 Turn the projector back over. 7 Connect the power cord and turn on the remote commander in place. Fold the handle. Remove dust from the outside of the lamp. • The power will not turn the projector to standby mode. 8 Press the following keys on if the lamp is securely in the following order for less than five seconds each: RESET, Cleaning the Air Filter The air filter should be cleaned...
... lamp cover and tighten the screws. 6 Turn the projector back over. 7 Connect the power cord and turn on the remote commander in place. Fold the handle. Remove dust from the outside of the lamp. • The power will not turn the projector to standby mode. 8 Press the following keys on if the lamp is securely in the following order for less than five seconds each: RESET, Cleaning the Air Filter The air filter should be cleaned...
Operating Instructions
Page 39
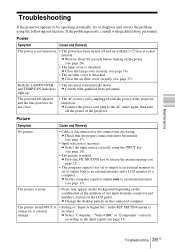
... the power of pixel on . c Select "Computer," "Video GBR" or "Component" correctly according to the input signal (see page 37). Troubleshooting 39 GB and TEMP/FAN indicators c Consult with qualified Sony personnel. c Set the computer signal to output only to an external monitor (see page 26). • The lamp cover is detached. The picture from the connector and numbers of the projector turned on the LCD panel. in the SET SETTING menu...
... the power of pixel on . c Select "Computer," "Video GBR" or "Component" correctly according to the input signal (see page 37). Troubleshooting 39 GB and TEMP/FAN indicators c Consult with qualified Sony personnel. c Set the computer signal to output only to an external monitor (see page 26). • The lamp cover is detached. The picture from the connector and numbers of the projector turned on the LCD panel. in the SET SETTING menu...
Operating Instructions
Page 41
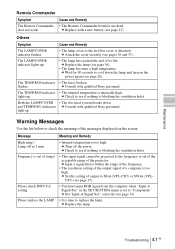
... projector. c Consult with a new battery (see page 33). and TEMP/FAN indicators c Consult with qualified Sony personnel. The LAMP/COVER indicator lights up. • The lamp has reached the end of range! • This input signal cannot be projected as the frequency is detached. correctly (see page 15). lights up . Message Meaning and Remedy High temp.! c Set "Input-A Signal Sel." Maintenance Remote Commander Symptom Cause and Remedy The Remote Commander • The Remote Commander batteries are dead. Warning Messages Use...
... projector. c Consult with a new battery (see page 33). and TEMP/FAN indicators c Consult with qualified Sony personnel. The LAMP/COVER indicator lights up. • The lamp has reached the end of range! • This input signal cannot be projected as the frequency is detached. correctly (see page 15). lights up . Message Meaning and Remedy High temp.! c Set "Input-A Signal Sel." Maintenance Remote Commander Symptom Cause and Remedy The Remote Commander • The Remote Commander batteries are dead. Warning Messages Use...
Operating Instructions
Page 44
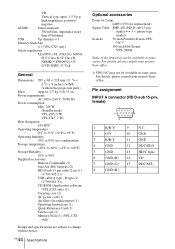
... your nearest Sony office. GB 44 Specifications Optional accessories Projector Lamp LMP-C150 (for replacement) (1) Operating Instructions (1) Quick Reference Card (1) Ferrite core (1) Memory Stick (1) (VPL-CX5 only) Design and specifications are subject to change without the projection parts) Mass Approx. 2.7 kg (5 lb 15 oz) Power requirements AC 100 to 240 V, 50/60 Hz Power consumption Max. 240 W (Standby mode: VPL-CS5: 5 W VPL-CX5: 7 W) Heat dissipation 819 BTU Operating temperature 0°C to...
... your nearest Sony office. GB 44 Specifications Optional accessories Projector Lamp LMP-C150 (for replacement) (1) Operating Instructions (1) Quick Reference Card (1) Ferrite core (1) Memory Stick (1) (VPL-CX5 only) Design and specifications are subject to change without the projection parts) Mass Approx. 2.7 kg (5 lb 15 oz) Power requirements AC 100 to 240 V, 50/60 Hz Power consumption Max. 240 W (Standby mode: VPL-CS5: 5 W VPL-CX5: 7 W) Heat dissipation 819 BTU Operating temperature 0°C to...

Operating Instructions
Page 48
... INPUT SETTING menu 31 INSTALL SETTING menu 34 MENU SETTING menu 33 PICTURE SETTING menu 29 SET SETTING menu . 32 using the menu 28 Menu Color 33 Menu Position 33 Message caution 42 warning 41 O Optional accessories ...... 44 P Picture Mode 29 Pin assignment 44 Power turn on 23 Power Saving 12, 33 Powered tilt adjuster ...... 11 Precautions 6 R Remote Commander ...... 13 location and function of controls 13 Remote control detector front 11 Reset resettable items 29 resetting the item ........ 29 RGB Enhancer 30 S Scan Converter 31 Screen size 16, 43 SET SETTING menu...
... INPUT SETTING menu 31 INSTALL SETTING menu 34 MENU SETTING menu 33 PICTURE SETTING menu 29 SET SETTING menu . 32 using the menu 28 Menu Color 33 Menu Position 33 Message caution 42 warning 41 O Optional accessories ...... 44 P Picture Mode 29 Pin assignment 44 Power turn on 23 Power Saving 12, 33 Powered tilt adjuster ...... 11 Precautions 6 R Remote Commander ...... 13 location and function of controls 13 Remote control detector front 11 Reset resettable items 29 resetting the item ........ 29 RGB Enhancer 30 S Scan Converter 31 Screen size 16, 43 SET SETTING menu...


