

English Owners Manual
Page 2
...Installation 5 Setting the Dial Mode Switch 6 Charging the Battery Pack 6 Adjusting the Volume Controls 7 Using your New Phone 9 Making and Receiving Calls 9 Storing a Number in Memory 10 Entering a Pause in Memory Dialing 10 Storing Mixed Tone/Pulse Numbers 11 Dialing a Stored Number 11 Speed Dialing 12 Chain Dialing 12 Erasing a Stored Number 13 Replacing a Stored Number 13 Selecting a Different Channel 13 Using the Flash Button 14 Traveling Out-Of-Range 14 Troubleshooting your New Phone 15 Quick Reference Chart 15 Specifications of your New Phone 16 General 16 Base Unit...
...Installation 5 Setting the Dial Mode Switch 6 Charging the Battery Pack 6 Adjusting the Volume Controls 7 Using your New Phone 9 Making and Receiving Calls 9 Storing a Number in Memory 10 Entering a Pause in Memory Dialing 10 Storing Mixed Tone/Pulse Numbers 11 Dialing a Stored Number 11 Speed Dialing 12 Chain Dialing 12 Erasing a Stored Number 13 Replacing a Stored Number 13 Selecting a Different Channel 13 Using the Flash Button 14 Traveling Out-Of-Range 14 Troubleshooting your New Phone 15 Quick Reference Chart 15 Specifications of your New Phone 16 General 16 Base Unit...
English Owners Manual
Page 3
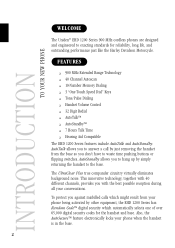
... answer a call by other equipment, the EHD 1200 Series has Random Code™ digital security which automatically selects one of over 65,000 digital security codes for reliability, long life, and outstanding performance just like the Harley Davidson Motorcycle. FEATURES J 900 MHz Extended Range Technology J 40 Channel Autoscan J 10-Number Memory Dialing J 3 "One-Touch Speed Dial" Keys J Tone/Pulse Dialing J Handset Volume Control J 32 Digit Redial J AutoTalk™ J AutoStandby™ J 7 Hours Talk Time J Hearing Aid Compatible...
... answer a call by other equipment, the EHD 1200 Series has Random Code™ digital security which automatically selects one of over 65,000 digital security codes for reliability, long life, and outstanding performance just like the Harley Davidson Motorcycle. FEATURES J 900 MHz Extended Range Technology J 40 Channel Autoscan J 10-Number Memory Dialing J 3 "One-Touch Speed Dial" Keys J Tone/Pulse Dialing J Handset Volume Control J 32 Digit Redial J AutoTalk™ J AutoStandby™ J 7 Hours Talk Time J Hearing Aid Compatible...

English Owners Manual
Page 4
to complete and mail the product registration form. Central Time, Monday through Friday. Handset Teardrop Shaped Gas Tank (Base) Rechargeable Battery Telephone Cord AC Adapter G This Reference Guide G Precautions and Important Safety Instructions G Registration Card If any of these items are from your phone, please read this reference guide thoroughly. We can also be reached on the web at (800) 554-3988. Be sure to 5:00 p.m. Hours are missing or damaged, contact the Uniden Parts Department at www.uniden.com. 3 INCLUDED IN YOUR PACKAGE To get the most from 8:00 a.m.
to complete and mail the product registration form. Central Time, Monday through Friday. Handset Teardrop Shaped Gas Tank (Base) Rechargeable Battery Telephone Cord AC Adapter G This Reference Guide G Precautions and Important Safety Instructions G Registration Card If any of these items are from your phone, please read this reference guide thoroughly. We can also be reached on the web at (800) 554-3988. Be sure to 5:00 p.m. Hours are missing or damaged, contact the Uniden Parts Department at www.uniden.com. 3 INCLUDED IN YOUR PACKAGE To get the most from 8:00 a.m.

English Owners Manual
Page 5
...: G The location should charge your handset for your new phone, read the INSTALLATION CONSIDERATIONS included in the PRECAUTIONS AND IMPORTANT SAFETY INSTRUCTIONS brochure. G The base can be close to both a phone jack and a continuous power outlet. (A continuous power outlet is sufficient space to interrupt its power.) G Keep the base and handset away from sources of electrical noise such as motors and fluorescent lighting. G You should be...
...: G The location should charge your handset for your new phone, read the INSTALLATION CONSIDERATIONS included in the PRECAUTIONS AND IMPORTANT SAFETY INSTRUCTIONS brochure. G The base can be close to both a phone jack and a continuous power outlet. (A continuous power outlet is sufficient space to interrupt its power.) G Keep the base and handset away from sources of electrical noise such as motors and fluorescent lighting. G You should be...
English Owners Manual
Page 6
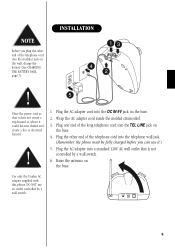
... the AC adapter cord into the DC IN 9V jack on the base. INSTALLATION Before you plug the other end of the telephone cord into the telephone wall jack. (Remember, the phone must be fully charged before you can use an outlet controlled by a wall switch. 6. Plug one end of the long telephone cord into the TEL LINE jack on the wall, charge the battery (See CHARGING THE BATTERY PACK, page...
... the AC adapter cord into the DC IN 9V jack on the base. INSTALLATION Before you plug the other end of the telephone cord into the telephone wall jack. (Remember, the phone must be fully charged before you can use an outlet controlled by a wall switch. 6. Plug one end of the long telephone cord into the TEL LINE jack on the wall, charge the battery (See CHARGING THE BATTERY PACK, page...

English Owners Manual
Page 7
... the battery compartment. 6 SETTING THE DIAL MODE SWITCH Place the switch in the TONE position for tone dialing, or the PULSE position for the first time. Before plugging the phone line into the handset. Plug the battery's cable into your phone. 2. Remove the handset battery cover. Make sure the battery's connector is properly aligned. Use only the Uniden battery pack (model BT-905) supplied with your new phone, you must be fully charged before using your phone for pulse dialing.
... the battery compartment. 6 SETTING THE DIAL MODE SWITCH Place the switch in the TONE position for tone dialing, or the PULSE position for the first time. Before plugging the phone line into the handset. Plug the battery's cable into your phone. 2. Remove the handset battery cover. Make sure the battery's connector is properly aligned. Use only the Uniden battery pack (model BT-905) supplied with your new phone, you must be fully charged before using your phone for pulse dialing.

English Owners Manual
Page 8
M Setting the Handset Earpiece Volume 1. The phone has two ringer tones, each with two volume levels. The phone has two receiver volume levels, one soft and one loud. ADJUSTING THE VOLUME CONTROLS M Ringer Tone and Volume 1. While the phone is not in use, press . 2. Replace the battery cover. Press again until you hear the volume level you want . 7 Press again until you hear the ringer tone and volume level you want . While you are on a call, press . 2. 3.
M Setting the Handset Earpiece Volume 1. The phone has two ringer tones, each with two volume levels. The phone has two receiver volume levels, one soft and one loud. ADJUSTING THE VOLUME CONTROLS M Ringer Tone and Volume 1. While the phone is not in use, press . 2. Replace the battery cover. Press again until you hear the volume level you want . 7 Press again until you hear the ringer tone and volume level you want . While you are on a call, press . 2. 3.

English Owners Manual
Page 9
... talk time. Then charge the battery for charging. To avoid this occurs while you are on the handset and base about once a month. M Low battery indicator When the battery pack in the handset is important to charge. Use a pencil eraser or other contact cleaner. If this memory effect, on the base to clean all battery contacts on the phone, you will hear an alert tone. M Charging the Handset Place the handset on...
... talk time. Then charge the battery for charging. To avoid this occurs while you are on the handset and base about once a month. M Low battery indicator When the battery pack in the handset is important to charge. Use a pencil eraser or other contact cleaner. If this memory effect, on the base to clean all battery contacts on the phone, you will hear an alert tone. M Charging the Handset Place the handset on...
English Owners Manual
Page 10
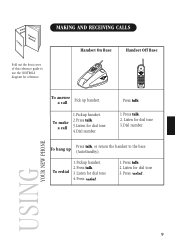
... dial tone 4. Dial number. USING YOUR NEW PHONE 9 Dial number. To redial 1. Press . 1. MAKING AND RECEIVING CALLS Fold out the front cover of this reference guide to the base (AutoStandby). Press talk. 3. Press talk. 3 Listen for dial tone 4. Press . Listen for dial tone 3. Press talk. 2. Press talk. 1. To hang up handset. To make a call Pick up Press talk, or return the handset to use the CONTROLS diagram for reference. Press talk. 2. Pickup handset. 2. Handset...
... dial tone 4. Dial number. USING YOUR NEW PHONE 9 Dial number. To redial 1. Press . 1. MAKING AND RECEIVING CALLS Fold out the front cover of this reference guide to the base (AutoStandby). Press talk. 3. Press talk. 3 Listen for dial tone 4. Press . Listen for dial tone 3. Press talk. 2. Press talk. 1. To hang up handset. To make a call Pick up Press talk, or return the handset to use the CONTROLS diagram for reference. Press talk. 2. Pickup handset. 2. Handset...
English Owners Manual
Page 11
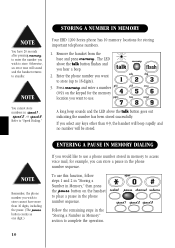
... phone number sequence. If you hear a beep. 2. STORING A NUMBER IN MEMORY You have more than 0-9, the handset will beep rapidly and no number will sound and the handset returns to standby. Otherwise, an error tone will be stored. Remove the handset from the base and press . You cannot store numbers in Memory" section to complete the operation. 10 To use this function, follow steps 1 and 2 in "Storing a Number in Memory...
... phone number sequence. If you hear a beep. 2. STORING A NUMBER IN MEMORY You have more than 0-9, the handset will beep rapidly and no number will sound and the handset returns to standby. Otherwise, an error tone will be stored. Remove the handset from the base and press . You cannot store numbers in Memory" section to complete the operation. 10 To use this function, follow steps 1 and 2 in "Storing a Number in Memory...

English Owners Manual
Page 12
... tone mode. Remove the handset from the base and press . You hear a long beep and the LED above the talk button flashes and you can store a mixed mode number (up for the memory location you wish to easily access long distance services. 1. Your phone will not dial. STORING MIXED TONE/PULSE NUMBERS If your phone is set up to 16 digits) to use. Press the button on the keypad for pulse dialing, you hear a beep. 2. The button...
... tone mode. Remove the handset from the base and press . You hear a long beep and the LED above the talk button flashes and you can store a mixed mode number (up for the memory location you wish to easily access long distance services. 1. Your phone will not dial. STORING MIXED TONE/PULSE NUMBERS If your phone is set up to 16 digits) to use. Press the button on the keypad for pulse dialing, you hear a beep. 2. The button...
English Owners Manual
Page 13
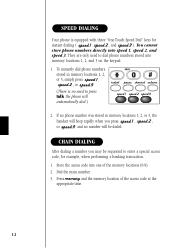
... phone numbers directly into one of the access code at the appropriate time. 12 If no number will automatically dial.) 2. CHAIN DIALING After dialing a number you press , , or and no phone number was stored in memory locations 1, 2, or 3, simply press , , or . (There is equipped with three "One-Touch Speed Dial" keys for example, when performing a banking transaction. 1. Store the access code into speed 1, speed 2, and speed 3. They are only used to enter a special access code...
... phone numbers directly into one of the access code at the appropriate time. 12 If no number will automatically dial.) 2. CHAIN DIALING After dialing a number you press , , or and no phone number was stored in memory locations 1, 2, or 3, simply press , , or . (There is equipped with three "One-Touch Speed Dial" keys for example, when performing a banking transaction. 1. Store the access code into speed 1, speed 2, and speed 3. They are only used to enter a special access code...

English Owners Manual
Page 14
... using your home. The button on the keypad. The LED above the talk button flashes, indicating the phone is in your phone, you want to another channel. 13 Press twice. 3. This function works only when the phone is changing to clear. Press the memory location number (0-9) you can come from the base. 2. ERASING A STORED NUMBER 1. Remove the handset from appliances or other phones in use. You'll hear a long beep confirming that the number...
... using your home. The button on the keypad. The LED above the talk button flashes, indicating the phone is in your phone, you want to another channel. 13 Press twice. 3. This function works only when the phone is changing to clear. Press the memory location number (0-9) you can come from the base. 2. ERASING A STORED NUMBER 1. Remove the handset from appliances or other phones in use. You'll hear a long beep confirming that the number...

English Owners Manual
Page 15
USING THE FLASH BUTTON Use flash for accessing services such as call . As you first hear a clicking sound. TRAVELING OUT-OF-RANGE As you begin to move too far from your call terminates. 14 If you receive a call during your conversation, press the flash button on the handset to accept the waiting call. You must subscribe to Call Waiting service from the base, you travel out-ofrange, your phone company to use this feature. Press flash again to return to the previous call waiting. If you travel further, the noise increases.
USING THE FLASH BUTTON Use flash for accessing services such as call . As you first hear a clicking sound. TRAVELING OUT-OF-RANGE As you begin to move too far from your call terminates. 14 If you receive a call during your conversation, press the flash button on the handset to accept the waiting call. You must subscribe to Call Waiting service from the base, you travel out-ofrange, your phone company to use this feature. Press flash again to return to the previous call waiting. If you travel further, the noise increases.

English Owners Manual
Page 16
.... TROUBLESHOOTING YOUR NEW PHONE QUICK REFERENCE CHART If your expectations, please try again. G Make sure the AC adapter is placed in the base. Can't make or receive calls. The audio sounds weak and/or scratchy. G Check both ends of the telephone line cord. The status LED blinks indicating that the phone has been reset. 15 G Place the handset back on when the handset is plugged into the base and wall outlet. G Make...
.... TROUBLESHOOTING YOUR NEW PHONE QUICK REFERENCE CHART If your expectations, please try again. G Make sure the AC adapter is placed in the base. Can't make or receive calls. The audio sounds weak and/or scratchy. G Check both ends of the telephone line cord. The status LED blinks indicating that the phone has been reset. 15 G Place the handset back on when the handset is plugged into the base and wall outlet. G Make...

English Owners Manual
Page 17
... help you ! HANDSET Transmit Frequency Size Weight Battery: Capacity Talk mode Standby mode 902.052 ~ 904.002 MHz (40 Channels) 2.31 in . Thank you need any assistance with FCC Parts 15 and 68. If you for purchasing a Uniden product. 16 H Approximately 16 oz. SPECIFICATIONS OF YOUR NEW PHONE GENERAL The EHD 1200 complies with this unit, available accessories, or any matters regarding the operation of optional accessories are...
... help you ! HANDSET Transmit Frequency Size Weight Battery: Capacity Talk mode Standby mode 902.052 ~ 904.002 MHz (40 Channels) 2.31 in . Thank you need any assistance with FCC Parts 15 and 68. If you for purchasing a Uniden product. 16 H Approximately 16 oz. SPECIFICATIONS OF YOUR NEW PHONE GENERAL The EHD 1200 complies with this unit, available accessories, or any matters regarding the operation of optional accessories are...


