

English Manual
Page 1
Write the serial number in this manual before using this equipment. Model No. WEANSY1978.0 Serial No. Save this product. USERʼS MANUAL CAUTION Read all precautions and instructions in the space above for future reference. Serial Number Decal (under seat) QUESTIONS? If you have questions, or if there are missing or damaged parts, please contact the establishment where you purchased this manual for reference.
Write the serial number in this manual before using this equipment. Model No. WEANSY1978.0 Serial No. Save this product. USERʼS MANUAL CAUTION Read all precautions and instructions in the space above for future reference. Serial Number Decal (under seat) QUESTIONS? If you have questions, or if there are missing or damaged parts, please contact the establishment where you purchased this manual for reference.

English Manual
Page 2
... drawing shows the location(s) of ICON IP, Inc. 2 If a decal is missing or illegible, see the front cover of this area. WEIDER is placed on both sides of this manual and request a free replacement decal. Note: The decal(s) may not be shown at actual size. This decal is a registered trademark of the...
... drawing shows the location(s) of ICON IP, Inc. 2 If a decal is missing or illegible, see the front cover of this area. WEIDER is placed on both sides of this manual and request a free replacement decal. Note: The decal(s) may not be shown at actual size. This decal is a registered trademark of the...
English Manual
Page 3
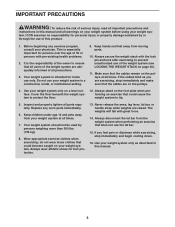
... do not wear loose clothes that could cause the weight system to ensure that could become caught on your physician. Do not use of this manual and all warnings on page 20). 11. Make sure that does not use of the weight system (see LOCKING THE WEIGHT STACK on your weight... system before using your weight system at all times. If the cables bind as described in this manual. 3 ICON assumes no responsibility for home use only. Always stand on the pulleys at all parts regularly. Keep hands and feet away from the ...
... do not wear loose clothes that could cause the weight system to ensure that could become caught on your physician. Do not use of this manual and all warnings on page 20). 11. Make sure that does not use of the weight system (see LOCKING THE WEIGHT STACK on your weight... system before using your weight system at all times. If the cables bind as described in this manual. 3 ICON assumes no responsibility for home use only. Always stand on the pulleys at all parts regularly. Keep hands and feet away from the ...
English Manual
Page 4
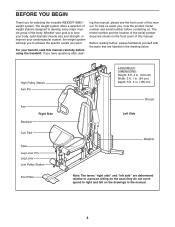
... Station Foot Plate ASSEMBLED DIMENSIONS: Height: 6 ft. 4 in. (193 cm) Width: 3 ft. 1 in. (94 cm) Depth: 5 ft. 5 in the manual. 4 Whether your goal is to achieve the specific results you , note the product model number and serial number before using the treadmill. If you for... selecting the versatile WEIDER® 8980 I weight system. Before reading further, please familiarize yourself with the parts that are determined relative to develop every major muscle group of...
... Station Foot Plate ASSEMBLED DIMENSIONS: Height: 6 ft. 4 in. (193 cm) Width: 3 ft. 1 in. (94 cm) Depth: 5 ft. 5 in the manual. 4 Whether your goal is to achieve the specific results you , note the product model number and serial number before using the treadmill. If you for... selecting the versatile WEIDER® 8980 I weight system. Before reading further, please familiarize yourself with the parts that are determined relative to develop every major muscle group of...
English Manual
Page 5
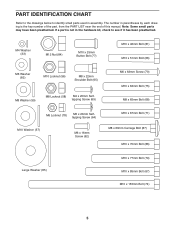
...: Some small parts may have been preattached. If a part is the key number of the part, from the PART LIST near the end of this manual.
...: Some small parts may have been preattached. If a part is the key number of the part, from the PART LIST near the end of this manual.
English Manual
Page 6
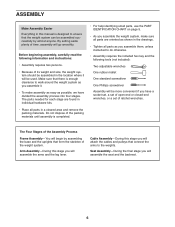
... Assembly will be assembled in this stage you will be used. Seat Assembly-During the final stage you will go smoothly. Cable Assembly-During this manual is completed. • For help identifying small parts, use the PART IDENTIFICATION CHART on page 5. • As you assemble the weight system, make assembly as...
... Assembly will be assembled in this stage you will be used. Seat Assembly-During the final stage you will go smoothly. Cable Assembly-During this manual is completed. • For help identifying small parts, use the PART IDENTIFICATION CHART on page 5. • As you assemble the weight system, make assembly as...
English Manual
Page 22
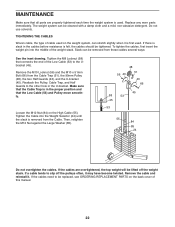
... in the proper position and that the Low Cable (53) and Pulley move smoothly. Tighten the M8 Locknut (58) that connects the end of this manual. 22 Then, retighten the M12 Nut against the Large Washer (85). 56 43 48 51 43 66 45 58 53 45 53 55 84 85...
... in the proper position and that the Low Cable (53) and Pulley move smoothly. Tighten the M8 Locknut (58) that connects the end of this manual. 22 Then, retighten the M12 Nut against the Large Washer (85). 56 43 48 51 43 66 45 58 53 45 53 55 84 85...
English Manual
Page 23
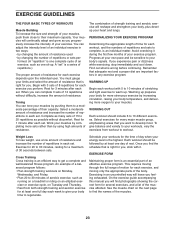
... balance and variety to your body time to their capacity. This requires moving only the appropriate parts of rest. On the exercise guide accompanying this manual you perform.
... balance and variety to your body time to their capacity. This requires moving only the appropriate parts of rest. On the exercise guide accompanying this manual you perform.
English Manual
Page 25
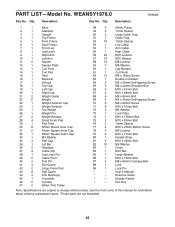
See the front cover of this manual for information about ordering replacement parts. *These parts are subject to change without notice. PART LIST-Model No. Qty. Description 1 1 Base 2 1 Stabilizer 3 1 Upright 4 1 Top Frame 5 1 ... 88 1 Lock 89 1 Lock Pin * - Qty. Grease Packet * - Hex Key Note: Specifications are not illustrated. 25 WEANSY1978.0 R0608A Key No. Description Key No. Userʼs Manual * - Exercise Guide * -
See the front cover of this manual for information about ordering replacement parts. *These parts are subject to change without notice. PART LIST-Model No. Qty. Description 1 1 Base 2 1 Stabilizer 3 1 Upright 4 1 Top Frame 5 1 ... 88 1 Lock 89 1 Lock Pin * - Qty. Grease Packet * - Hex Key Note: Specifications are not illustrated. 25 WEANSY1978.0 R0608A Key No. Description Key No. Userʼs Manual * - Exercise Guide * -
English Manual
Page 28
To help us assist you, be prepared to provide the following information when contacting us: • the model number and serial number of the product (see the front cover of this manual) • the name of the product (see the front cover of this manual) • the key number and description of the replacement part(s) (see the front cover of this manual. ORDERING REPLACEMENT PARTS To order replacement parts, please see the PART LIST and the EXPLODED DRAWING near the end of this manual) Part No. 267904 R0608A Printed in China © 2008 ICON IP, Inc
To help us assist you, be prepared to provide the following information when contacting us: • the model number and serial number of the product (see the front cover of this manual) • the name of the product (see the front cover of this manual) • the key number and description of the replacement part(s) (see the front cover of this manual. ORDERING REPLACEMENT PARTS To order replacement parts, please see the PART LIST and the EXPLODED DRAWING near the end of this manual) Part No. 267904 R0608A Printed in China © 2008 ICON IP, Inc


