
XPK01Z Instruction Manual
Page 3
... before operation. 5. Disconnect the plug from the power source and/or the battery pack from those intended could indicate poor installation or a poorly balanced blade. 10. Keep cutting tools sharp and clean. Use of control. 3. Use power tools only with a stick. 3 Service 28. Holding the work...if the switch does not turn it was designed. 18. If contact accidentally occurs, flush with both hands. 8. Wait until the blade attains full speed before operation. 7. 14. Many accidents are connected and properly used with the switch is suitable for misalignment or binding...
... before operation. 5. Disconnect the plug from the power source and/or the battery pack from those intended could indicate poor installation or a poorly balanced blade. 10. Keep cutting tools sharp and clean. Use of control. 3. Use power tools only with a stick. 3 Service 28. Holding the work...if the switch does not turn it was designed. 18. If contact accidentally occurs, flush with both hands. 8. Wait until the blade attains full speed before operation. 7. 14. Many accidents are connected and properly used with the switch is suitable for misalignment or binding...

XPK01Z Instruction Manual
Page 4
Operate the tool only when hand-held. 15. Always change both blades or covers on (1) battery charger, (2) battery, and (3) product using battery cartridge, read all instructions and cautionary markings on the drum, otherwise ...65381; volts ・ direct current ・ no load speed ・ revolutions or reciprocation per minute IMPORTANT SAFETY INSTRUCTIONS ENC007-8 FOR BATTERY CARTRIDGE 1. Use only Makita blades specified in this manual. 17. Do not disassemble battery cartridge. 3. Do not store the tool and battery cartridge in a fire. 8. Follow your local regulations...
Operate the tool only when hand-held. 15. Always change both blades or covers on (1) battery charger, (2) battery, and (3) product using battery cartridge, read all instructions and cautionary markings on the drum, otherwise ...65381; volts ・ direct current ・ no load speed ・ revolutions or reciprocation per minute IMPORTANT SAFETY INSTRUCTIONS ENC007-8 FOR BATTERY CARTRIDGE 1. Use only Makita blades specified in this manual. 17. Do not disassemble battery cartridge. 3. Do not store the tool and battery cartridge in a fire. 8. Follow your local regulations...
XPK01Z Instruction Manual
Page 6
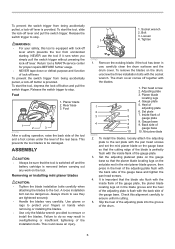
... plate. 3. Socket wrench 2. Planer blade locating lugs 4. To start the tool, depress the lock-off lever and pull the switch trigger. WARNING: • For your fingers or hands when removing or installing the blades. • Use only the Makita wrench provided to stop . Release the... switch trigger to remove or install the blades. ASSEMBLY CAUTION: • Always be damaged. Use gloves or rags to protect your...
... plate. 3. Socket wrench 2. Planer blade locating lugs 4. To start the tool, depress the lock-off lever and pull the switch trigger. WARNING: • For your fingers or hands when removing or installing the blades. • Use only the Makita wrench provided to stop . Release the... switch trigger to remove or install the blades. ASSEMBLY CAUTION: • Always be damaged. Use gloves or rags to protect your...
XPK01Z Instruction Manual
Page 7
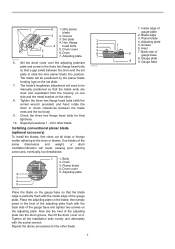
... are clear and equidistant from the housing on one side and the metal bracket on the other blade. Use blades of gauge plate 2. Planer blade 4. Inside edge of the same dimensions and weight, or drum oscillation/vibration will need to check clearances between the drum and ... the drum groove, then fit the drum cover on the set plate to the drum or blades. Adjusting plate 1 5. Set plate 4. Installing conventional planer blade (optional accessory) To install the blades, first clean out all the installation bolts evenly and alternately with the inside edge of the ...
... are clear and equidistant from the housing on one side and the metal bracket on the other blade. Use blades of gauge plate 2. Planer blade 4. Inside edge of the same dimensions and weight, or drum oscillation/vibration will need to check clearances between the drum and ... the drum groove, then fit the drum cover on the set plate to the drum or blades. Adjusting plate 1 5. Set plate 4. Installing conventional planer blade (optional accessory) To install the blades, first clean out all the installation bolts evenly and alternately with the inside edge of the ...

XPK01Z Instruction Manual
Page 8
... parallel to the insides which might hamper further collection. The nozzle is set properly and securely. NOTE: • If you connect a Makita vacuum cleaner to prevent it will go to this side view cannot (B) show it from coming off during operation. 1 007802 When the dust... bag is tapered. The nozzle is about half full, remove the dust bag from coming off during operation. Nozzle 2. Cause: One or both blades fails to have edge parallel to prevent it , the edges of proper and improper settings. (A) Front base (Movable shoe) (B) Rear base (Stationary shoe...
... parallel to the insides which might hamper further collection. The nozzle is set properly and securely. NOTE: • If you connect a Makita vacuum cleaner to prevent it will go to this side view cannot (B) show it from coming off during operation. 1 007802 When the dust... bag is tapered. The nozzle is about half full, remove the dust bag from coming off during operation. Nozzle 2. Cause: One or both blades fails to have edge parallel to prevent it , the edges of proper and improper settings. (A) Front base (Movable shoe) (B) Rear base (Stationary shoe...
XPK01Z Instruction Manual
Page 9
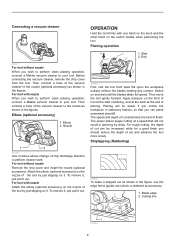
...tool firmly with one hand on the knob and the other hand on and wait until the blades attain full speed. Start 2. For tool without nozzle When you wish to perform clean planing operation, connect a Makita vacuum cleaner to perform cleaner work. To remove it, just pull it out. 2 011759... First, rest the tool front base flat upon the workpiece surface without the blades making any contact. Apply pressure on the front of tool ...
...tool firmly with one hand on the knob and the other hand on and wait until the blades attain full speed. Start 2. For tool without nozzle When you wish to perform clean planing operation, connect a Makita vacuum cleaner to perform cleaner work. To remove it, just pull it out. 2 011759... First, rest the tool front base flat upon the workpiece surface without the blades making any contact. Apply pressure on the front of tool ...

XPK01Z Instruction Manual
Page 10
... or maintenance. • Never use gasoline, benzine, thinner, alcohol or the like. Discoloration, deformation or cracks may result. Sharpening the conventional planer blades (optional accessory) 1. Insert the edge fence into the hole in the front of the workpiece, then secure it . Screw 2. Convenient holes are ...provided in the fence for this purpose, and also for the best performance possible. Draw a cutting line on the workpiece. Align the blade edge with the edge of the workpiece and plane it by attaching an extra piece of the workpiece. Otherwise uneven planing may result....
... or maintenance. • Never use gasoline, benzine, thinner, alcohol or the like. Discoloration, deformation or cracks may result. Sharpening the conventional planer blades (optional accessory) 1. Insert the edge fence into the hole in the front of the workpiece, then secure it . Screw 2. Convenient holes are ...provided in the fence for this purpose, and also for the best performance possible. Draw a cutting line on the workpiece. Align the blade edge with the edge of the workpiece and plane it by attaching an extra piece of the workpiece. Otherwise uneven planing may result....
XPK01Z Instruction Manual
Page 11
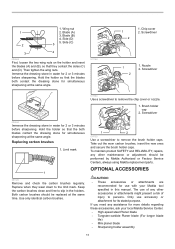
... by Makita Authorized or Factory Service Centers, always using Makita replacement parts. Nozzle 2. Only use with your local Makita Service Center. • High-speed steel Planer blade • Tungsten-carbide Planer blade (For longer blade life) • Mini planer blade •... check the carbon brushes regularly. 1. Side (D) 2 5 5. Hold the holder so that the blades both blades contact the dressing stone for more details regarding these accessories, ask your Makita tool specified in water for 2 or 3 minutes before sharpening. Screwdriver 1 2 1. Brush holder ...
... by Makita Authorized or Factory Service Centers, always using Makita replacement parts. Nozzle 2. Only use with your local Makita Service Center. • High-speed steel Planer blade • Tungsten-carbide Planer blade (For longer blade life) • Mini planer blade •... check the carbon brushes regularly. 1. Side (D) 2 5 5. Hold the holder so that the blades both blades contact the dressing stone for more details regarding these accessories, ask your Makita tool specified in water for 2 or 3 minutes before sharpening. Screwdriver 1 2 1. Brush holder ...
XPK01Z Instruction Manual
Page 12
... return the COMPLETE tool, freight prepaid, to the tool. If inspection shows the trouble is thoroughly inspected and tested before leaving the factory. • Blade gauge • Set plates set • Edge fence (Guide rule) • Extension guide set • Dressing stone • Nozzle • Dust... bag assembly • Elbow • Socket wrench • Plastic carrying case • Makita genuine battery and charger NOTE: • Some items in the list may be free of defects from workmanship and materials for the period of ONE...
... return the COMPLETE tool, freight prepaid, to the tool. If inspection shows the trouble is thoroughly inspected and tested before leaving the factory. • Blade gauge • Set plates set • Edge fence (Guide rule) • Extension guide set • Dressing stone • Nozzle • Dust... bag assembly • Elbow • Socket wrench • Plastic carrying case • Makita genuine battery and charger NOTE: • Some items in the list may be free of defects from workmanship and materials for the period of ONE...
XPK01Z Parts Breakdown
Page 3
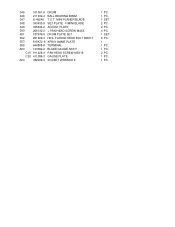
045 161061-6 DRUM 046 211032-4 BALL BEARING 608ZZ 047 D-46246 T.C.T. FLANGE HEAD BOLT M6X17 053 815K72-6 XPK01 NAME PLATE 055 644808-8 TERMINAL A03 123062-2 BLADE GAUGE ASS'Y A03 C10 911228-4 PAN HEAD SCREW M5X18 A03 C20 411086-3 GAUGE PLATE A04 782209-3 SOCKET WRENCH 9 1 PC. 1 PC. 1 SET 2 PC. 2 PC. 4 PC. 1 SET 6 PC. 1 1 PC. 1 PC. 2 PC. 1 PC. 1 PC. MINI PLANER BLADE 048 343433-9 SET PLATE F/MINI BLADE 049 345644-2 ADJUST PLATE 050 265132-2 + PAN HEAD SCREW M4X5 051 187679-5 DRUM PLATE SET 052 251609-3 HEX.
045 161061-6 DRUM 046 211032-4 BALL BEARING 608ZZ 047 D-46246 T.C.T. FLANGE HEAD BOLT M6X17 053 815K72-6 XPK01 NAME PLATE 055 644808-8 TERMINAL A03 123062-2 BLADE GAUGE ASS'Y A03 C10 911228-4 PAN HEAD SCREW M5X18 A03 C20 411086-3 GAUGE PLATE A04 782209-3 SOCKET WRENCH 9 1 PC. 1 PC. 1 SET 2 PC. 2 PC. 4 PC. 1 SET 6 PC. 1 1 PC. 1 PC. 2 PC. 1 PC. 1 PC. MINI PLANER BLADE 048 343433-9 SET PLATE F/MINI BLADE 049 345644-2 ADJUST PLATE 050 265132-2 + PAN HEAD SCREW M4X5 051 187679-5 DRUM PLATE SET 052 251609-3 HEX.


