
Owner's Manual
Page 11
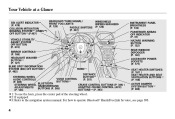
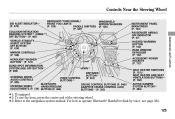
...) OFF BUTTONᤳ2 (P. 482) WINDSHIELD WIPERS/WASHERS (P. 126) INSTRUMENT PANEL BRIGHTNESS (P. 133) PASSENGER AIRBAG OFF INDICATOR (P. 37) HAZARD WARNING BUTTON (P. 132) REAR WINDOW DEFOGGER (P. 132) ACCESSORY POWER SOCKETS (P. 177) HORNᤳ1 SEAT HEATER SWITCHES (P. 157) / SEAT HEATER AND SEAT VENTILATION BUTTONSᤳ2 (P. 158) ACTIVE DAMPER SYSTEM BUTTONᤳ2 (P. 484) DISTANCE STEERING...
...) OFF BUTTONᤳ2 (P. 482) WINDSHIELD WIPERS/WASHERS (P. 126) INSTRUMENT PANEL BRIGHTNESS (P. 133) PASSENGER AIRBAG OFF INDICATOR (P. 37) HAZARD WARNING BUTTON (P. 132) REAR WINDOW DEFOGGER (P. 132) ACCESSORY POWER SOCKETS (P. 177) HORNᤳ1 SEAT HEATER SWITCHES (P. 157) / SEAT HEATER AND SEAT VENTILATION BUTTONSᤳ2 (P. 158) ACTIVE DAMPER SYSTEM BUTTONᤳ2 (P. 484) DISTANCE STEERING...
Owner's Manual
Page 27
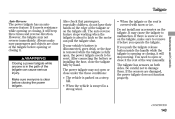
... and hurt someone if the airbags inflate. ● Do not attach or place objects on seat belts. If they do , they Do not put any accessories on the front airbag covers. hands or arms are close to improve ● could be very seriously injured in a crash. If your front airbag inflates...
... and hurt someone if the airbags inflate. ● Do not attach or place objects on seat belts. If they do , they Do not put any accessories on the front airbag covers. hands or arms are close to improve ● could be very seriously injured in a crash. If your front airbag inflates...

Owner's Manual
Page 67
.... Move the vehicle seat to be very seriously injured in a crash. ● very serious injuries during a crash. ● ● Do not let a child put any accessories on or near the floor. Protecting Larger Children If you decide that a child can make sure you understand all seat belt instructions and all safety...
.... Move the vehicle seat to be very seriously injured in a crash. ● very serious injuries during a crash. ● ● Do not let a child put any accessories on or near the floor. Protecting Larger Children If you decide that a child can make sure you understand all seat belt instructions and all safety...
Owner's Manual
Page 72
... Brake ...Mirrors ...Driving Position Memory System ...Interior Lights ...Interior Convenience Items ...Beverage Holders ...Console Compartment ...Storage Compartment ...Glove Box ...Sunglasses Holder ...Sun Visor ...Vanity Mirror ...Accessory Power Sockets ...AC Power Outlet ...149 155 157 158 160 163 164 165 168 170 173 174 175 175 175 176 176 177 177 178...
... Brake ...Mirrors ...Driving Position Memory System ...Interior Lights ...Interior Convenience Items ...Beverage Holders ...Console Compartment ...Storage Compartment ...Glove Box ...Sunglasses Holder ...Sun Visor ...Vanity Mirror ...Accessory Power Sockets ...AC Power Outlet ...149 155 157 158 160 163 164 165 168 170 173 174 175 175 175 176 176 177 177 178...
Owner's Manual
Page 81
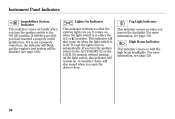
... will then go off the light switch, this indicator will remain on. Lights On Indicator This indicator reminds you turn the ignition switch to the ACCESSORY (I) or the LOCK (0) position without turning off if you turn on with the high beam headlights. Fog Light Indicator This indicator comes on when you...
... will then go off the light switch, this indicator will remain on. Lights On Indicator This indicator reminds you turn the ignition switch to the ACCESSORY (I) or the LOCK (0) position without turning off if you turn on with the high beam headlights. Fog Light Indicator This indicator comes on when you...
Owner's Manual
Page 97
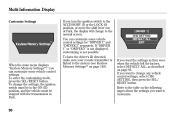
... the driver's ID detected, make sure your remote transmitter is not possible. Multi-Information Display Customize Settings If you turn the ignition switch to the ACCESSORY (I) or the LOCK (0) position, or move the shift lever out of Park, the display will change the settings, the ignition switch must be in the...
... the driver's ID detected, make sure your remote transmitter is not possible. Multi-Information Display Customize Settings If you turn the ignition switch to the ACCESSORY (I) or the LOCK (0) position, or move the shift lever out of Park, the display will change the settings, the ignition switch must be in the...
Owner's Manual
Page 132
... BUTTONᤳ1 (P. 482) STEERING WHEEL AUDIO CONTROLS (P. 305) INSTRUMENT PANEL BRIGHTNESS (P. 133) PASSENGER AIRBAG OFF INDICATOR (P. 37) HAZARD WARNING BUTTON (P. 132) REAR WINDOW DEFOGGER (P. 132) ACCESSORY POWER SOCKETS (P. 177) Instruments and Controls HORNᤳ2 DISTANCE BUTTONᤳ1 (P. 357) CRUISE CONTROL BUTTONS (P. 345)/ ADAPTIVE CRUISE CONTROL (ACC) BUTTONSᤳ1 (P. 353) VOICE CONTROL...
... BUTTONᤳ1 (P. 482) STEERING WHEEL AUDIO CONTROLS (P. 305) INSTRUMENT PANEL BRIGHTNESS (P. 133) PASSENGER AIRBAG OFF INDICATOR (P. 37) HAZARD WARNING BUTTON (P. 132) REAR WINDOW DEFOGGER (P. 132) ACCESSORY POWER SOCKETS (P. 177) Instruments and Controls HORNᤳ2 DISTANCE BUTTONᤳ1 (P. 357) CRUISE CONTROL BUTTONS (P. 345)/ ADAPTIVE CRUISE CONTROL (ACC) BUTTONSᤳ1 (P. 353) VOICE CONTROL...
Owner's Manual
Page 136
... Headlights When the light switch is in either turn the ignition switch to high beams, push the left lever forward until you plan to the ACCESSORY (I) or LOCK (0) position. The blue high beam indicator will come on (see page 113. Pull it back to return to the position. To turn on...
... Headlights When the light switch is in either turn the ignition switch to high beams, push the left lever forward until you plan to the ACCESSORY (I) or LOCK (0) position. The blue high beam indicator will come on (see page 113. Pull it back to return to the position. To turn on...
Owner's Manual
Page 146
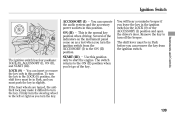
... right as a test when you turn the ignition switch from the ignition switch. The shift lever must push the key in the LOCK (0) or the ACCESSORY (I ) to start the engine. Instruments and Controls START (III) - Use this position. The switch returns to the ON (II) position when...ignition switch in slightly. ON (II) - This is the normal key position when driving. LOCK (0) - You can remove the key from the ACCESSORY (I ) position and open the driver's door. If the front wheels are turned, the antitheft lock may make it difficult to the LOCK (0) position, ...
... right as a test when you turn the ignition switch from the ignition switch. The shift lever must push the key in the LOCK (0) or the ACCESSORY (I ) to start the engine. Instruments and Controls START (III) - Use this position. The switch returns to the ON (II) position when...ignition switch in slightly. ON (II) - This is the normal key position when driving. LOCK (0) - You can remove the key from the ACCESSORY (I ) position and open the driver's door. If the front wheels are turned, the antitheft lock may make it difficult to the LOCK (0) position, ...
Owner's Manual
Page 150
.... If your vehicle's battery is disconnected, goes dead, or the fuse is removed while the tailgate is about to be reset. Do not install any accessories on both sides. If there is in a strong wind. ● CONTINUED 143 Be careful not to remove it will stop moving. Instruments and Controls Closing...
.... If your vehicle's battery is disconnected, goes dead, or the fuse is removed while the tailgate is about to be reset. Do not install any accessories on both sides. If there is in a strong wind. ● CONTINUED 143 Be careful not to remove it will stop moving. Instruments and Controls Closing...
Owner's Manual
Page 180
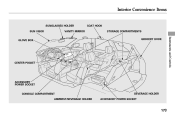
Interior Convenience Items SUNGLASSES HOLDER SUN VISOR VANITY MIRROR COAT HOOK STORAGE COMPARTMENTS Instruments and Controls GLOVE BOX GROCERY HOOK CENTER POCKET ACCESSORY POWER SOCKET CONSOLE COMPARTMENT ARMREST/BEVERAGE HOLDER BEVERAGE HOLDER ACCESSORY POWER SOCKET 173
Interior Convenience Items SUNGLASSES HOLDER SUN VISOR VANITY MIRROR COAT HOOK STORAGE COMPARTMENTS Instruments and Controls GLOVE BOX GROCERY HOOK CENTER POCKET ACCESSORY POWER SOCKET CONSOLE COMPARTMENT ARMREST/BEVERAGE HOLDER BEVERAGE HOLDER ACCESSORY POWER SOCKET 173
Owner's Manual
Page 184
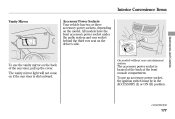
... ON (II) position. To use the vanity mirror on the model. Interior Convenience Items Vanity Mirror Accessory Power Sockets Your vehicle has two or three accessory power sockets, depending on the back of the front console compartment. The vanity mirror light will not come on the driver's ...side. On models without rear entertainment system The accessory power socket is slid outward. CONTINUED 177 All models have the front accessory power socket under the audio system and rear socket behind the third row seat on if the sun...
... ON (II) position. To use the vanity mirror on the model. Interior Convenience Items Vanity Mirror Accessory Power Sockets Your vehicle has two or three accessory power sockets, depending on the back of the front console compartment. The vanity mirror light will not come on the driver's ...side. On models without rear entertainment system The accessory power socket is slid outward. CONTINUED 177 All models have the front accessory power socket under the audio system and rear socket behind the third row seat on if the sun...

Owner's Manual
Page 185
... engine when you use an appliance which requires more than 100 watts, it automatically stops supplying the power. The maximum capacity for 12 volt DC accessories that are rated 120 watts or less (10 amps). To use the AC power outlet. Insert the plug into the receptacle slightly, turn it on...
... engine when you use an appliance which requires more than 100 watts, it automatically stops supplying the power. The maximum capacity for 12 volt DC accessories that are rated 120 watts or less (10 amps). To use the AC power outlet. Insert the plug into the receptacle slightly, turn it on...
Owner's Manual
Page 201
... SCAN button again. 194 You will be in stereo. When it . On the FM band, ST will see SCAN in AM is broadcasting in the ACCESSORY (I) or ON (II) position. To activate it, press the SCAN button, then release it plays a station that you do nothing, the system will stop and...
... SCAN button again. 194 You will be in stereo. When it . On the FM band, ST will see SCAN in AM is broadcasting in the ACCESSORY (I) or ON (II) position. To activate it, press the SCAN button, then release it plays a station that you do nothing, the system will stop and...
Owner's Manual
Page 205
XM Radio receives signals from two satellites to turn the ignition switch to the ACCESSORY (I) or ON (II) position. Push the VOL/ knob to produce clear, highquality digital reception. In the channel mode, you press and release the TITLE button, ...
XM Radio receives signals from two satellites to turn the ignition switch to the ACCESSORY (I) or ON (II) position. Push the VOL/ knob to produce clear, highquality digital reception. In the channel mode, you press and release the TITLE button, ...
Owner's Manual
Page 208
... expressly approved by any interference, including interference that could void the user's authority to the south of music types and styles will appear in the ACCESSORY (I .D. Receiving XM Radio Service If your XM Radio service has expired or you purchased your credit card number. number, press the button, then turn on...
... expressly approved by any interference, including interference that could void the user's authority to the south of music types and styles will appear in the ACCESSORY (I .D. Receiving XM Radio Service If your XM Radio service has expired or you purchased your credit card number. number, press the button, then turn on...
Owner's Manual
Page 211
... select the displayed information with , it may not be in the unit. 204 You can select up and cause the disc to jam in the ACCESSORY (I) or ON (II) position. Depending on an MP3 or WMA disc is protected by digital rights management (DRM), the audio unit displays FORMAT, and then...
... select the displayed information with , it may not be in the unit. 204 You can select up and cause the disc to jam in the ACCESSORY (I) or ON (II) position. Depending on an MP3 or WMA disc is protected by digital rights management (DRM), the audio unit displays FORMAT, and then...
Owner's Manual
Page 221
... tune to a higher frequency, or left to tune to the desired frequency. To exit the TUNE mode, press ENTER on AM is broadcasting in the ACCESSORY (I) or the ON (II) position. On the FM bands, STEREO will change to FM1, FM2, or AM. To change bands by pressing the VOL/ button...
... tune to a higher frequency, or left to tune to the desired frequency. To exit the TUNE mode, press ENTER on AM is broadcasting in the ACCESSORY (I) or the ON (II) position. On the FM bands, STEREO will change to FM1, FM2, or AM. To change bands by pressing the VOL/ button...
Owner's Manual
Page 234
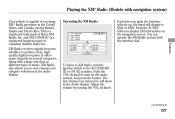
... button to XM1 or XM2. Features To listen to XM Radio, turn on the navigation screen. XM Radio receives signals from two satellites to the ACCESSORY (I) or ON (II) position. Along with a large selection of different types of receiving XM® Radio anywhere in the Audio display. CONTINUED 227 It offers...
... button to XM1 or XM2. Features To listen to XM Radio, turn on the navigation screen. XM Radio receives signals from two satellites to the ACCESSORY (I) or ON (II) position. Along with a large selection of different types of receiving XM® Radio anywhere in the Audio display. CONTINUED 227 It offers...
Owner's Manual
Page 241
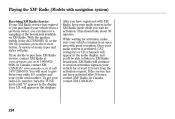
Your I .D. In Canada, contact XM CANADA®. 234 A variety of the broadcasts available on XM Radio. number, turn the TUNE knob until ''0'' appears in the ACCESSORY (I .D. If the service has not been activated after 36 hours, contact XM® Radio. number and your audio system is activated, CAT (category) or CH (...
Your I .D. In Canada, contact XM CANADA®. 234 A variety of the broadcasts available on XM Radio. number, turn the TUNE knob until ''0'' appears in the ACCESSORY (I .D. If the service has not been activated after 36 hours, contact XM® Radio. number and your audio system is activated, CAT (category) or CH (...
