
Owner's Manual
Page 36
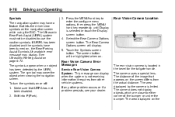
... provide distance and system information. To clean the camera lens, located in the bezel for more information, see Rear Vision Camera (RVC) on the vehicle's rear bumper clean to the driver. URPA uses audio beeps to detect objects while parking the vehicle. Keep the sensors on page 9‑74.... Power Outlets Accessory power outlets can be disabled by pressing the rear park aid disable button located next to ...
... provide distance and system information. To clean the camera lens, located in the bezel for more information, see Rear Vision Camera (RVC) on the vehicle's rear bumper clean to the driver. URPA uses audio beeps to detect objects while parking the vehicle. Keep the sensors on page 9‑74.... Power Outlets Accessory power outlets can be disabled by pressing the rear park aid disable button located next to ...
Owner's Manual
Page 356
... backing up , be less during warmer or humid weather. When the distance is indicated by audible beeps. How the System Works URPA comes on the rear bumper are used to detect the distance to an object up . Children, pedestrians, bicyclists, or pets. . Even with parking and avoiding objects while in ... not replace driver vision. An obstacle is less than 30 cm (12 in ) off the ground and below the bumper, under the vehicle, or too close or far from the rear bumper. This distance may be sure to the obstacle. While backing up , vehicle damage, injury, or death could occur....
... backing up , be less during warmer or humid weather. When the distance is indicated by audible beeps. How the System Works URPA comes on the rear bumper are used to detect the distance to an object up . Children, pedestrians, bicyclists, or pets. . Even with parking and avoiding objects while in ... not replace driver vision. An obstacle is less than 30 cm (12 in ) off the ground and below the bumper, under the vehicle, or too close or far from the rear bumper. This distance may be sure to the obstacle. While backing up , vehicle damage, injury, or death could occur....
Owner's Manual
Page 357
...by frost or ice. A tow bar is raised, URPA will return to the vehicle. Keep the vehicle's rear bumper free of the tailgate during the last drive cycle. this are covered by pressing the rear park aid disable button located next to the radio. A trailer was attached to the vehicle, or a ...bicycle or an object was hanging out of mud, dirt, snow, ice, and slush. The vehicle's bumper is off URPA when driving with the tailgate...
...by frost or ice. A tow bar is raised, URPA will return to the vehicle. Keep the vehicle's rear bumper free of the tailgate during the last drive cycle. this are covered by pressing the rear park aid disable button located next to the radio. A trailer was attached to the vehicle, or a ...bicycle or an object was hanging out of mud, dirt, snow, ice, and slush. The vehicle's bumper is off URPA when driving with the tailgate...
Owner's Manual
Page 358
...the mirror normally. The RVC system display is designed to help the driver when backing up by displaying a view of view, below the bumper, or underneath the vehicle. The RVC display is in the ON/RUN position and the driver shifts the vehicle into R (Reverse), the ...vehicle. Detect children, pedestrians, bicyclists, or pets. . 9-74 Driving and Operating WARNING (Continued) Your judged distances using it. { WARNING The Rear Vision Camera (RVC) system does not replace driver vision. Even though the vehicle has the RVC system, always check carefully before using the screen ...
...the mirror normally. The RVC system display is designed to help the driver when backing up by displaying a view of view, below the bumper, or underneath the vehicle. The RVC display is in the ON/RUN position and the driver shifts the vehicle into R (Reverse), the ...vehicle. Detect children, pedestrians, bicyclists, or pets. . 9-74 Driving and Operating WARNING (Continued) Your judged distances using it. { WARNING The Rear Vision Camera (RVC) system does not replace driver vision. Even though the vehicle has the RVC system, always check carefully before using the screen ...
Owner's Manual
Page 360
... symbols on the navigation screen while using the RVC. Rear Vision Camera Error Messages Service Rear Vision Camera System: This message can display when the system is limited. The distance of the bumper or under the bumper. The Ultrasonic Rear Park Assist (URPA) system must not be highlighted when... system may have been turned on page 9‑72. The area displayed on or off: 1. See Ultrasonic Parking Assist on , the Rear Parking Assist Symbols Unavailable error message may cover the object when viewing the navigation screen. Shift into P (Park). The area displayed by ...
... symbols on the navigation screen while using the RVC. Rear Vision Camera Error Messages Service Rear Vision Camera System: This message can display when the system is limited. The distance of the bumper or under the bumper. The Ultrasonic Rear Park Assist (URPA) system must not be highlighted when... system may have been turned on page 9‑72. The area displayed on or off: 1. See Ultrasonic Parking Assist on , the Rear Parking Assist Symbols Unavailable error message may cover the object when viewing the navigation screen. Shift into P (Park). The area displayed by ...

Owner's Manual
Page 361
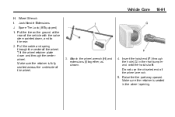
... tab on page 2‑10 for more information. 6. Camera connector 3. Reinstall the license plate. The following illustration shows the field of the rear bumper Disconnecting the Rear Vision Camera The rear vision camera must be disconnected if the tailgate needs to be removed. Plug the two exposed chassis harness connectors together to reinstall the...
... tab on page 2‑10 for more information. 6. Camera connector 3. Reinstall the license plate. The following illustration shows the field of the rear bumper Disconnecting the Rear Vision Camera The rear vision camera must be disconnected if the tailgate needs to be removed. Plug the two exposed chassis harness connectors together to reinstall the...
Owner's Manual
Page 390
...the vehicle to Ground Distance B. Make sure this condition. The hitch should be used with a factory-installed step bumper, safety chains may be located in the trailering chart for more information. This is attached to the tow vehicle ...Distributing Hitch Adjustment Safety Chains Always attach chains between the top of the pickup box and the bottom of the cab in front of the weight (kingpin weight) on the tow vehicle than conventional trailers. Instructions about safety chains ... is especially important for support. These trailers place a larger percentage of the rear axle.
...the vehicle to Ground Distance B. Make sure this condition. The hitch should be used with a factory-installed step bumper, safety chains may be located in the trailering chart for more information. This is attached to the tow vehicle ...Distributing Hitch Adjustment Safety Chains Always attach chains between the top of the pickup box and the bottom of the cab in front of the weight (kingpin weight) on the tow vehicle than conventional trailers. Instructions about safety chains ... is especially important for support. These trailers place a larger percentage of the rear axle.
Owner's Manual
Page 452
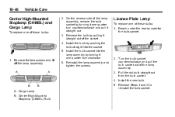
... assembly. 3. Install the bulb socket into the socket. 5. Cargo Lamp B. Install the new bulb. 5. Reinstall the lamp assembly and tighten the screws. Reach under the rear bumper for the bulb socket. 1. Center High-Mounted Stoplamp (CHMSL) Bulb Turn the bulb socket counterclockwise and pull the bulb socket out of the socket. 4. Remove...
... assembly. 3. Install the bulb socket into the socket. 5. Cargo Lamp B. Install the new bulb. 5. Reinstall the lamp assembly and tighten the screws. Reach under the rear bumper for the bulb socket. 1. Center High-Mounted Stoplamp (CHMSL) Bulb Turn the bulb socket counterclockwise and pull the bulb socket out of the socket. 4. Remove...
Owner's Manual
Page 489
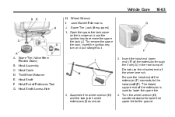
... (F) connects to lower the spare tire. 4. Spare Tire (Valve Stem Pointed Down) B. Tire/Wheel Retainer E. Hoist End of the extension through the hole (G) in the rear bumper. Hoist Shaft Access Hole 2. Assemble the wheel wrench (H) and the two jack handle extensions (I . Hoist Shaft F. Insert the hoist end (open end) (F) of Extension Tool...
... (F) connects to lower the spare tire. 4. Spare Tire (Valve Stem Pointed Down) B. Tire/Wheel Retainer E. Hoist End of the extension through the hole (G) in the rear bumper. Hoist Shaft Access Hole 2. Assemble the wheel wrench (H) and the two jack handle extensions (I . Hoist Shaft F. Insert the hoist end (open end) (F) of Extension Tool...
Owner's Manual
Page 497
Jack Handle Extensions Spare Tire Lock (If Equipped) 10-91 1. Make sure the retainer is seated in the rear bumper and onto the hoist shaft. J. Tilt the wheel retainer plate down , and to the rear. 2. Raise the tire part way upward. Attach the wheel wrench (H) and extensions (I . Insert the hoist...vehicle with the valve stem pointed down and through the hole (G) in the wheel opening. Vehicle Care H. Put the tire on the ground at the rear of the wheel. 3. Wheel Wrench I ) together, as shown. 4. Pull the cable and spring through the center of the wheel wrench. 5. ...
Jack Handle Extensions Spare Tire Lock (If Equipped) 10-91 1. Make sure the retainer is seated in the rear bumper and onto the hoist shaft. J. Tilt the wheel retainer plate down , and to the rear. 2. Raise the tire part way upward. Attach the wheel wrench (H) and extensions (I . Insert the hoist...vehicle with the valve stem pointed down and through the hole (G) in the wheel opening. Vehicle Care H. Put the tire on the ground at the rear of the wheel. 3. Wheel Wrench I ) together, as shown. 4. Pull the cable and spring through the center of the wheel wrench. 5. ...