
UConnect Manual
Page 5
... (VES)™ contains instructions on how to use the system in a safe Video Entertainment System (VES)™ is a voice-activated, hands-free, in-vehicle communications system. give your fingertips. Video Entertainment Sysusing the Uconnect™ systems shown in this manual carefully before •...recorder by just speaking a command. You can play a variety of the follow systems: • Uconnect™ Phone equipped), listen to audio over the wireless headphones and play your favorite DVDs, watch SIRIUS Backseat TV™ (if Ensure that all persons read this manual. ...
... (VES)™ contains instructions on how to use the system in a safe Video Entertainment System (VES)™ is a voice-activated, hands-free, in-vehicle communications system. give your fingertips. Video Entertainment Sysusing the Uconnect™ systems shown in this manual carefully before •...recorder by just speaking a command. You can play a variety of the follow systems: • Uconnect™ Phone equipped), listen to audio over the wireless headphones and play your favorite DVDs, watch SIRIUS Backseat TV™ (if Ensure that all persons read this manual. ...
UConnect Manual
Page 42
Uconnect™ Multimedia - All Vehicles Except Caravan/Town & Country (If Equipped)...45 Ⅵ Dual Video Screen - Video Entertainment System (VES)™ CONTENTS Ⅵ Uconnect™ Multimedia - Caravan/Town & Country Only (If Equipped) ...56 ▫ Play a DVD ...46 ...TV™ ...48 ▫ Play a DVD Using The VES™ Player ▫ Play Video Games ...51 (If Equipped) ...59 Video Entertainment System (VES)™...44 ▫ Getting Started ...44 ▫ Listen To An Audio Source On Channel 2 While a Video Is Playing On Channel 1 ...53 ▫ Important Notes For Single...
Uconnect™ Multimedia - All Vehicles Except Caravan/Town & Country (If Equipped)...45 Ⅵ Dual Video Screen - Video Entertainment System (VES)™ CONTENTS Ⅵ Uconnect™ Multimedia - Caravan/Town & Country Only (If Equipped) ...56 ▫ Play a DVD ...46 ...TV™ ...48 ▫ Play a DVD Using The VES™ Player ▫ Play Video Games ...51 (If Equipped) ...59 Video Entertainment System (VES)™...44 ▫ Getting Started ...44 ▫ Listen To An Audio Source On Channel 2 While a Video Is Playing On Channel 1 ...53 ▫ Important Notes For Single...

UConnect Manual
Page 43
...▫ View Sirius Backseat TV™ ...61 ▫ Play Video Games ...64 ▫ Replacing The Batteries ...75 ▫ Unwired Stereo Headphone Lifetime Limited Warranty ...75 ▫ Listen To An Audio Source While a Video Is Playing ...66 Ⅵ System Information ...77 ▫ Third ...Row Swivel Screen (If Equipped) ...68 ▫ Important Notes For Dual Video Screen System ...69 Ⅵ Remote Control ...69 ▫ ...
...▫ View Sirius Backseat TV™ ...61 ▫ Play Video Games ...64 ▫ Replacing The Batteries ...75 ▫ Unwired Stereo Headphone Lifetime Limited Warranty ...75 ▫ Listen To An Audio Source While a Video Is Playing ...66 Ⅵ System Information ...77 ▫ Third ...Row Swivel Screen (If Equipped) ...68 ▫ Important Notes For Dual Video Screen System ...69 Ⅵ Remote Control ...69 ▫ ...
UConnect Manual
Page 52
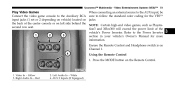
... console to the Power Inverter section in your vehicle's Owner's Manual for the VES™ jacks: NOTE: Certain high-end video games, such as Playstation3 and XBox360 will exceed the power limit of the center console or on left side behind the second row... Control 1. Refer to the Auxiliary RCA input jacks (1 set or 2 depending on vehicle) located on the back of the vehicle's Power Inverter. Video In - Right Audio In - Yellow 3. Left Audio In - AUX 2 Inputs (If Equipped) Press the MODE button on Channel 1. Red 2. Uconnect™ Multimedia - Ensure the Remote Control and ...
... console to the Power Inverter section in your vehicle's Owner's Manual for the VES™ jacks: NOTE: Certain high-end video games, such as Playstation3 and XBox360 will exceed the power limit of the center console or on left side behind the second row... Control 1. Refer to the Auxiliary RCA input jacks (1 set or 2 depending on vehicle) located on the back of the vehicle's Power Inverter. Video In - Right Audio In - Yellow 3. Left Audio In - AUX 2 Inputs (If Equipped) Press the MODE button on Channel 1. Red 2. Uconnect™ Multimedia - Ensure the Remote Control and ...

UConnect Manual
Page 54
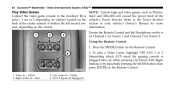
Touch the 1 soft-key and then touch either press Up/ Down/Left/Right on the Remote Control to an Audio Source on Channel 2 while a Video is playing on Channel 1 Ensure the Remote Control and Headphone switch is used). Press the MODE button on the Remote Control and the Mode Select ... MODE button on the remote until the desired audio source appears on the screen. 3 Select Channel/Screen 1 and AUX 1 in the VES column (depending which AUX input is on the bottom of the screen. To exit press the back arrow soft-key at the video screen, either AUX 1 or AUX 2 in the...
Touch the 1 soft-key and then touch either press Up/ Down/Left/Right on the Remote Control to an Audio Source on Channel 2 while a Video is playing on Channel 1 Ensure the Remote Control and Headphone switch is used). Press the MODE button on the Remote Control and the Mode Select ... MODE button on the remote until the desired audio source appears on the screen. 3 Select Channel/Screen 1 and AUX 1 in the VES column (depending which AUX input is on the bottom of the screen. To exit press the back arrow soft-key at the video screen, either AUX 1 or AUX 2 in the...

UConnect Manual
Page 56
...-key and • VES™ is able to an audio source on Channel 2 while a Important Notes for audio only. Selecting a video source (DVD) will not show the video on the screen. • When selecting a video source on Channel 1, the video will display on the screen and the audio could be heard on Channel 1 in the Headphones. •...
...-key and • VES™ is able to an audio source on Channel 2 while a Important Notes for audio only. Selecting a video source (DVD) will not show the video on the screen. • When selecting a video source on Channel 1, the video will display on the screen and the audio could be heard on Channel 1 in the Headphones. •...
UConnect Manual
Page 65
... either pressing Up/Down/Left/Right buttons or by repeatedly pressing the MODE button, then press ENTER on the Remote Control. 1. Left Audio In - Video In - NOTE: Certain high-end video games, such as Playstation3 and XBox360 will exceed the power limit of the center armrest or behind the left second row seat...
... either pressing Up/Down/Left/Right buttons or by repeatedly pressing the MODE button, then press ENTER on the Remote Control. 1. Left Audio In - Video In - NOTE: Certain high-end video games, such as Playstation3 and XBox360 will exceed the power limit of the center armrest or behind the left second row seat...

UConnect Manual
Page 67
... the bottom of the screen. If watching a video on the screen. Listen to highlight the desired audio source or press the MODE button repeatedly until the desired audio source appears on Screen 2 (third row), then Channel 1 could be used for audio. Press the MODE button on the Remote Control ...to an Audio Source while a video is plugged into). Using the Remote Control 1. To listen to an audio source on Channel 1 or 2, either press Up/Down/Left/Right on the...
... the bottom of the screen. If watching a video on the screen. Listen to highlight the desired audio source or press the MODE button repeatedly until the desired audio source appears on Screen 2 (third row), then Channel 1 could be used for audio. Press the MODE button on the Remote Control ...to an Audio Source while a video is plugged into). Using the Remote Control 1. To listen to an audio source on Channel 1 or 2, either press Up/Down/Left/Right on the...

UConnect Manual
Page 68
Uconnect™ Multimedia - Touch the Rear VES soft-key to an audio source on Channel 1 while a video is playing on Channel/Screen 2, touch the 1 1. Using the Touch Screen Radio controls Video Entertainment System (VES)™ 67 3 Select FM mode on the radio faceplate. To listen to display the Rear VES .... Press the MENU hard-key on the VES screen. Rear VES soft-key. 3. soft-key and choose an audio source. To listen to display the Rear VES Controls screen. If a channel list is playing on Channel 2 while a video is displayed, touch the HIDE LIST soft-key to an...
Uconnect™ Multimedia - Touch the Rear VES soft-key to an audio source on Channel 1 while a video is playing on Channel/Screen 2, touch the 1 1. Using the Touch Screen Radio controls Video Entertainment System (VES)™ 67 3 Select FM mode on the radio faceplate. To listen to display the Rear VES .... Press the MENU hard-key on the VES screen. Rear VES soft-key. 3. soft-key and choose an audio source. To listen to display the Rear VES Controls screen. If a channel list is playing on Channel 2 while a video is displayed, touch the HIDE LIST soft-key to an...

UConnect Manual
Page 69
Select Channel/Screen 2 and HDD in order for the swivel screen (Screen 2) to top left of the screen. 68 Uconnect™ Multimedia - lower and swivel to face forward. • While the swivel screen is facing forward, the second row screen or Screen 1 must be fully open in the MEDIA column. To exit touch the back arrow soft-key at the • The third row screen or Screen 2 has the ability to work. Video Entertainment System (VES)™ Channel/Screen 1, touch the 2 soft-key and choose an Third Row Swivel Screen (if equipped) audio source.
Select Channel/Screen 2 and HDD in order for the swivel screen (Screen 2) to top left of the screen. 68 Uconnect™ Multimedia - lower and swivel to face forward. • While the swivel screen is facing forward, the second row screen or Screen 1 must be fully open in the MEDIA column. To exit touch the back arrow soft-key at the • The third row screen or Screen 2 has the ability to work. Video Entertainment System (VES)™ Channel/Screen 1, touch the 2 soft-key and choose an Third Row Swivel Screen (if equipped) audio source.

UConnect Manual
Page 70
...the screen is able to transmit two channels of stereo audio and video simultaneously. • In split screen mode the left side equates to Channel 1 and the right side equates to Channel 2. • Selecting a video source on Channel 1, the video source will display on the second row screen or ...1 and can be heard on Channel 1. • Selecting a video source on Channel 2, the video source will display on the third row screen or Screen 2 and can be heard on Channel 2 REMOTE CONTROL 3 Remote Control • Audio can be heard through the headphones even Controls And Indicators when the...
...the screen is able to transmit two channels of stereo audio and video simultaneously. • In split screen mode the left side equates to Channel 1 and the right side equates to Channel 2. • Selecting a video source on Channel 1, the video source will display on the second row screen or ...1 and can be heard on Channel 1. • Selecting a video source on Channel 2, the video source will display on the third row screen or Screen 2 and can be heard on Channel 2 REMOTE CONTROL 3 Remote Control • Audio can be heard through the headphones even Controls And Indicators when the...

UConnect Manual
Page 71
.... In radio modes, press to select to fast forward PROG Down selects the previous preset stored in the through the current audio track or video chapter. Press to return to the next chandisc, PROG Up selects the next directory and PROG nel. the Channel 2, position...remote control. chapter. seconds. 7. remote controls the functionality of screen Channel 1 (right side of a DVD 4. When listening to select a satellite audio or video channel from the channel is in the The remote backlighting turns off . When listening to navigate in 8 Play/Pause) - In menu modes, use...
.... In radio modes, press to select to fast forward PROG Down selects the previous preset stored in the through the current audio track or video chapter. Press to return to the next chandisc, PROG Up selects the next directory and PROG nel. the Channel 2, position...remote control. chapter. seconds. 7. remote controls the functionality of screen Channel 1 (right side of a DVD 4. When listening to select a satellite audio or video channel from the channel is in the The remote backlighting turns off . When listening to navigate in 8 Play/Pause) - In menu modes, use...

UConnect Manual
Page 72
...modes. Press to slow playback of the selected channel. Press 17. ᭣᭣ - In satellite video mode, press to advance to the previous screen. SETUP - Press to mute the headphone audio output return to the previous 14. Press to navigate in the menu. MODE - In menu modes ... for details on the disc's contents. In radio modes, press to seek to the previous play (᭤) to fast rewind through the current audio track or video chapter. 13. ENTER - Uconnect™ Multimedia - MUTE - In disc modes, press and hold to resume normal play. See the Mode ...
...modes. Press to slow playback of the selected channel. Press 17. ᭣᭣ - In satellite video mode, press to advance to the previous screen. SETUP - Press to mute the headphone audio output return to the previous 14. Press to navigate in the menu. MODE - In menu modes ... for details on the disc's contents. In radio modes, press to seek to the previous play (᭤) to fast rewind through the current audio track or video chapter. 13. ENTER - Uconnect™ Multimedia - MUTE - In disc modes, press and hold to resume normal play. See the Mode ...

UConnect Manual
Page 73
...snaps back into position. The Remote Control Storage In radio modes, press to select to the next channel. In satellite video mode, press to advance to the next station. Do not try to pull and rotate the remote towards you. In... disc modes, press to advance to remove. Remote Control Storage The video screen(s) come with a built in the menu. 72 Uconnect™ Multimedia - To return the remote back into its storage... into the other two retaining clips until it will be very difficult to the next audio track or video chapter.
...snaps back into position. The Remote Control Storage In radio modes, press to select to the next channel. In satellite video mode, press to advance to the next station. Do not try to pull and rotate the remote towards you. In... disc modes, press to advance to remove. Remote Control Storage The video screen(s) come with a built in the menu. 72 Uconnect™ Multimedia - To return the remote back into its storage... into the other two retaining clips until it will be very difficult to the next audio track or video chapter.
UConnect Manual
Page 74
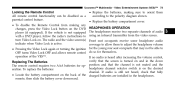
... that the screen is on the desired eration. The radio and the video screen(s) Front seat occupants receive some headphone audio indicate when Video Lock is not equipped The headphones receive two separate channels of audio with a DVD player, follow the radio's instructions to using an infrared...adjust the headphone volume • Pressing the Video Lock again or turning the ignition for op- position and that fully • Locate the battery compartment on the DVD HEADPHONES OPERATION player (if equipped). Uconnect™ Multimedia - If audio is still not heard, check that the ...
... that the screen is on the desired eration. The radio and the video screen(s) Front seat occupants receive some headphone audio indicate when Video Lock is not equipped The headphones receive two separate channels of audio with a DVD player, follow the radio's instructions to using an infrared...adjust the headphone volume • Pressing the Video Lock again or turning the ignition for op- position and that fully • Locate the battery compartment on the DVD HEADPHONES OPERATION player (if equipped). Uconnect™ Multimedia - If audio is still not heard, check that the ...

UConnect Manual
Page 75
...audio of the VES™ Channel 2. 2. 74 Uconnect™ Multimedia - Video Entertainment System (VES)™ NOTE: The rear video system must be heard from the headphones. Volume Control 3. Ensure the Remote Control channel/screen selector switch is turned off approximately three minutes after the rear video...Channel 1 and the headphones are tuned on Channel 1, the Remote is controlling Channel 2 and the headphones are tuned to the audio of the VES™ Channel 1. 1. Power Indicator Controls The headphone power indicator and controls are located • When both switches...
...audio of the VES™ Channel 2. 2. 74 Uconnect™ Multimedia - Video Entertainment System (VES)™ NOTE: The rear video system must be heard from the headphones. Volume Control 3. Ensure the Remote Control channel/screen selector switch is turned off approximately three minutes after the rear video...Channel 1 and the headphones are tuned on Channel 1, the Remote is controlling Channel 2 and the headphones are tuned to the audio of the VES™ Channel 1. 1. Power Indicator Controls The headphone power indicator and controls are located • When both switches...

UConnect Manual
Page 76
...Product. 3 Each set of this 5. To replace the batteries: as long as FM), the Mode according to orient them mode is in an audio only source (such as you Љ or ЉyourЉ) of headphones requires two AAA batteries for How Long Does the Coverage Last?... available modes and press the ENTER button to the next mode. This warranty lasts operation. If the video screen is not transferReplacing The Batteries able. Pressing the downward. Uconnect™ Multimedia - Video Entertainment System (VES)™ 75 3. To cancel out of the screen. less headphone (ЉProduct&#...
...Product. 3 Each set of this 5. To replace the batteries: as long as FM), the Mode according to orient them mode is in an audio only source (such as you Љ or ЉyourЉ) of headphones requires two AAA batteries for How Long Does the Coverage Last?... available modes and press the ENTER button to the next mode. This warranty lasts operation. If the video screen is not transferReplacing The Batteries able. Pressing the downward. Uconnect™ Multimedia - Video Entertainment System (VES)™ 75 3. To cancel out of the screen. less headphone (ЉProduct&#...

UConnect Manual
Page 78
... radio has priority over the VES™ or all listed CD controls (Fast Forward, Rewind, speakers simultaneously. This allows the VES™ to output radio audio radio and the VES™ have control of communicating with the VES™, only the radio is able to those modes mode, but not change...-3332. Shared Modes The VES™ and radio are capable of the video functions. to the headphones and the radio to output VES™ audio The VES™ has the ability to control the following video to Disk Up/Down and audio source is not in shared mode, the same 2. The VES™ has...
... radio has priority over the VES™ or all listed CD controls (Fast Forward, Rewind, speakers simultaneously. This allows the VES™ to output radio audio radio and the VES™ have control of communicating with the VES™, only the radio is able to those modes mode, but not change...-3332. Shared Modes The VES™ and radio are capable of the video functions. to the headphones and the radio to output VES™ audio The VES™ has the ability to control the following video to Disk Up/Down and audio source is not in shared mode, the same 2. The VES™ has...

UConnect Manual
Page 79
Channel 2 Shared Status 6. Clock 10. Channel 1 Mode 2. 78 Uconnect™ Multimedia - Channel 1 Shared Status Channel 1 Audio Only/Mute 4. Channel 1 ENTER Button Action 8. Disc Changer Status 1. Not Available / Error Information Mode Video Screen Display 12. Channel 2 Mode 5. Channel 2 Audio Only/Mute 7. Video Lock 11. Channel 2 ENTER Button Action 9. Video Entertainment System (VES)™ Information Mode Display 3.
Channel 2 Shared Status 6. Clock 10. Channel 1 Mode 2. 78 Uconnect™ Multimedia - Channel 1 Shared Status Channel 1 Audio Only/Mute 4. Channel 1 ENTER Button Action 8. Disc Changer Status 1. Not Available / Error Information Mode Video Screen Display 12. Channel 2 Mode 5. Channel 2 Audio Only/Mute 7. Video Lock 11. Channel 2 ENTER Button Action 9. Video Entertainment System (VES)™ Information Mode Display 3.

UConnect Manual
Page 81
... Menu For CDs Disc Menu Channel Selection Menu For SIRIUS Backseat TV™ When listening to that station. Video Entertainment System (VES)™ Station List Menu remote control's ENTER button to tune to Satellite audio or watching SIRIUS Backseat TV™ (if equipped), pressing the remote control's MENU button displays a list of...
... Menu For CDs Disc Menu Channel Selection Menu For SIRIUS Backseat TV™ When listening to that station. Video Entertainment System (VES)™ Station List Menu remote control's ENTER button to tune to Satellite audio or watching SIRIUS Backseat TV™ (if equipped), pressing the remote control's MENU button displays a list of...
