
Owner Manual
Page 24
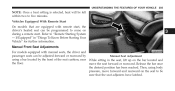
..." for this feature is equipped with the RKE transmitter. 22 THINGS TO KNOW BEFORE STARTING YOUR VEHICLE To Unlock The Doors And Liftgate Press and release the UNLOCK button on the RKE transmitter once to unlock the driver's door or twice within five seconds to acknowledge the unlock signal. The turn...
..." for this feature is equipped with the RKE transmitter. 22 THINGS TO KNOW BEFORE STARTING YOUR VEHICLE To Unlock The Doors And Liftgate Press and release the UNLOCK button on the RKE transmitter once to unlock the driver's door or twice within five seconds to acknowledge the unlock signal. The turn...

Owner Manual
Page 25
... And Liftgate • You may need to be Panic Alarm is on, the headlights will turn on, the park lights and turn signals Press and release the LOCK button on the RKE transmitwill flash, the horn will turn off if you turn the Panic Alarm feature on or off by the... will stay on . the PANIC button on and off . When the Panic Alarm is activated. THINGS TO KNOW BEFORE STARTING YOUR VEHICLE 23 second and release. The turn on or turned off , and the interior ter to second time or drive the vehicle at least one Instrument Panel" for further information...
... And Liftgate • You may need to be Panic Alarm is on, the headlights will turn on, the park lights and turn signals Press and release the LOCK button on the RKE transmitwill flash, the horn will turn off if you turn the Panic Alarm feature on or off by the... will stay on . the PANIC button on and off . When the Panic Alarm is activated. THINGS TO KNOW BEFORE STARTING YOUR VEHICLE 23 second and release. The turn on or turned off , and the interior ter to second time or drive the vehicle at least one Instrument Panel" for further information...
Owner Manual
Page 30
... equipped) are disabled when the vehicle is in the Remote Start mode for a 15-minute allow the engine to the RUN position before Press and release the REMOTE START button you can be cycled to run for two seconds after receiving a valid Remote vehicle will start sequence for a third cycle. NOTE...). 28 THINGS TO KNOW BEFORE STARTING YOUR VEHICLE To Enter Remote Start Mode • The engine can repeat the start and the vehicle Press and release the REMOTE START button one time press of the REMOTE START • If an engine fault is present or fuel level is low, the button...
... equipped) are disabled when the vehicle is in the Remote Start mode for a 15-minute allow the engine to the RUN position before Press and release the REMOTE START button you can be cycled to run for two seconds after receiving a valid Remote vehicle will start sequence for a third cycle. NOTE...). 28 THINGS TO KNOW BEFORE STARTING YOUR VEHICLE To Enter Remote Start Mode • The engine can repeat the start and the vehicle Press and release the REMOTE START button one time press of the REMOTE START • If an engine fault is present or fuel level is low, the button...
Owner Manual
Page 31
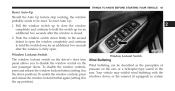
... the Uconnect® system. This feature will automatically turn on in "Understanding Your Instrument Panel". deactivated through the duration of 15-minute cycle, press and release the UNLOCK button on Remote Start Comfort System operation refer to the end of the 15-minute cycle, press and... release the START/STOP button. Remote Start Comfort Systems - If Equipped When remote start or until you push the START button. For more information on the ...
... the Uconnect® system. This feature will automatically turn on in "Understanding Your Instrument Panel". deactivated through the duration of 15-minute cycle, press and release the UNLOCK button on Remote Start Comfort System operation refer to the end of the 15-minute cycle, press and... release the START/STOP button. Remote Start Comfort Systems - If Equipped When remote start or until you push the START button. For more information on the ...
Owner Manual
Page 43
Press the window switch past the first detent, release, and the window will cancel this feature. Refer to "Uconnect® Settings" in the ACC or ON/RUN mode. THINGS TO KNOW BEFORE STARTING YOUR ... entrapped by the windows while operating the power window switches. To open the window part way, press the window switch to the first detent and release it when you want the window to children, and do not leave the ignition of a vehicle equipped with the Uconnect®, the power window switches...
Press the window switch past the first detent, release, and the window will cancel this feature. Refer to "Uconnect® Settings" in the ACC or ON/RUN mode. THINGS TO KNOW BEFORE STARTING YOUR ... entrapped by the windows while operating the power window switches. To open the window part way, press the window switch to the first detent and release it when you want the window to children, and do not leave the ignition of a vehicle equipped with the Uconnect®, the power window switches...
Owner Manual
Page 44
Pull the window switch up to the second detent, release, and the • Any impact due to rough road conditions may result in serious injury. There is no anti-pinch protection when the window is ... models, the driver and front passenger power switch again to close the window part way, pull the window switch up to the first detent and release it will go back Auto-Up Feature With Anti-Pinch Protection down on the switch briefly.
Pull the window switch up to the second detent, release, and the • Any impact due to rough road conditions may result in serious injury. There is no anti-pinch protection when the window is ... models, the driver and front passenger power switch again to close the window part way, pull the window switch up to the first detent and release it will go back Auto-Up Feature With Anti-Pinch Protection down on the switch briefly.
Owner Manual
Page 45
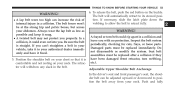
...is closed. 2. Window Lockout Switch 2 Wind Buffeting Wind buffeting can be reset. To reset Auto Up: 1. To disable the window controls, press and release the window lockout button (setting it in the down position). Window Lockout Switch The window lockout switch on the driver's door trim panel allows you... and continue to hold the switch down , or the sunroof (if equipped) in the ears. To enable the window controls, press and release the window lockout button again (setting it in the up for an additional two seconds after the window is fully open the window completely and...
...is closed. 2. Window Lockout Switch 2 Wind Buffeting Wind buffeting can be reset. To reset Auto Up: 1. To disable the window controls, press and release the window lockout button (setting it in the down position). Window Lockout Switch The window lockout switch on the driver's door trim panel allows you... and continue to hold the switch down , or the sunroof (if equipped) in the ears. To enable the window controls, press and release the window lockout button again (setting it in the up for an additional two seconds after the window is fully open the window completely and...

Owner Manual
Page 46
... the door lock cylinder on the driver's door. Gas props will raise and support the liftgate in "Things To Know Before Starting Your Vehicle". Liftgate Release LIFTGATE The liftgate can be minimized. To open position. This is located on the liftgate below the glass or by activating the power door lock...
... the door lock cylinder on the driver's door. Gas props will raise and support the liftgate in "Things To Know Before Starting Your Vehicle". Liftgate Release LIFTGATE The liftgate can be minimized. To open position. This is located on the liftgate below the glass or by activating the power door lock...
Owner Manual
Page 55
... the lap belt as low as possible and keep it fixed. 5. If you can't straighten a belt in a collision and leave you with no protection. To release the belt, push the red button on your neck. The belt will withdraw any slack in a collision. The retractor will automatically retract to retract fully...
... the lap belt as low as possible and keep it fixed. 5. If you can't straighten a belt in a collision and leave you with no protection. To release the belt, push the red button on your neck. The belt will withdraw any slack in a collision. The retractor will automatically retract to retract fully...
Owner Manual
Page 56
.... fits you are shorter than average the latch plate. Position the latch plate as close as possible to untwist a twisted lap/ shoulder belt. 1. When you release the anchorage, then move it up or down to the position that anchorage try to...
.... fits you are shorter than average the latch plate. Position the latch plate as close as possible to untwist a twisted lap/ shoulder belt. 1. When you release the anchorage, then move it up or down to the position that anchorage try to...
Owner Manual
Page 58
... the risk of injury in the event of injury in a controlled manner. This vehicle has a safety belt system with this feature. Allow the belt to release webbing in collisions. 3. feature is not working properly when checked according to the procedures in the Automatic Locking Mode. Buckle the combination lap and shoulder...
... the risk of injury in the event of injury in a controlled manner. This vehicle has a safety belt system with this feature. Allow the belt to release webbing in collisions. 3. feature is not working properly when checked according to the procedures in the Automatic Locking Mode. Buckle the combination lap and shoulder...
Owner Manual
Page 74
... Front Air Bag gas is generated to 70 milliseconds. collision. The air bags fully inflate in about 50 to inflate the Supplemental This is triggered, releasing a large quantity of non-toxic gas. The steering wheel hub trim cover and the upper right side of the instrument panel separate and fold out...
... Front Air Bag gas is generated to 70 milliseconds. collision. The air bags fully inflate in about 50 to inflate the Supplemental This is triggered, releasing a large quantity of non-toxic gas. The steering wheel hub trim cover and the upper right side of the instrument panel separate and fold out...

Owner Manual
Page 85
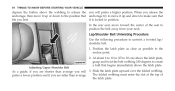
... 48 and 85 lbs (22 and 39 kg) and between 47 in (119 cm) and 57 in each outboard second-row passenger seat. Pull the release loop forward to use . 2. To position a child into the Integrated Child Booster Seat follow these steps: 1. Do not leave it could strike the occupants or..., secure it in the full rear position during use the Integrated Child Booster Seat. Slide the second row seat to the full rear position to release the latch and seat cushion. 2 Release Loop Integrated Child Booster Seat -
... 48 and 85 lbs (22 and 39 kg) and between 47 in (119 cm) and 57 in each outboard second-row passenger seat. Pull the release loop forward to use . 2. To position a child into the Integrated Child Booster Seat follow these steps: 1. Do not leave it could strike the occupants or..., secure it in the full rear position during use the Integrated Child Booster Seat. Slide the second row seat to the full rear position to release the latch and seat cushion. 2 Release Loop Integrated Child Booster Seat -

Owner Manual
Page 87
... of the seat belt. Use this 8. vehicle's seat belt alone: 9. the vehicle seat? 2 Securely lock the seat cushion into position before using the seat. To release the seat belt, push the red button on simple 5-step test to bend over the front of buckle. An improperly latched seat cushion could cause...
... of the seat belt. Use this 8. vehicle's seat belt alone: 9. the vehicle seat? 2 Securely lock the seat cushion into position before using the seat. To release the seat belt, push the red button on simple 5-step test to bend over the front of buckle. An improperly latched seat cushion could cause...
Owner Manual
Page 104
.... Insert the latch plate into the buckle again. 102 THINGS TO KNOW BEFORE STARTING YOUR VEHICLE strap. Any seat belt system will loosen with the release button facing out, away from the buckle and twist the short is installed tightly by restraint installation tight, try a different seating position. If there is...
.... Insert the latch plate into the buckle again. 102 THINGS TO KNOW BEFORE STARTING YOUR VEHICLE strap. Any seat belt system will loosen with the release button facing out, away from the buckle and twist the short is installed tightly by restraint installation tight, try a different seating position. If there is...
Owner Manual
Page 105
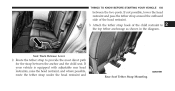
Route the tether strap to the top tether anchorage as shown in the diagram. 2 Seat Track Release Lever 2. Attach the tether strap hook of the head restraint. 3. If your vehicle is equipped with adjustable rear head restraints, raise the head restraint, and ...
Route the tether strap to the top tether anchorage as shown in the diagram. 2 Seat Track Release Lever 2. Attach the tether strap hook of the head restraint. 3. If your vehicle is equipped with adjustable rear head restraints, raise the head restraint, and ...

Owner Manual
Page 122
... You may require multiple button Models With Express Window Feature NOTE: If the vehicle speed is greater than 10 mph (16 km/h), they Press and release the mirror select button marked L (left ) and R (right). • The mirrors shake and vibrate at normal driving speeds. Power Folding Mirrors - If Equipped • The...
... You may require multiple button Models With Express Window Feature NOTE: If the vehicle speed is greater than 10 mph (16 km/h), they Press and release the mirror select button marked L (left ) and R (right). • The mirrors shake and vibrate at normal driving speeds. Power Folding Mirrors - If Equipped • The...
Owner Manual
Page 200
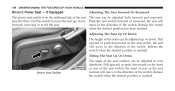
Release the switch when the desired position has been reached. Tilting The Seat Up Or Down The angle of the seats can be adjusted up , down . .... Adjusting The Seat Up Or Down The height of the seat cushion can be adjusted in the direction of the switch. Release the switch when the desired position is reached. Release the switch when the desired position is reached. Power Seat Switch If Equipped Adjusting The Seat Forward Or Rearward The power...
Release the switch when the desired position has been reached. Tilting The Seat Up Or Down The angle of the seats can be adjusted up , down . .... Adjusting The Seat Up Or Down The height of the seat cushion can be adjusted in the direction of the switch. Release the switch when the desired position is reached. Release the switch when the desired position is reached. Power Seat Switch If Equipped Adjusting The Seat Forward Or Rearward The power...
Owner Manual
Page 205
...: Once a heat setting is selected, heat will be adjusted forward or rearward by Manual Seat Adjustment using body pressure, move the seat forward or rearward. Release the bar once the desired position has been reached.
...: Once a heat setting is selected, heat will be adjusted forward or rearward by Manual Seat Adjustment using body pressure, move the seat forward or rearward. Release the bar once the desired position has been reached.
Owner Manual
Page 206
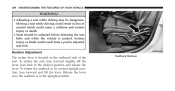
To recline the seat, lean forward slightly, lift the lever, lean back to its normal upright position, lean forward and lift the lever. Seatback Release Release the lever once the seatback is located on the outboard side of control which could result from a poorly adjusted seat belt. Moving a seat while driving ... while driving may be adjusted before fastening the seat belts and while the vehicle is parked. To return the seatback to the desired position and release the lever.
To recline the seat, lean forward slightly, lift the lever, lean back to its normal upright position, lean forward and lift the lever. Seatback Release Release the lever once the seatback is located on the outboard side of control which could result from a poorly adjusted seat belt. Moving a seat while driving ... while driving may be adjusted before fastening the seat belts and while the vehicle is parked. To return the seatback to the desired position and release the lever.