

Owners Manual
Page 5
warnings 19 Vehicle ID number 21 Engine ID number 22 Plate positioning 23 Noise and exhaust emission control system information 27 34 Table of Contents California emission control warranty statement 27 Your warranty rights and obligations 27 Manufacturer's warranty coverage 28 Owner's warranty responsibilities: 28 California evaporation emission system 29 Ducati limited warranty on emission control system 30 Introduction 7 Instrument Panel (Dashboard) Display settings and functions 34 Acronyms and...
warnings 19 Vehicle ID number 21 Engine ID number 22 Plate positioning 23 Noise and exhaust emission control system information 27 34 Table of Contents California emission control warranty statement 27 Your warranty rights and obligations 27 Manufacturer's warranty coverage 28 Owner's warranty responsibilities: 28 California evaporation emission system 29 Ducati limited warranty on emission control system 30 Introduction 7 Instrument Panel (Dashboard) Display settings and functions 34 Acronyms and...
Owners Manual
Page 6
... Battery voltage 115 Backlighting setting 117 LAP 119 Clock setting 127 Pin Code 130 Changing the PIN CODE 134 Engine rpm digital indication (RPM) 139 Setting the unit of measurement 140 Light control 150 The Immobilizer system 153 Keys 154 Operation 155 Duplicate keys 156 Restoring motorcycle operation via the PIN CODE 157 Controls 161 Position of motorcycle controls 161 Key-operated ignition switch and steering lock...
... Battery voltage 115 Backlighting setting 117 LAP 119 Clock setting 127 Pin Code 130 Changing the PIN CODE 134 Engine rpm digital indication (RPM) 139 Setting the unit of measurement 140 Light control 150 The Immobilizer system 153 Keys 154 Operation 155 Duplicate keys 156 Restoring motorcycle operation via the PIN CODE 157 Controls 161 Position of motorcycle controls 161 Key-operated ignition switch and steering lock...
Owners Manual
Page 7
Left-hand switch 163 Clutch lever 164 Righthand switch 167 Throttle twistgrip 168 Front brake lever 169 Rear brake pedal 170 Gear change pedal 171 Adjusting the position of the gearchange and rear brake pedals 172 Braking 197 Stopping the motorcycle 199 Refueling 200 Parking 201 Tool kit and accessories 202 Main maintenance operations 203 Main components and devices Position on the vehicle 174 Tank filler plug 175 Seat lock 176 Seat height...
Left-hand switch 163 Clutch lever 164 Righthand switch 167 Throttle twistgrip 168 Front brake lever 169 Rear brake pedal 170 Gear change pedal 171 Adjusting the position of the gearchange and rear brake pedals 172 Braking 197 Stopping the motorcycle 199 Refueling 200 Parking 201 Tool kit and accessories 202 Main maintenance operations 203 Main components and devices Position on the vehicle 174 Tank filler plug 175 Seat lock 176 Seat height...

Owners Manual
Page 8
Storing the motorcycle Important notes 239 239 Exhaust system 253 Available colors 253 Electrical system 255 Maintenance 240 Scheduled maintenance chart: operations to be performed by the Dealer 240 Scheduled maintenance chart: operations to be performed by the customer 243 Routine maintenance record Routine maintenance record 261 261 Technical data 244 Weights 244 Overall dimensions 245 Top-ups 246 Engine 248 Timing system 249 Performance data 250 Spark plugs 250 Fuel system 250 Brakes 251 Transmission 252 Frame 253 Wheels 253 Tires 253 Suspensions 253 6
Storing the motorcycle Important notes 239 239 Exhaust system 253 Available colors 253 Electrical system 255 Maintenance 240 Scheduled maintenance chart: operations to be performed by the Dealer 240 Scheduled maintenance chart: operations to be performed by the customer 243 Routine maintenance record Routine maintenance record 261 261 Technical data 244 Weights 244 Overall dimensions 245 Top-ups 246 Engine 248 Timing system 249 Performance data 250 Spark plugs 250 Fuel system 250 Brakes 251 Transmission 252 Frame 253 Wheels 253 Tires 253 Suspensions 253 6

Owners Manual
Page 9
... and development by Ducati may lead to guarantee product reliability, we strongly recommend that of the Warranty, besides potential damage and reduced performance. In your Ducati motorcycle for performing small maintenance procedures. Ducati Motor Holding S.p.A. Before using your motorcycle for full interchangeability, smooth running and long life. In the Owner's Manual you 'll be riding your own interest and safety, and in competitions...
... and development by Ducati may lead to guarantee product reliability, we strongly recommend that of the Warranty, besides potential damage and reduced performance. In your Ducati motorcycle for performing small maintenance procedures. Ducati Motor Holding S.p.A. Before using your motorcycle for full interchangeability, smooth running and long life. In the Owner's Manual you 'll be riding your own interest and safety, and in competitions...
Owners Manual
Page 29
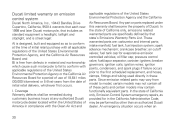
... to sunlight. Rough idle. Control of fuel vapors from the crankcase emission control system. The Exhaust Emission Control System is toxic. Misfiring or backfiring during acceleration. In California, new motor 27 Poor performance (drivability) and poor economy. Noise and exhaust emission control system information Source of the following symptoms, have the vehicle inspected and repaired by your MY 2015 motorcycle. Problems that may affect...
... to sunlight. Rough idle. Control of fuel vapors from the crankcase emission control system. The Exhaust Emission Control System is toxic. Misfiring or backfiring during acceleration. In California, new motor 27 Poor performance (drivability) and poor economy. Noise and exhaust emission control system information Source of the following symptoms, have the vehicle inspected and repaired by your MY 2015 motorcycle. Problems that may affect...
Owners Manual
Page 30
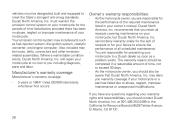
.... - will repair your motorcycle to a Ducati dealer as soon as fuel-injection system, the ignition system, catalytic converter, and engine computer. You are responsible for the periods of the required maintenance listed in a reasonable amount of your owner's manual. Ducati North America, Inc. As the motorcycle owner, you including diagnosis, parts and labor. Manufacturer's warranty coverage Manufacturer's warranty coverage 5 years or 18641 miles (30,000...
.... - will repair your motorcycle to a Ducati dealer as soon as fuel-injection system, the ignition system, catalytic converter, and engine computer. You are responsible for the periods of the required maintenance listed in a reasonable amount of your owner's manual. Ducati North America, Inc. As the motorcycle owner, you including diagnosis, parts and labor. Manufacturer's warranty coverage Manufacturer's warranty coverage 5 years or 18641 miles (30,000...
Owners Manual
Page 32
... controlled vehicles; These warranted parts are specifically defined by other than an authorized Ducati dealer. Coverage Warranty defects shall be performed by that includes as standard equipment a headlight, taillight and stoplight, and is street legal: A) is free from defects in compliance with all of these parts. In the state of Ducati. fuel tank, fuel injection system; crankcase breather; air cutoff valves; pressure control valve; fuel/vapor separator; ignition wires...
... controlled vehicles; These warranted parts are specifically defined by other than an authorized Ducati dealer. Coverage Warranty defects shall be performed by that includes as standard equipment a headlight, taillight and stoplight, and is street legal: A) is free from defects in compliance with all of these parts. In the state of Ducati. fuel tank, fuel injection system; crankcase breather; air cutoff valves; pressure control valve; fuel/vapor separator; ignition wires...

Owners Manual
Page 51
DTC level (DTC) - Restoring the default settings of measurement (Speed - Temperature Fuel consumption) UNT ERRORS (error indication - Engine setting (ENGINE) - active only if one or more errors are the following: RIDING MODE customization:... rider can customize the following: - Restoring the default settings of a single Riding Mode (DEFAULT) Battery voltage (BATTERY) Backlighting setting (BACK LIGHT) LAP (LAP time activation and displaying) Clock setting (CLOCK) PIN (enter/change PIN CODE) Engine rpm indication (RPM) Units of all Riding Modes (ALL DEFAULT) - ABS setting (ABS) -
DTC level (DTC) - Restoring the default settings of measurement (Speed - Temperature Fuel consumption) UNT ERRORS (error indication - Engine setting (ENGINE) - active only if one or more errors are the following: RIDING MODE customization:... rider can customize the following: - Restoring the default settings of a single Riding Mode (DEFAULT) Battery voltage (BATTERY) Backlighting setting (BACK LIGHT) LAP (LAP time activation and displaying) Clock setting (CLOCK) PIN (enter/change PIN CODE) Engine rpm indication (RPM) Units of all Riding Modes (ALL DEFAULT) - ABS setting (ABS) -

Owners Manual
Page 60
... mode controls both wheels and anti lift-up * control is active. "SPORT" Riding Mode The ABS in this mode controls both wheels "URBAN" Riding Mode and anti lift-up * prevention, yet keeping good maximum deceleration performance. 58 This calibration focuses on braking power. It is the default level for the DITION The ABS in this mode controls both wheels, but NO anti lift-up * controls are...
... mode controls both wheels and anti lift-up * control is active. "SPORT" Riding Mode The ABS in this mode controls both wheels "URBAN" Riding Mode and anti lift-up * prevention, yet keeping good maximum deceleration performance. 58 This calibration focuses on braking power. It is the default level for the DITION The ABS in this mode controls both wheels, but NO anti lift-up * controls are...

Owners Manual
Page 62
... a very stable braking, good lift-up control. It is advisable to restore optimal system operation. Pirelli Diablo Rosso II; Selecting level 3, the ABS will give satisfactory results. Using tires with the same size (front 120/70ZR17 - Motorcycle original equipment: (front 120/70ZR17 rear 180/60ZR17). Settings between level 3 and level 1 privilege more and more the braking power rather than...
... a very stable braking, good lift-up control. It is advisable to restore optimal system operation. Pirelli Diablo Rosso II; Selecting level 3, the ABS will give satisfactory results. Using tires with the same size (front 120/70ZR17 - Motorcycle original equipment: (front 120/70ZR17 rear 180/60ZR17). Settings between level 3 and level 1 privilege more and more the braking power rather than...
Owners Manual
Page 93
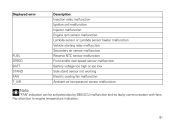
... rear speed sensor malfunction Battery voltage too high or too low Side stand sensor not working Electric cooling fan malfunction Ambient air temperature sensor malfunction Note "FAN" indication can be activated also by BBS ECU malfunction and its faulty communication with fans. Pay attention to engine temperature indication. 91 Displayed error Description Injection relay malfunction Ignition coil malfunction Injector malfunction Engine rpm sensor malfunction Lambda sensor or Lambda sensor heater malfunction Vehicle starting...
... rear speed sensor malfunction Battery voltage too high or too low Side stand sensor not working Electric cooling fan malfunction Ambient air temperature sensor malfunction Note "FAN" indication can be activated also by BBS ECU malfunction and its faulty communication with fans. Pay attention to engine temperature indication. 91 Displayed error Description Injection relay malfunction Ignition coil malfunction Injector malfunction Engine rpm sensor malfunction Lambda sensor or Lambda sensor heater malfunction Vehicle starting...
Owners Manual
Page 152
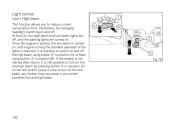
Light control 1 A B 3 5 Fig 76 150 If the engine is not started , the low beam is turned on the low beam; any further time you press it is restored: it once to turn on ; with engine running the standard operation of the lights is still possible to turn on the low/high beam by managing headlight switching-on the left switch; At Key-On, the high beam...
Light control 1 A B 3 5 Fig 76 150 If the engine is not started , the low beam is turned on the low beam; any further time you press it is restored: it once to turn on ; with engine running the standard operation of the lights is still possible to turn on the low/high beam by managing headlight switching-on the left switch; At Key-On, the high beam...

Owners Manual
Page 155
... is turned off automatically after 120 minutes (2 hours) in order to save battery charge. The ECU will only allow the engine to "OFF"), the function will turn off . key turned to start -up) by which is changed at each ignition key is an electronic device that inhibits engine operation whenever the ignition switch is equipped with an IMMOBILIZER, an electronic system that modulates an output signal...
... is turned off automatically after 120 minutes (2 hours) in order to save battery charge. The ECU will only allow the engine to "OFF"), the function will turn off . key turned to start -up) by which is changed at each ignition key is an electronic device that inhibits engine operation whenever the ignition switch is equipped with an IMMOBILIZER, an electronic system that modulates an output signal...

Owners Manual
Page 190
CHOOSING THE SUSPENSION SETTING The values in 188 They have been calculated considering a dressed rider weighing 176-198 lb (80-90 kg) and a dressed passenger weighing 154-176 lb (70-80 kg). Monster 821 rear shock absorber adjustment Parameter Compression Rebound Spring preload Range - 0 ÷ 5 turns 10 ÷ 20 mm 0.39 ÷ 0.79 in Default - 1.5 turns 15 mm 0.59 in Sport - 0.5 turns 15 mm 0.59 in Comfort - 2.5 turns 15 mm 0.59 in Rider + passenger - 1.5 turns 19 mm 0.75 in the table are indicative.
CHOOSING THE SUSPENSION SETTING The values in 188 They have been calculated considering a dressed rider weighing 176-198 lb (80-90 kg) and a dressed passenger weighing 154-176 lb (70-80 kg). Monster 821 rear shock absorber adjustment Parameter Compression Rebound Spring preload Range - 0 ÷ 5 turns 10 ÷ 20 mm 0.39 ÷ 0.79 in Default - 1.5 turns 15 mm 0.59 in Sport - 0.5 turns 15 mm 0.59 in Comfort - 2.5 turns 15 mm 0.59 in Rider + passenger - 1.5 turns 19 mm 0.75 in the table are indicative.
Owners Manual
Page 221
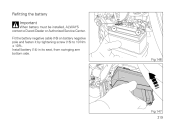
Fit the battery negative cable (16) on battery negative pole and fasten it by tightening screw (15) to 10 Nm ± 10%. Install battery (14) in its seat, from swinging arm bottom side. 15 16 - + Fig 146 14 Fig 147 219 Refitting the battery Important When battery must be installed, ALWAYS contact a Ducati Dealer or Authorized Service Center.
Fit the battery negative cable (16) on battery negative pole and fasten it by tightening screw (15) to 10 Nm ± 10%. Install battery (14) in its seat, from swinging arm bottom side. 15 16 - + Fig 146 14 Fig 147 219 Refitting the battery Important When battery must be installed, ALWAYS contact a Ducati Dealer or Authorized Service Center.
Owners Manual
Page 243
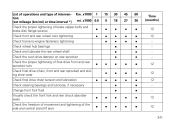
... of final drive front and rear sprocket nuts Check final drive (chain, front and rear sprocket) and sliding shoe wear Check final drive chain tension and lubrication Check steering bearings and lubricate, if necessary Change front fork fluid Visually check the front fork and rear shock absorber seals Check the freedom of movement and tightening of intervention [set mileage (km/mi) or time interval *] Km...
... of final drive front and rear sprocket nuts Check final drive (chain, front and rear sprocket) and sliding shoe wear Check final drive chain tension and lubrication Check steering bearings and lubricate, if necessary Change front fork fluid Visually check the front fork and rear shock absorber seals Check the freedom of movement and tightening of intervention [set mileage (km/mi) or time interval *] Km...
Owners Manual
Page 244
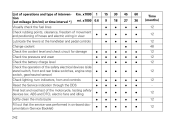
ABS and DTC), electric fans and idling Softly clean the motorcycle Fill out that the service was performed in view Lubricate the levers at the handlebar and pedal controls Change coolant Check the coolant level and check circuit for damage Check tire pressure and wear Check the battery charge level Check the operation of the safety electrical devices (side stand switch, front and rear brake switches, engine stop switch, gear/neutral sensor) Check lighting, turn indicators, horn and...
ABS and DTC), electric fans and idling Softly clean the motorcycle Fill out that the service was performed in view Lubricate the levers at the handlebar and pedal controls Change coolant Check the coolant level and check circuit for damage Check tire pressure and wear Check the battery charge level Check the operation of the safety electrical devices (side stand switch, front and rear brake switches, engine stop switch, gear/neutral sensor) Check lighting, turn indicators, horn and...
Owners Manual
Page 245
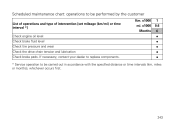
x1000 mi. If necessary, contact your dealer to replace components. * Service operation to be carried out in accordance with the specified distance or time intervals (km, miles or months), whichever occurs first. x1000 Months 1 0.6 6 243 Km. Scheduled maintenance chart: operations to be performed by the customer List of operations and type of intervention [set mileage (km/mi) or time interval *] Check engine oil level Check brake fluid level Check tire pressure and wear Check the drive chain tension and lubrication Check brake pads.
x1000 mi. If necessary, contact your dealer to replace components. * Service operation to be carried out in accordance with the specified distance or time intervals (km, miles or months), whichever occurs first. x1000 Months 1 0.6 6 243 Km. Scheduled maintenance chart: operations to be performed by the customer List of operations and type of intervention [set mileage (km/mi) or time interval *] Check engine oil level Check brake fluid level Check tire pressure and wear Check the drive chain tension and lubrication Check brake pads.
Owners Manual
Page 261
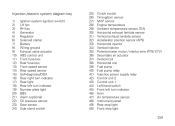
...) Ignition system (ignition switch) LH fan RH fan Generator Regulator Solenoid starter Battery Wiring ground Exhaust valve actuator ABS control unit Front fuse box Rear fuse box Front speed sensor Rear speed sensor Self-diagnosis/DDA Rear right turn indicator Rear light Rear left turn indicator Number plate light BBS Alarm (optional) Oil pressure sensor Gear sensor Side stand switch 25) 26) 27) 28) 29) 30) 31) 32) 33) 34) 35) 36) 37) 38) 39) 40) 41) 42) 43) 44) 45) 46) 47) 48) 49) 50) Clutch switch Timing...
...) Ignition system (ignition switch) LH fan RH fan Generator Regulator Solenoid starter Battery Wiring ground Exhaust valve actuator ABS control unit Front fuse box Rear fuse box Front speed sensor Rear speed sensor Self-diagnosis/DDA Rear right turn indicator Rear light Rear left turn indicator Number plate light BBS Alarm (optional) Oil pressure sensor Gear sensor Side stand switch 25) 26) 27) 28) 29) 30) 31) 32) 33) 34) 35) 36) 37) 38) 39) 40) 41) 42) 43) 44) 45) 46) 47) 48) 49) 50) Clutch switch Timing...