
Owner's Manual
Page 33
... a readiness lamp and a warning tone. The diagnostic module monitors its own circuits, the air bag electrical system, the air bag readiness light, the air bag power, and the air bag inflators. 31
... a readiness lamp and a warning tone. The diagnostic module monitors its own circuits, the air bag electrical system, the air bag readiness light, the air bag power, and the air bag inflators. 31

Owner's Manual
Page 97
... to stabilize the systems before reporting the status of the systems to display by using the keyboard directly below the M/C display. This self-test is powered, the display goes through a self-test by displaying a blank message for the M/C to you. Operator Selectable Features These features are controlled by the switches in...
... to stabilize the systems before reporting the status of the systems to display by using the keyboard directly below the M/C display. This self-test is powered, the display goes through a self-test by displaying a blank message for the M/C to you. Operator Selectable Features These features are controlled by the switches in...

Owner's Manual
Page 139
.... To use the hazard flasher: 1. NOTE: The flasher button will be sticking up to two hours when the battery is not fully charged, the battery power can be drained. Steering Column Controls Hazard Flasher The hazard flasher is running or not.
.... To use the hazard flasher: 1. NOTE: The flasher button will be sticking up to two hours when the battery is not fully charged, the battery power can be drained. Steering Column Controls Hazard Flasher The hazard flasher is running or not.

Owner's Manual
Page 149
Features Setting the Childproof Locks for the Rear Doors In addition to standard or power locks, your vehicle has childproof locks for the rear doors. The child lock lever To set these locks, the rear doors cannot be opened from ...
Features Setting the Childproof Locks for the Rear Doors In addition to standard or power locks, your vehicle has childproof locks for the rear doors. The child lock lever To set these locks, the rear doors cannot be opened from ...

Owner's Manual
Page 150
... sure that you do not, possible damage may occur to prevent exhaust fumes from outside the vehicle. You can lock the liftgate by using the power door lock switch on the left side of the cargo area.
... sure that you do not, possible damage may occur to prevent exhaust fumes from outside the vehicle. You can lock the liftgate by using the power door lock switch on the left side of the cargo area.

Owner's Manual
Page 155
To lock all doors push the switch button marked U. Power door lock controls 155 The manual door locks will override the power door lock controls. To unlock all doors push the switch button marked L. Features Power Door Locks (If equipped) The power door lock switches are located in the front doors and in the driver side trim panel of the cargo area.
To lock all doors push the switch button marked U. Power door lock controls 155 The manual door locks will override the power door lock controls. To unlock all doors push the switch button marked L. Features Power Door Locks (If equipped) The power door lock switches are located in the front doors and in the driver side trim panel of the cargo area.

Owner's Manual
Page 160
To reactivate the Autolock system, simply repeat the instructions for deactivating the system. Press the door power unlock button 3 times. 4. You can also deactivate or reactivate the Autolock feature by a long chirp) if the Autolock feature was activated. 11. Turn the ... 1. The horn should chirp once. Turn the ignition key from RUN to RUN. 3. If not, wait 30 seconds and repeat steps 1 through 6. 8. Press the door power lock button. 10. By re-entering the code that you activated or deactivated the Autolock feature. 160 Make sure the anti-theft system is not...
To reactivate the Autolock system, simply repeat the instructions for deactivating the system. Press the door power unlock button 3 times. 4. You can also deactivate or reactivate the Autolock feature by a long chirp) if the Autolock feature was activated. 11. Turn the ... 1. The horn should chirp once. Turn the ignition key from RUN to RUN. 3. If not, wait 30 seconds and repeat steps 1 through 6. 8. Press the door power lock button. 10. By re-entering the code that you activated or deactivated the Autolock feature. 160 Make sure the anti-theft system is not...

Owner's Manual
Page 163
... armed or triggered, ignition is turned on at any time. When your convenience. Turn the ignition key from OFF to OFF. 163 Press the door power unlock button 3 times. 4. Turn the ignition key from RUN to RUN. 3. With this Owner Guide). You can deactivate or reactivate the remote Memory Seat feature...
... armed or triggered, ignition is turned on at any time. When your convenience. Turn the ignition key from OFF to OFF. 163 Press the door power unlock button 3 times. 4. Turn the ignition key from RUN to RUN. 3. With this Owner Guide). You can deactivate or reactivate the remote Memory Seat feature...

Owner's Manual
Page 164
...deactivated the remote Memory Seat feature. NOTE: The Memory Seat function will continue to work from the door switch even when deactivated at your Ford or Lincoln-Mercury dealer. 164 The horn should chirp once. Turn the ignition key back to confirm that deactivates the remote Memory Seat,... the keyless entry system reinstates the feature. Press the door power unlock button twice. 9. Press the door power unlock button 3 times. 6. The horn will chirp once to RUN within 30 seconds of normal use. To reactivate the ...
...deactivated the remote Memory Seat feature. NOTE: The Memory Seat function will continue to work from the door switch even when deactivated at your Ford or Lincoln-Mercury dealer. 164 The horn should chirp once. Turn the ignition key back to confirm that deactivates the remote Memory Seat,... the keyless entry system reinstates the feature. Press the door power unlock button twice. 9. Press the door power unlock button 3 times. 6. The horn will chirp once to RUN within 30 seconds of normal use. To reactivate the ...

Owner's Manual
Page 166
... handle is pulled or when the remote entry system is used ) from the RUN to the OFF position. Delayed Accessory This feature provides power to operate the power windows and power moon roof for the lost transmitter. NOTE: The inside lights will need to take your vehicle's transmitters to your dealer to have...
... handle is pulled or when the remote entry system is used ) from the RUN to the OFF position. Delayed Accessory This feature provides power to operate the power windows and power moon roof for the lost transmitter. NOTE: The inside lights will need to take your vehicle's transmitters to your dealer to have...

Owner's Manual
Page 167
... turned OFF and the alarm is not completely closed. If a door, liftgate or liftgate window is open or closed), or s Opening a door and pressing the power door lock button to lock the doors. Features This will prearm the anti-theft system: s Pressing the remote entry transmitter LOCK button to lock the...
... turned OFF and the alarm is not completely closed. If a door, liftgate or liftgate window is open or closed), or s Opening a door and pressing the power door lock button to lock the doors. Features This will prearm the anti-theft system: s Pressing the remote entry transmitter LOCK button to lock the...

Owner's Manual
Page 172
... switch in the ON or ACC position to completely open the window completely, press the window switch to lock the levers. One touch down driver's power window operation The one touch down the window switch. Lift the latch and pull inward, then press latch outward to the down , the window will... stop at that door. Flip quarter window Using the Power Windows (If equipped) Each door has a power control that opens and closes the window on that position. 172 If the switch is pressed while the window is going down...
... switch in the ON or ACC position to completely open the window completely, press the window switch to lock the levers. One touch down driver's power window operation The one touch down the window switch. Lift the latch and pull inward, then press latch outward to the down , the window will... stop at that door. Flip quarter window Using the Power Windows (If equipped) Each door has a power control that opens and closes the window on that position. 172 If the switch is pressed while the window is going down...

Owner's Manual
Page 173
Features To close the window, hold the window switch to the up position until the window closes. RWARNING Do not let children play with the power windows. Master control switch 173 They may seriously hurt themselves. Make sure occupants are clear of the window(s) before closing.
Features To close the window, hold the window switch to the up position until the window closes. RWARNING Do not let children play with the power windows. Master control switch 173 They may seriously hurt themselves. Make sure occupants are clear of the window(s) before closing.
Owner's Manual
Page 183
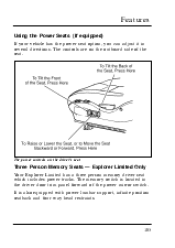
The memory switch is also equipped with power lumbar support, infinite position seatback and four way head restraints. 183 The power controls on the outboard side of the power mirror switch. Features Using the Power Seats (If equipped) If your vehicle has the power seat option, you can adjust it in the driver door trim panel forward of the seat. It is located in several directions. The controls are on the driver's seat Three Person Memory Seats - Explorer Limited Only Your Explorer Limited has a three person memory driver seat which includes power tracks.
The memory switch is also equipped with power lumbar support, infinite position seatback and four way head restraints. 183 The power controls on the outboard side of the power mirror switch. Features Using the Power Seats (If equipped) If your vehicle has the power seat option, you can adjust it in the driver door trim panel forward of the seat. It is located in several directions. The controls are on the driver's seat Three Person Memory Seats - Explorer Limited Only Your Explorer Limited has a three person memory driver seat which includes power tracks.

Owner's Manual
Page 184
... memory switch: 1. You can tilt the seat back or bring it forward. Pushing the seatback backwards with the handle lifted returns the seat upright. The power controls on the driver's seat To adjust the infinite position seatback, pull up on the handle while leaning against the back of an unoccupied seat...
... memory switch: 1. You can tilt the seat back or bring it forward. Pushing the seatback backwards with the handle lifted returns the seat upright. The power controls on the driver's seat To adjust the infinite position seatback, pull up on the handle while leaning against the back of an unoccupied seat...

Owner's Manual
Page 185
... within 5 seconds or until the light goes off . 3. Features 2. To deflate the lumbar support pad, push the " " end of the rear rocker switch. Using the Power Lumbar Support and Side Bolsters (If equipped) Inflating the lumbar support and side bolsters If your memory switch either the "1", "2", or "1 and 2 simultaneously" and the...
... within 5 seconds or until the light goes off . 3. Features 2. To deflate the lumbar support pad, push the " " end of the rear rocker switch. Using the Power Lumbar Support and Side Bolsters (If equipped) Inflating the lumbar support and side bolsters If your memory switch either the "1", "2", or "1 and 2 simultaneously" and the...

Owner's Manual
Page 186
... affected by a particular cleaner, do not use it on a small, hidden area of fabric. Follow the directions that come with a whisk broom or a vacuum cleaner. Power lumbar and side bolsters switch - sport bucket seat Cleaning the Seats Fabric Remove dust and loose dirt with the cleaner. Remove fresh spots immediately. Cleaning...
... affected by a particular cleaner, do not use it on a small, hidden area of fabric. Follow the directions that come with a whisk broom or a vacuum cleaner. Power lumbar and side bolsters switch - sport bucket seat Cleaning the Seats Fabric Remove dust and loose dirt with the cleaner. Remove fresh spots immediately. Cleaning...

Owner's Manual
Page 191
... you could damage them. Select the right or left mirror by moving the selector switch to move the mirror glass or damage may result. 191 Power mirror control Do not clean the plastic housing of any electric mirror with a scraper or you want to the right or left. 3. Heated Mirror Feature...
... you could damage them. Select the right or left mirror by moving the selector switch to move the mirror glass or damage may result. 191 Power mirror control Do not clean the plastic housing of any electric mirror with a scraper or you want to the right or left. 3. Heated Mirror Feature...

Owner's Manual
Page 198
... or metallic objects placed in by referring to the compass: Zone and Calibration. Zone adjustment: 1. Determine which zone of things - such as large buildings, bridges, power lines, and powerful antennas.
... or metallic objects placed in by referring to the compass: Zone and Calibration. Zone adjustment: 1. Determine which zone of things - such as large buildings, bridges, power lines, and powerful antennas.

Owner's Manual
Page 204
Power point electrical outlet Power point electrical outlet (high series console) 204 Use the power point. Power Point Electrical Outlet The power point outlet should be used in place of the cigarette lighter for optional electrical accessories. NOTE: Do not plug optional electrical accessories into the cigarette lighter.
Power point electrical outlet Power point electrical outlet (high series console) 204 Use the power point. Power Point Electrical Outlet The power point outlet should be used in place of the cigarette lighter for optional electrical accessories. NOTE: Do not plug optional electrical accessories into the cigarette lighter.


