

Owner Guide 4th Printing
Page 24
... mode Press this control to stop on the tape. (The tape scans in a forward direction. At the end of the tape's first side, direction automatically reverses to the opposite side of all selections on a particular selection, press the control again. Press the AM or FM control to tape play . You can...
... mode Press this control to stop on the tape. (The tape scans in a forward direction. At the end of the tape's first side, direction automatically reverses to the opposite side of all selections on a particular selection, press the control again. Press the AM or FM control to tape play . You can...

Owner Guide 4th Printing
Page 26
... the control to tape play (with the open edge to select the next disc in the CD changer. You can switch from CD to continue reversing through the remaining discs. After that CD play (if CDs are loaded in the CD changer), press the CD button. Hold the control to move...
... the control to tape play (with the open edge to select the next disc in the CD changer. You can switch from CD to continue reversing through the remaining discs. After that CD play (if CDs are loaded in the CD changer), press the CD button. Hold the control to move...

Owner Guide 4th Printing
Page 27
... noise reduction system is reached. • In CD mode, pressing the REW control for less than three seconds results in a slow reverse. Pressing the control for more than three seconds results in slow forward action. Dolbyா noise reduction Dolby noise reduction operates ...only in fast reverse. Press the control to play will automatically reverse when the end of the tape is manufactured under license from Dolby Laboratories Licensing Corporation. Pressing the...
... noise reduction system is reached. • In CD mode, pressing the REW control for less than three seconds results in a slow reverse. Pressing the control for more than three seconds results in slow forward action. Dolbyா noise reduction Dolby noise reduction operates ...only in fast reverse. Press the control to play will automatically reverse when the end of the tape is manufactured under license from Dolby Laboratories Licensing Corporation. Pressing the...

Owner Guide 4th Printing
Page 32
... (whether or not a listenable station is not running. After that allows you to select the next disc in shuffle mode. Hold the control to continue reversing through the remaining discs. The first track of the disc unless the CD changer is located there). Tune adjust in the audio system. • To...
... (whether or not a listenable station is not running. After that allows you to select the next disc in shuffle mode. Hold the control to continue reversing through the remaining discs. The first track of the disc unless the CD changer is located there). Tune adjust in the audio system. • To...

Owner Guide 4th Printing
Page 33
Rewind The rewind control works in tape and CD modes. • Pressing the REW control for less than three seconds results in a slow reverse. Pressing the control for more consistent listening level. Shuffle feature The shuffle feature operates in slow forward action. Pressing the control for more than three... into the CD player as jamming may occur. Press the COMP control to the next disc after all tracks on the current disc in fast reverse. Press the SHUFFLE control to toggle between single CD mode and CD changer mode (if available). Fast forward The fast forward control works in ...
Rewind The rewind control works in tape and CD modes. • Pressing the REW control for less than three seconds results in a slow reverse. Pressing the control for more consistent listening level. Shuffle feature The shuffle feature operates in slow forward action. Pressing the control for more than three... into the CD player as jamming may occur. Press the COMP control to the next disc after all tracks on the current disc in fast reverse. Press the SHUFFLE control to toggle between single CD mode and CD changer mode (if available). Fast forward The fast forward control works in ...

Owner Guide 4th Printing
Page 62
... the replacement LED module. Remove the bulb socket by rotating it counterclockwise and pulling it out from the inside of the socket and push in reverse order. Carefully lift the lamp assembly away from the liftgate. 8. Carefully pull the bulb straight out of the decklid, remove the three nuts that hold...
... the replacement LED module. Remove the bulb socket by rotating it counterclockwise and pulling it out from the inside of the socket and push in reverse order. Carefully lift the lamp assembly away from the liftgate. 8. Carefully pull the bulb straight out of the decklid, remove the three nuts that hold...

Owner Guide 4th Printing
Page 63
... Wagon 1. Install the lamp assembly on the LED module). 4. Remove the wiring harness grommet and disengage the electrical connector. 6. Make sure headlamp switch is in reverse order. Remove bulb socket by turning counterclockwise. 3. To complete installation, follow the removal procedure in OFF position and remove screw and the license plate lamp...
... Wagon 1. Install the lamp assembly on the LED module). 4. Remove the wiring harness grommet and disengage the electrical connector. 6. Make sure headlamp switch is in reverse order. Remove bulb socket by turning counterclockwise. 3. To complete installation, follow the removal procedure in OFF position and remove screw and the license plate lamp...
Owner Guide 4th Printing
Page 70
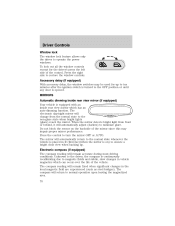
The electronic day/night mirror will automatically return to the normal state whenever the vehicle is placed in R (Reverse)(when the mirror is on the backside of the mirror since this may be used for the driver's press the left side of the vehicle. ...
The electronic day/night mirror will automatically return to the normal state whenever the vehicle is placed in R (Reverse)(when the mirror is on the backside of the mirror since this may be used for the driver's press the left side of the vehicle. ...
Owner Guide 4th Printing
Page 78
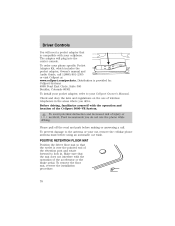
...the antenna or your Cellport Owner's Manual. To avoid potential distraction and increased risk of wireless telephones in . To remove the floor mat, reverse the installation procedure. 78 Driver Controls You will plug into the center console. POSITIVE RETENTION FLOOR MAT Position the driver floor mat so that ... operation and location of the retention post and rotate forward to lock in the areas where you do not use of injury or accident, Ford recommends you drive. To order your cellphone. Please pull off the road and park before using an automatic car wash. The adapter will...
...the antenna or your Cellport Owner's Manual. To avoid potential distraction and increased risk of wireless telephones in . To remove the floor mat, reverse the installation procedure. 78 Driver Controls You will plug into the center console. POSITIVE RETENTION FLOOR MAT Position the driver floor mat so that ... operation and location of the retention post and rotate forward to lock in the areas where you do not use of injury or accident, Ford recommends you drive. To order your cellphone. Please pull off the road and park before using an automatic car wash. The adapter will...

Owner Guide 4th Printing
Page 145
... chapter. To avoid unwanted vehicle movement, always set the parking brake. 3. If you verify that prevents the gearshift lever from being moved from forward and reverse gears while stopping between shifts, in a steady pattern. In the ignition OFF position, the automatic transmission shift lever can be rocked out by shifting from...
... chapter. To avoid unwanted vehicle movement, always set the parking brake. 3. If you verify that prevents the gearshift lever from being moved from forward and reverse gears while stopping between shifts, in a steady pattern. In the ignition OFF position, the automatic transmission shift lever can be rocked out by shifting from...

Owner Guide 4th Printing
Page 147
... pedal down , your vehicle. Understanding gearshift positions P (Park) Always come to a complete stop before shifting into and out of R (Reverse). If you do not hold the brake pedal down while you leave your vehicle may move backward.... P R N D D 1 R (Reverse) With the gearshift lever in P (Park). Make sure the gearshift lever is latched in R (Reverse), the vehicle will move unexpectedly and injure someone. P R N D D 1 147 You should always come to a complete stop...
... pedal down , your vehicle. Understanding gearshift positions P (Park) Always come to a complete stop before shifting into and out of R (Reverse). If you do not hold the brake pedal down while you leave your vehicle may move backward.... P R N D D 1 R (Reverse) With the gearshift lever in P (Park). Make sure the gearshift lever is latched in R (Reverse), the vehicle will move unexpectedly and injure someone. P R N D D 1 147 You should always come to a complete stop...
Owner Guide 4th Printing
Page 172
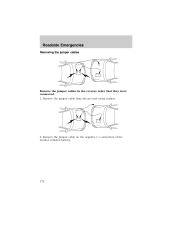
Remove the jumper cable from the ground metal surface. 2. Remove the jumper cable on the negative (-) connection of the booster vehicle's battery. 172 - - - - + + + + Roadside Emergencies Removing the jumper cables Remove the jumper cables in the reverse order that they were connected. 1.
Remove the jumper cable from the ground metal surface. 2. Remove the jumper cable on the negative (-) connection of the booster vehicle's battery. 172 - - - - + + + + Roadside Emergencies Removing the jumper cables Remove the jumper cables in the reverse order that they were connected. 1.

