

Owner's Manual
Page 199
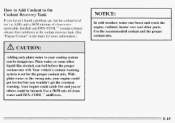
Radiator Pressure Cap C. Coolant Recovery Tank B. Engine Fan 5-13 If the coolant inside the coolant recovery tank is boiling, don't do anything else until it 's safe to lift the hood, here's what you'll see: kc: A If your vehicle has air conditioning, the auxiliary electric fan under the hood can start up even when the engineis not running andcan injure from you decide it cools down. A. When you . Keep hands, clothing and tools away any underhood electric fan.
Radiator Pressure Cap C. Coolant Recovery Tank B. Engine Fan 5-13 If the coolant inside the coolant recovery tank is boiling, don't do anything else until it 's safe to lift the hood, here's what you'll see: kc: A If your vehicle has air conditioning, the auxiliary electric fan under the hood can start up even when the engineis not running andcan injure from you decide it cools down. A. When you . Keep hands, clothing and tools away any underhood electric fan.

Owner's Manual
Page 200
If you may have a leak in the radiator hoses, heater hoses, radiator, water pump or somewhere else in the cooling system. 1 NOTICE: Engine damage from running your engine by pushing the accelerator pedal down. If it doesn't, ...
If you may have a leak in the radiator hoses, heater hoses, radiator, water pump or somewhere else in the cooling system. 1 NOTICE: Engine damage from running your engine by pushing the accelerator pedal down. If it doesn't, ...
Owner's Manual
Page 201
... clean water and DEX-COOL antifreeze. With system is set for more information.) TM NOTICE: In cold weather, water can freeze and crack the engine, radiator, heater core and other liquid like alcohol, can be burned. Use the recommended coolant and the proper coolant mix.
... clean water and DEX-COOL antifreeze. With system is set for more information.) TM NOTICE: In cold weather, water can freeze and crack the engine, radiator, heater core and other liquid like alcohol, can be burned. Use the recommended coolant and the proper coolant mix.
Owner's Manual
Page 202
I f the overheat warning continues, there's one more thing you can try. You can add the proper coolant mix directly to the radiator, but be burned if you spill coolant on hot engine parts. You can be sure the cooling system is at ADD, start your vehicle. Don't spill coolant ona hot engine. When the coolant in the coolant recovery tank is cool before you do it will burn if the engine parts are hot enough. Coolant contains ethylene glycol and it . 5-16
I f the overheat warning continues, there's one more thing you can try. You can add the proper coolant mix directly to the radiator, but be burned if you spill coolant on hot engine parts. You can be sure the cooling system is at ADD, start your vehicle. Don't spill coolant ona hot engine. When the coolant in the coolant recovery tank is cool before you do it will burn if the engine parts are hot enough. Coolant contains ethylene glycol and it . 5-16

Owner's Manual
Page 203
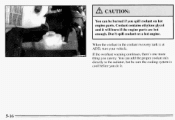
Never turn the pressure cap. -- -- 5-17 Wait the cooling systemand for radiator pressure cap to turn the cap when the cooling system, including the radiator pressure cap, is hot. They are under pressure, and you ever have to cool if you turn the radiator if pressure cap even a little they can blow out and burn you badly. Steam and scalding liquids from a hot cooling system can come out at high speed.
Never turn the pressure cap. -- -- 5-17 Wait the cooling systemand for radiator pressure cap to turn the cap when the cooling system, including the radiator pressure cap, is hot. They are under pressure, and you ever have to cool if you turn the radiator if pressure cap even a little they can blow out and burn you badly. Steam and scalding liquids from a hot cooling system can come out at high speed.
Owner's Manual
Page 204
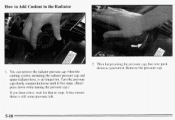
Youcan remove the radiator pressure cap when the cooling system. A hiss means there is 110longer hot. Remove the pressure cap. Turn the pressure cap slowly counterclockwiseuntil it first stops. (Don't press down as you hear a hiss, wait for that to the Ra 2. I . Then keep turning the pressure cap, but now push down while tu1-nin2 the pressurecap.) If you turn it. including the radiator pressure cap and upper radiator hose, is still some pressure left. 5-18 How to Add Coolant to stop.
Youcan remove the radiator pressure cap when the cooling system. A hiss means there is 110longer hot. Remove the pressure cap. Turn the pressure cap slowly counterclockwiseuntil it first stops. (Don't press down as you hear a hiss, wait for that to the Ra 2. I . Then keep turning the pressure cap, but now push down while tu1-nin2 the pressurecap.) If you turn it. including the radiator pressure cap and upper radiator hose, is still some pressure left. 5-18 How to Add Coolant to stop.
Owner's Manual
Page 205
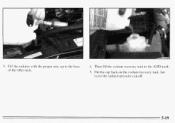
Fill the radiator with the proper m i x . Then fill the coolant recovery tank to the base of the filler neck. 4. up to the ADD mark. 5. but leave the radiator pressure cap off. 5-19 3. Put the cap back on the coolant recovery tank.
Fill the radiator with the proper m i x . Then fill the coolant recovery tank to the base of the filler neck. 4. up to the ADD mark. 5. but leave the radiator pressure cap off. 5-19 3. Put the cap back on the coolant recovery tank.

Owner's Manual
Page 206
Be sure the arrows on the pressure cap lineup like this time the coolant level inside the radiator filler neck may be lower. I 6. If the level is lower, add more of the proper mix through the filler neck until you can feel the upper radiator hose getting hot. Then replace the pressure cap. Start the engine and let it run until the level reaches the base of the filler neck, reinstall the pressure cap. Watch out forthe engine fan. 7. By this . At any time during this procedure if coolant begins to flow out of the filler neck. 8.
Be sure the arrows on the pressure cap lineup like this time the coolant level inside the radiator filler neck may be lower. I 6. If the level is lower, add more of the proper mix through the filler neck until you can feel the upper radiator hose getting hot. Then replace the pressure cap. Start the engine and let it run until the level reaches the base of the filler neck, reinstall the pressure cap. Watch out forthe engine fan. 7. By this . At any time during this procedure if coolant begins to flow out of the filler neck. 8.

Owner's Manual
Page 236
..., remove the wing nuts that hold the cover i n place. 6-14 Instead, recycle it by putting it in the steering linkage shield assembly located under the radiator support. then replace the air cleaner cover. Tighten the wing nuts to unlock or lock the door. If you know that used engine oil contains...
..., remove the wing nuts that hold the cover i n place. 6-14 Instead, recycle it by putting it in the steering linkage shield assembly located under the radiator support. then replace the air cleaner cover. Tighten the wing nuts to unlock or lock the door. If you know that used engine oil contains...
Owner's Manual
Page 247
...-free) coolant meetingGM Specification 6277M. A dding only plain water to your vehicle will: 0 Give freezing protection down to the system, premature engine, heater core or radiator corrosion may result. Use a mixture of clean Use water and DEX-COOL (orange-colored, silicate-free) antifreeze. TM NOTICE: When adding coolant it important thatyou...
...-free) coolant meetingGM Specification 6277M. A dding only plain water to your vehicle will: 0 Give freezing protection down to the system, premature engine, heater core or radiator corrosion may result. Use a mixture of clean Use water and DEX-COOL (orange-colored, silicate-free) antifreeze. TM NOTICE: When adding coolant it important thatyou...
Owner's Manual
Page 248
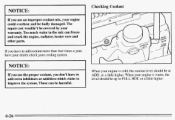
Too much water in the can be badly damaged. These can freeze mix and crack the engine, radiator, heater core and other parts. When your warranty. Checking Coolant NOTICE: If you use an improper coolant mix, your engine is cold, the coolant level ...
Too much water in the can be badly damaged. These can freeze mix and crack the engine, radiator, heater core and other parts. When your warranty. Checking Coolant NOTICE: If you use an improper coolant mix, your engine is cold, the coolant level ...
Owner's Manual
Page 249
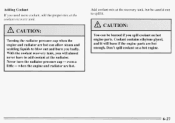
Don't spill coolant on a hot engine. -- -- 6-27 t m k . Add coolant mix at Never turn the radiator pressure cap even a little when the engine and radiator are hot. You can be careful not to add coolant the radiator. Coolant contains ethylene glycol, and itwill burn if the engine parts are hot can steam and allow scalding... the coolant recovery tank, will almost you never have to spill it. at the recovery tank, but be burnedif you spill coolanton hot Turning the radiator pressure cap when the engine and radiator are hot enough. engine parts.
Don't spill coolant on a hot engine. -- -- 6-27 t m k . Add coolant mix at Never turn the radiator pressure cap even a little when the engine and radiator are hot. You can be careful not to add coolant the radiator. Coolant contains ethylene glycol, and itwill burn if the engine parts are hot can steam and allow scalding... the coolant recovery tank, will almost you never have to spill it. at the recovery tank, but be burnedif you spill coolanton hot Turning the radiator pressure cap when the engine and radiator are hot enough. engine parts.
Owner's Manual
Page 250
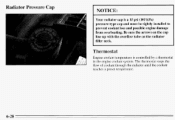
Radiator Pressure Cap NOTICE: Your radiator cap is controlled by a thermostat in the engine coolant system. Thermostat Engine coolant temperature is a15 psi (105 kPa) pressure-type cap and must be tightly installed to prevent coolant loss and possible engine damage from overheating.Be sure the arrowson the cap line up with the overflow tube on the radiator filler neck. The thermostat stops the tlow of coolant through the radiator until the coolant reaches a preset temperature. 6-28
Radiator Pressure Cap NOTICE: Your radiator cap is controlled by a thermostat in the engine coolant system. Thermostat Engine coolant temperature is a15 psi (105 kPa) pressure-type cap and must be tightly installed to prevent coolant loss and possible engine damage from overheating.Be sure the arrowson the cap line up with the overflow tube on the radiator filler neck. The thermostat stops the tlow of coolant through the radiator until the coolant reaches a preset temperature. 6-28
Owner's Manual
Page 252
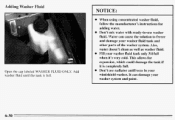
... full. Don't use washer fluid. This allows for expansion, which could damage the tank if it 's very cold. It can cause the solution to -use radiator antifreezein your washer fluid tank only 3/4 full when it is full. 0 When using concentrated washer fluid, follow the manufacturer's instructions for adding water. Adding Washer...
... full. Don't use washer fluid. This allows for expansion, which could damage the tank if it 's very cold. It can cause the solution to -use radiator antifreezein your washer fluid tank only 3/4 full when it is full. 0 When using concentrated washer fluid, follow the manufacturer's instructions for adding water. Adding Washer...
Owner's Manual
Page 259
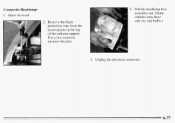
Unplug the electrical connector. 6-37 Use a hex socket to unscrew the pins. 3. Composite Headlamps 1. Open the hood. 2. Remove the black protective caps from the removal pins at the top of the radiator support. Pull the headlamp lens assembly out. (Some vehicles may have side-by-side bulbs.) 4.
Unplug the electrical connector. 6-37 Use a hex socket to unscrew the pins. 3. Composite Headlamps 1. Open the hood. 2. Remove the black protective caps from the removal pins at the top of the radiator support. Pull the headlamp lens assembly out. (Some vehicles may have side-by-side bulbs.) 4.
Owner's Manual
Page 261
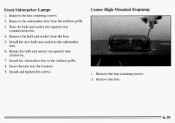
Install the new bulb and socket to the radiator grille. 8. Remove the sidemarker lensfrom the radiator grille. 3. Remove the bulb and socket fromthe lens. Turn the bulb and socket one -quarter turn counterclockwise. 4. r , -. Install the sidemarker lens to the sidemarker lens. 6. ...
Install the new bulb and socket to the radiator grille. 8. Remove the sidemarker lensfrom the radiator grille. 3. Remove the bulb and socket fromthe lens. Turn the bulb and socket one -quarter turn counterclockwise. 4. r , -. Install the sidemarker lens to the sidemarker lens. 6. ...
Owner's Manual
Page 322
... clutch pedal springs at every oil change (or every 3 months, whichever occurs first). Check constant velocity joints and axle seals for what to use. Clean radiator, condenser, pressure cap and neck. Check readfront axle fluid level and add fluid as needed. Inspect hoses. DATE ACTUAL MILEAGE SERVICED BY 0Inspect spark plug...
... clutch pedal springs at every oil change (or every 3 months, whichever occurs first). Check constant velocity joints and axle seals for what to use. Clean radiator, condenser, pressure cap and neck. Check readfront axle fluid level and add fluid as needed. Inspect hoses. DATE ACTUAL MILEAGE SERVICED BY 0Inspect spark plug...

Owner's Manual
Page 337
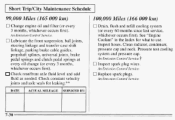
Clean radiator, condenser, pressure cap and neck. An Emission Control Service. (Continued) DATE ACTUAL MILEAGE SERVICED BY 7-45 Long Tripmighway Maintenance Schedule 100,000 Miles (144 000 ...
Clean radiator, condenser, pressure cap and neck. An Emission Control Service. (Continued) DATE ACTUAL MILEAGE SERVICED BY 7-45 Long Tripmighway Maintenance Schedule 100,000 Miles (144 000 ...

Owner's Manual
Page 343
... seams, holes, loose connections or other conditions which should let your GM dealer's service department or otherqualified service centerdo these servicesmay be performed at once. Radiator and Heater Hose Inspection Inspect the hoses and have high effort or excessive wear. Exhaust System Inspection Inspect the complete exhaust system. You should be...
... seams, holes, loose connections or other conditions which should let your GM dealer's service department or otherqualified service centerdo these servicesmay be performed at once. Radiator and Heater Hose Inspection Inspect the hoses and have high effort or excessive wear. Exhaust System Inspection Inspect the complete exhaust system. You should be...

Owner's Manual
Page 365
... Horn ...Horsepower ...6-66 6-20 HydraulicClutch ...Hydroplaning ...4-3 1 Ignition Positions ...2-8 Inflation, Tire ...6-45 Inside DayNight Rearview Mirror ...2-43 Inspections Brake System ...7-52 Drive Axle .."...7-52 Exhaust Systems ...7-5 1 Radiator and Heater Hose ...7-51 7-51 Steering ... Customer Assistance ...8-3 HeaterControls ...3-1 Heater/Air Conditioning Controls ...: ...3-2 . 5-22 Tire High/Low Beamchanger ...2-35 Highway Hypnosis ...4-35 Hill and Mountain...
... Horn ...Horsepower ...6-66 6-20 HydraulicClutch ...Hydroplaning ...4-3 1 Ignition Positions ...2-8 Inflation, Tire ...6-45 Inside DayNight Rearview Mirror ...2-43 Inspections Brake System ...7-52 Drive Axle .."...7-52 Exhaust Systems ...7-5 1 Radiator and Heater Hose ...7-51 7-51 Steering ... Customer Assistance ...8-3 HeaterControls ...3-1 Heater/Air Conditioning Controls ...: ...3-2 . 5-22 Tire High/Low Beamchanger ...2-35 Highway Hypnosis ...4-35 Hill and Mountain...


