
Owner's Manual
Page 5
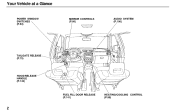
Your Vehicle at a Glance POWER WINDOW SWITCHES (P.84) MIRROR CONTROLS (P.86) AUDIO SYSTEM (P.106) TAILGATE RELEASE (P.75) HOOD RELEASE HANDLE (P.142) FUEL FILL DOOR RELEASE (P.141) HEATING/COOLING CONTROL (P.98)
Your Vehicle at a Glance POWER WINDOW SWITCHES (P.84) MIRROR CONTROLS (P.86) AUDIO SYSTEM (P.106) TAILGATE RELEASE (P.75) HOOD RELEASE HANDLE (P.142) FUEL FILL DOOR RELEASE (P.141) HEATING/COOLING CONTROL (P.98)

Owner's Manual
Page 52
They warn you of potential hazards that could cause serious injury. models only SUN VISOR U.S. models RADIATOR CAP Driver and Passenger Safety models Canadian models DASHBOARD U.S. models Canadian models SUN VISOR U.S. Safety Labels These labels are in the locations shown. If a label comes off or becomes hard to read, contact your Honda dealer for a replacement. Read these labels carefully. HOOD U.S.
They warn you of potential hazards that could cause serious injury. models only SUN VISOR U.S. models RADIATOR CAP Driver and Passenger Safety models Canadian models DASHBOARD U.S. models Canadian models SUN VISOR U.S. Safety Labels These labels are in the locations shown. If a label comes off or becomes hard to read, contact your Honda dealer for a replacement. Read these labels carefully. HOOD U.S.
Owner's Manual
Page 54
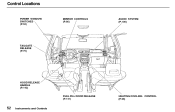
Control Locations POWER WINDOW SWITCHES (P.84) MIRROR CONTROLS (P.86) AUDIO SYSTEM (P.106) TAILGATE RELEASE (P.75) HOOD RELEASE HANDLE (P.142) FUEL FILL DOOR RELEASE (P.141) HEATING/COOLING CONTROL (P.98) Instruments and Controls
Control Locations POWER WINDOW SWITCHES (P.84) MIRROR CONTROLS (P.86) AUDIO SYSTEM (P.106) TAILGATE RELEASE (P.75) HOOD RELEASE HANDLE (P.142) FUEL FILL DOOR RELEASE (P.141) HEATING/COOLING CONTROL (P.98) Instruments and Controls

Owner's Manual
Page 139
...you should know how to properly store luggage or packages. You also need to know what gasoline to use, and how to your Honda, you . Break-in this section first. The information in Period...140 Gasoline...140 Service Station Procedures ...141 Filling the Fuel Tank...141... Opening the Hood...142 Oil Check...143 Engine Coolant Check...144 Fuel Economy...145 Vehicle Condition...145 Driving Habits...145 Accessories and Modifications...146 Carrying Cargo......
...you should know how to properly store luggage or packages. You also need to know what gasoline to use, and how to your Honda, you . Break-in this section first. The information in Period...140 Gasoline...140 Service Station Procedures ...141 Filling the Fuel Tank...141... Opening the Hood...142 Oil Check...143 Engine Coolant Check...144 Fuel Economy...145 Vehicle Condition...145 Driving Habits...145 Accessories and Modifications...146 Carrying Cargo......

Owner's Manual
Page 142
...back as before, the mechanism should be cleaned and lubricated (see page 213). 1. Slide your fingers under the lower left until it releases the hood. Standing in front of the vehicle, put your hand to the right of the dashboard. Before Driving Lift the... hood. Pull the hood release handle located under the front edge of the hood to the left corner of center. Push this handle up slightly. 2. Service Station Procedures Opening the Hood HOOD RELEASE HANDLE LATCH If you feel the hood latch handle. Shift to Park or Neutral ...
...back as before, the mechanism should be cleaned and lubricated (see page 213). 1. Slide your fingers under the lower left until it releases the hood. Standing in front of the vehicle, put your hand to the right of the dashboard. Before Driving Lift the... hood. Pull the hood release handle located under the front edge of the hood to the left corner of center. Push this handle up slightly. 2. Service Station Procedures Opening the Hood HOOD RELEASE HANDLE LATCH If you feel the hood latch handle. Shift to Park or Neutral ...

Owner's Manual
Page 143
... paper towel. Wipe the dipstick with fuel. CONTINUED Before Driving Service Station Procedures Oil Check SUPPORT ROD DIPSTICK 3. To close the hood, lift it is securely latched. After closing the hood, make sure it up slightly to about a foot (30 cm) above the fender, then let it drop. Remove the dipstick (...orange handle). 2. Pull the support rod out of the hood around the center. Put the support rod back into the hole on the front of its clip and insert the end into its holding clip...
... paper towel. Wipe the dipstick with fuel. CONTINUED Before Driving Service Station Procedures Oil Check SUPPORT ROD DIPSTICK 3. To close the hood, lift it is securely latched. After closing the hood, make sure it up slightly to about a foot (30 cm) above the fender, then let it drop. Remove the dipstick (...orange handle). 2. Pull the support rod out of the hood around the center. Put the support rod back into the hole on the front of its clip and insert the end into its holding clip...
Owner's Manual
Page 153
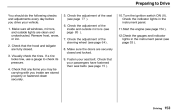
... panel. 11.Start the engine (see page 154 ). 12.Check the gauges and indicator lights in the instrument panel (see page 64). 8. Check that the hood and tailgate are fully closed and locked. 9. Driving Make sure all windows, mirrors, and outside mirrors (see page 77 ). 6. Check that any items you may...
... panel. 11.Start the engine (see page 154 ). 12.Check the gauges and indicator lights in the instrument panel (see page 64). 8. Check that the hood and tailgate are fully closed and locked. 9. Driving Make sure all windows, mirrors, and outside mirrors (see page 77 ). 6. Check that any items you may...
Owner's Manual
Page 183
...Differential Fluid...209 Brake and Clutch Fluid...210 Brake System...210 Clutch System...211 Power Steering...211 Air Cleaner Element...212 Hood Latch...213 Spark Plugs...213 Replacement...213 Specifications...214 Battery...215 Wiper Blades...217 Air Conditioning System...219 Air Conditioning ...basic maintenance safety precautions. See page 293 for information on your vehicle well maintained and to obtain a copy, or see your Honda dealer. This section also includes Maintenance Schedules for normal driving and severe driving conditions, a Maintenance Record, and instructions for Normal ...
...Differential Fluid...209 Brake and Clutch Fluid...210 Brake System...210 Clutch System...211 Power Steering...211 Air Cleaner Element...212 Hood Latch...213 Spark Plugs...213 Replacement...213 Specifications...214 Battery...215 Wiper Blades...217 Air Conditioning System...219 Air Conditioning ...basic maintenance safety precautions. See page 293 for information on your vehicle well maintained and to obtain a copy, or see your Honda dealer. This section also includes Maintenance Schedules for normal driving and severe driving conditions, a Maintenance Record, and instructions for Normal ...

Owner's Manual
Page 199
Run the engine until it reaches normal operating temperature, then shut it . Open the hood and remove the engine oil fill cap. A special wrench (available from your engine if they are not removed regularly. The oil and filter collect contaminants ... let the remaining oil drain. Engine Oil Changing the Oil and Filter Always change the oil and filter according to instructions that can damage your Honda dealer) is required to remove the filter. 4. OIL FILTER OIL DRAIN BOLT WASHER 1. Install a new oil filter according to the time and distance (miles/kilometers...
Run the engine until it reaches normal operating temperature, then shut it . Open the hood and remove the engine oil fill cap. A special wrench (available from your engine if they are not removed regularly. The oil and filter collect contaminants ... let the remaining oil drain. Engine Oil Changing the Oil and Filter Always change the oil and filter according to instructions that can damage your Honda dealer) is required to remove the filter. 4. OIL FILTER OIL DRAIN BOLT WASHER 1. Install a new oil filter according to the time and distance (miles/kilometers...

Owner's Manual
Page 203
... clockwise. CONTINUED Maintenance Turn the ignition off. 2. Remove the drain bolt and washer from the engine block. Turn the ignition ON (II). Only use Genuine Honda Antifreeze/Coolant. Draining the coolant requires access to the touch. 3. DRAIN BOLT DRAIN PLUG 1. Make sure the engine and radiator are cool to the underside...
... clockwise. CONTINUED Maintenance Turn the ignition off. 2. Remove the drain bolt and washer from the engine block. Turn the ignition ON (II). Only use Genuine Honda Antifreeze/Coolant. Draining the coolant requires access to the touch. 3. DRAIN BOLT DRAIN PLUG 1. Make sure the engine and radiator are cool to the underside...

Owner's Manual
Page 213
... oil around the spark plug caps. 2. Remove the spark plug with a multipurpose grease. Hood Latch, Spark Plugs Hood Latch Spark Plugs The spark plugs in your vehicle should be replaced according to clean and grease the latch, contact your Honda dealer. 1. Lubricate all the moving parts, including the pivot. CONTINUED Maintenance Follow the...) spark plug socket. If you are not sure how to the time and distance recommendations in the Maintenance Schedule. Replacement SPARK PLUG CAP Clean the hood latch assembly with a mild cleaner, then lubricate it straight out. 3.
... oil around the spark plug caps. 2. Remove the spark plug with a multipurpose grease. Hood Latch, Spark Plugs Hood Latch Spark Plugs The spark plugs in your vehicle should be replaced according to clean and grease the latch, contact your Honda dealer. 1. Lubricate all the moving parts, including the pivot. CONTINUED Maintenance Follow the...) spark plug socket. If you are not sure how to the time and distance recommendations in the Maintenance Schedule. Replacement SPARK PLUG CAP Clean the hood latch assembly with a mild cleaner, then lubricate it straight out. 3.

Owner's Manual
Page 230
Load your vehicle was new. These are set to their aim if you normally cany. Open the hood. 4. Maintenance Lights Headlight Aiming The headlights were properly aimed when your vehicle with the "0" mark on the gauge. HORIZONTAL ANGLE GAUGE 3. Check the horizontal angle ...
Load your vehicle was new. These are set to their aim if you normally cany. Open the hood. 4. Maintenance Lights Headlight Aiming The headlights were properly aimed when your vehicle with the "0" mark on the gauge. HORIZONTAL ANGLE GAUGE 3. Check the horizontal angle ...

Owner's Manual
Page 232
NOTICE Halogen headlight bulbs get very hot when lit. Open the hood. 2. Pull the connector straight off. 3. Oil, perspiration, or a scratch on the tab. If you touch the glass, clean it by its steel base and protect ...
NOTICE Halogen headlight bulbs get very hot when lit. Open the hood. 2. Pull the connector straight off. 3. Oil, perspiration, or a scratch on the tab. If you touch the glass, clean it by its steel base and protect ...

Owner's Manual
Page 259
...automatic transmission by using a booster battery. Put the transmission in extreme cold, the electrolyte inside can freeze. Attempting to jump start a Honda with a frozen battery can cause it to rupture. 2. Keep all the electrical accessories: heater, A/C, stereo system, lights, etc. In ...correct procedure, seriously injuring anyone nearby. Turn off all sparks, open flames, and smoking materials away from the battery. Open the hood and check the physical condition of the electrolyte. If it . 1. Although this seems like ice, do not follow these directions ...
...automatic transmission by using a booster battery. Put the transmission in extreme cold, the electrolyte inside can freeze. Attempting to jump start a Honda with a frozen battery can cause it to rupture. 2. Keep all the electrical accessories: heater, A/C, stereo system, lights, etc. In ...correct procedure, seriously injuring anyone nearby. Turn off all sparks, open flames, and smoking materials away from the battery. Open the hood and check the physical condition of the electrolyte. If it . 1. Although this seems like ice, do not follow these directions ...

Owner's Manual
Page 261
... down almost immediately. Put the transmission in the midrange under the hood. NOTICE Driving with the A/C running and watch the temperature gauge. Do not open the hood. If you see no more signs of steam or spray, then open the hood if steam is due to overloading (climbing a long, steep hill...off the heating and cooling system and all other accessories. If it does, wait until you see steam and/or spray coming from under the hood, turn off the engine. 5. If the high heat is coming from an overheated engine can cause serious damage to the red mark, you ...
... down almost immediately. Put the transmission in the midrange under the hood. NOTICE Driving with the A/C running and watch the temperature gauge. Do not open the hood. If you see no more signs of steam or spray, then open the hood if steam is due to overloading (climbing a long, steep hill...off the heating and cooling system and all other accessories. If it does, wait until you see steam and/or spray coming from under the hood, turn off the engine. 5. If the high heat is coming from an overheated engine can cause serious damage to the red mark, you ...

Owner's Manual
Page 263
... dipstick (see page 143). Start the engine and watch the oil pressure indicator. This indicator should never come on the hazard warning indicators. Open the hood and check the oil level (see page 197). 4. In either case, you can lose pressure during cornering and other driving maneuvers. Turn on when the...
... dipstick (see page 143). Start the engine and watch the oil pressure indicator. This indicator should never come on the hazard warning indicators. Open the hood and check the oil level (see page 197). 4. In either case, you can lose pressure during cornering and other driving maneuvers. Turn on when the...

Owner's Manual
Page 267
... protect them from a short circuit or overload. To open it straight out of the Unexpected These fuses are located in the engine compartment. Fuses UNDER-HOOD TAB INTERIOR ABS FUSE BOX All the electrical circuits in your vehicle have a third fuse box for the ABS. It is in the engine compartment... fuse box lid by swinging the lid down and pulling it . The interior fuse box is located in two or three fuse boxes. The under-hood fuse box is underneath the dashboard on the passenger's side.
... protect them from a short circuit or overload. To open it straight out of the Unexpected These fuses are located in the engine compartment. Fuses UNDER-HOOD TAB INTERIOR ABS FUSE BOX All the electrical circuits in your vehicle have a third fuse box for the ABS. It is in the engine compartment... fuse box lid by swinging the lid down and pulling it . The interior fuse box is located in two or three fuse boxes. The under-hood fuse box is underneath the dashboard on the passenger's side.

Owner's Manual
Page 268
... should check for is not the cause. Removing these fuses requires a Phillips-head screwdriver. 4. Check the smaller fuses in the under -hood fuse box by pulling out each of the interior fuse box. Determine from the fuse box. CONTINUED Taking Care of the Unexpected Fuses Checking... and Replacing Fuses If something electrical in the under -hood fuse box and all other accessories are off. 2. Turn the ignition switch to LOCK (0). Replace any blown fuses and check the component's operation...
... should check for is not the cause. Removing these fuses requires a Phillips-head screwdriver. 4. Check the smaller fuses in the under -hood fuse box by pulling out each of the interior fuse box. Determine from the fuse box. CONTINUED Taking Care of the Unexpected Fuses Checking... and Replacing Fuses If something electrical in the under -hood fuse box and all other accessories are off. 2. Turn the ignition switch to LOCK (0). Replace any blown fuses and check the component's operation...

Owner's Manual
Page 271
Fuses UNDER-HOOD FUSE BOX ABS FUSE BOX (For some types) Taking Care of the Unexpected
Fuses UNDER-HOOD FUSE BOX ABS FUSE BOX (For some types) Taking Care of the Unexpected

Owner's Manual
Page 297
... Box...77 Head Restraints...79 Healing and Cooling...98 High Altitude, Starting at...155 High-Low Beam Switch ...60 High-mount Brake Light...237 Hood Latch...213 Hood, Opening the...142 Horn...59 Hot Coolant, Warning about...201 Hydraulic Clutch...211 Hydroplaning...169 Normal Driving...222 Inside Mirror...85 Inspection, Tire...223...
... Box...77 Head Restraints...79 Healing and Cooling...98 High Altitude, Starting at...155 High-Low Beam Switch ...60 High-mount Brake Light...237 Hood Latch...213 Hood, Opening the...142 Horn...59 Hot Coolant, Warning about...201 Hydraulic Clutch...211 Hydroplaning...169 Normal Driving...222 Inside Mirror...85 Inspection, Tire...223...


