Owner's Manual
Page 4
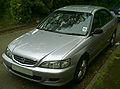
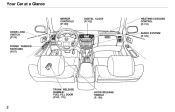
Your Car at a Glance MIRROR CONTROLS (P.100) DOOR LOCK SWITCH (P.75) DIGITAL CLOCK (P.102) HEATING/COOLING CONTROL (P.110) AUDIO SYSTEM (P.125) POWER WINDOW SWITCHES (P.97) TRUNK RELEASE HANDLE/ FUEL FILL DOOR (P.80, 178) HOOD RELEASE HANDLE (P. 180)
Your Car at a Glance MIRROR CONTROLS (P.100) DOOR LOCK SWITCH (P.75) DIGITAL CLOCK (P.102) HEATING/COOLING CONTROL (P.110) AUDIO SYSTEM (P.125) POWER WINDOW SWITCHES (P.97) TRUNK RELEASE HANDLE/ FUEL FILL DOOR (P.80, 178) HOOD RELEASE HANDLE (P. 180)

Owner's Manual
Page 52
Instruments and Controls This section gives information about the controls and displays that contribute to the daily operation of your Honda. All the essential controls are within easy reach. Instrument Panel Brightness...63 Turn Signals...64 Windshield Wipers...64 Windshield Washers...66 Hazard...92 Folding Rear Seat...93 Rear Seat Armrest...94 Trunk Pass-through Cover...95 Seat Heaters...96 Power Windows...97 Moonroof...98 Mirrors...99 Adjusting the Power Mirrors...100 Parking Brake...101 Digital Clock...102 Console Compartment...103 Coin Box...103 Beverage Holder...104 Sun Visor...105 Vanity...
Instruments and Controls This section gives information about the controls and displays that contribute to the daily operation of your Honda. All the essential controls are within easy reach. Instrument Panel Brightness...63 Turn Signals...64 Windshield Wipers...64 Windshield Washers...66 Hazard...92 Folding Rear Seat...93 Rear Seat Armrest...94 Trunk Pass-through Cover...95 Seat Heaters...96 Power Windows...97 Moonroof...98 Mirrors...99 Adjusting the Power Mirrors...100 Parking Brake...101 Digital Clock...102 Console Compartment...103 Coin Box...103 Beverage Holder...104 Sun Visor...105 Vanity...
Owner's Manual
Page 53
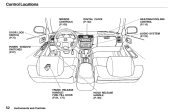
Control Locations MIRROR CONTROLS (P.100) DOOR LOCK SWITCH (P.75) DIGITAL CLOCK (P.102) HEATING/COOLING CONTROL (P.110) AUDIO SYSTEM (P.125) POWER WINDOW SWITCHES (P.97) TRUNK RELEASE HANDLE/ FUEL FILL DOOR (P.80, 178) HOOD RELEASE HANDLE (P.180) Instruments and Controls
Control Locations MIRROR CONTROLS (P.100) DOOR LOCK SWITCH (P.75) DIGITAL CLOCK (P.102) HEATING/COOLING CONTROL (P.110) AUDIO SYSTEM (P.125) POWER WINDOW SWITCHES (P.97) TRUNK RELEASE HANDLE/ FUEL FILL DOOR (P.80, 178) HOOD RELEASE HANDLE (P.180) Instruments and Controls
Owner's Manual
Page 100
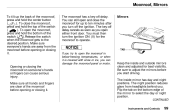
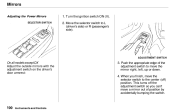
...up to ten minutes after you turn the ignition ON (II) for the moonroof to operate. Mirrors NOTICE If you . Keep the inside mirror has day and night positions. Be sure to adjust the mirrors before opening or closing it is covered with snow or ice, you can cause serious injury....Make sure all hands and fingers are away from headlights behind you try to the desired position. CONTINUED Instruments and Controls The inside and outside mirrors clean and adjusted for up the back of the switch ( ).Release the switch when the moonroof gets to open either front door. Flip the...
...up to ten minutes after you turn the ignition ON (II) for the moonroof to operate. Mirrors NOTICE If you . Keep the inside mirror has day and night positions. Be sure to adjust the mirrors before opening or closing it is covered with snow or ice, you can cause serious injury....Make sure all hands and fingers are away from headlights behind you try to the desired position. CONTINUED Instruments and Controls The inside and outside mirrors clean and adjusted for up the back of the switch ( ).Release the switch when the moonroof gets to open either front door. Flip the...
Owner's Manual
Page 101
Move the selector switch to move a mirror out of the adjustment switch to L (driver's side) or R (passenger's side). Push the appropriate edge of position by accidentally bumping the switch. Instruments and Controls .... Turn the ignition switch ON (II). 2. When you finish, move the selector switch to the center (off the adjustment switch so you can't move the mirror right, left, up or down. 4. ADJUSTMENT SWITCH On all models except DX Adjust the outside...
Move the selector switch to move a mirror out of the adjustment switch to L (driver's side) or R (passenger's side). Push the appropriate edge of position by accidentally bumping the switch. Instruments and Controls .... Turn the ignition switch ON (II). 2. When you finish, move the selector switch to the center (off the adjustment switch so you can't move the mirror right, left, up or down. 4. ADJUSTMENT SWITCH On all models except DX Adjust the outside...

Owner's Manual
Page 102
... Parking Brake HEATED MIRROR BUTTON NOTICE Driving the car with the engine running (see page 55). To apply the parking brake, pull the lever up slightly, push the button, ... brakes and axles. With the ignition switch ON (II), turn the heaters off. PARKING BRAKE LEVER On all Canadian models except DX model The outside mirrors are heated to turn on the heaters by pressing the button. Press the button again to remove fog and frost. To release it, pull up...
... Parking Brake HEATED MIRROR BUTTON NOTICE Driving the car with the engine running (see page 55). To apply the parking brake, pull the lever up slightly, push the button, ... brakes and axles. With the ignition switch ON (II), turn the heaters off. PARKING BRAKE LEVER On all Canadian models except DX model The outside mirrors are heated to turn on the heaters by pressing the button. Press the button again to remove fog and frost. To release it, pull up...
Owner's Manual
Page 106
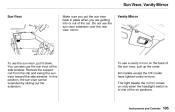
... sun visor at the side window. In this position, the sun visor can also use the sun visor, pull it down. The light beside the mirror comes on only when the headlight switch is in place when you are getting into or out of the sun visor, pull up the cover... the side window. To use the sun visor extension over the rear view mirror. Instruments and Controls All models except the DX model have lighted vanity mirrors. You can be extended by sliding out the extension. Sun Visor, Vanity Mirror Sun Visor Make sure you put the sun visor back in one of...
... sun visor at the side window. In this position, the sun visor can also use the sun visor, pull it down. The light beside the mirror comes on only when the headlight switch is in place when you are getting into or out of the sun visor, pull up the cover... the side window. To use the sun visor extension over the rear view mirror. Instruments and Controls All models except the DX model have lighted vanity mirrors. You can be extended by sliding out the extension. Sun Visor, Vanity Mirror Sun Visor Make sure you put the sun visor back in one of...

Owner's Manual
Page 192
Make sure all windows, mirrors, and outside mirrors (see page 88). 6. Check the adjustment of the inside are clean and unobstructed. Driving Check that the hood and trunk are securely closed . 3. Fasten your ...
Make sure all windows, mirrors, and outside mirrors (see page 88). 6. Check the adjustment of the inside are clean and unobstructed. Driving Check that the hood and trunk are securely closed . 3. Fasten your ...
Owner's Manual
Page 215
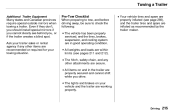
...and spare are working properly. The lights and brakes on and in good operating condition. Even if they don't, you should install special mirrors if you cannot clearly see behind you drive. Towing a Trailer Additional Trailer Equipment Many states and Canadian provinces require special outside... mirrors when towing a trailer. Ask your trailer sales or rental agency if any other items are recommended or required for your vehicle and ...
...and spare are working properly. The lights and brakes on and in good operating condition. Even if they don't, you should install special mirrors if you cannot clearly see behind you drive. Towing a Trailer Additional Trailer Equipment Many states and Canadian provinces require special outside... mirrors when towing a trailer. Ask your trailer sales or rental agency if any other items are recommended or required for your vehicle and ...

Owner's Manual
Page 281
... Bulbs in place. Push the new bulb into the hole. Snap the lens back in the Interior Lights The ceiling light, door light and vanity mirror light come apart the same way, but they do not use the same type of the lens near both spotlights. Spotlight: Not available on DX...
... Bulbs in place. Push the new bulb into the hole. Snap the lens back in the Interior Lights The ceiling light, door light and vanity mirror light come apart the same way, but they do not use the same type of the lens near both spotlights. Spotlight: Not available on DX...
Owner's Manual
Page 346
......252 Hydroplaning...210 Important Safety Precautions...6 Indicators, Instrument Panel...53 Infant Restraint...28 Infant Seats...28 Tether Anchorage Points...39 Inflation, Proper Tire ...268 Inside Mirror...98 Inspection, Tire...270 Instrument Panel...53 Instrument Panel Brightness...63 Interior Cleaning...290 Interior Lights...106 Introduction...i Gas Mileage, Improving...185 Gasohol...331 Gasoline...
......252 Hydroplaning...210 Important Safety Precautions...6 Indicators, Instrument Panel...53 Infant Restraint...28 Infant Seats...28 Tether Anchorage Points...39 Inflation, Proper Tire ...268 Inside Mirror...98 Inspection, Tire...270 Instrument Panel...53 Instrument Panel Brightness...63 Interior Cleaning...290 Interior Lights...106 Introduction...i Gas Mileage, Improving...185 Gasohol...331 Gasoline...

Owner's Manual
Page 348
... Procedures ...178 Radiator Overheating...309 Radio/Cassette Sound System...125 Rear Lights, Bulb Replacement...281 Rear Seat Armrest...94 Rear Seat, Folding...93 Rear View Mirror...99 Rear Window Defogger...66 Safety Belts...8 Safety Defects, Reporting* ...344
... Procedures ...178 Radiator Overheating...309 Radio/Cassette Sound System...125 Rear Lights, Bulb Replacement...281 Rear Seat Armrest...94 Rear Seat, Folding...93 Rear View Mirror...99 Rear Window Defogger...66 Safety Belts...8 Safety Defects, Reporting* ...344

Owner's Manual
Page 350
... Unexpected, Taking Care of the...295 Uniform Tire Quality Grading...329 Unleaded Gasoline...178 Upholstery Cleaning...292 Used Oil, How to Dispose of...238 Vanity Mirror...105 Vehicle Capacity Load ...189 Vehicle Dimensions...326 Vehicle Identification Number...324 Vehicle Storage...287 VIN...324 WARNING, Explanation of...ii Warning Labels, Location of...
... Unexpected, Taking Care of the...295 Uniform Tire Quality Grading...329 Unleaded Gasoline...178 Upholstery Cleaning...292 Used Oil, How to Dispose of...238 Vanity Mirror...105 Vehicle Capacity Load ...189 Vehicle Dimensions...326 Vehicle Identification Number...324 Vehicle Storage...287 VIN...324 WARNING, Explanation of...ii Warning Labels, Location of...


