
Owner's Manual
Page 17
... chance of your chest and over the strongest bones in a crash. Protecting Adults 5.Fasten and Position the Seat Belts Using a Lap/Shoulder Belt Insert the latch plate into the buckle, then tug on the belt to remove any slack from the shoulder part, then check that the belt is securely... latched. This spreads the forces of the belt so the lap part fits snugly. If necessary, pull up on the shoulder part of a crash over your ...
... chance of your chest and over the strongest bones in a crash. Protecting Adults 5.Fasten and Position the Seat Belts Using a Lap/Shoulder Belt Insert the latch plate into the buckle, then tug on the belt to remove any slack from the shoulder part, then check that the belt is securely... latched. This spreads the forces of the belt so the lap part fits snugly. If necessary, pull up on the shoulder part of a crash over your ...

Owner's Manual
Page 18
...belt anchor height. If the belt is too short, hold the latch plate at a right angle and pull on the belt to extend the belt. Then insert the latch plate into the buckle marked CENTER. Driver and Passenger Safety Insert the latch plate into the buckle, and tug on the plate to make... sure the belt is securely latched. Using the Lap Belt If the seat belt touches or crosses...
...belt anchor height. If the belt is too short, hold the latch plate at a right angle and pull on the belt to extend the belt. Then insert the latch plate into the buckle marked CENTER. Driver and Passenger Safety Insert the latch plate into the buckle, and tug on the plate to make... sure the belt is securely latched. Using the Lap Belt If the seat belt touches or crosses...

Owner's Manual
Page 32
... and tips on installing a rear-facing child seat with the lap belt. See page 32 for how to the seat maker's instructions, then insert the latch plate into the buckle. For tips on how to secure a rear-facing child seat with a Lap/Shoulder Belt The lap/shoulder belts in the center...
... and tips on installing a rear-facing child seat with the lap belt. See page 32 for how to the seat maker's instructions, then insert the latch plate into the buckle. For tips on how to secure a rear-facing child seat with a Lap/Shoulder Belt The lap/shoulder belts in the center...

Owner's Manual
Page 34
... Passenger Safety For proper protection, an infant must ride in a reclined, or semi-reclined position. Finally, follow instruction number 5 on page 30 for routing and latching the seat belt. To install a rear-facing child seat in the center back seat with the lap belt, follow the seat maker's recommendations. Protecting Children...
... Passenger Safety For proper protection, an infant must ride in a reclined, or semi-reclined position. Finally, follow instruction number 5 on page 30 for routing and latching the seat belt. To install a rear-facing child seat in the center back seat with the lap belt, follow the seat maker's recommendations. Protecting Children...

Owner's Manual
Page 36
... front seat can result in the desired seating position, route the belt through the child seat according to the seat maker's instructions, then insert the latch plate into the buckle. If it is necessary to secure a forward-facing child seat with this type of seat belt. With the child seat in...
... front seat can result in the desired seating position, route the belt through the child seat according to the seat maker's instructions, then insert the latch plate into the buckle. If it is necessary to secure a forward-facing child seat with this type of seat belt. With the child seat in...

Owner's Manual
Page 38
... order to remove any slack; To install a forward-facing child seat in the center back seat with the Lap Belt Additional Precautions for routing and latching the seat belt. Then pull hard on page 34 for Small Children Never hold on the belt.
... order to remove any slack; To install a forward-facing child seat in the center back seat with the Lap Belt Additional Precautions for routing and latching the seat belt. Then pull hard on page 34 for Small Children Never hold on the belt.

Owner's Manual
Page 44
...collision or sudden stop after a few seconds, but it keeps some tension on the belt to the door pillar. To fasten the belt, insert the latch plate into the buckle, then tug on the belt. If the driver's seat belt is not fastened before the ignition is turned ON (II), the.../shoulder belts except the driver's have an emergency locking retractor. The seat belt system also includes a light on until the driver's seat belt is latched. The beeper will stop , the retractor automatically locks the belt to move freely in the center back seat. After exiting the vehicle, be activated ...
...collision or sudden stop after a few seconds, but it keeps some tension on the belt to the door pillar. To fasten the belt, insert the latch plate into the buckle, then tug on the belt. If the driver's seat belt is not fastened before the ignition is turned ON (II), the.../shoulder belts except the driver's have an emergency locking retractor. The seat belt system also includes a light on until the driver's seat belt is latched. The beeper will stop , the retractor automatically locks the belt to move freely in the center back seat. After exiting the vehicle, be activated ...

Owner's Manual
Page 45
...then tug on seat belts. See page 16 for details. Check that the latches work smoothly and that fits across the hips. Honda will not provide good protection and should check the condition of your Honda Warranty Information booklet for how to lengthen the lap belt, and how to ...not working properly will repair or replace any seat belt component that fails to make sure the buckle is latched. To unlock the belt, push the red PRESS button. Models Honda provides a lifetime warranty on the belt to function properly during normal use. Additional Information About Your Seat ...
...then tug on seat belts. See page 16 for details. Check that the latches work smoothly and that fits across the hips. Honda will not provide good protection and should check the condition of your Honda Warranty Information booklet for how to lengthen the lap belt, and how to ...not working properly will repair or replace any seat belt component that fails to make sure the buckle is latched. To unlock the belt, push the red PRESS button. Models Honda provides a lifetime warranty on the belt to function properly during normal use. Additional Information About Your Seat ...

Owner's Manual
Page 78
... press on the door and pull the door open on the support strut as shown. Instruments and Controls Pull the handle on it until it latches. Put the stop on an incline, use the stop in the right cargo floor pocket. To keep the tailgate door open . Lift up slightly. 3. Keys...
... press on the door and pull the door open on the support strut as shown. Instruments and Controls Pull the handle on it until it latches. Put the stop on an incline, use the stop in the right cargo floor pocket. To keep the tailgate door open . Lift up slightly. 3. Keys...

Owner's Manual
Page 80
... the front dial on the outside of the seat bottom. Move the seat to the desired position and release the lever. Let the seat-back latch in position. Instruments and Controls Try to move the seat to raise the rear. Move the seat-back to the desired position and release the...
... the front dial on the outside of the seat bottom. Move the seat to the desired position and release the lever. Let the seat-back latch in position. Instruments and Controls Try to move the seat to raise the rear. Move the seat-back to the desired position and release the...

Owner's Manual
Page 82
Instruments and Controls Move the seat-back to properly position seats and seat-backs. Make sure the seat-back latches in the new position. Seats Rear Seat-back Adjustment See pages 12 - 14 for important safety information and warnings about how to the desired position, then release the knob. Pivot them down to use them. Rear Seat Armrest The angle of the rear seat. The rear seat armrests are located at the center of the rear seat-backs can be adjusted separately. To change the angle of the seat-back, pull up on the knob on the top of the seat-back.
Instruments and Controls Move the seat-back to properly position seats and seat-backs. Make sure the seat-back latches in the new position. Seats Rear Seat-back Adjustment See pages 12 - 14 for important safety information and warnings about how to the desired position, then release the knob. Pivot them down to use them. Rear Seat Armrest The angle of the rear seat. The rear seat armrests are located at the center of the rear seat-backs can be adjusted separately. To change the angle of the seat-back, pull up on the knob on the top of the seat-back.

Owner's Manual
Page 83
... seat. 3. Lift the slide lever and slide the front seat forward as far as it in the pocket of the seat bottom until the seat latches. Pull up the seat-back angle adjustment lever, then pivot the seat-back backward. CONTINUED Instruments and Controls Release the lever when the seat-back...
... seat. 3. Lift the slide lever and slide the front seat forward as far as it in the pocket of the seat bottom until the seat latches. Pull up the seat-back angle adjustment lever, then pivot the seat-back backward. CONTINUED Instruments and Controls Release the lever when the seat-back...

Owner's Manual
Page 84
... belt and pushing it will go. Release the knob when the seat-back is reclined as far as it into the seat pocket. Store the latch plate for the center lap belt by rolling up separately to their upright positions. Make sure you install the head restraints, and that the seats...
... belt and pushing it will go. Release the knob when the seat-back is reclined as far as it into the seat pocket. Store the latch plate for the center lap belt by rolling up separately to their upright positions. Make sure you install the head restraints, and that the seats...

Owner's Manual
Page 89
... half hour, pressing the RESET button sets the clock forward to quickly set the clock: 1. Digital Clock, Center Table Digital Clock H M R(RESET) 3. To store it latches. You can use the center table, pull up the outside edge of the next hour.
... half hour, pressing the RESET button sets the clock forward to quickly set the clock: 1. Digital Clock, Center Table Digital Clock H M R(RESET) 3. To store it latches. You can use the center table, pull up the outside edge of the next hour.

Owner's Manual
Page 154
You can be burned or seriously injured when handling fuel. Do not try to "top off . Push the fuel fill door closed until it latches. Stop the engine and keep heat, sparks, and flame away. Handle fuel only outdoors. Screw the fuel fill cap back on the handle at the ...
You can be burned or seriously injured when handling fuel. Do not try to "top off . Push the fuel fill door closed until it latches. Stop the engine and keep heat, sparks, and flame away. Handle fuel only outdoors. Screw the fuel fill cap back on the handle at the ...

Owner's Manual
Page 155
...slightly. 2. Slide your fingers under the lower left until it releases the hood. Service Station Procedures Opening the Hood HOOD RELEASE HANDLE LATCH If you feel the hood latch handle. Pull the hood release handle located under the front edge of the dashboard. The hood will pop up until you can ...open the hood without lifting the hood latch handle, or the hood latch handle moves stiffly or does not spring back as before, the mechanism should be cleaned and lubricated (see page 227). 1.
...slightly. 2. Slide your fingers under the lower left until it releases the hood. Service Station Procedures Opening the Hood HOOD RELEASE HANDLE LATCH If you feel the hood latch handle. Pull the hood release handle located under the front edge of the dashboard. The hood will pop up until you can ...open the hood without lifting the hood latch handle, or the hood latch handle moves stiffly or does not spring back as before, the mechanism should be cleaned and lubricated (see page 227). 1.

Owner's Manual
Page 156
... rod from the hole. To close the hood, lift it up slightly to about a foot (30 cm) above the fender, then let it is securely latched. Pull the support rod out of its holding clip. Remove the dipstick (orange handle). 2.
... rod from the hole. To close the hood, lift it up slightly to about a foot (30 cm) above the fender, then let it is securely latched. Pull the support rod out of its holding clip. Remove the dipstick (orange handle). 2.
Owner's Manual
Page 197
... Differential Fluid...223 Brake and Clutch Fluid...224 Brake System...224 Clutch System...225 Power Steering...225 Air Cleaner Element...226 Hood Latch...227 Spark Plugs...227 Replacement...227 Specifications...228 Battery...229 Wiper Blades...231 Air Conditioning System...233 Air Conditioning Filter...234 Drive ...Belts...234 Timing Belt...235 Tires...235 Inflation...235 Recommended Tire Pressures for information on your Honda, you may want to take care of yourself. If you have the skills and tools to perform more complex maintenance tasks ...
... Differential Fluid...223 Brake and Clutch Fluid...224 Brake System...224 Clutch System...225 Power Steering...225 Air Cleaner Element...226 Hood Latch...227 Spark Plugs...227 Replacement...227 Specifications...228 Battery...229 Wiper Blades...231 Air Conditioning System...233 Air Conditioning Filter...234 Drive ...Belts...234 Timing Belt...235 Tires...235 Inflation...235 Recommended Tire Pressures for information on your Honda, you may want to take care of yourself. If you have the skills and tools to perform more complex maintenance tasks ...
Owner's Manual
Page 227
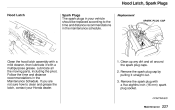
... distance recommendations in the maintenance schedule. Clean up any dirt and oil around the spark plug caps. 2. Hood Latch, Spark Plugs Hood Latch Spark Plugs The spark plugs in your Honda dealer. 1. Lubricate all the moving parts, including the pivot. If you are not sure how to clean and... grease the latch, contact your vehicle should be replaced according to the time and distance recommendations in the Maintenance Schedule. Remove the spark plug...
... distance recommendations in the maintenance schedule. Clean up any dirt and oil around the spark plug caps. 2. Hood Latch, Spark Plugs Hood Latch Spark Plugs The spark plugs in your Honda dealer. 1. Lubricate all the moving parts, including the pivot. If you are not sure how to clean and... grease the latch, contact your vehicle should be replaced according to the time and distance recommendations in the Maintenance Schedule. Remove the spark plug...

Owner's Manual
Page 314
... on...60 Head Restraints...79 Heating and Cooling...98 High Altitude, Starting at...167 High-Low Beam Switch ...60 High-mount Brake Light...237 Hood Latch...227 Hood, Opening the ...154 Horn...59 Hydraulic Clutch...224 Hydroplaning...180 Identification Number, Vehicle...292 Ignition Keys...69 Switch...69 Timing Control System...285...
... on...60 Head Restraints...79 Heating and Cooling...98 High Altitude, Starting at...167 High-Low Beam Switch ...60 High-mount Brake Light...237 Hood Latch...227 Hood, Opening the ...154 Horn...59 Hydraulic Clutch...224 Hydroplaning...180 Identification Number, Vehicle...292 Ignition Keys...69 Switch...69 Timing Control System...285...


