Owner's Manual
Page 5
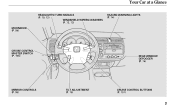
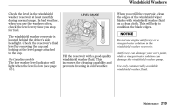
Your Car at a Glance HEADLIGHTS/TURN SIGNALS (P. 70, 72) WINDSHIELD WIPERS/WASHERS (P. 72, 73) MOONROOF (P. 94) HAZARD WARNING LIGHTS (P. 74) CRUISE CONTROL MASTER SWITCH (P. 156) REAR WINDOW DEFOGGER (P. 74) MIRROR CONTROLS (P. 95) TILT ADJUSTMENT (P. 75) CRUISE CONTROL BUTTONS (P. 157) 3
Your Car at a Glance HEADLIGHTS/TURN SIGNALS (P. 70, 72) WINDSHIELD WIPERS/WASHERS (P. 72, 73) MOONROOF (P. 94) HAZARD WARNING LIGHTS (P. 74) CRUISE CONTROL MASTER SWITCH (P. 156) REAR WINDOW DEFOGGER (P. 74) MIRROR CONTROLS (P. 95) TILT ADJUSTMENT (P. 75) CRUISE CONTROL BUTTONS (P. 157) 3
Owner's Manual
Page 57
... the controls and displays that contribute to the daily operation of your Honda. Indicator Lights...59 Gauges ...66 Speedometer ...66 Tachometer ...66 Odometer ...66 Trip Meter ...67 Fuel Gauge ...67 Temperature Gauge ...68 Controls Near the Steering Wheel ...69 Headlights ...70 Daytime Running Lights...71 Instrument Panel Brightness ...71 Turn Signals ...72...
... the controls and displays that contribute to the daily operation of your Honda. Indicator Lights...59 Gauges ...66 Speedometer ...66 Tachometer ...66 Odometer ...66 Trip Meter ...67 Fuel Gauge ...67 Temperature Gauge ...68 Controls Near the Steering Wheel ...69 Headlights ...70 Daytime Running Lights...71 Instrument Panel Brightness ...71 Turn Signals ...72...
Owner's Manual
Page 61
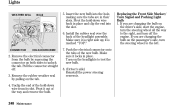
...not fully released can indicate a problem in the ABS. It should go off and the parking brake set. If it comes on the headlights or release the parking brake. If the indicator remains lit after you turn the ignition switch to START (III). For complete information, see...page 282 . If this happens, take the car to check the parking brake. Canada U.S. With the light on models equipped with the high beam headlights. 62 Instruments and Controls Canada Anti-lock Brake System (ABS) Indicator ''Daytime Running Lights'' Indicator Canadian models only Only on , your dealer to...
...not fully released can indicate a problem in the ABS. It should go off and the parking brake set. If it comes on the headlights or release the parking brake. If the indicator remains lit after you turn the ignition switch to START (III). For complete information, see...page 282 . If this happens, take the car to check the parking brake. Canada U.S. With the light on models equipped with the high beam headlights. 62 Instruments and Controls Canada Anti-lock Brake System (ABS) Indicator ''Daytime Running Lights'' Indicator Canadian models only Only on , your dealer to...
Owner's Manual
Page 62
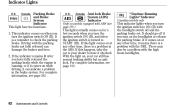
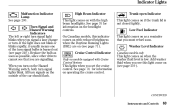
...low. When you see page 219 ). See page 70 for information on with Cruise Control System Trunk-open Indicator This light comes on the headlight controls. Indicator Lights Malfunction Indicator Lamp See page 280 . If the light does not blink or blinks rapidly, it usually means one of ...the car should flash. Cruise Control Indicator Only on models equipped with the high beam headlights. CONTINUED Instruments and Controls 63 Low Fuel Indicator This light comes on when the washer fluid level is burned out (see that you ...
...low. When you see page 219 ). See page 70 for information on with Cruise Control System Trunk-open Indicator This light comes on the headlight controls. Indicator Lights Malfunction Indicator Lamp See page 280 . If the light does not blink or blinks rapidly, it usually means one of ...the car should flash. Cruise Control Indicator Only on models equipped with the high beam headlights. CONTINUED Instruments and Controls 63 Low Fuel Indicator This light comes on when the washer fluid level is burned out (see that you ...
Owner's Manual
Page 68
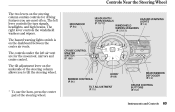
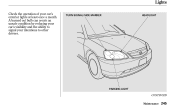
...press the center pad of the steering wheel. Instruments and Controls 69 The controls under the left lever controls the turn signals, headlights, and high beams. The right lever controls the windshield washers and wipers. The tilt adjustment lever on the dashboard between the... center air vents. MIRROR CONTROLS (P.95) TILT ADJUSTMENT (P.75) CRUISE CONTROL MASTER SWITCH (P.156) MOONROOF (P.94) HEADLIGHTS/ TURN SIGNALS (P.70/72) WINDSHIELD WIPERS/WASHERS (P.72/73) HAZARD WARNING LIGHTS (P.74) HORN (P.69) REAR WINDOW DEFOGGER (P.74) CRUISE CONTROL ...
...press the center pad of the steering wheel. Instruments and Controls 69 The controls under the left lever controls the turn signals, headlights, and high beams. The right lever controls the windshield washers and wipers. The tilt adjustment lever on the dashboard between the... center air vents. MIRROR CONTROLS (P.95) TILT ADJUSTMENT (P.75) CRUISE CONTROL MASTER SWITCH (P.156) MOONROOF (P.94) HEADLIGHTS/ TURN SIGNALS (P.70/72) WINDSHIELD WIPERS/WASHERS (P.72/73) HAZARD WARNING LIGHTS (P.74) HORN (P.69) REAR WINDOW DEFOGGER (P.74) CRUISE CONTROL ...
Owner's Manual
Page 69
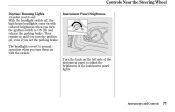
...the turn signal lever forward until you hold the lever back, no matter what position the headlight switch is in ACCESSORY (I) or LOCK (0), you will come on and go off. Controls Near the Steering Wheel Headlights If you leave the lights on with the ignition switch in . 70 Instruments and Controls... low beams to low beams, pull the turn signal lever back lightly, then release it. Turning this switch to the '' '' position turns on the headlights. The blue high beam indicator will stay on the left lever controls the lights. The rotating switch on for as long as you hear a click.
...the turn signal lever forward until you hold the lever back, no matter what position the headlight switch is in ACCESSORY (I) or LOCK (0), you will come on and go off. Controls Near the Steering Wheel Headlights If you leave the lights on with the ignition switch in . 70 Instruments and Controls... low beams to low beams, pull the turn signal lever back lightly, then release it. Turning this switch to the '' '' position turns on the headlights. The blue high beam indicator will stay on the left lever controls the lights. The rotating switch on for as long as you hear a click.
Owner's Manual
Page 70
The headlights revert to normal operation when you turn the ignition switch to adjust the brightness of the instrument panel lights. Controls Near the Steering Wheel Daytime Running Lights Canadian models only Instrument Panel Brightness With the headlight switch off , even if you set the parking brake. Turn the knob on until you turn the ignition off , the high beam headlights come on with reduced brightness when you turn them on with the switch. They remain on the left side of the instrument panel to ON (II) and release the parking brake. Instruments and Controls 71
The headlights revert to normal operation when you turn the ignition switch to adjust the brightness of the instrument panel lights. Controls Near the Steering Wheel Daytime Running Lights Canadian models only Instrument Panel Brightness With the headlight switch off , even if you set the parking brake. Turn the knob on until you turn the ignition off , the high beam headlights come on with reduced brightness when you turn them on with the switch. They remain on the left side of the instrument panel to ON (II) and release the parking brake. Instruments and Controls 71
Owner's Manual
Page 94
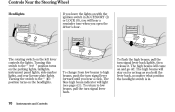
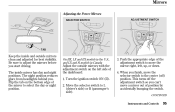
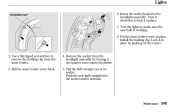
... the bottom edge of position by accidentally bumping the switch. Flip the tab on the left , up, or down. 4. The night position reduces glare from headlights behind you start driving. CONTINUED Instruments and Controls 95 When you can't move a mirror out of the mirror to adjust the mirrors before you . Turn...
... the bottom edge of position by accidentally bumping the switch. Flip the tab on the left , up, or down. 4. The night position reduces glare from headlights behind you start driving. CONTINUED Instruments and Controls 95 When you can't move a mirror out of the mirror to adjust the mirrors before you . Turn...
Owner's Manual
Page 191
It takes your headlights. Apply smooth, even pressure to relearn those skills. A person can cause loss of control in driving conditions. The cruise control should not be seen more ...
It takes your headlights. Apply smooth, even pressure to relearn those skills. A person can cause loss of control in driving conditions. The cruise control should not be seen more ...
Owner's Manual
Page 193
...Dust and Pollen Filter ...235 Drive Belts ...237 Timing Belt ...237 Tires ...238 Inflation ...238 Recommended Tire Pressures for information on your Honda, you may want to obtain a copy, or see your car well maintained and to purchase the Service Manual. This section also includes ... ...241 Replacing Tires and Wheels ...242 Wheels and Tires ...243 Winter Driving ...243 Snow Tires ...243 Traction Devices...244 Lights ...245 Headlight Aiming ...247 Replacing Bulbs ...250 Storing Your Car ...254 Maintenance 195 If you have the skills and tools to perform more complex maintenance...
...Dust and Pollen Filter ...235 Drive Belts ...237 Timing Belt ...237 Tires ...238 Inflation ...238 Recommended Tire Pressures for information on your Honda, you may want to obtain a copy, or see your car well maintained and to purchase the Service Manual. This section also includes ... ...241 Replacing Tires and Wheels ...242 Wheels and Tires ...243 Winter Driving ...243 Snow Tires ...243 Traction Devices...244 Lights ...245 Headlight Aiming ...247 Replacing Bulbs ...250 Storing Your Car ...254 Maintenance 195 If you have the skills and tools to perform more complex maintenance...
Owner's Manual
Page 205
... Check the operation of how to perform any check, turn to use the washers frequently, check the reservoir each time you are unsure of the headlights, parking lights, taillights, high-mount brake light, turn signals, brake lights, and license plate lights monthly. See page 245 . If you stop for wear and...
... Check the operation of how to perform any check, turn to use the washers frequently, check the reservoir each time you are unsure of the headlights, parking lights, taillights, high-mount brake light, turn signals, brake lights, and license plate lights monthly. See page 245 . If you stop for wear and...
Owner's Manual
Page 217
... washer pump. This increases the cleaning capability and prevents freezing in cold weather. This will light when the level is located behind the driver's side headlight.
... washer pump. This increases the cleaning capability and prevents freezing in cold weather. This will light when the level is located behind the driver's side headlight.
Owner's Manual
Page 242
Lights Check the operation of your intentions to other drivers. A burned out bulb can create an unsafe condition by reducing your car's visibility and the ability to signal your car's exterior lights at least once a month. TURN SIGNAL/SIDE MARKER HEADLIGHT PARKING LIGHT CONTINUED Maintenance 245
Lights Check the operation of your intentions to other drivers. A burned out bulb can create an unsafe condition by reducing your car's visibility and the ability to signal your car's exterior lights at least once a month. TURN SIGNAL/SIDE MARKER HEADLIGHT PARKING LIGHT CONTINUED Maintenance 245
Owner's Manual
Page 243
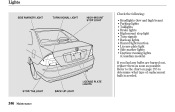
LICENSE PLATE LIGHTS STOP/TAILLIGHT BACK-UP LIGHT 246 Maintenance Lights Check the following: SIDE MARKER LIGHT TURN SIGNAL LIGHT HIGH-MOUNT STOP LIGHT Headlights (low and high beam) Parking lights Taillights Brake lights High-mount stop light Turn signals Back-up lights Hazard light function License plate light Side marker lights Daytime running lights (Canadian models) If you find any bulbs are burned out, replace them as soon as possible. Refer to the chart on page 295 to determine what type of replacement bulb is needed.
LICENSE PLATE LIGHTS STOP/TAILLIGHT BACK-UP LIGHT 246 Maintenance Lights Check the following: SIDE MARKER LIGHT TURN SIGNAL LIGHT HIGH-MOUNT STOP LIGHT Headlights (low and high beam) Parking lights Taillights Brake lights High-mount stop light Turn signals Back-up lights Hazard light function License plate light Side marker lights Daytime running lights (Canadian models) If you find any bulbs are burned out, replace them as soon as possible. Refer to the chart on page 295 to determine what type of replacement bulb is needed.
Owner's Manual
Page 244
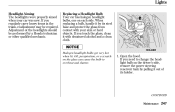
... get very hot when lit. Oil, perspiration, or a scratch on the glass can cause the bulb to change the headlight bulb on each side. If you regularly carry heavy items in the trunk, readjustment may be performed by its holder. Open the hood. If you ...touch the glass, clean it by a Honda technician or other qualified mechanic. Adjustment of its steel base and protect the glass from contact with denatured alcohol and a clean cloth.
... get very hot when lit. Oil, perspiration, or a scratch on the glass can cause the bulb to change the headlight bulb on each side. If you regularly carry heavy items in the trunk, readjustment may be performed by its holder. Open the hood. If you ...touch the glass, clean it by a Honda technician or other qualified mechanic. Adjustment of its steel base and protect the glass from contact with denatured alcohol and a clean cloth.
Owner's Manual
Page 245
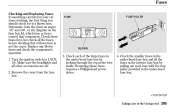
.... If you are changing the bulb on the headlights to test the new bulb. 8. (Driver's side) Reinstall the power steering reservoir. 248 Maintenance Pivot it is marked ''TOP.'' Replacing the Front Side Marker/ Turn ...
.... If you are changing the bulb on the headlights to test the new bulb. 8. (Driver's side) Reinstall the power steering reservoir. 248 Maintenance Pivot it is marked ''TOP.'' Replacing the Front Side Marker/ Turn ...
Owner's Manual
Page 246
...inner fender. 3. Lights HOLDING CLIP 6. Lock it in place by turning it one-quarter turn counterclockwise. 5. Push the new bulb straight into the headlight assembly. Turn it clockwise to make sure the new bulb is working. 8. Put the inner fender cover in place. 7. Pull the bulb straight out... of its socket. Install the holding clip from the headlight assembly by pushing on the center. 2. Insert the socket back into the socket until it in place. Test the lights to lock it bottoms....
...inner fender. 3. Lights HOLDING CLIP 6. Lock it in place by turning it one-quarter turn counterclockwise. 5. Push the new bulb straight into the headlight assembly. Turn it clockwise to make sure the new bulb is working. 8. Put the inner fender cover in place. 7. Pull the bulb straight out... of its socket. Install the holding clip from the headlight assembly by pushing on the center. 2. Insert the socket back into the socket until it in place. Test the lights to lock it bottoms....
Owner's Manual
Page 268
... or the connections are corroded. You may hear a clicking sound or series of the Unexpected 271 Turn the ignition switch to start. If the headlights are OK, there is probably something wrong with the electrical circuit for the ignition switch or starter motor. If the fuses are very dim or...can hear the starter motor operating normally, or the starter motor sounds like it must be in Park or Neutral. See Jump Starting on the headlights and check their brightness. If Your Engine Won't Start Diagnosing why your engine won't start falls into two areas, depending on what you hear...
... or the connections are corroded. You may hear a clicking sound or series of the Unexpected 271 Turn the ignition switch to start. If the headlights are OK, there is probably something wrong with the electrical circuit for the ignition switch or starter motor. If the fuses are very dim or...can hear the starter motor operating normally, or the starter motor sounds like it must be in Park or Neutral. See Jump Starting on the headlights and check their brightness. If Your Engine Won't Start Diagnosing why your engine won't start falls into two areas, depending on what you hear...
Owner's Manual
Page 283
... in the under -hood fuse box. FUSE FUSE PULLER BLOWN 3. Determine from the fuse box. Removing these fuses requires a Phillips-head screwdriver. 4. Make sure the headlights and all the fuses in the interior fuse box by pulling out each of the Unexpected 285 Check those fuses first, but check all the...
... in the under -hood fuse box. FUSE FUSE PULLER BLOWN 3. Determine from the fuse box. Removing these fuses requires a Phillips-head screwdriver. 4. Make sure the headlights and all the fuses in the interior fuse box by pulling out each of the Unexpected 285 Check those fuses first, but check all the...
Owner's Manual
Page 285
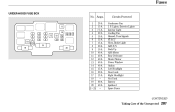
Fuses UNDER-HOOD FUSE BOX No. Amps. 20 A 1 15 A 2 7.5 A 3 20 A 4 10 A 5 15 A 6 15 A 7 20 A 8 10 A 9 40 A 10 40 A 11 40 A 12 40 A 13 40 A 14 15 A 15 20 A 16 15 A 17 18 80 A 19 40 A 20 21 25 Circuits Protected Condenser Fan I. Lights, Exterior Lights Interior Light Cooling Fan Hazard, Turn Signals FI ECU Horn, Brake Light ABS F/S Back Up ABS Motor Rear Defroster Heater Motor Power Window Option Left Headlight Door Lock Right Headlight Not Used Battery Ignition 1 Spare Fuses CONTINUED Taking Care of the Unexpected 287 P.
Fuses UNDER-HOOD FUSE BOX No. Amps. 20 A 1 15 A 2 7.5 A 3 20 A 4 10 A 5 15 A 6 15 A 7 20 A 8 10 A 9 40 A 10 40 A 11 40 A 12 40 A 13 40 A 14 15 A 15 20 A 16 15 A 17 18 80 A 19 40 A 20 21 25 Circuits Protected Condenser Fan I. Lights, Exterior Lights Interior Light Cooling Fan Hazard, Turn Signals FI ECU Horn, Brake Light ABS F/S Back Up ABS Motor Rear Defroster Heater Motor Power Window Option Left Headlight Door Lock Right Headlight Not Used Battery Ignition 1 Spare Fuses CONTINUED Taking Care of the Unexpected 287 P.


