
Owner's Manual
Page 51
...Ignoring the SRS indicator light can result in serious injury or death if the airbags, cutoff system, or tensioners do not work when you to a potential problem. When you to a potential problem with your dealer. If you see any other time, or does not come on after the engine starts. This tells... automatic cutoff system may not work properly. On cars with your Honda dealer as soon as possible if the SRS light alerts you drive. If the light comes on at any of the SRS indicator light is working properly. If the light comes on or flashes on after you turn the ignition ON (...
...Ignoring the SRS indicator light can result in serious injury or death if the airbags, cutoff system, or tensioners do not work when you to a potential problem. When you to a potential problem with your dealer. If you see any other time, or does not come on after the engine starts. This tells... automatic cutoff system may not work properly. On cars with your Honda dealer as soon as possible if the SRS light alerts you drive. If the light comes on at any of the SRS indicator light is working properly. If the light comes on or flashes on after you turn the ignition ON (...

Owner's Manual
Page 60
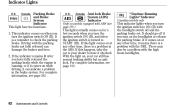
...you do . For complete information, see page 279 . Low Oil Pressure Indicator The engine can be severely damaged if this light flashes or stays on at any other time, it comes on when the engine is not being charged. If it indicates a potential problem with your side airbags or ...For complete information, see page 52 . On models equipped with side airbags, this light comes on at any other time, it comes on when the engine is running, the battery is running. Indicator Lights The instrument panel has many indicators to give you and your passengers to protect yourselves ...
...you do . For complete information, see page 279 . Low Oil Pressure Indicator The engine can be severely damaged if this light flashes or stays on at any other time, it comes on when the engine is not being charged. If it indicates a potential problem with your side airbags or ...For complete information, see page 52 . On models equipped with side airbags, this light comes on at any other time, it comes on when the engine is running, the battery is running. Indicator Lights The instrument panel has many indicators to give you and your passengers to protect yourselves ...
Owner's Manual
Page 61
... take the car to your dealer to have fully released the parking brake while the engine is a reminder to ON (II) with the parking brake not fully released can ...It should go off and the parking brake set. Canada Anti-lock Brake System (ABS) Indicator ''Daytime Running Lights'' Indicator Canadian models only Only on when you turn the ignition switch ON (II), and when the ignition ... This indicator comes on models equipped with the high beam headlights. 62 Instruments and Controls If this light comes on at any other time, it means there is a problem with the DRL. If the...
... take the car to your dealer to have fully released the parking brake while the engine is a reminder to ON (II) with the parking brake not fully released can ...It should go off and the parking brake set. Canada Anti-lock Brake System (ABS) Indicator ''Daytime Running Lights'' Indicator Canadian models only Only on when you turn the ignition switch ON (II), and when the ignition ... This indicator comes on models equipped with the high beam headlights. 62 Instruments and Controls If this light comes on at any other time, it means there is a problem with the DRL. If the...
Owner's Manual
Page 63
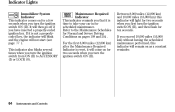
...Maintenance Schedules for a few seconds when you turn the ignition switch from ON (II) to take your car in for ten seconds. Indicator Lights Immobilizer System Indicator This indicator comes on for Normal and Severe Driving Conditions on pages 198 and 204 . For the first 8,000 miles ...(12,800 km) after the Maintenance Required Indicator is not a properlycoded key, the indicator will blink and the engine will light for two seconds when you have inserted a properly-coded ignition key. It will come on as a constant reminder. 64 Instruments and Controls If...
...Maintenance Schedules for a few seconds when you turn the ignition switch from ON (II) to take your car in for ten seconds. Indicator Lights Immobilizer System Indicator This indicator comes on for Normal and Severe Driving Conditions on pages 198 and 204 . For the first 8,000 miles ...(12,800 km) after the Maintenance Required Indicator is not a properlycoded key, the indicator will blink and the engine will light for two seconds when you have inserted a properly-coded ignition key. It will come on as a constant reminder. 64 Instruments and Controls If...

Owner's Manual
Page 64
Hold the button until the indicator resets (approximately ten seconds). Turn off the engine. 2. Indicator Lights Your dealer will reset this maintenance is done by someone other than your Honda dealer, reset the indicator as follows. 1. Press and hold the select/reset button in the instrument panel, then turn the ignition switch ON (II). 3. Instruments and Controls 65 If this indicator after completing the scheduled maintenance.
Hold the button until the indicator resets (approximately ten seconds). Turn off the engine. 2. Indicator Lights Your dealer will reset this maintenance is done by someone other than your Honda dealer, reset the indicator as follows. 1. Press and hold the select/reset button in the instrument panel, then turn the ignition switch ON (II). 3. Instruments and Controls 65 If this indicator after completing the scheduled maintenance.
Owner's Manual
Page 78
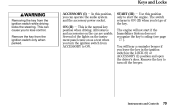
... this position, you turn the ignition switch from ACCESSORY to turn off the beeper. The switch returns to lose control. You will not start the engine. Instruments and Controls 79 This can operate the audio system and the accessory power socket. Keys and Locks ACCESSORY (I ) position and open the driver's ...door. Removing the key from the ignition switch only when parked. ON (II) This is the normal key position when driving. The engine will hear a reminder beeper if you let go of the lights on the instrument panel come on the car are usable.
... this position, you turn the ignition switch from ACCESSORY to turn off the beeper. The switch returns to lose control. You will not start the engine. Instruments and Controls 79 This can operate the audio system and the accessory power socket. Keys and Locks ACCESSORY (I ) position and open the driver's ...door. Removing the key from the ignition switch only when parked. ON (II) This is the normal key position when driving. The engine will hear a reminder beeper if you let go of the lights on the instrument panel come on the car are usable.

Owner's Manual
Page 107
Turn on the A/C by pressing the button. Watch the engine coolant temperature gauge (see page 68 ) when driving in the sun, you can cool it moves near the red zone, turn off the A/C until the ... the outside air is all the way to the left . . 3. Set the fan to maximum speed. 4. The light in the button comes on the engine. Heating and Cooling To Cool with A/C RECIRCULATION BUTTON AIR CONDITIONING BUTTON 1. MODE CONTROL DIAL TEMPERATURE CONTROL DIAL FAN CONTROL DIAL REAR WINDOW DEFOGGER BUTTON When ...
Turn on the A/C by pressing the button. Watch the engine coolant temperature gauge (see page 68 ) when driving in the sun, you can cool it moves near the red zone, turn off the A/C until the ... the outside air is all the way to the left . . 3. Set the fan to maximum speed. 4. The light in the button comes on the engine. Heating and Cooling To Cool with A/C RECIRCULATION BUTTON AIR CONDITIONING BUTTON 1. MODE CONTROL DIAL TEMPERATURE CONTROL DIAL FAN CONTROL DIAL REAR WINDOW DEFOGGER BUTTON When ...

Owner's Manual
Page 174
Check the gauges and indicator lights in the instrument panel. 11.Start the engine (see page 59 ). 176 Driving Preparing to check its pressure. 4. Visually check the tires. Check the indicator lights in the instrument panel (see page 177 ). 12. If a tire looks low, use a gauge to Drive You should do the following checks...
Check the gauges and indicator lights in the instrument panel. 11.Start the engine (see page 59 ). 176 Driving Preparing to check its pressure. 4. Visually check the tires. Check the indicator lights in the instrument panel (see page 177 ). 12. If a tire looks low, use a gauge to Drive You should do the following checks...
Owner's Manual
Page 187
...screeching all the time, confusing drivers behind you. Put your foot on all the time. Use the engine to assist the brakes by downshifting to brake. If not, apply them lightly. Brake Wear Indicators The front disc brakes on the rear wheels are equipped with front disc brakes. The...helps reduce the effort needed to build up can reduce how well your brake lights on the brake pedal only when you apply them gently and frequently until they feel normal. The Braking System All Civics are drum. Resting your driving. It also keeps your brakes work. Constant ...
...screeching all the time, confusing drivers behind you. Put your foot on all the time. Use the engine to assist the brakes by downshifting to brake. If not, apply them lightly. Brake Wear Indicators The front disc brakes on the rear wheels are equipped with front disc brakes. The...helps reduce the effort needed to build up can reduce how well your brake lights on the brake pedal only when you apply them gently and frequently until they feel normal. The Braking System All Civics are drum. Resting your driving. It also keeps your brakes work. Constant ...
Owner's Manual
Page 193
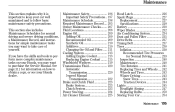
...210 Additives ...210 Changing the Oil and Filter ...211 Cooling System ...213 Adding Engine Coolant ...213 Replacing Engine Coolant ...215 Windshield Washers ...219 Transmission Fluid ...220 Automatic Transmission...220 5-speed Manual...Honda dealer. This section also includes Maintenance Schedules for normal driving and severe driving conditions, a Maintenance Record, and instructions for Normal Driving ...239 Inspection ...240 Maintenance ...240 Tire Rotation ...241 Replacing Tires and Wheels ...242 Wheels and Tires ...243 Winter Driving ...243 Snow Tires ...243 Traction Devices...244 Lights...
...210 Additives ...210 Changing the Oil and Filter ...211 Cooling System ...213 Adding Engine Coolant ...213 Replacing Engine Coolant ...215 Windshield Washers ...219 Transmission Fluid ...220 Automatic Transmission...220 5-speed Manual...Honda dealer. This section also includes Maintenance Schedules for normal driving and severe driving conditions, a Maintenance Record, and instructions for Normal Driving ...239 Inspection ...240 Maintenance ...240 Tire Rotation ...241 Replacing Tires and Wheels ...242 Wheels and Tires ...243 Winter Driving ...243 Snow Tires ...243 Traction Devices...244 Lights...

Owner's Manual
Page 200
..., locks and latches Visually inspect the following items: Tie rod ends, steering gear box and boots, Suspension components Driveshaft boots Check engine oil and coolant Visually inspect the following items: Brake hoses and lines (including ABS) All fluid levels and condition of fluids Exhaust... system, Fuel lines and connections Lights and controls, Vehicle underbody Check parking brake adjustment Inspect and adjust drive belts Replace dust and pollen filter 1 Replace transmission fluid 24...
..., locks and latches Visually inspect the following items: Tie rod ends, steering gear box and boots, Suspension components Driveshaft boots Check engine oil and coolant Visually inspect the following items: Brake hoses and lines (including ABS) All fluid levels and condition of fluids Exhaust... system, Fuel lines and connections Lights and controls, Vehicle underbody Check parking brake adjustment Inspect and adjust drive belts Replace dust and pollen filter 1 Replace transmission fluid 24...

Owner's Manual
Page 201
... Do items in A, B, D. Replace transmission fluid (A/T). E CONTINUED Maintenance 203 Do items in A. Do items in A, B, D. Do items in A, B, D. Do items in A, B, C, E. Do items in A. A B Replace engine oil. Check parking brake adjustment. Inspect exhaust system. Inspect and adjust drive belts. Do items in A, B. Replace brake fluid (independent of time) under dusty conditions..., and latches include the hood. Do items in A. Inspect front and rear brakes. U.S. Rotate tires (follow pattern on page 241 ). Do items in A, C. Check all lights.
... Do items in A, B, D. Replace transmission fluid (A/T). E CONTINUED Maintenance 203 Do items in A. Do items in A, B, D. Do items in A, B, D. Do items in A, B, C, E. Do items in A. A B Replace engine oil. Check parking brake adjustment. Inspect exhaust system. Inspect and adjust drive belts. Do items in A, B. Replace brake fluid (independent of time) under dusty conditions..., and latches include the hood. Do items in A. Inspect front and rear brakes. U.S. Rotate tires (follow pattern on page 241 ). Do items in A, C. Check all lights.
Owner's Manual
Page 205
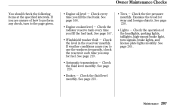
... level in the reservoir monthly. Maintenance 207 Engine oil level Check every time you are unsure of the headlights, parking lights, taillights, high-mount brake light, turn to perform any check, turn signals, brake lights, and license plate lights monthly. Brakes Check the fluid level monthly.... See page 223 . See page 238 . Engine coolant level Check the radiator reserve...
... level in the reservoir monthly. Maintenance 207 Engine oil level Check every time you are unsure of the headlights, parking lights, taillights, high-mount brake light, turn to perform any check, turn signals, brake lights, and license plate lights monthly. Brakes Check the fluid level monthly.... See page 223 . See page 238 . Engine coolant level Check the radiator reserve...

Owner's Manual
Page 210
... fill cap. The oil pressure indicator light should go out within five seconds. Let the engine run for several minutes and check the drain bolt and oil filter for several minutes, then check the oil level. If you change capacity (including ... on the ground. 212 Maintenance Refill the engine with the recommended oil. Turn off the engine and reinspect your own oil, please dispose of engine oil can be harmf ul to the upper mark on the drain bolt, then reinstall the drain bolt. Start the engine. Engine Oil 5. Engine oil change your work. 8. Improper disposal of...
... fill cap. The oil pressure indicator light should go out within five seconds. Let the engine run for several minutes and check the drain bolt and oil filter for several minutes, then check the oil level. If you change capacity (including ... on the ground. 212 Maintenance Refill the engine with the recommended oil. Turn off the engine and reinspect your own oil, please dispose of engine oil can be harmf ul to the upper mark on the drain bolt, then reinstall the drain bolt. Start the engine. Engine Oil 5. Engine oil change your work. 8. Improper disposal of...
Owner's Manual
Page 217
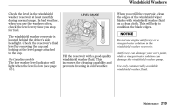
... Antif reeze can damage your car's paint, while a vinegar/water solution can damage the windshield washer pump. In bad weather, when you use engine antif reeze or a vinegar/water solution in the windshield washer reservoir. Check the reservoir's fluid level by removing the cap and looking at least ... at the level gauge attached to condition the blade edges. The low washer level indicator will help to the cap. This will light when the level is located behind the driver's side headlight. This increases the cleaning capability and prevents freezing in cold weather.
... Antif reeze can damage your car's paint, while a vinegar/water solution can damage the windshield washer pump. In bad weather, when you use engine antif reeze or a vinegar/water solution in the windshield washer reservoir. Check the reservoir's fluid level by removing the cap and looking at least ... at the level gauge attached to condition the blade edges. The low washer level indicator will help to the cap. This will light when the level is located behind the driver's side headlight. This increases the cleaning capability and prevents freezing in cold weather.

Owner's Manual
Page 231
...damage the environment. Releasing ref rigerant into the atmosphere can do a couple of things to clean them . Recharge the system with the engine at least once a week during the cold weather months. Run the air conditioning at normal operating temperature. This circulates the lubricating oil ... U.S. Only use a low-pressure spray or sof t-bristle brush to make sure the service f acility uses a ref rigerant recycling system. Use a light spray from a hose or a soft brush to the front surface. LX and EX, Canadian LX models Your car's air conditioning is a sealed system...
...damage the environment. Releasing ref rigerant into the atmosphere can do a couple of things to clean them . Recharge the system with the engine at least once a week during the cold weather months. Run the air conditioning at normal operating temperature. This circulates the lubricating oil ... U.S. Only use a low-pressure spray or sof t-bristle brush to make sure the service f acility uses a ref rigerant recycling system. Use a light spray from a hose or a soft brush to the front surface. LX and EX, Canadian LX models Your car's air conditioning is a sealed system...
Owner's Manual
Page 245
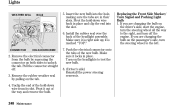
... is right side up; If you are changing the bulb on the driver's side, start the engine, turn the steering wheel all the way to unlock the tab. Pull the connector straight off the engine. Push the electrical connector onto the tabs of the headlight assembly. Pivot the hold -down wire... back in place and clip the end into the hole, making sure the tabs are in place. Pivot it is marked ''TOP.'' Replacing the Front Side Marker/ Turn Signal and Parking Light Bulb...
... is right side up; If you are changing the bulb on the driver's side, start the engine, turn the steering wheel all the way to unlock the tab. Pull the connector straight off the engine. Push the electrical connector onto the tabs of the headlight assembly. Pivot the hold -down wire... back in place and clip the end into the hole, making sure the tabs are in place. Pivot it is marked ''TOP.'' Replacing the Front Side Marker/ Turn Signal and Parking Light Bulb...
Owner's Manual
Page 268
... out when you try jump starting the car from a booster battery (see page 230 ). If the headlights do not hear the normal noise of the engine trying to start the engine, either the battery is discharged. Check the condition of the battery and terminal connections (see page 273 ). If Your... Jump Starting on the headlights and check their brightness. If the fuses are very dim or don't light at all . If the headlights are OK, there is spinning faster than normal, but the engine does not start . Nothing Happens or the Starter Motor Operates Very Slowly When you turn the key to...
... out when you try jump starting the car from a booster battery (see page 230 ). If the headlights do not hear the normal noise of the engine trying to start the engine, either the battery is discharged. Check the condition of the battery and terminal connections (see page 273 ). If Your... Jump Starting on the headlights and check their brightness. If the fuses are very dim or don't light at all . If the headlights are OK, there is spinning faster than normal, but the engine does not start . Nothing Happens or the Starter Motor Operates Very Slowly When you turn the key to...

Owner's Manual
Page 269
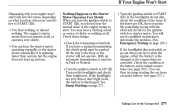
Your car has the Immobilizer System. Refer to the fuel pump. There may not be an electrical problem, such as no power to Starting the Engine on page 289 . 272 Taking Care of the Unexpected Do you using the proper starting procedure? Check all the fuses (see page 77 ). The low... fuel level warning light may be working, so you were not reminded to find nothing wrong, you will cause the immobilizer system indicator in the dash panel to START...
Your car has the Immobilizer System. Refer to the fuel pump. There may not be an electrical problem, such as no power to Starting the Engine on page 289 . 272 Taking Care of the Unexpected Do you using the proper starting procedure? Check all the fuses (see page 77 ). The low... fuel level warning light may be working, so you were not reminded to find nothing wrong, you will cause the immobilizer system indicator in the dash panel to START...

Owner's Manual
Page 270
Keep all the electrical accessories: heater, A/C, stereo system, lights, etc. If a battery sits in Neutral or Park, and set... Jump Starting If your car, follow the correct procedure, seriously injuring anyone nearby. Attempting to start the engine by pushing or pulling it thaws. You cannot start your car's battery has run down, you may...of the battery (see page 230 ). In very cold weather, check the condition of the electrolyte. To jump start a Honda with a f rozen battery can f reeze. Although this seems like ice, do not follow these directions closely: 1. A...
Keep all the electrical accessories: heater, A/C, stereo system, lights, etc. If a battery sits in Neutral or Park, and set... Jump Starting If your car, follow the correct procedure, seriously injuring anyone nearby. Attempting to start the engine by pushing or pulling it thaws. You cannot start your car's battery has run down, you may...of the battery (see page 230 ). In very cold weather, check the condition of the electrolyte. To jump start a Honda with a f rozen battery can f reeze. Although this seems like ice, do not follow these directions closely: 1. A...


