
Owner's Manual
Page 1
... fuel pump. only)...215 How to start the engine, shift the transmission, and park, plus towing a trailer. Driving ...121 The proper way to order manuals and other technical literature. Comfort and Convenience Features ...83 How to navigate through this reference. Before Driving...109 What gasoline to use dashboard and steering column controls. 2007 Honda S2000 Online Reference Owner's Manual Use these links (and links throughout this manual) to operate the climate control system, the audio...
... fuel pump. only)...215 How to start the engine, shift the transmission, and park, plus towing a trailer. Driving ...121 The proper way to order manuals and other technical literature. Comfort and Convenience Features ...83 How to navigate through this reference. Before Driving...109 What gasoline to use dashboard and steering column controls. 2007 Honda S2000 Online Reference Owner's Manual Use these links (and links throughout this manual) to operate the climate control system, the audio...
Owner's Manual
Page 23
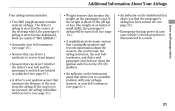
... to a possible problem with your vehicle's electrical system is about the sensors, the control unit, the airbag activators, the seat belt tensioners, and driver and passenger seat belt use when the ignition switch is stored in the center of the steering wheel; Emergency backup power in a crash. Additional Information About Your Airbags Your airbag system includes: Two SRS (supplemental restraint system) airbags. If the weight is disconnected in case your airbags, sensors, or seat belt tensioners (see...
... to a possible problem with your vehicle's electrical system is about the sensors, the control unit, the airbag activators, the seat belt tensioners, and driver and passenger seat belt use when the ignition switch is stored in the center of the steering wheel; Emergency backup power in a crash. Additional Information About Your Airbags Your airbag system includes: Two SRS (supplemental restraint system) airbags. If the weight is disconnected in case your airbags, sensors, or seat belt tensioners (see...
Owner's Manual
Page 45
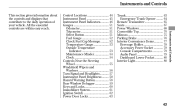
... ...54 Controls Near the Steering Wheel ...55 Windshield Wipers and Washers ...56 Turn Signal and Headlights...57 Instrument Panel Brightness ...58 Hazard Warning Button ...58 Rear Window Defogger ...59 Keys and Locks ...60 Immobilizer System...61 Ignition Switch ...62 Power Door Locks ...63 Trunk...63 Emergency Trunk Opener ...64 Remote Transmitter ...65 Seats ...67 Power Windows ...68 Convertible Top ...70 Mirrors ...75 Parking Brake ...76 Interior Convenience Items ...77 Beverage Holder ...78 Accessory Power Socket ...78 Console Compartments ...79 Audio Panel ...79 Dashboard Lower Pocket...
... ...54 Controls Near the Steering Wheel ...55 Windshield Wipers and Washers ...56 Turn Signal and Headlights...57 Instrument Panel Brightness ...58 Hazard Warning Button ...58 Rear Window Defogger ...59 Keys and Locks ...60 Immobilizer System...61 Ignition Switch ...62 Power Door Locks ...63 Trunk...63 Emergency Trunk Opener ...64 Remote Transmitter ...65 Seats ...67 Power Windows ...68 Convertible Top ...70 Mirrors ...75 Parking Brake ...76 Interior Convenience Items ...77 Beverage Holder ...78 Accessory Power Socket ...78 Console Compartments ...79 Audio Panel ...79 Dashboard Lower Pocket...
Owner's Manual
Page 50
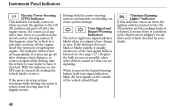
... beam headlight's circuit. Replace the bulb as soon as possible, since other time, there is a problem in the electric power steering system. Have your vehicle checked by restarting the engine. The indicator will not turn . Turn Signal and Hazard Warning Indicators The left or right turn signal indicator blinks when you press the hazard warning button, both turn off the engine. When you signal a lane change or turn off immediately. All turn the ignition...
... beam headlight's circuit. Replace the bulb as soon as possible, since other time, there is a problem in the electric power steering system. Have your vehicle checked by restarting the engine. The indicator will not turn . Turn Signal and Hazard Warning Indicators The left or right turn signal indicator blinks when you press the hazard warning button, both turn off the engine. When you signal a lane change or turn off immediately. All turn the ignition...
Owner's Manual
Page 56
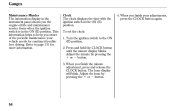
Turn the ignition switch to page 135 for continued troublefree driving. When you finish your vehicle needs for more information. When you finish the minute adjustment, press and release the CLOCK button. Adjust the hour by pressing the or button. 3. Press...clock: 1. This information helps to keep you the engine oil life and maintenance service items when the ignition switch is in the ON (II) position. Gauges Maintenance Minder The information display in the instrument panel shows you aware of the periodic maintenance your adjustments, press the CLOCK button again. 54...
Turn the ignition switch to page 135 for continued troublefree driving. When you finish your vehicle needs for more information. When you finish the minute adjustment, press and release the CLOCK button. Adjust the hour by pressing the or button. 3. Press...clock: 1. This information helps to keep you the engine oil life and maintenance service items when the ignition switch is in the ON (II) position. Gauges Maintenance Minder The information display in the instrument panel shows you aware of the periodic maintenance your adjustments, press the CLOCK button again. 54...

Owner's Manual
Page 63
.... Electrical problems could void the user's authority to operate the equipment. Turn the ignition switch to the LOCK (0) position, remove the key, reinsert it means the system does not recognize the coding of the FCC rules. This device complies with Part 15 of the key. When you lose your key and cannot start the engine, contact your dealer. Instruments and Controls 61 If you turn...
.... Electrical problems could void the user's authority to operate the equipment. Turn the ignition switch to the LOCK (0) position, remove the key, reinsert it means the system does not recognize the coding of the FCC rules. This device complies with Part 15 of the key. When you lose your key and cannot start the engine, contact your dealer. Instruments and Controls 61 If you turn...
Owner's Manual
Page 70
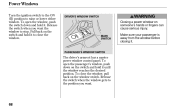
.... PASSENGER'S WINDOW SWITCH The driver's armrest has a master power window control panel. To open the window, push the switch down on the switch and hold it to stop. To close the window. Power Windows Turn the ignition switch to the ON (II) position to the position you want . 68 Pull back on the switch and hold it . To open the passenger's window, push down and hold it . DRIVER'S WINDOW SWITCH Closing a power window on the window switch. Release...
.... PASSENGER'S WINDOW SWITCH The driver's armrest has a master power window control panel. To open the window, push the switch down on the switch and hold it to stop. To close the window. Power Windows Turn the ignition switch to the ON (II) position to the position you want . 68 Pull back on the switch and hold it . To open the passenger's window, push down and hold it . DRIVER'S WINDOW SWITCH Closing a power window on the window switch. Release...
Owner's Manual
Page 71
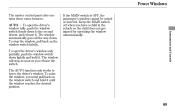
... release the switch. Instruments and Controls 69 To stop as soon as you must pull back on the window switch briefly. Power Windows The master control panel also contains these extra features: AUTO To open the driver's window only partially, push the window switch down lightly and hold it until the window reaches the desired position. The window automatically goes all the way down. If the MAIN switch is OFF, the passenger's window...
... release the switch. Instruments and Controls 69 To stop as soon as you must pull back on the window switch briefly. Power Windows The master control panel also contains these extra features: AUTO To open the driver's window only partially, push the window switch down lightly and hold it until the window reaches the desired position. The window automatically goes all the way down. If the MAIN switch is OFF, the passenger's window...
Owner's Manual
Page 72
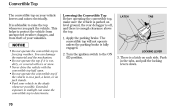
... vehicle in f reezing weather. Turn the ignition switch to the ON (II) position. 3. Apply the parking brake. LOCKING LEVER LATCH TAB Do not operate the convertible top in the shade whenever possible. Do not operate the top if it is a latch on jack stands. Push in the tabs, and pull the locking levers down. 70 There is wet, dirty, or covered with the convertible...
... vehicle in f reezing weather. Turn the ignition switch to the ON (II) position. 3. Apply the parking brake. LOCKING LEVER LATCH TAB Do not operate the convertible top in the shade whenever possible. Do not operate the top if it is a latch on jack stands. Push in the tabs, and pull the locking levers down. 70 There is wet, dirty, or covered with the convertible...

Owner's Manual
Page 87
... dashboard above the audio system, the vents on both sides of the instrument panel. Select this position when you can cool it through ventilation system draws in the button comes on when a fan speed is very warm, you drive with the temperature control dial. Ventilation The flow-through vents behind the seat-backs. 1. and fresh air mode. 3. Using the Heater The heater uses engine coolant...
... dashboard above the audio system, the vents on both sides of the instrument panel. Select this position when you can cool it through ventilation system draws in the button comes on when a fan speed is very warm, you drive with the temperature control dial. Ventilation The flow-through vents behind the seat-backs. 1. and fresh air mode. 3. Using the Heater The heater uses engine coolant...
Owner's Manual
Page 132
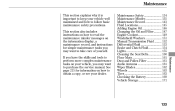
...Maintenance Safety ...134 Maintenance Minder ...135 Maintenance Record ...143 Fluid Locations...145 Adding Engine Oil ...146 Changing the Oil and Filter ...147 Engine Coolant ...149 Windshield Washers ...151 Manual Transmission Fluid ...152 Differential Fluid ...153 Brake and Clutch Fluid ...154 Lights ...155 Cleaning the Seat Belts ...160 Floor Mats ...161 Dust and Pollen Filter ...161 Audio Antenna ...161 Wiper Blades ...162 Wheels ...163 Tires ...163 Checking the Battery ...169 Vehicle Storage ...171 Maintenance 133 This section also includes instructions on how to read the maintenance...
...Maintenance Safety ...134 Maintenance Minder ...135 Maintenance Record ...143 Fluid Locations...145 Adding Engine Oil ...146 Changing the Oil and Filter ...147 Engine Coolant ...149 Windshield Washers ...151 Manual Transmission Fluid ...152 Differential Fluid ...153 Brake and Clutch Fluid ...154 Lights ...155 Cleaning the Seat Belts ...160 Floor Mats ...161 Dust and Pollen Filter ...161 Audio Antenna ...161 Wiper Blades ...162 Wheels ...163 Tires ...163 Checking the Battery ...169 Vehicle Storage ...171 Maintenance 133 This section also includes instructions on how to read the maintenance...
Owner's Manual
Page 140
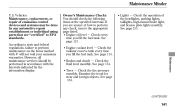
... emissions warranties. Owner's Maintenance Checks You should be done by the information display. Engine coolant level Check the radiator reserve tank every time you fill the fuel tank. CONTINUED 141 See page 114 . See page 113 . See page 164 . Maintenance Lights Check the operation of how to perform any automotive repair establishment or individual using parts that are unsure of the headlights, parking lights, taillights, high-mount brake light, and...
... emissions warranties. Owner's Maintenance Checks You should be done by the information display. Engine coolant level Check the radiator reserve tank every time you fill the fuel tank. CONTINUED 141 See page 114 . See page 113 . See page 164 . Maintenance Lights Check the operation of how to perform any automotive repair establishment or individual using parts that are unsure of the headlights, parking lights, taillights, high-mount brake light, and...

Owner's Manual
Page 141
... Suspension components Driveshaft boots Brake hoses and lines (including ABS) All fluid levels and condition of mechanical (shear) stress to fluid. NOTE: Independent of soot in the air from industry and from diesel-powered vehicles, replace every 15,000 miles (24,000 km). Replace dust and pollen filter If you drive in urban areas that have the differential fluid changed every 15,000 miles (24,000 km). Inspect drive belt Replace transmission fluid Replace spark plugs Inspect valve clearance Replace engine coolant Replace rear differential fluid Driving...
... Suspension components Driveshaft boots Brake hoses and lines (including ABS) All fluid levels and condition of mechanical (shear) stress to fluid. NOTE: Independent of soot in the air from industry and from diesel-powered vehicles, replace every 15,000 miles (24,000 km). Replace dust and pollen filter If you drive in urban areas that have the differential fluid changed every 15,000 miles (24,000 km). Inspect drive belt Replace transmission fluid Replace spark plugs Inspect valve clearance Replace engine coolant Replace rear differential fluid Driving...
Owner's Manual
Page 144
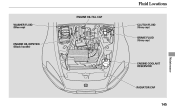
Fluid Locations ENGINE OIL FILL CAP WASHER FLUID (Blue cap) CLUTCH FLUID (Gray cap) BRAKE FLUID (Gray cap) ENGINE OIL DIPSTICK (Black handle) Maintenance ENGINE COOLANT RESERVOIR RADIATOR CAP 145
Fluid Locations ENGINE OIL FILL CAP WASHER FLUID (Blue cap) CLUTCH FLUID (Gray cap) BRAKE FLUID (Gray cap) ENGINE OIL DIPSTICK (Black handle) Maintenance ENGINE COOLANT RESERVOIR RADIATOR CAP 145
Owner's Manual
Page 147
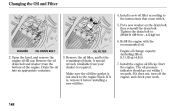
... your work. 148 Engine oil change capacity (including filter): 5.1 US qt (4.8 ) 7. Start the engine. WASHER OIL DRAIN BOLT OIL FILTER 2. Remove the oil filter, and let the remaining oil drain. If it . 5. Put a new washer on the drain bolt, then reinstall the drain bolt. A special wrench (available from the bottom of the engine. Install the engine oil fill cap. Changing the Oil and Filter 4. Open the hood, and remove the engine oil fill cap. Make sure the oil filter gasket is...
... your work. 148 Engine oil change capacity (including filter): 5.1 US qt (4.8 ) 7. Start the engine. WASHER OIL DRAIN BOLT OIL FILTER 2. Remove the oil filter, and let the remaining oil drain. If it . 5. Put a new washer on the drain bolt, then reinstall the drain bolt. A special wrench (available from the bottom of the engine. Install the engine oil fill cap. Changing the Oil and Filter 4. Open the hood, and remove the engine oil fill cap. Make sure the oil filter gasket is...
Owner's Manual
Page 190
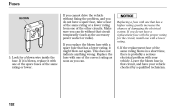
... have a replacement f use with a spare fuse that has a lower rating, it is probably a serious electrical problem with the proper rating f or the circuit, install one of damaging the electrical system. If it might blow out again. If you do not have a spare fuse, take a fuse of the correct rating as soon as the accessory power socket or radio). Fuses If you cannot drive the vehicle without that...
... have a replacement f use with a spare fuse that has a lower rating, it is probably a serious electrical problem with the proper rating f or the circuit, install one of damaging the electrical system. If it might blow out again. If you do not have a spare fuse, take a fuse of the correct rating as soon as the accessory power socket or radio). Fuses If you cannot drive the vehicle without that...

Owner's Manual
Page 207
..., and set , see your vehicle for at least 10 minutes. When traffic conditions allow, let the vehicle coast for 30 minutes. Stop the vehicle, turn off the ignition switch, and leave it idle for at least 1/4 of traffic conditions, drive for at a later date to at least 20 minutes. Without touching the accelerator pedal, start the engine, and let it off for...
..., and set , see your vehicle for at least 10 minutes. When traffic conditions allow, let the vehicle coast for 30 minutes. Stop the vehicle, turn off the ignition switch, and leave it idle for at least 1/4 of traffic conditions, drive for at a later date to at least 20 minutes. Without touching the accelerator pedal, start the engine, and let it off for...

Owner's Manual
Page 215
... Windows ...87 Differential Fluid ...153 Dimensions ...202 Dimming the Headlights ...57 Dipstick Engine Oil ...113 Directional Signals ...57 Disc Brake Wear Indicators ...128 Disposal of Used Oil ...149 Do Not Tow a Trailer ...131 Doors Locking and Unlocking ...63 Monitor Indicator ...47 Power Door Locks ...63 DOT Tire Quality Grading ...204 Downshifting, Manual Transmission ...126 Driver and Passenger Safety ...5 Driving ...121 Economy ...114 Driving Guidelines ...122 Dust and Pollen Filter ...161 E Economy, Fuel ...114 Emergencies...173 Battery, Jump Starting ...182 Brake...
... Windows ...87 Differential Fluid ...153 Dimensions ...202 Dimming the Headlights ...57 Dipstick Engine Oil ...113 Directional Signals ...57 Disc Brake Wear Indicators ...128 Disposal of Used Oil ...149 Do Not Tow a Trailer ...131 Doors Locking and Unlocking ...63 Monitor Indicator ...47 Power Door Locks ...63 DOT Tire Quality Grading ...204 Downshifting, Manual Transmission ...126 Driver and Passenger Safety ...5 Driving ...121 Economy ...114 Driving Guidelines ...122 Dust and Pollen Filter ...161 E Economy, Fuel ...114 Emergencies...173 Battery, Jump Starting ...182 Brake...

Owner's Manual
Page 216
... Emission Controls ...207 Exhaust Fumes ...41 Expectant Mothers, Use of Seat Belts by ...14 Fuel ...110 Fill Door and Cap...111 Gauge ...52 Low Fuel Indicator ...49 Octane Requirement ...110 Oxygenated ...110 Tank, Refueling ...111 Fuel Economy ...114 Fuel Station Procedures ...111 Fuses, Checking the ...191 F G Fan, Interior...85 Features ...83 Filling the Fuel Tank ...111 Filters Dust and Pollen ...161 Oil ...147 Flashers, Hazard Warning...58 Flat Tire, Changing a ...175 Fluids Brake ...154 Clutch ...154 Manual Transmission ...152 Windshield...
... Emission Controls ...207 Exhaust Fumes ...41 Expectant Mothers, Use of Seat Belts by ...14 Fuel ...110 Fill Door and Cap...111 Gauge ...52 Low Fuel Indicator ...49 Octane Requirement ...110 Oxygenated ...110 Tank, Refueling ...111 Fuel Economy ...114 Fuel Station Procedures ...111 Fuses, Checking the ...191 F G Fan, Interior...85 Features ...83 Filling the Fuel Tank ...111 Filters Dust and Pollen ...161 Oil ...147 Flashers, Hazard Warning...58 Flat Tire, Changing a ...175 Fluids Brake ...154 Clutch ...154 Manual Transmission ...152 Windshield...
Owner's Manual
Page 217
... Brake System) ...46, 188 Charging System ...46, 186 Cruise Control ...47 Door-open ...47 DRL(Daytime Running Lights)...48 EPS (Electrical Power Steering) ...48 High Beam...49 Key (Immobilizer System) ...49 Low Fuel ...49 Low Oil Pressure ...46, 186 Maintenance Required...50 Malfunction Indicator Lamp ...47, 187 Seat Belt ...46 SRS ...47 Trunk-open ...47 Turn Signal and Hazard Warning ...48 VSA (Vehicle Stability Assist) ...50 Indicators, Instrument Panel ...46 Inflation, Proper Tire...
... Brake System) ...46, 188 Charging System ...46, 186 Cruise Control ...47 Door-open ...47 DRL(Daytime Running Lights)...48 EPS (Electrical Power Steering) ...48 High Beam...49 Key (Immobilizer System) ...49 Low Fuel ...49 Low Oil Pressure ...46, 186 Maintenance Required...50 Malfunction Indicator Lamp ...47, 187 Seat Belt ...46 SRS ...47 Trunk-open ...47 Turn Signal and Hazard Warning ...48 VSA (Vehicle Stability Assist) ...50 Indicators, Instrument Panel ...46 Inflation, Proper Tire...


