

Owner's Manual
Page 2
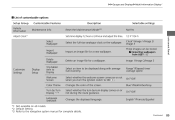
...for vehicles sold . Your particular model may find descriptions of equipment and features that are not on some of these features. Images throughout this publication were in effect at any time without notice and without incurring any obligation. This owner's manual is sold in... The information and specifications included in this owner's manual (including the front cover) represent features and equipment that are available on your vehicle. Honda Motor Co., Ltd. You may not have some , but not all models of your particular model. Contents This owner's manual should be ...
...for vehicles sold . Your particular model may find descriptions of equipment and features that are not on some of these features. Images throughout this publication were in effect at any time without notice and without incurring any obligation. This owner's manual is sold in... The information and specifications included in this owner's manual (including the front cover) represent features and equipment that are available on your vehicle. Honda Motor Co., Ltd. You may not have some , but not all models of your particular model. Contents This owner's manual should be ...
Owner's Manual
Page 91
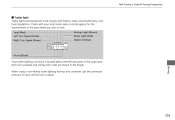
...not when you turn the ignition switch to the navigation system manual for a wallpaper. Import an image file for a new wallpaper. 2 Importing wallpapers from USB P. 92 Instrument Panel Delete an image file for complete details. Continued 89 Changes the displayed language. Sets time display 12 hour or... 24 hour and adjust the time. Image 1/Image 2/Image 3 Range*2/Elapsed time/ Average speed On*2/Off Blue*2/Red/Amber/Gray On*2/Off English*2/Francais/Español *1: Not available on all...
...not when you turn the ignition switch to the navigation system manual for a wallpaper. Import an image file for a new wallpaper. 2 Importing wallpapers from USB P. 92 Instrument Panel Delete an image file for complete details. Continued 89 Changes the displayed language. Sets time display 12 hour or... 24 hour and adjust the time. Image 1/Image 2/Image 3 Range*2/Elapsed time/ Average speed On*2/Off Blue*2/Red/Amber/Gray On*2/Off English*2/Francais/Español *1: Not available on all...

Owner's Manual
Page 94
... at a time for wallpaper from a USB flash drive. Connect the USB flash drive to store an image. 1. Select Customize Settings with the (+ / (button, then press the SOURCE button. 92 The number of files that can be • • • in black. Instrument ... be displayed in a folder cannot be imported is BMP (bmp) or JPEG (jpg). If the image size was less than 480 x 234 pixels, the image is 2 MB. Press the MENU button. 3. Images in the file name. The individual file size limit is displayed in the middle of the screen with the extra area...
... at a time for wallpaper from a USB flash drive. Connect the USB flash drive to store an image. 1. Select Customize Settings with the (+ / (button, then press the SOURCE button. 92 The number of files that can be • • • in black. Instrument ... be displayed in a folder cannot be imported is BMP (bmp) or JPEG (jpg). If the image size was less than 480 x 234 pixels, the image is 2 MB. Press the MENU button. 3. Images in the file name. The individual file size limit is displayed in the middle of the screen with the extra area...

Owner's Manual
Page 95
Press the (- Press the SOURCE button if it is displayed. Instrument Panel 6. The preview of the display, then press the SOURCE button. 7. u The file names are displayed on the center of the imported data is OK. 8. uu Gauges and Displays u Multi-Information Display * 5. Save Continued 93 Select Import Wallpaper with the (+ / (button, then press the SOURCE button. button until the file name you want to save the image file. Press the SOURCE button to store appears on the screen.
Press the (- Press the SOURCE button if it is displayed. Instrument Panel 6. The preview of the display, then press the SOURCE button. 7. u The file names are displayed on the center of the imported data is OK. 8. uu Gauges and Displays u Multi-Information Display * 5. Save Continued 93 Select Import Wallpaper with the (+ / (button, then press the SOURCE button. button until the file name you want to save the image file. Press the SOURCE button to store appears on the screen.

Owner's Manual
Page 96
button, then press the SOURCE button. 10.Press the MENU button to store the image file in with the (+ / (- Instrument Panel 94 Select the location you want to exit the customizing screen. uu Gauges and Displays u Multi-Information Display * 9.
button, then press the SOURCE button. 10.Press the MENU button to store the image file in with the (+ / (- Instrument Panel 94 Select the location you want to exit the customizing screen. uu Gauges and Displays u Multi-Information Display * 9.

Owner's Manual
Page 97
Select Display Setup with the (+ / (- Instrument Panel 5. button, then press the SOURCE button. Select the image file you want with the (+ / (button, then press the SOURCE button. 4. Press the MENU button to exit the customizing screen. 95 button, then press the SOURCE button. 3. Select Select Wallpaper with the (+ / (- Select Customize Settings with the (+ / (button, then press the SOURCE button. u When the scroll is stopped, the thumbnail is displayed. 6. uu Gauges and Displays u Multi-Information Display * Selecting a wallpaper 1. Press the MENU button. 2.
Select Display Setup with the (+ / (- Instrument Panel 5. button, then press the SOURCE button. Select the image file you want with the (+ / (button, then press the SOURCE button. 4. Press the MENU button to exit the customizing screen. 95 button, then press the SOURCE button. 3. Select Select Wallpaper with the (+ / (- Select Customize Settings with the (+ / (button, then press the SOURCE button. u When the scroll is stopped, the thumbnail is displayed. 6. uu Gauges and Displays u Multi-Information Display * Selecting a wallpaper 1. Press the MENU button. 2.
Owner's Manual
Page 255
... local trailer sales or rental agency for your vehicle from a dealer. 253 Driving Check with federal, state, province/territory, and local regulations. When using a non-Honda trailer lighting harness and converter, get the connector and pins for the requirements in the cargo area. Small (Red) Left Turn Signal (Violet) Right Turn... located behind the left side panel in the area where you plan to tow. Each pin's purpose and wiring color code are shown in the image.
... local trailer sales or rental agency for your vehicle from a dealer. 253 Driving Check with federal, state, province/territory, and local regulations. When using a non-Honda trailer lighting harness and converter, get the connector and pins for the requirements in the cargo area. Small (Red) Left Turn Signal (Violet) Right Turn... located behind the left side panel in the area where you plan to tow. Each pin's purpose and wiring color code are shown in the image.
Owner's Manual
Page 308
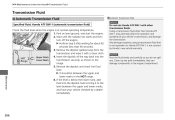
... securely, as shown in the engine compartment. 306 Maintenance Remove the dipstick (yellow loop) from the transmission and wipe it to Honda ATF DW-1 is at normal operating temperature. 1. Insert the dipstick all the way back into the dipstick hole to bring it... transmission, and damage the transmission. they can damage components in the Lower Mark Range image. 5. uu Maintenance Under the Hood u Transmission Fluid Transmission Fluid ■ Automatic Transmission Fluid Specified fluid: Honda ATF DW-1 (automatic transmission fluid) Check the fluid level when the engine is not ...
... securely, as shown in the engine compartment. 306 Maintenance Remove the dipstick (yellow loop) from the transmission and wipe it to Honda ATF DW-1 is at normal operating temperature. 1. Insert the dipstick all the way back into the dipstick hole to bring it... transmission, and damage the transmission. they can damage components in the Lower Mark Range image. 5. uu Maintenance Under the Hood u Transmission Fluid Transmission Fluid ■ Automatic Transmission Fluid Specified fluid: Honda ATF DW-1 (automatic transmission fluid) Check the fluid level when the engine is not ...

Owner's Manual
Page 346
... the jack handle, until the top of or underneath the jack. 344 Handling the Unexpected Jack Handle Bar Wheel Nut Wrench as shown in the image) clockwise until the tire is resting in your vehicle. u Make sure that the jacking point tab is off the jack, seriously injuring anyone underneath. Use...
... the jack handle, until the top of or underneath the jack. 344 Handling the Unexpected Jack Handle Bar Wheel Nut Wrench as shown in the image) clockwise until the tire is resting in your vehicle. u Make sure that the jacking point tab is off the jack, seriously injuring anyone underneath. Use...

Owner's Manual
Page 347
... Tire ■ Replacing the Flat Tire 1. Screw the wheel nuts until they touch the lips around , tightening the nuts, two to three times in the image.
... Tire ■ Replacing the Flat Tire 1. Screw the wheel nuts until they touch the lips around , tightening the nuts, two to three times in the image.

Owner's Manual
Page 352
... the slot and remove it as possible. u The lock is now released. Have the shift lever checked by a dealer as soon as shown in the image. 4. Insert the key into (N . Shift Lock Release Slot Slot Handling the Unexpected Cover Release Button 350 u Put the tip of the shift lock release slot...
... the slot and remove it as possible. u The lock is now released. Have the shift lever checked by a dealer as soon as shown in the image. 4. Insert the key into (N . Shift Lock Release Slot Slot Handling the Unexpected Cover Release Button 350 u Put the tip of the shift lock release slot...

Owner's Manual
Page 368
... your vehicle. Vehicle Identification Number Cover Engine Number Automatic Transmission Number Certification Label/ Vehicle Identification Number 366 Information Engine Number and Transmission Number See the image below for the VIN locations. 1 Vehicle Identification Number (VIN) The interior vehicle identification number (VIN) is located under the cover. See the...
... your vehicle. Vehicle Identification Number Cover Engine Number Automatic Transmission Number Certification Label/ Vehicle Identification Number 366 Information Engine Number and Transmission Number See the image below for the VIN locations. 1 Vehicle Identification Number (VIN) The interior vehicle identification number (VIN) is located under the cover. See the...