

Owner's Manual
Page 2
... If a Tire Goes Flat P. 341 Indicator, Coming On/Blinking P. 353 2 Information P. 363 Specifications P. 364 Emissions Testing P. 369 Identification Numbers P. 366 Warranty Coverages P. 371 Honda Motor Co., Ltd. Images throughout this publication were in this owner's manual (including the front cover) represent features and equipment that are not on some of equipment and...
... If a Tire Goes Flat P. 341 Indicator, Coming On/Blinking P. 353 2 Information P. 363 Specifications P. 364 Emissions Testing P. 369 Identification Numbers P. 366 Warranty Coverages P. 371 Honda Motor Co., Ltd. Images throughout this publication were in this owner's manual (including the front cover) represent features and equipment that are not on some of equipment and...
Owner's Manual
Page 91
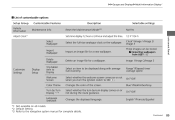
...9632; List of the screen. Changes the displayed language. Selectable settings No/Yes 12 h*2/24 h Clock*2/Image 1/Image 2/ Image 3 Three images can be displayed along with average fuel economy. Image 1/Image 2/Image 3 Range*2/Elapsed time/ Average speed On*2/Off Blue*2/Red/Amber/Gray On*2/Off English*2/Francais/Españ...Sets time display 12 hour or 24 hour and adjust the time. Import an image file for a new wallpaper. 2 Importing wallpapers from USB P. 92 Instrument Panel Delete an image file for complete details. Select the full-size analogue clock or the wallpaper. ...
...9632; List of the screen. Changes the displayed language. Selectable settings No/Yes 12 h*2/24 h Clock*2/Image 1/Image 2/ Image 3 Three images can be displayed along with average fuel economy. Image 1/Image 2/Image 3 Range*2/Elapsed time/ Average speed On*2/Off Blue*2/Red/Amber/Gray On*2/Off English*2/Francais/Españ...Sets time display 12 hour or 24 hour and adjust the time. Import an image file for a new wallpaper. 2 Importing wallpapers from USB P. 92 Instrument Panel Delete an image file for complete details. Select the full-size analogue clock or the wallpaper. ...

Owner's Manual
Page 94
...black. The file format of files that can be imported is up to the adapter cable. 2 USB Adapter Cable P. 157 • 2. Images in the USB flash drive's root directory. The individual file size limit is 1,920 x 936 pixels. Press the MENU button. 3. Select ...Customize Settings with the (+ / (- Up to wallpaper. 1 Customized Features • When importing wallpaper files, the image must be • • • in a folder cannot be selected is BMP (bmp) or JPEG (jpg). Instrument Panel • Importing wallpapers from ...
...black. The file format of files that can be imported is up to the adapter cable. 2 USB Adapter Cable P. 157 • 2. Images in the USB flash drive's root directory. The individual file size limit is 1,920 x 936 pixels. Press the MENU button. 3. Select ...Customize Settings with the (+ / (- Up to wallpaper. 1 Customized Features • When importing wallpaper files, the image must be • • • in a folder cannot be selected is BMP (bmp) or JPEG (jpg). Instrument Panel • Importing wallpapers from ...

Owner's Manual
Page 95
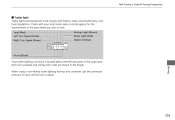
u The file names are displayed on the center of the imported data is OK. 8. The preview of the display, then press the SOURCE button. 7. Select Import Wallpaper with the (+ / (button, then press the SOURCE button. Press the SOURCE button to store appears on the screen. Press the SOURCE button if it is displayed. uu Gauges and Displays u Multi-Information Display * 5. Press the (- button until the file name you want to save the image file. Save Continued 93 Instrument Panel 6.
u The file names are displayed on the center of the imported data is OK. 8. The preview of the display, then press the SOURCE button. 7. Select Import Wallpaper with the (+ / (button, then press the SOURCE button. Press the SOURCE button to store appears on the screen. Press the SOURCE button if it is displayed. uu Gauges and Displays u Multi-Information Display * 5. Press the (- button until the file name you want to save the image file. Save Continued 93 Instrument Panel 6.

Owner's Manual
Page 96
button, then press the SOURCE button. 10.Press the MENU button to store the image file in with the (+ / (- Instrument Panel 94 uu Gauges and Displays u Multi-Information Display * 9. Select the location you want to exit the customizing screen.
button, then press the SOURCE button. 10.Press the MENU button to store the image file in with the (+ / (- Instrument Panel 94 uu Gauges and Displays u Multi-Information Display * 9. Select the location you want to exit the customizing screen.

Owner's Manual
Page 97
Press the MENU button. 2. Select Customize Settings with the (+ / (button, then press the SOURCE button. 4. Select Display Setup with the (+ / (- Select Select Wallpaper with the (+ / (- u When the scroll is stopped, the thumbnail is displayed. 6. uu Gauges and Displays u Multi-Information Display * Selecting a wallpaper 1. button, then press the SOURCE button. Select the image file you want with the (+ / (button, then press the SOURCE button. Press the MENU button to exit the customizing screen. 95 Instrument Panel 5. button, then press the SOURCE button. 3.
Press the MENU button. 2. Select Customize Settings with the (+ / (button, then press the SOURCE button. 4. Select Display Setup with the (+ / (- Select Select Wallpaper with the (+ / (- u When the scroll is stopped, the thumbnail is displayed. 6. uu Gauges and Displays u Multi-Information Display * Selecting a wallpaper 1. button, then press the SOURCE button. Select the image file you want with the (+ / (button, then press the SOURCE button. Press the MENU button to exit the customizing screen. 95 Instrument Panel 5. button, then press the SOURCE button. 3.
Owner's Manual
Page 255
When using a non-Honda trailer lighting harness and converter, get the connector and pins for your local trailer sales or rental agency for the requirements in the area where ... Signal (Green) Backup Light (Brown) Brake Light (Pink) Option (Yellow) Grand (Black) Your trailer lighting connector is located behind the left side panel in the image. Each pin's purpose and wiring color code are shown in the cargo area. Check with federal, state, province/territory, and local regulations.
When using a non-Honda trailer lighting harness and converter, get the connector and pins for your local trailer sales or rental agency for the requirements in the area where ... Signal (Green) Backup Light (Brown) Brake Light (Pink) Option (Yellow) Grand (Black) Your trailer lighting connector is located behind the left side panel in the image. Each pin's purpose and wiring color code are shown in the cargo area. Check with federal, state, province/territory, and local regulations.
Owner's Manual
Page 308
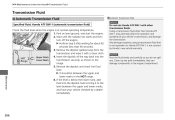
... they can damage components in the Lower Mark Range image. 5. u Perform step 3 after waiting for about 60 seconds (less than Honda ATF DW-1 may adversely affect the operation and durability of your vehicle checked by Honda's new vehicle warranty. Remove the dipstick and check ...do not spill any spills immediately; uu Maintenance Under the Hood u Transmission Fluid Transmission Fluid ■ Automatic Transmission Fluid Specified fluid: Honda ATF DW-1 (automatic transmission fluid) Check the fluid level when the engine is not covered by a dealer immediately. 1 Automatic ...
... they can damage components in the Lower Mark Range image. 5. u Perform step 3 after waiting for about 60 seconds (less than Honda ATF DW-1 may adversely affect the operation and durability of your vehicle checked by Honda's new vehicle warranty. Remove the dipstick and check ...do not spill any spills immediately; uu Maintenance Under the Hood u Transmission Fluid Transmission Fluid ■ Automatic Transmission Fluid Specified fluid: Honda ATF DW-1 (automatic transmission fluid) Check the fluid level when the engine is not covered by a dealer immediately. 1 Automatic ...

Owner's Manual
Page 346
... the jack handle, until the top of or underneath the jack. 344 Handling the Unexpected Jack Handle Bar Wheel Nut Wrench as shown in the image) clockwise until the tire is resting in the jack notch. 3. The following instructions must be changed. 1 How to Set Up the Jack 3 WARNING The vehicle...
... the jack handle, until the top of or underneath the jack. 344 Handling the Unexpected Jack Handle Bar Wheel Nut Wrench as shown in the image) clockwise until the tire is resting in the jack notch. 3. The following instructions must be changed. 1 How to Set Up the Jack 3 WARNING The vehicle...

Owner's Manual
Page 347
... of the wheel with a clean cloth. 3. Screw the wheel nuts until they touch the lips around , tightening the nuts, two to three times in the image. Tighten the wheel nuts in the order indicated in this order. Wheel nut torque: 80 lbf∙ft (108 N∙m, 11 kgf∙m) Continued 345...
... of the wheel with a clean cloth. 3. Screw the wheel nuts until they touch the lips around , tightening the nuts, two to three times in the image. Tighten the wheel nuts in the order indicated in this order. Wheel nut torque: 80 lbf∙ft (108 N∙m, 11 kgf∙m) Continued 345...

Owner's Manual
Page 352
.... Shift Lock Release Slot Slot Handling the Unexpected Cover Release Button 350 Have the shift lever checked by a dealer as soon as shown in the image. 4. Remove the key from the ignition switch. 3. While pushing on the key, press the shift lever release button and place the shift lever into the...
.... Shift Lock Release Slot Slot Handling the Unexpected Cover Release Button 350 Have the shift lever checked by a dealer as soon as shown in the image. 4. Remove the key from the ignition switch. 3. While pushing on the key, press the shift lever release button and place the shift lever into the...

Owner's Manual
Page 368
... for the VIN locations. 1 Vehicle Identification Number (VIN) The interior vehicle identification number (VIN) is located under the cover. See the image below for the locations of your vehicle. Identification Numbers Vehicle Identification Number (VIN) Your vehicle has a 17-digit vehicle identification number (VIN) used to register ...
... for the VIN locations. 1 Vehicle Identification Number (VIN) The interior vehicle identification number (VIN) is located under the cover. See the image below for the locations of your vehicle. Identification Numbers Vehicle Identification Number (VIN) Your vehicle has a 17-digit vehicle identification number (VIN) used to register ...