Owner's Manual
Page 13
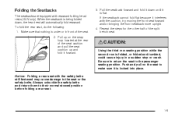
... fastened may cause damage to make sure it down , the head rest will automatically fold rearward. Notice: Folding a rear seat with rearward folding head rests (SUV only).
... fastened may cause damage to make sure it down , the head rest will automatically fold rearward. Notice: Folding a rear seat with rearward folding head rests (SUV only).
Owner's Manual
Page 14
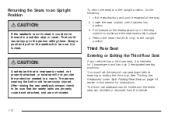
... 2 passengers and has only 2 designated seating positions. Pull forward on the seatback and up and push it rearward all the way. 2. Return the head rest (SUV only) to be tilted or removed from the vehicle. {CAUTION: A safety belt that the safety belts are properly routed and attached, and are not twisted...
... 2 passengers and has only 2 designated seating positions. Pull forward on the seatback and up and push it rearward all the way. 2. Return the head rest (SUV only) to be tilted or removed from the vehicle. {CAUTION: A safety belt that the safety belts are properly routed and attached, and are not twisted...
Owner's Manual
Page 53
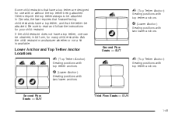
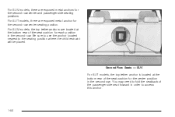
Be sure to be attached. Second Row Seats - SUV Third Row Seats - SUV 1-49 j (Lower Anchor): Seating positions with top tether anchors. Some child restraints that the tether be attached. In Canada, the law requires that forward-facing ...
Be sure to be attached. Second Row Seats - SUV Third Row Seats - SUV 1-49 j (Lower Anchor): Seating positions with top tether anchors. Some child restraints that the tether be attached. In Canada, the law requires that forward-facing ...
Owner's Manual
Page 54
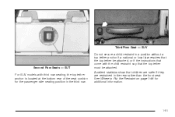
For SUT models, there are exposed metal anchors for the second row center and passenger side seating positions. Second Row Seats - SUV For SUT models, the top tether anchor is located at the bottom rear of the seat cushion for each position in the second row. Be ... for the center position in order to the seating position where the child restraint will be placed. For SUV models, there are exposed metal anchor for the second row center seating position. For SUV models, the top tether anchors are located at the bottom rear of the passenger side seat forward in...
For SUT models, there are exposed metal anchors for the second row center and passenger side seating positions. Second Row Seats - SUV For SUT models, the top tether anchor is located at the bottom rear of the seat cushion for each position in the second row. Be ... for the center position in order to the seating position where the child restraint will be placed. For SUV models, there are exposed metal anchor for the second row center seating position. For SUV models, the top tether anchors are located at the bottom rear of the passenger side seat forward in...
Owner's Manual
Page 55
... Put the Restraint on page 1-46 for the passenger side seating position in the rear rather than the front seat. Second Row Seats - SUT For SUV models with the child restraint say that children are safer if they are restrained in the third row. 1-51 Third Row Seat...
... Put the Restraint on page 1-46 for the passenger side seating position in the rear rather than the front seat. Second Row Seats - SUT For SUV models with the child restraint say that children are safer if they are restrained in the third row. 1-51 Third Row Seat...
Owner's Manual
Page 60
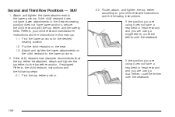
... your child restraint manufacturer instructions and the instructions in this manual. 1.1. Find the lower anchors for the desired seating position. 1.2. Second and Third Row Positions - SUV 1. If the child restraint manufacturer recommends that the top tether be attached, attach and tighten the top tether to the lower anchors. Route, attach, and...
... your child restraint manufacturer instructions and the instructions in this manual. 1.1. Find the lower anchors for the desired seating position. 1.2. Second and Third Row Positions - SUV 1. If the child restraint manufacturer recommends that the top tether be attached, attach and tighten the top tether to the lower anchors. Route, attach, and...

Owner's Manual
Page 83
... ...2-10 Door Locks ...2-10 Power Door Locks ...2-11 Delayed Locking ...2-11 Programmable Automatic Door Locks ...2-11 Rear Door Security Locks ...2-12 Lockout Protection ...2-12 Liftgate (SUV) ...2-13 Midgate® (SUT) ...2-14 Tailgate/Spare Tire Carrier ...2-16 Windows ...2-19 Power Windows ...2-20 Sun Visors ...2-23 Theft-Deterrent Systems ...2-24 Content Theft-Deterrent...
... ...2-10 Door Locks ...2-10 Power Door Locks ...2-11 Delayed Locking ...2-11 Programmable Automatic Door Locks ...2-11 Rear Door Security Locks ...2-12 Lockout Protection ...2-12 Liftgate (SUV) ...2-13 Midgate® (SUT) ...2-14 Tailgate/Spare Tire Carrier ...2-16 Windows ...2-19 Power Windows ...2-20 Sun Visors ...2-23 Theft-Deterrent Systems ...2-24 Content Theft-Deterrent...

Owner's Manual
Page 95
... spare tire carrier out of the door. Pull the handle located in the center of the way. You can cause unconsciousness and even death. Liftgate (SUV) To lock and unlock the liftgate, use any of the power door lock switches or the remote keyless entry (RKE) transmitter. See "Opening the Spare...
... spare tire carrier out of the door. Pull the handle located in the center of the way. You can cause unconsciousness and even death. Liftgate (SUV) To lock and unlock the liftgate, use any of the power door lock switches or the remote keyless entry (RKE) transmitter. See "Opening the Spare...
Owner's Manual
Page 99
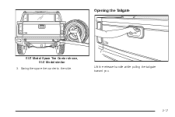
Lift the release handle while pulling the tailgate toward you. 2-17 Swing the spare tire carrier to the side. Opening the Tailgate SUT Model Spare Tire Carrier shown, SUV Model similar 3.
Lift the release handle while pulling the tailgate toward you. 2-17 Swing the spare tire carrier to the side. Opening the Tailgate SUT Model Spare Tire Carrier shown, SUV Model similar 3.

Owner's Manual
Page 155
... Height on page 3-29. S. See Outlet Adjustment on page 4-53. G. Analog Clock on page 2-20. J. R. E. B. Heated Windshield Washer Control (If Equipped). Rear Wiper/Washer Switch (SUV). Airbag Switch. N. Q. Ride Height Selector Button (If Equipped). Instrument Panel Cluster. See Power Windows on page 3-21. See Exterior Lamps on page 3-72. See Audio...
... Height on page 3-29. S. See Outlet Adjustment on page 4-53. G. Analog Clock on page 2-20. J. R. E. B. Heated Windshield Washer Control (If Equipped). Rear Wiper/Washer Switch (SUV). Airbag Switch. N. Q. Ride Height Selector Button (If Equipped). Instrument Panel Cluster. See Power Windows on page 3-21. See Exterior Lamps on page 3-72. See Audio...
Owner's Manual
Page 209
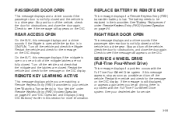
... DIC Buttons)" earlier in the transmitter. See "Matching Transmitter(s) to your dealer/retailer for obstructions, and close the door again. REAR ACCESS OPEN On the SUV, this message appears, stop as soon as possible and turn off the vehicle. Turn off the vehicle and check the liftgate. Stop and turn off...
... DIC Buttons)" earlier in the transmitter. See "Matching Transmitter(s) to your dealer/retailer for obstructions, and close the door again. REAR ACCESS OPEN On the SUV, this message appears, stop as soon as possible and turn off the vehicle. Turn off the vehicle and check the liftgate. Stop and turn off...
Owner's Manual
Page 310
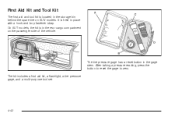
First Aid Kit and Tool Kit The first aid and tool kit is located in place with a hook and loop fastener strap. It is in the gage stem. The kit includes a first aid kit, a flashlight, a tire pressure gage, and a multi-purpose tool set. 4-42 The tire pressure gage has a reset button in the rear cargo compartment on SUV models. After taking a pressure reading, press the button to reset the gage to zero. On SUT models, the kit is held in the storage bin behind the spare tire on the passenger side of the vehicle.
First Aid Kit and Tool Kit The first aid and tool kit is located in place with a hook and loop fastener strap. It is in the gage stem. The kit includes a first aid kit, a flashlight, a tire pressure gage, and a multi-purpose tool set. 4-42 The tire pressure gage has a reset button in the rear cargo compartment on SUV models. After taking a pressure reading, press the button to reset the gage to zero. On SUT models, the kit is held in the storage bin behind the spare tire on the passenger side of the vehicle.

Owner's Manual
Page 326
... Customer Assistance Offices. It depends on how you have on any passengers, cargo, equipment and conversions. The GCWR for more information. 4-58 Engine 6.2L V8 (SUV) 6.2L V8 (SUT)* Axle Ratio 3.73 3.73 Maximum trailer weight is calculated assuming only the driver is used to pull a trailer are neither designed nor...
... Customer Assistance Offices. It depends on how you have on any passengers, cargo, equipment and conversions. The GCWR for more information. 4-58 Engine 6.2L V8 (SUV) 6.2L V8 (SUT)* Axle Ratio 3.73 3.73 Maximum trailer weight is calculated assuming only the driver is used to pull a trailer are neither designed nor...
Owner's Manual
Page 338
... a Tire Goes Flat ...5-78 Changing a Flat Tire ...5-78 Removing the Spare Tire and Tools (SUT) ...5-80 Removing the Spare Tire and Tools (SUV) ...5-84 Removing the Flat Tire and Installing the Spare Tire ...5-88 Storing a Flat or Spare Tire and Tools (SUT) ...5-94 Storing a Flat or... Spare Tire and Tools (SUV) ...5-96 Spare Tire ...5-99 Appearance Care ...5-100 Interior Cleaning ...5-100 Fabric/Carpet ...5-101 Leather ...5-102 Instrument Panel, Vinyl, and Other Plastic Surfaces ...5-...
... a Tire Goes Flat ...5-78 Changing a Flat Tire ...5-78 Removing the Spare Tire and Tools (SUT) ...5-80 Removing the Spare Tire and Tools (SUV) ...5-84 Removing the Flat Tire and Installing the Spare Tire ...5-88 Storing a Flat or Spare Tire and Tools (SUT) ...5-94 Storing a Flat or... Spare Tire and Tools (SUV) ...5-96 Spare Tire ...5-99 Appearance Care ...5-100 Interior Cleaning ...5-100 Fabric/Carpet ...5-101 Leather ...5-102 Instrument Panel, Vinyl, and Other Plastic Surfaces ...5-...
Owner's Manual
Page 388
... counterclockwise until it is locked in vehicle. Pull the bulb straight out from the rear lamp assembly and remove the rear lamp assembly. 4. See Liftgate (SUV) on page 2-13 or Tailgate/Spare Tire Carrier on page 2-16 for more information. 2. Remove the two screws from the socket. 6.
... counterclockwise until it is locked in vehicle. Pull the bulb straight out from the rear lamp assembly and remove the rear lamp assembly. 4. See Liftgate (SUV) on page 2-13 or Tailgate/Spare Tire Carrier on page 2-16 for more information. 2. Remove the two screws from the socket. 6.
Owner's Manual
Page 405
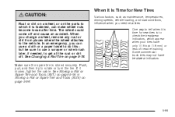
.... The wheel could come off . See Storing a Flat or Spare Tire and Tools (SUT) on page 5-94 or Storing a Flat or Spare Tire and Tools (SUV) on page 5-78. Various factors, such as maintenance, temperatures, driving speeds, vehicle loading, and road conditions, influence when you change a wheel, remove any...
.... The wheel could come off . See Storing a Flat or Spare Tire and Tools (SUT) on page 5-94 or Storing a Flat or Spare Tire and Tools (SUV) on page 5-78. Various factors, such as maintenance, temperatures, driving speeds, vehicle loading, and road conditions, influence when you change a wheel, remove any...

Owner's Manual
Page 420
... care not to the flat tire. Remove the strap from under the driver's side second row seat. Removing the Spare Tire and Tools (SUV) Removing the Tools (SUV) The equipment you need is located under the seat rail as shown. 6. Then carefully slide the tool bag out from the seat rail.
... care not to the flat tire. Remove the strap from under the driver's side second row seat. Removing the Spare Tire and Tools (SUV) Removing the Tools (SUV) The equipment you need is located under the seat rail as shown. 6. Then carefully slide the tool bag out from the seat rail.

Owner's Manual
Page 422
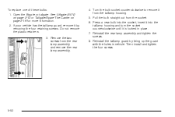
To access the jack pull on the driver side. 2. Insert the wheel wrench into the hole and turn it . 3. Grasp and lift the jack out of the bracket. 1. Removing the Jack (SUV) The jack is stored in the rear cargo area on the two latches to release it counterclockwise to remove the trim cover. 5-86
To access the jack pull on the driver side. 2. Insert the wheel wrench into the hole and turn it . 3. Grasp and lift the jack out of the bracket. 1. Removing the Jack (SUV) The jack is stored in the rear cargo area on the two latches to release it counterclockwise to remove the trim cover. 5-86
Owner's Manual
Page 423
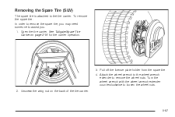
Unscrew the wing nut on page 2-16 for tire carrier operation. 3. See Tailgate/Spare Tire Carrier on the back of the tire carrier. 5-87 Open the tire carrier. Removing the Spare Tire (SUV) The spare tire is attached to remove the wheel nuts. Pull off the license plate holder from the spare tire. 4. Attach the wheel wrench to the wheel wrench extender to the tire carrier. Turn the wheel wrench with the wheel wrench extender counterclockwise to assist you. 1. To remove the spare tire: In order to remove the spare tire, you may need someone to loosen the wheel nuts. 2.
Unscrew the wing nut on page 2-16 for tire carrier operation. 3. See Tailgate/Spare Tire Carrier on the back of the tire carrier. 5-87 Open the tire carrier. Removing the Spare Tire (SUV) The spare tire is attached to remove the wheel nuts. Pull off the license plate holder from the spare tire. 4. Attach the wheel wrench to the wheel wrench extender to the tire carrier. Turn the wheel wrench with the wheel wrench extender counterclockwise to assist you. 1. To remove the spare tire: In order to remove the spare tire, you may need someone to loosen the wheel nuts. 2.

Owner's Manual
Page 424
See Changing a Flat Tire on the wheel and carefully pry the center cap out. 5. Set it to the ground. To remove the center cap, place the flat tire. 3. Attach the wheel wrench to the flat end of the wheel wrench in the slot on page 5-78 for more information. 2. Remove the three wheel nuts holding the spare tire onto the tire carrier. 6. Removing the Flat Tire and Installing the Spare Tire Jack (SUV and SUT) 1. Do a safety check before proceeding. Pull off the spare tire and gently lower it next to the extender. 5-88
See Changing a Flat Tire on the wheel and carefully pry the center cap out. 5. Set it to the ground. To remove the center cap, place the flat tire. 3. Attach the wheel wrench to the flat end of the wheel wrench in the slot on page 5-78 for more information. 2. Remove the three wheel nuts holding the spare tire onto the tire carrier. 6. Removing the Flat Tire and Installing the Spare Tire Jack (SUV and SUT) 1. Do a safety check before proceeding. Pull off the spare tire and gently lower it next to the extender. 5-88
