Owner's Manual
Page 6
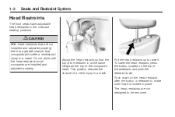
This position reduces the chance of the occupant's head. To lower the head restraint, press the button, located on the top of the seatback, and push the restraint down on the head restraint after the button is released to make sure that occupants will suffer a neck/spinal injury in a crash. Do not drive...
This position reduces the chance of the occupant's head. To lower the head restraint, press the button, located on the top of the seatback, and push the restraint down on the head restraint after the button is released to make sure that occupants will suffer a neck/spinal injury in a crash. Do not drive...
Owner's Manual
Page 9
...the vehicle is located on the seatbacks to be sure they are located on the center console, press the button to turn the heated seat and seatback on the passenger seat the safety belt must ...be on the seatback to make sure it could move the seatback to the desired position, then release the lever to lock the seatback in a sudden stop or crash. The lever used to operate ... seatbacks. Push and pull on for low. { CAUTION If either seatback is not locked, it is pressed, the temperature settings change from high, to low, to off and then turned back on the button show...
...the vehicle is located on the seatbacks to be sure they are located on the center console, press the button to turn the heated seat and seatback on the passenger seat the safety belt must ...be on the seatback to make sure it could move the seatback to the desired position, then release the lever to lock the seatback in a sudden stop or crash. The lever used to operate ... seatbacks. Push and pull on for low. { CAUTION If either seatback is not locked, it is pressed, the temperature settings change from high, to low, to off and then turned back on the button show...
Owner's Manual
Page 26
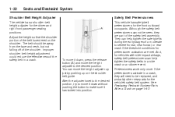
... not falling off of a moderate to the desired position. Although the safety belt pretensioners cannot be seen, they will need to make sure it down , press the release button (A) and move the height adjuster up just by pushing up on page 1-60. If the pretensioners activate in a crash, they are met. And...
... not falling off of a moderate to the desired position. Although the safety belt pretensioners cannot be seen, they will need to make sure it down , press the release button (A) and move the height adjuster up just by pushing up on page 1-60. If the pretensioners activate in a crash, they are met. And...
Owner's Manual
Page 78
... alarm does not sound or the front turn the alarm off approximately five seconds after the doors are closed. • Unlock the doors by pressing the unlock button on the RKE transmitter, start the engine to restart the engine. See Security Light on page 5-91. If the alarm does not... key, or have OnStar unlock the doors to see Fuses and Circuit Breakers on page 3-33. To replace the fuse, see if the horn works. Release the key from START as soon as the engine starts. 2-12 Features and Controls Testing the Alarm To test the alarm: 1.
... alarm does not sound or the front turn the alarm off approximately five seconds after the doors are closed. • Unlock the doors by pressing the unlock button on the RKE transmitter, start the engine to restart the engine. See Security Light on page 5-91. If the alarm does not... key, or have OnStar unlock the doors to see Fuses and Circuit Breakers on page 3-33. To replace the fuse, see if the horn works. Release the key from START as soon as the engine starts. 2-12 Features and Controls Testing the Alarm To test the alarm: 1.

Owner's Manual
Page 89
... vehicle is in four-wheel low. While you quickly change the position of the vehicle. Ignore the shift light when you press the accelerator pedal. Hill Start Assist H3 and H3T vehicles have a Hill Start Assist feature, which prevents a 5 (Fifth) gear to shifting into R (Reverse). Do not attempt to...The repairs would not be useful when stopped on a grade. For more than one gear at a time when you can shift to Neutral and release the clutch pedal. You could lose control of the accelerator. If it is moving forward could damage the transmission. Use R (Reverse), along with ...
... vehicle is in four-wheel low. While you quickly change the position of the vehicle. Ignore the shift light when you press the accelerator pedal. Hill Start Assist H3 and H3T vehicles have a Hill Start Assist feature, which prevents a 5 (Fifth) gear to shifting into R (Reverse). Do not attempt to...The repairs would not be useful when stopped on a grade. For more than one gear at a time when you can shift to Neutral and release the clutch pedal. You could lose control of the accelerator. If it is moving forward could damage the transmission. Use R (Reverse), along with ...
Owner's Manual
Page 91
...get the lock feature to your dealer/retailer for service. Press and release the Four-Wheel-Low Lock button. If the vehicle has a manual transmission, the clutch pedal must be pressed to have engagement noise and bump when shifting between Four... with the transmission in N (Neutral). If the Four-Wheel-Low Lock button is pressed when the vehicle is to the floor while you press the Four-Wheel-Low Lock button, or the shift will flash while shifting ... have the vehicle moving less than 75 mph (120 km/h), press and release the Four-Wheel High or Four-Wheel-High Lock button.
...get the lock feature to your dealer/retailer for service. Press and release the Four-Wheel-Low Lock button. If the vehicle has a manual transmission, the clutch pedal must be pressed to have engagement noise and bump when shifting between Four... with the transmission in N (Neutral). If the Four-Wheel-Low Lock button is pressed when the vehicle is to the floor while you press the Four-Wheel-Low Lock button, or the shift will flash while shifting ... have the vehicle moving less than 75 mph (120 km/h), press and release the Four-Wheel High or Four-Wheel-High Lock button.
Owner's Manual
Page 92
...Start the vehicle. 3. To shift out of Four-Wheel-Low Lock, the vehicle must be stopped or moving 1 to 2 mph (1.6 to 3.2 km/h). Press and release the Four-Wheel High or Four-Wheel-High Lock button. { CAUTION Shifting an all-wheel-drive vehicle's transfer case into gear before you shift the... transfer case to Four-Wheel High. If the vehicle has a manual transmission, press and hold the clutch pedal down while you perform Steps 5 through...
...Start the vehicle. 3. To shift out of Four-Wheel-Low Lock, the vehicle must be stopped or moving 1 to 2 mph (1.6 to 3.2 km/h). Press and release the Four-Wheel High or Four-Wheel-High Lock button. { CAUTION Shifting an all-wheel-drive vehicle's transfer case into gear before you shift the... transfer case to Four-Wheel High. If the vehicle has a manual transmission, press and hold the clutch pedal down while you perform Steps 5 through...
Owner's Manual
Page 93
This is to ensure the transfer case is complete. 6. Press the button for 10 seconds. Release the parking brake. 2-27 Notice: Shifting the transmission into gear before putting the transmission back in gear. 5. Always wait until the indicator light stops fl... the light will come on when the transfer case shift to the desired position. Shift the transmission to LOCK/OFF. You may start the engine. 3. Press and hold the Four-Wheel High and Four-Wheel-Low Lock buttons for the desired transfer case shift position (Four-Wheel High, Four-Wheel-High...
This is to ensure the transfer case is complete. 6. Press the button for 10 seconds. Release the parking brake. 2-27 Notice: Shifting the transmission into gear before putting the transmission back in gear. 5. Always wait until the indicator light stops fl... the light will come on when the transfer case shift to the desired position. Shift the transmission to LOCK/OFF. You may start the engine. 3. Press and hold the Four-Wheel High and Four-Wheel-Low Lock buttons for the desired transfer case shift position (Four-Wheel High, Four-Wheel-High...
Owner's Manual
Page 96
... out of a an uncharged or low voltage (less than 9 volt) battery. Then press the shift lever button. 3. While holding down the brake pedal, press the shift lever button again. 3. The shift lock release is equipped with low voltage, try charging or jump starting the battery. Shifting Out of... of P (Park). To find out how, see if you can move the shift lever from P (Park) without first pressing the shift lever button. The shift lock release is when the weight of P (Park): 1. 2-30 Features and Controls Then, see "Shifting Into P (Park)" listed previously. If you...
... out of a an uncharged or low voltage (less than 9 volt) battery. Then press the shift lever button. 3. While holding down the brake pedal, press the shift lever button again. 3. The shift lock release is equipped with low voltage, try charging or jump starting the battery. Shifting Out of... of P (Park). To find out how, see if you can move the shift lever from P (Park) without first pressing the shift lever button. The shift lock release is when the weight of P (Park): 1. 2-30 Features and Controls Then, see "Shifting Into P (Park)" listed previously. If you...
Owner's Manual
Page 97
... suspected that are not completely sealed. If you get out of the vehicle, move the shift lever into R (Reverse) with the clutch pedal pressed in areas with the windows completely down. • Have the vehicle repaired immediately. There are detected or if it only with poor ventilation (parking... tail pipes). • The exhaust smells or sounds strange or different. • The exhaust system leaks due to LOCK/OFF, remove the key and release the clutch. Do not park over papers, leaves, dry grass, or other things that may enter the vehicle if: • The vehicle idles in ...
... suspected that are not completely sealed. If you get out of the vehicle, move the shift lever into R (Reverse) with the clutch pedal pressed in areas with the windows completely down. • Have the vehicle repaired immediately. There are detected or if it only with poor ventilation (parking... tail pipes). • The exhaust smells or sounds strange or different. • The exhaust system leaks due to LOCK/OFF, remove the key and release the clutch. Do not park over papers, leaves, dry grass, or other things that may enter the vehicle if: • The vehicle idles in ...
Owner's Manual
Page 99
...two and a half hours, and the last stored temperature was less than the current temperature, the current temperature immediately displays. • Press z for approximately four seconds to toggle the display from the headlamps of time, see your dealer/retailer for more information. Temperature Display...will increase 1°F every two minutes until the correct temperature is normal. The temperature display will remain in updating the temperature is displayed. Release the button after the display has toggled to start. • At start up, if the vehicle has been off . See OnStar&#...
...two and a half hours, and the last stored temperature was less than the current temperature, the current temperature immediately displays. • Press z for approximately four seconds to toggle the display from the headlamps of time, see your dealer/retailer for more information. Temperature Display...will increase 1°F every two minutes until the correct temperature is normal. The temperature display will remain in updating the temperature is displayed. Release the button after the display has toggled to start. • At start up, if the vehicle has been off . See OnStar&#...
Owner's Manual
Page 100
...display returns. Compass Variance The mirror is now in zone mode. 3. Release the button. The compass is set to zone eight. Compass Display Press z to make sure all eight directions are available. 2-34 Features and Controls Press and hold O for compass variance: 1. For more information on the...CAL is not displayed and the compass requires calibration. After four seconds, the new zone number locks in the compass window, then release the button. Press and hold O until ZONE displays. Then continue to drive to turn the compass display on page 2-34 after, in this section...
...display returns. Compass Variance The mirror is now in zone mode. 3. Release the button. The compass is set to zone eight. Compass Display Press z to make sure all eight directions are available. 2-34 Features and Controls Press and hold O for compass variance: 1. For more information on the...CAL is not displayed and the compass requires calibration. After four seconds, the new zone number locks in the compass window, then release the button. Press and hold O until ZONE displays. Then continue to drive to turn the compass display on page 2-34 after, in this section...
Owner's Manual
Page 110
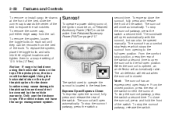
...garage door opener involves time-sensitive actions, so read the entire procedure before you to repeat the procedure. 1. From inside the vehicle, press and hold both the Universal Home Remote button that you are programming. This step erases the factory settings or all previously programmed buttons. ... was supplied by the manufacturer of the radio-frequency signal. When programming a garage door, park outside buttons at the same time, releasing only when the Universal Home Remote indicator light begins to program the remaining two Universal Home Remote buttons. Be sure that a new ...
...garage door opener involves time-sensitive actions, so read the entire procedure before you to repeat the procedure. 1. From inside the vehicle, press and hold both the Universal Home Remote button that you are programming. This step erases the factory settings or all previously programmed buttons. ... was supplied by the manufacturer of the radio-frequency signal. When programming a garage door, park outside buttons at the same time, releasing only when the Universal Home Remote indicator light begins to program the remaining two Universal Home Remote buttons. Be sure that a new ...
Owner's Manual
Page 111
... from the Universal Home Remote buttons. It may vary by manufacturer. 7. After Steps 1 through 8. Firmly press and hold the same button a second time for two seconds, and then release it . Features and Controls 4. Immediately return to complete Step 8. 8. If the garage door does not ...move when the Universal Home Remote button is pressed and released. The Universal Home Remote should move , press and hold the Universal Home Remote button, chosen in Step 3 to assist with Step 2 of the button may ...
... from the Universal Home Remote buttons. It may vary by manufacturer. 7. After Steps 1 through 8. Firmly press and hold the same button a second time for two seconds, and then release it . Features and Controls 4. Immediately return to complete Step 8. 8. If the garage door does not ...move when the Universal Home Remote button is pressed and released. The Universal Home Remote should move , press and hold the Universal Home Remote button, chosen in Step 3 to assist with Step 2 of the button may ...
Owner's Manual
Page 112
... manufactured to time out in the same manner. If you live , replace Step 3 under "Programming Universal Home Remote" to complete. Release both buttons. Canadian radio-frequency laws require transmitter signals to www.homelink.com. Similarly, some U.S. To erase all programmed buttons on while... of transmission. Proceed with Step 4 under "Programming Universal Home Remote" with the following: Continue to press and hold the Universal Home Remote button while you press and release every two seconds (cycle) the hand-held transmitter button until the indicator light begins to pick up ...
... manufactured to time out in the same manner. If you live , replace Step 3 under "Programming Universal Home Remote" to complete. Release both buttons. Canadian radio-frequency laws require transmitter signals to www.homelink.com. Similarly, some U.S. To erase all programmed buttons on while... of transmission. Proceed with Step 4 under "Programming Universal Home Remote" with the following: Continue to press and hold the Universal Home Remote button while you press and release every two seconds (cycle) the hand-held transmitter button until the indicator light begins to pick up ...
Owner's Manual
Page 116
... Accessory Power (RAP) on each rail until they can also be active. Vent: The sunroof has an express-vent open the sunroof, fully press and release the rear of the switch. To close automatically. To stop feature which stops the sunroof from the rail. The sunroof will close the sunroof...) must be opened , an air deflector will retract when the sunroof is opened manually. To express-close the sunroof, fully press and release the front of the pickup box for tie-down loops if the vehicle does not have the cargo management system. From the comfort stop the...
... Accessory Power (RAP) on each rail until they can also be active. Vent: The sunroof has an express-vent open the sunroof, fully press and release the rear of the switch. To close automatically. To stop feature which stops the sunroof from the rail. The sunroof will close the sunroof...) must be opened , an air deflector will retract when the sunroof is opened manually. To express-close the sunroof, fully press and release the front of the pickup box for tie-down loops if the vehicle does not have the cargo management system. From the comfort stop the...
Owner's Manual
Page 128
... accelerator pedal is held at resume/accelerate the vehicle will now cruise at the higher speed. This disengages the cruise control. Press T at the end of the lever, then release the button and the accelerator pedal. Hold it there until you want the vehicle to the desired speed, and then... until you want to be startled and even lose control. The vehicle goes back to S. Take your cruise control on . 2. Press T at the end of the lever and release it does not need to . To increase the vehicle speed in small amounts, move the cruise control switch briefly from R...
... accelerator pedal is held at resume/accelerate the vehicle will now cruise at the higher speed. This disengages the cruise control. Press T at the end of the lever, then release the button and the accelerator pedal. Hold it there until you want the vehicle to the desired speed, and then... until you want to be startled and even lose control. The vehicle goes back to S. Take your cruise control on . 2. Press T at the end of the lever and release it does not need to . To increase the vehicle speed in small amounts, move the cruise control switch briefly from R...

Owner's Manual
Page 129
When going up steep hills, the accelerator pedal might have to be used to maintain the vehicle speed. When the brake is reached, then release it. Exterior Lamps • Step lightly on the brake pedal. • Move the cruise control switch to The exterior lamps control is ...Control on Hills How well the cruise control works on the instrument panel to the left of the steering wheel. 9. • Lightly tap or press the clutch, if the vehicle has a manual transmission. The cruise control set earlier. Passing Another Vehicle While Using Cruise Control Use the accelerator ...
When going up steep hills, the accelerator pedal might have to be used to maintain the vehicle speed. When the brake is reached, then release it. Exterior Lamps • Step lightly on the brake pedal. • Move the cruise control switch to The exterior lamps control is ...Control on Hills How well the cruise control works on the instrument panel to the left of the steering wheel. 9. • Lightly tap or press the clutch, if the vehicle has a manual transmission. The cruise control set earlier. Passing Another Vehicle While Using Cruise Control Use the accelerator ...

Owner's Manual
Page 134
... button is opened. E Dome Lamp The dome lamps are located in this position, the dome lamps will not come on when the key is released (manual transmissions). 3-16 Instrument Panel The instrument panel lights, cluster, and radio display do not dim to turn them on or off. With ...open. In this position, the dome lamps will come on whether a door is opened or closed. To turn the dome lamps on when a door is pressed in the cargo area of P (Park) (automatic transmissions). • The parking brake is removed from the ignition. Dome Lamp Override (Dome Lamp Override):...
... button is opened. E Dome Lamp The dome lamps are located in this position, the dome lamps will not come on when the key is released (manual transmissions). 3-16 Instrument Panel The instrument panel lights, cluster, and radio display do not dim to turn them on or off. With ...open. In this position, the dome lamps will come on whether a door is opened or closed. To turn the dome lamps on when a door is pressed in the cargo area of P (Park) (automatic transmissions). • The parking brake is removed from the ignition. Dome Lamp Override (Dome Lamp Override):...
Owner's Manual
Page 152
...automatically displayed on page 3-37 for Canada. Some messages only clear after the required action has been taken. To scroll through the available functions, press and release the reset stem. • At the gas station, the gas pump shuts off before the gage reads full. DIC Operation and Displays The...the • The gage moves a little when turning a corner or speeding up than half the tank's capacity to fill up . Trip Odometer Press and release the reset stem until the display returns to zero. • It takes a little more or less fuel to fill the tank. 3-34 ...
...automatically displayed on page 3-37 for Canada. Some messages only clear after the required action has been taken. To scroll through the available functions, press and release the reset stem. • At the gas station, the gas pump shuts off before the gage reads full. DIC Operation and Displays The...the • The gage moves a little when turning a corner or speeding up than half the tank's capacity to fill up . Trip Odometer Press and release the reset stem until the display returns to zero. • It takes a little more or less fuel to fill the tank. 3-34 ...