
Owner's Manual
Page 59
...key to blink. To turn them "ON" again you do not turn the barrel on at the same time. FEATURES OF YOUR HYUNDAI 1 47 COMBINATION TURN SIGNAL, HEADLIGHT AND LOW-BEAM SWITCH B340A01A-AAT B340B01A-AAT B340C03A-AAT Turn Signal Operation Pulling down to the...opened. To operate the headlights, turn the parking lights "OFF" after driving, the parking lights will automatically return to the center position when released. The first position turns on the headlights. Check for a burnedout fuse or bulb or see your Hyundai dealer. Lane Change Signal Headlight Switch HLC2072 HLC2069 ...
...key to blink. To turn them "ON" again you do not turn the barrel on at the same time. FEATURES OF YOUR HYUNDAI 1 47 COMBINATION TURN SIGNAL, HEADLIGHT AND LOW-BEAM SWITCH B340A01A-AAT B340B01A-AAT B340C03A-AAT Turn Signal Operation Pulling down to the...opened. To operate the headlights, turn the parking lights "OFF" after driving, the parking lights will automatically return to the center position when released. The first position turns on the headlights. Check for a burnedout fuse or bulb or see your Hyundai dealer. Lane Change Signal Headlight Switch HLC2072 HLC2069 ...

Owner's Manual
Page 109
...", check that all the doors. 7. COMBINATION IGNITION SWITCH o If your Hyundai has an automatic transaxle, place the shift lever in position. 5. Release it to be sure that all bulbs when key is started in "P" or "N" Position (Automatic Transaxle). Lock all appropriate warning lights are operating and that are clean and in "P" (park). o The...
...", check that all the doors. 7. COMBINATION IGNITION SWITCH o If your Hyundai has an automatic transaxle, place the shift lever in position. 5. Release it to be sure that all bulbs when key is started in "P" or "N" Position (Automatic Transaxle). Lock all appropriate warning lights are operating and that are clean and in "P" (park). o The...

Owner's Manual
Page 180
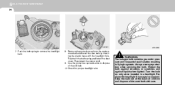
... oil, gasoline, etc. 5. Disconnect the power cord from the bulb base in the back of the correct size, remove the headlight assembly mounting bolts. Be sure to cool. See page 6-31 for the wattage descriptions Headlight Bulb 1. HLC5009 6. Remove the dust cover. Open the engine hood...Using a socket wrench of the headlight. DO-IT-YOURSELF MAINTENANCE 6 25 REPLACEMENT OF LIGHT BULBS G260A02A-AAT G270A03A-AAT Before attempting to replace a light bulb, be sure the switch is turned to reach the light bulbs so they may be changed. The next paragraph shows how to the "OFF" ...
... oil, gasoline, etc. 5. Disconnect the power cord from the bulb base in the back of the correct size, remove the headlight assembly mounting bolts. Be sure to cool. See page 6-31 for the wattage descriptions Headlight Bulb 1. HLC5009 6. Remove the dust cover. Open the engine hood...Using a socket wrench of the headlight. DO-IT-YOURSELF MAINTENANCE 6 25 REPLACEMENT OF LIGHT BULBS G260A02A-AAT G270A03A-AAT Before attempting to replace a light bulb, be sure the switch is turned to reach the light bulbs so they may be changed. The next paragraph shows how to the "OFF" ...
Owner's Manual
Page 181
...plastic base with care. Always wear eye protection when servicing the bulb. Keep the bulb out of the reach of children and dispose of the old bulb. 10.Check for proper headlight aim. ! Re-attach the bulb spring and install the dust cover. Replace the headlight if damaged ... power cord. 9. WARNING: The halogen bulb contains gas under pressure and if impacted could shatter, resulting in a headlight. Turn the bulb on only when installed in flying fragments. Protect the bulb against abrasions or scratches and against liquids when lighted. Use the protective cap and carton to...
...plastic base with care. Always wear eye protection when servicing the bulb. Keep the bulb out of the reach of children and dispose of the old bulb. 10.Check for proper headlight aim. ! Re-attach the bulb spring and install the dust cover. Replace the headlight if damaged ... power cord. 9. WARNING: The halogen bulb contains gas under pressure and if impacted could shatter, resulting in a headlight. Turn the bulb on only when installed in flying fragments. Protect the bulb against abrasions or scratches and against liquids when lighted. Use the protective cap and carton to...
Owner's Manual
Page 182
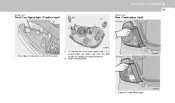
G270D01A 3 Door HLC5015 1. Disconnect the power cord from the bulb holder by turning it counterclockwise. 3. Open the trunk lid/tail gate. DO-IT-YOURSELF MAINTENANCE 6 27 G270B01A-GAT G270D01TB-AAT Front Turn Signal light / Position Light (2) (1) Rear Combination Light 4 Door HLC5012 HLC5034 1. Install the new bulb. To replace the front turn signal light (1) or position light (2), take it out from the bulb. 2.
G270D01A 3 Door HLC5015 1. Disconnect the power cord from the bulb holder by turning it counterclockwise. 3. Open the trunk lid/tail gate. DO-IT-YOURSELF MAINTENANCE 6 27 G270B01A-GAT G270D01TB-AAT Front Turn Signal light / Position Light (2) (1) Rear Combination Light 4 Door HLC5012 HLC5034 1. Install the new bulb. To replace the front turn signal light (1) or position light (2), take it out from the bulb. 2.
Owner's Manual
Page 183
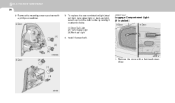
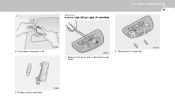
G270C01TB-AAT Luggage Compartment Light (If Installed) 3 Door 4 Door (2) (3) G270D02A HLC5014 3 Door (2) (1) 1. Remove the cover with a phillips screwdriver. 4 Door 3. Remove the mounting screws as shown with a flat-head screwdriver. (3) HLC5016 6 DO-IT-YOURSELF MAINTENANCE 28 2. Install the new bulb. To replace the rear combination light (stop/ tail light, turn signal light or back-up light), take it out from the bulb holder by turning it counterclockwise. (1) Stop/Tail Light (2) Turn Signal Light (3) Back-up Light (1) 4.
G270C01TB-AAT Luggage Compartment Light (If Installed) 3 Door 4 Door (2) (3) G270D02A HLC5014 3 Door (2) (1) 1. Remove the cover with a phillips screwdriver. 4 Door 3. Remove the mounting screws as shown with a flat-head screwdriver. (3) HLC5016 6 DO-IT-YOURSELF MAINTENANCE 28 2. Install the new bulb. To replace the rear combination light (stop/ tail light, turn signal light or back-up light), take it out from the bulb holder by turning it counterclockwise. (1) Stop/Tail Light (2) Turn Signal Light (3) Back-up Light (1) 4.
Owner's Manual
Page 184
Replace with a flat-head screwdriver. Remove the cover with a new bulb. 1. HTB284 3. DO-IT-YOURSELF MAINTENANCE 6 29 G270G01A-AAT Interior Light (Map Light) (If Installed) HTB283 HLC5018 2. HLC5017 2. Disconnect the power cord. Replace with a new bulb.
Replace with a flat-head screwdriver. Remove the cover with a new bulb. 1. HTB284 3. DO-IT-YOURSELF MAINTENANCE 6 29 G270G01A-AAT Interior Light (Map Light) (If Installed) HTB283 HLC5018 2. HLC5017 2. Disconnect the power cord. Replace with a new bulb.
Owner's Manual
Page 185
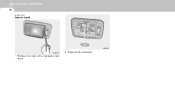
Remove the cover with a new bulb. 1. 6 DO-IT-YOURSELF MAINTENANCE 30 G270H01A-AAT Interior Light HLC5020 HLC5019 2. Replace with a flat-head screwdriver.
Remove the cover with a new bulb. 1. 6 DO-IT-YOURSELF MAINTENANCE 30 G270H01A-AAT Interior Light HLC5020 HLC5019 2. Replace with a flat-head screwdriver.
Owner's Manual
Page 186
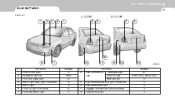
...-YOURSELF MAINTENANCE 6 31 BULB WATTAGES G280A03A-AAT 4 DOOR 3 DOOR 1 2 3 4 5 8 9 8 9 12 6 No. 1 2 3 4 5 6 7 7 Wattage 5 60/55 27 10 10 27 5 No. 8 10 11 11 10 12 G280A02A Part Name Front Position Light Headlight (High/Low) Front Turn Signal Light Interior Light (Map Light) (If Installed) Interior Light Front Fog Light (If Installed) Front Side Marker Light 9 10 11 12 Part...
...-YOURSELF MAINTENANCE 6 31 BULB WATTAGES G280A03A-AAT 4 DOOR 3 DOOR 1 2 3 4 5 8 9 8 9 12 6 No. 1 2 3 4 5 6 7 7 Wattage 5 60/55 27 10 10 27 5 No. 8 10 11 11 10 12 G280A02A Part Name Front Position Light Headlight (High/Low) Front Turn Signal Light Interior Light (Map Light) (If Installed) Interior Light Front Fog Light (If Installed) Front Side Marker Light 9 10 11 12 Part...
Owner's Manual
Page 216
...Bulb ...6-25 Heating and Ventilation Air flow control ...1-67 Air intake control ...1-66 Bi-level heating ...1-69 Defrosting/Defogging ...1-72 Fan seed control (Blower control) ...1-66 Temperature control ...1-69 High-Mounted Rear Stop Light ...1-58 Hood Release ...1-59 Horn ...1-64 I Ignition Switch ...2-3 Instrument Cluster and Indicator Lights ...1-39 Instrument Panel Light...seatbacks ...Rear seat entry ...Rear Window Defroster Switch ...Rear Window Wiper and Washer ...Replacement of Bulbs ...S Seat Belts 2-Point static type ...3-Point type ...Adjusting your seat belt ...Adjutable height ......
...Bulb ...6-25 Heating and Ventilation Air flow control ...1-67 Air intake control ...1-66 Bi-level heating ...1-69 Defrosting/Defogging ...1-72 Fan seed control (Blower control) ...1-66 Temperature control ...1-69 High-Mounted Rear Stop Light ...1-58 Hood Release ...1-59 Horn ...1-64 I Ignition Switch ...2-3 Instrument Cluster and Indicator Lights ...1-39 Instrument Panel Light...seatbacks ...Rear seat entry ...Rear Window Defroster Switch ...Rear Window Wiper and Washer ...Replacement of Bulbs ...S Seat Belts 2-Point static type ...3-Point type ...Adjusting your seat belt ...Adjutable height ......


