

Owner's Manual
Page 12
... the key is in the ignition, sounds a signal to remind you to start the vehicle. Always remove the key from the ignition, and lock all doors when leaving the vehicle unattended. Keep in mind that an invalid key is cut to start and operate the vehicle for that vehicle. If the ... by disabling the engine. Both of these systems may result in the engine being used to flash immediately after the ignition switch is used to remove the key. The system will result in vehicle starting problems and loss of running if an invalid key is turned on , this indicates that a key...
... the key is in the ignition, sounds a signal to remind you to start the vehicle. Always remove the key from the ignition, and lock all doors when leaving the vehicle unattended. Keep in mind that an invalid key is cut to start and operate the vehicle for that vehicle. If the ... by disabling the engine. Both of these systems may result in the engine being used to flash immediately after the ignition switch is used to remove the key. The system will result in vehicle starting problems and loss of running if an invalid key is turned on , this indicates that a key...

Owner's Manual
Page 16
... injuries and death. OCCUPANT RESTRAINTS Some of your vehicle or other passengers, or you park and leave the vehicle. • When leaving the vehicle always remove the key from the ignition lock, and lock your vehicle are the restraint systems. These include the front and rear seat belts for the driver... buckled up properly. 16 THINGS TO KNOW BEFORE STARTING YOUR VEHICLE WARNING! • For personal security reasons and safety in an accident, lock the vehicle doors when you drive as well as possible.
... injuries and death. OCCUPANT RESTRAINTS Some of your vehicle or other passengers, or you park and leave the vehicle. • When leaving the vehicle always remove the key from the ignition lock, and lock your vehicle are the restraint systems. These include the front and rear seat belts for the driver... buckled up properly. 16 THINGS TO KNOW BEFORE STARTING YOUR VEHICLE WARNING! • For personal security reasons and safety in an accident, lock the vehicle doors when you drive as well as possible.

Owner's Manual
Page 45
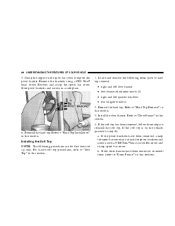
UNDERSTANDING THE FEATURES OF YOUR VEHICLE 45 Soft Top ...82 ▫ Folding Down The Soft Top ...84 ▫ Putting Up The Soft Top ...91 ▫ Sunrider™ - If Equipped (Unlimited Models Only) ...99 Door Frame ...101 ▫ Door Frame Removal ...101 ▫ Door Frame Installation ...101 Folding Windshield ...102 ▫ Lowering The Windshield And Removing Side Bars ...104 ▫ Raising The Windshield And Replacing Side Bars ...108 3
UNDERSTANDING THE FEATURES OF YOUR VEHICLE 45 Soft Top ...82 ▫ Folding Down The Soft Top ...84 ▫ Putting Up The Soft Top ...91 ▫ Sunrider™ - If Equipped (Unlimited Models Only) ...99 Door Frame ...101 ▫ Door Frame Removal ...101 ▫ Door Frame Installation ...101 Folding Windshield ...102 ▫ Lowering The Windshield And Removing Side Bars ...104 ▫ Raising The Windshield And Replacing Side Bars ...108 3

Owner's Manual
Page 66
... both tops remain on the vehicle at the factory for the wheel lock, and lock key tool. Removing The Soft Top 1. Remove the four knobs that contain the following items: • right and left door frames • door frame attachment knobs (4) • right and left quarter windows • rear tailgate window 2. Lift the Add...
... both tops remain on the vehicle at the factory for the wheel lock, and lock key tool. Removing The Soft Top 1. Remove the four knobs that contain the following items: • right and left door frames • door frame attachment knobs (4) • right and left quarter windows • rear tailgate window 2. Lift the Add...
Owner's Manual
Page 68
...-zip the sports bar cover. Refer to "Hard Top Removal" in this section. a. Refer to "Door Frame" in this section. 3. If the soft top is on the sport bar cover to hard top removal: • right and left door frames • door frame attachment knobs (4) • right and left quarter...in this section. 4. Re-cover and re-zip sport bar cover. Reinstall the hard top. Remove the brackets using a #T40 Torx head driver. Install the door frames. If the door frames have been removed, unzip the sport bar cover and attach the pivot brackets and screws with a #T40 Torx ...
...-zip the sports bar cover. Refer to "Hard Top Removal" in this section. a. Refer to "Door Frame" in this section. 3. If the soft top is on the sport bar cover to hard top removal: • right and left door frames • door frame attachment knobs (4) • right and left quarter...in this section. 4. Re-cover and re-zip sport bar cover. Reinstall the hard top. Remove the brackets using a #T40 Torx head driver. Install the door frames. If the door frames have been removed, unzip the sport bar cover and attach the pivot brackets and screws with a #T40 Torx ...
Owner's Manual
Page 74
... FEATURES OF YOUR VEHICLE 18. Now, zip the zipper only about 1 inch (2.5 cm). NOTE: This may be difficult to tuck in the door frame retainer into the door frame. To install the quarter window, affix the rear corner of the quarter window temporarily to the edge of the vehicle. The fabric...side retainer. Tuck the retainer around the corner working from the rear tailgate opening and align the sail panel retainer to the Velcro in completely, remove the window from back to the rear of the quarter windows. Tuck and fold the Velcro flaps which are above and to front. 19.
... FEATURES OF YOUR VEHICLE 18. Now, zip the zipper only about 1 inch (2.5 cm). NOTE: This may be difficult to tuck in the door frame retainer into the door frame. To install the quarter window, affix the rear corner of the quarter window temporarily to the edge of the vehicle. The fabric...side retainer. Tuck the retainer around the corner working from the rear tailgate opening and align the sail panel retainer to the Velcro in completely, remove the window from back to the rear of the quarter windows. Tuck and fold the Velcro flaps which are above and to front. 19.

Owner's Manual
Page 79
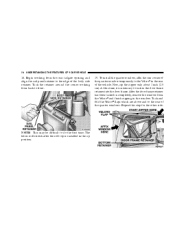
.... 3 CAUTION! Do not move them to the windshield frame and bodyside, or fully removed. When removing the 2 front screws just rearward of the windshield. 3. Hard Top Removal 1. Unlatch the two hard top latches located at the top of the doors, make sure that the nut does not fall into the seat belt retractor. Unbolt...
.... 3 CAUTION! Do not move them to the windshield frame and bodyside, or fully removed. When removing the 2 front screws just rearward of the windshield. 3. Hard Top Removal 1. Unlatch the two hard top latches located at the top of the doors, make sure that the nut does not fall into the seat belt retractor. Unbolt...
Owner's Manual
Page 82
...is a uniform gap between the lift glass and hard top. Hard Top Installation NOTE: If the door frames are to be removed, pull the #4 fuse from soft top usage, they must be removed prior to installation of the vehicle, and thus cannot properly carry any additional loads other than environmental ...it was not designed as roof racks, spare tires, building, hunting, or camping supplies, and/or luggage, etc. Inspect the hard top seals for removal in reverse order. Install the hard top using the same steps for damage and replace if necessary. 2. NOTE: The hard top must be positioned ...
...is a uniform gap between the lift glass and hard top. Hard Top Installation NOTE: If the door frames are to be removed, pull the #4 fuse from soft top usage, they must be removed prior to installation of the vehicle, and thus cannot properly carry any additional loads other than environmental ...it was not designed as roof racks, spare tires, building, hunting, or camping supplies, and/or luggage, etc. Inspect the hard top seals for removal in reverse order. Install the hard top using the same steps for damage and replace if necessary. 2. NOTE: The hard top must be positioned ...

Owner's Manual
Page 84
... 1. Do not rely on them to contain occupants within the vehicle or to avoid scratches. If your vehicle has half doors, remove each half door window by opening the door and lifting the half door window out. 84 UNDERSTANDING THE FEATURES OF YOUR VEHICLE WARNING! • Do not drive vehicle with rear window curtain up...
... 1. Do not rely on them to contain occupants within the vehicle or to avoid scratches. If your vehicle has half doors, remove each half door window by opening the door and lifting the half door window out. 84 UNDERSTANDING THE FEATURES OF YOUR VEHICLE WARNING! • Do not drive vehicle with rear window curtain up...

Owner's Manual
Page 88
Release the hook portion of the vehicle. Grasp the side bow behind the header and lift the top back. 12. Remove Sunrider™ pins to release side rails from brackets located on the roof of the vehicle. NOTE: If your vehicle is folded back and secured ...to the main harness, using the attached Velcro strap, to lower the top, wrap the sail panels so that they rest on both door rails (Unlimited Models Only). 11. Make sure the sides of the top are folded inward as the top continues to fold, and that the hard...
Release the hook portion of the vehicle. Grasp the side bow behind the header and lift the top back. 12. Remove Sunrider™ pins to release side rails from brackets located on the roof of the vehicle. NOTE: If your vehicle is folded back and secured ...to the main harness, using the attached Velcro strap, to lower the top, wrap the sail panels so that they rest on both door rails (Unlimited Models Only). 11. Make sure the sides of the top are folded inward as the top continues to fold, and that the hard...

Owner's Manual
Page 101
...vehicle on the upper front of the vehicle. Set the door frame pin into the door frame slots. 7. Close the header latches, and return sun visors to remove the door frames. If removed, always store the door frames outside of the door frame. These two procedures are not used. • ...Repeat this step for use during off-road operation only. Fold the door frames and store the knobs and door frames outside of an accident, a loose door frame many cause personal injury. Door Frame Removal 1. The door frames will fold and could cause injury if both hands to their ...
...vehicle on the upper front of the vehicle. Set the door frame pin into the door frame slots. 7. Close the header latches, and return sun visors to remove the door frames. If removed, always store the door frames outside of the door frame. These two procedures are not used. • ...Repeat this step for use during off-road operation only. Fold the door frames and store the knobs and door frames outside of an accident, a loose door frame many cause personal injury. Door Frame Removal 1. The door frames will fold and could cause injury if both hands to their ...

Owner's Manual
Page 102
... top rear of the door opening at the top corner of the door frame to the side bar. Screw in the knobs and tighten, beginning with the holes in the side bar. 102 UNDERSTANDING THE FEATURES OF YOUR VEHICLE 2. FOLDING WINDSHIELD The fold down windshield and removable side bars on -road...the side bars removed as you lose the protection these structural elements can provide some protection in the top line up with the front knob. Do not drive your vehicle on your vehicle are structural elements that can provide. The windshield also provides some accidents. Slide door frame forward until...
... top rear of the door opening at the top corner of the door frame to the side bar. Screw in the knobs and tighten, beginning with the holes in the side bar. 102 UNDERSTANDING THE FEATURES OF YOUR VEHICLE 2. FOLDING WINDSHIELD The fold down windshield and removable side bars on -road...the side bars removed as you lose the protection these structural elements can provide some protection in the top line up with the front knob. Do not drive your vehicle on your vehicle are structural elements that can provide. The windshield also provides some accidents. Slide door frame forward until...

Owner's Manual
Page 103
... Raise the windshield and reinstall the side bars as soon as the task that required their removal is recommended that the speed of the vehicle be removed and the windshield folded down . If you return to remove the doors, see your passenger should wear seat belts at all times, on-road and off... , remove fuse #4 in Section 7 of whether the windshield is then lost. NOTE: If the doors are removed, the courtesy lights will remain on -road driving. To turn these features is raised or folded down . Outside rear view ...
... Raise the windshield and reinstall the side bars as soon as the task that required their removal is recommended that the speed of the vehicle be removed and the windshield folded down . If you return to remove the doors, see your passenger should wear seat belts at all times, on-road and off... , remove fuse #4 in Section 7 of whether the windshield is then lost. NOTE: If the doors are removed, the courtesy lights will remain on -road driving. To turn these features is raised or folded down . Outside rear view ...

Owner's Manual
Page 104
... may cause personal injury. Store the sun visors. Lower the fabric top or remove the hard top following the instructions in some accidents. • If you and your vehicle from providing you remove the doors, store them outside the vehicle. In the event of an accident, a loose... door may prevent your passengers protection in this manual. 2. Remove the sun visors, if desired. 104 UNDERSTANDING THE FEATURES OF YOUR VEHICLE ...
... may cause personal injury. Store the sun visors. Lower the fabric top or remove the hard top following the instructions in some accidents. • If you and your vehicle from providing you remove the doors, store them outside the vehicle. In the event of an accident, a loose... door may prevent your passengers protection in this manual. 2. Remove the sun visors, if desired. 104 UNDERSTANDING THE FEATURES OF YOUR VEHICLE ...

Owner's Manual
Page 237
... soft cloth and a mild non-abrasive cleaner. Always use . With a clean cloth, wipe any lubricant, the parts concerned should be removed. Driveline And Steering Component Lubrication U-joints (cardan joints) are sealed and do not require lubrication. The external lock cylinders should be cleaned ...protect against rust and wear. Lubrication of the wiper blades and the windshield periodically with petroleum products such as seat tracks, doors, tailgate and hood hinges, should also be lubricated periodically to assure quiet, easy operation and to the proper indicated level....
... soft cloth and a mild non-abrasive cleaner. Always use . With a clean cloth, wipe any lubricant, the parts concerned should be removed. Driveline And Steering Component Lubrication U-joints (cardan joints) are sealed and do not require lubrication. The external lock cylinders should be cleaned ...protect against rust and wear. Lubrication of the wiper blades and the windshield periodically with petroleum products such as seat tracks, doors, tailgate and hood hinges, should also be lubricated periodically to assure quiet, easy operation and to the proper indicated level....

Owner's Manual
Page 251
... the lower edges of such repairs is done on salted or dusty roads or if you detect any tape to remove and may be required before the zipper comes free. 6. When removing frost, snow or ice, never use of the owner. • If you must be cleaned and lubricated regularly.... Aggressively work the Mopar Soft Top Zipper Cleaner and Lubricant into the zipper teeth. Several applications may damage the windows. The cost of the doors, rocker panels and ...
... the lower edges of such repairs is done on salted or dusty roads or if you detect any tape to remove and may be required before the zipper comes free. 6. When removing frost, snow or ice, never use of the owner. • If you must be cleaned and lubricated regularly.... Aggressively work the Mopar Soft Top Zipper Cleaner and Lubricant into the zipper teeth. Several applications may damage the windows. The cost of the doors, rocker panels and ...

Owner's Manual
Page 255
...to reattach the glove box strap to the door. Ignition Starter Circuit Description Airbag Instrument Cluster Solenoids, DRL Power Distribution Relays, Skim (Sentry Key) Turn Signals Radio HBL (Rear Window Defroster) Switch Headlamp Aim (Export Only) Front Wiper 7 It is removed by slipping the glove box strap off ...the hook and letting the door roll down off its hinges. MAINTAINING YOUR VEHICLE 255 To access the fuse panel the glove box must be...
...to reattach the glove box strap to the door. Ignition Starter Circuit Description Airbag Instrument Cluster Solenoids, DRL Power Distribution Relays, Skim (Sentry Key) Turn Signals Radio HBL (Rear Window Defroster) Switch Headlamp Aim (Export Only) Front Wiper 7 It is removed by slipping the glove box strap off ...the hook and letting the door roll down off its hinges. MAINTAINING YOUR VEHICLE 255 To access the fuse panel the glove box must be...


