Owner's Manual
Page 158
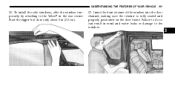
UNDERSTANDING THE FEATURES OF YOUR VEHICLE 157 11. To install the side windows, affix the window temporarily by attaching to the window. 3 Start the zipper but close only about 1 in the rear corner. Failure to do so can result in wind and water leaks or damage to the Velcro in (2.5 cm). 12. Insert the front retainer of the window into the door channel, making sure the retainer is fully seated and properly positioned on the door frame.
UNDERSTANDING THE FEATURES OF YOUR VEHICLE 157 11. To install the side windows, affix the window temporarily by attaching to the window. 3 Start the zipper but close only about 1 in the rear corner. Failure to do so can result in wind and water leaks or damage to the Velcro in (2.5 cm). 12. Insert the front retainer of the window into the door channel, making sure the retainer is fully seated and properly positioned on the door frame.

Owner's Manual
Page 188
Failure to do so can result in wind and water leaks or damage to the window. 16. UNDERSTANDING THE FEATURES OF YOUR VEHICLE 187 15. Continue closing the zipper only along the top edge of the window into the door channel, making sure the retainer is fully seated and properly positioned on the door frame. Insert the front retainer of the window. 3
Failure to do so can result in wind and water leaks or damage to the window. 16. UNDERSTANDING THE FEATURES OF YOUR VEHICLE 187 15. Continue closing the zipper only along the top edge of the window into the door channel, making sure the retainer is fully seated and properly positioned on the door frame. Insert the front retainer of the window. 3
Owner's Manual
Page 395
...cooling system pressure cap when the radiator or coolant bottle is dirty or rusty in appearance, the system should be badly burned by gently spraying water from the radiator drain cock. Engine Coolant Checks Check antifreeze/coolant protection every 12 months (before the onset of bugs, leaves, etc. ...If antifreeze/coolant is hot. Check the engine cooling system hoses for leaks. DO NOT REMOVE THE COOLANT PRESSURE CAP WHEN THE COOLING SYSTEM IS HOT. Never try to cool. Inspect the entire system for brittle rubber...
...cooling system pressure cap when the radiator or coolant bottle is dirty or rusty in appearance, the system should be badly burned by gently spraying water from the radiator drain cock. Engine Coolant Checks Check antifreeze/coolant protection every 12 months (before the onset of bugs, leaves, etc. ...If antifreeze/coolant is hot. Check the engine cooling system hoses for leaks. DO NOT REMOVE THE COOLANT PRESSURE CAP WHEN THE COOLING SYSTEM IS HOT. Never try to cool. Inspect the entire system for brittle rubber...
Owner's Manual
Page 399
...against freezing. • If frequent antifreeze/coolant additions are not kinked or obstructed. • Keep the front of radiator or hose leaks, the vehicle may observe vapor coming from rain, snow, or high humidity accumulating on the radiator and being vaporized when the thermostat ... antifreeze/coolant is needed to maintain the proper level, it should be pressure-tested for leaks. • Maintain antifreeze/coolant concentration at 50% HOAT antifreeze/coolant (minimum) and distilled water for summer or winter operation. If your vehicle is equipped with air conditioning, keep the...
...against freezing. • If frequent antifreeze/coolant additions are not kinked or obstructed. • Keep the front of radiator or hose leaks, the vehicle may observe vapor coming from rain, snow, or high humidity accumulating on the radiator and being vaporized when the thermostat ... antifreeze/coolant is needed to maintain the proper level, it should be pressure-tested for leaks. • Maintain antifreeze/coolant concentration at 50% HOAT antifreeze/coolant (minimum) and distilled water for summer or winter operation. If your vehicle is equipped with air conditioning, keep the...
Owner's Manual
Page 404
... in this policy is normal for the dipstick cap to aid in detecting fluid leaks. Therefore, do not add any fluid additives to produce an accurate reading. 7. Refer to this section for leaks. The only exception to Fluids, Lubricants, and Genuine Parts in the dipstick tube.... Release the parking brake. NOTE: To prevent dirt and water from its fully seated positions, as long as they may be replaced...
... in this policy is normal for the dipstick cap to aid in detecting fluid leaks. Therefore, do not add any fluid additives to produce an accurate reading. 7. Refer to this section for leaks. The only exception to Fluids, Lubricants, and Genuine Parts in the dipstick tube.... Release the parking brake. NOTE: To prevent dirt and water from its fully seated positions, as long as they may be replaced...

Owner's Manual
Page 406
... this section for drain and fill plugs is 15 to 25 ft lbs (20 to Fluids, Lubricants, and Genuine Parts in mud, sand or water, or similar dirty conditions, have your brake drums, brake linings, and axle joints inspected and cleaned as soon as possible. Front/Rear Axle Fluid... Fluid Level Check Lubricant should be at the fill hole and only to leak. Adding Fluid Add lubricant only at bottom edge of Lubricant Use only manufacturer's recommended fluid. Selection of Lubricant Use only manufacturer's recommended fluid....
... this section for drain and fill plugs is 15 to 25 ft lbs (20 to Fluids, Lubricants, and Genuine Parts in mud, sand or water, or similar dirty conditions, have your brake drums, brake linings, and axle joints inspected and cleaned as soon as possible. Front/Rear Axle Fluid... Fluid Level Check Lubricant should be at the fill hole and only to leak. Adding Fluid Add lubricant only at bottom edge of Lubricant Use only manufacturer's recommended fluid. Selection of Lubricant Use only manufacturer's recommended fluid....