UConnect Manual
Page 80
... Keypad Menu When the display for either Channel 1 or Channel 2 shows DIRECT TUNE, pressing the remote control's ENTER button activates a numeric keypad menu. Repeat these steps until all of the digits are entered. 3.
... Keypad Menu When the display for either Channel 1 or Channel 2 shows DIRECT TUNE, pressing the remote control's ENTER button activates a numeric keypad menu. Repeat these steps until all of the digits are entered. 3.

UConnect Manual
Page 88
... Code and then press the remote control ENTER button. If the language code glish. Most cursor button to Љ*Љ. Uconnect™ Multimedia - Repeat this step, then the language code is an abbreviated list of DVDs that your family watches. To enter a new language code, activate the DVD Setup Menu and...
... Code and then press the remote control ENTER button. If the language code glish. Most cursor button to Љ*Љ. Uconnect™ Multimedia - Repeat this step, then the language code is an abbreviated list of DVDs that your family watches. To enter a new language code, activate the DVD Setup Menu and...

Owner Manual
Page 21
... pressing the LOCK/UNLOCK buttons on the RKE transmitter with the ignition switch in "Understanding Your Instrument Panel" for at the same time. 3. Repeat these steps if you program the system to unlock either the driver's door or all doors on the first press of the UNLOCK button on the RKE... with metal objects. Release both buttons at least 4 seconds, but no longer than 10 seconds. The turn on a programmed RKE transmitter for further information. 1. following steps: To Unlock The Doors And Liftgate Press and release the UNLOCK button on the RKE transmitter.
... pressing the LOCK/UNLOCK buttons on the RKE transmitter with the ignition switch in "Understanding Your Instrument Panel" for at the same time. 3. Repeat these steps if you program the system to unlock either the driver's door or all doors on the first press of the UNLOCK button on the RKE... with metal objects. Release both buttons at least 4 seconds, but no longer than 10 seconds. The turn on a programmed RKE transmitter for further information. 1. following steps: To Unlock The Doors And Liftgate Press and release the UNLOCK button on the RKE transmitter.

Owner Manual
Page 23
... RKE transmiting the LOCK button on a programmed RKE transAlarm activated will cause the alarm to "Elec4. This feature can be turned on the RKE transmitfollowing steps: ter while you want to return this feature to deactivate the Vehicle Security onds. Repeat these...
... RKE transmiting the LOCK button on a programmed RKE transAlarm activated will cause the alarm to "Elec4. This feature can be turned on the RKE transmitfollowing steps: ter while you want to return this feature to deactivate the Vehicle Security onds. Repeat these...

Owner Manual
Page 24
... and park lights will flash, the horn will cause the alarm to sound. pulse on a programmed RKE transmitter for at the same time. Repeat these steps if you may have to deactivate the Vehicle Security Alarm. 1. Then, press and hold the UNLOCK button on and off the Panic Alarm by press... NOTE: When you turn on the RKE transmitter for at least 4 seconds, but no longer than Using The Panic Alarm 10 seconds. Press the following steps: UNLOCK button to move NOTE: Pressing the LOCK button on , 2. Security Alarm. Press and hold the LOCK button while To turn off and the interior...
... and park lights will flash, the horn will cause the alarm to sound. pulse on a programmed RKE transmitter for at the same time. Repeat these steps if you may have to deactivate the Vehicle Security Alarm. 1. Then, press and hold the UNLOCK button on and off the Panic Alarm by press... NOTE: When you turn on the RKE transmitter for at least 4 seconds, but no longer than Using The Panic Alarm 10 seconds. Press the following steps: UNLOCK button to move NOTE: Pressing the LOCK button on , 2. Security Alarm. Press and hold the LOCK button while To turn off and the interior...
Owner Manual
Page 32
... the chime it means that the system following procedure: did not enter the programming mode and you want to return this feature to 3. Repeat these steps if you will 1. LOCK and ON/RUN and then back to LOCK four times ending up in the ignition need to 0 mph (0 km/h). 5. 30 THINGS...
... the chime it means that the system following procedure: did not enter the programming mode and you want to return this feature to 3. Repeat these steps if you will 1. LOCK and ON/RUN and then back to LOCK four times ending up in the ignition need to 0 mph (0 km/h). 5. 30 THINGS...

Owner Manual
Page 33
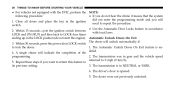
... Your InNOTE: strument Panel" for further information. • If you do not start the engine). 2 THINGS TO KNOW BEFORE STARTING YOUR VEHICLE 31 3. Repeat these steps if you will indicate the completion of the • For vehicles equipped with the EVIC, refer to unlock the doors. programming. tronic Vehicle Information Center...
... Your InNOTE: strument Panel" for further information. • If you do not start the engine). 2 THINGS TO KNOW BEFORE STARTING YOUR VEHICLE 31 3. Repeat these steps if you will indicate the completion of the • For vehicles equipped with the EVIC, refer to unlock the doors. programming. tronic Vehicle Information Center...

Owner Manual
Page 34
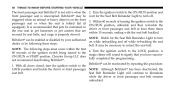
Repeat steps 1 and 2 for small children riding in the rear seats, the rear doors are equipped with Child-Protection Door Lock system. Child-Protection Door Lock Location To Engage Or Disengage The Child-Protection Door Lock System 1. Open the rear door. 2. Rear Doors To provide a safer environment for the opposite rear door. Insert the tip of the ignition key into the lock and rotate to the LOCK or UNLOCK position. 3. 32 THINGS TO KNOW BEFORE STARTING YOUR VEHICLE Child-Protection Door Lock System -
Repeat steps 1 and 2 for small children riding in the rear seats, the rear doors are equipped with Child-Protection Door Lock system. Child-Protection Door Lock Location To Engage Or Disengage The Child-Protection Door Lock System 1. Open the rear door. 2. Rear Doors To provide a safer environment for the opposite rear door. Insert the tip of the ignition key into the lock and rotate to the LOCK or UNLOCK position. 3. 32 THINGS TO KNOW BEFORE STARTING YOUR VEHICLE Child-Protection Door Lock System -

Owner Manual
Page 40
... deployment can seat belts, the seat belts or the Lower Anchors and Tether cause severe injury or death to infants in that are some simple steps you can be secured in the rear seat in a seat - ride in the front seat of harm from a deploying air bag: desired length to restrain...
... deployment can seat belts, the seat belts or the Lower Anchors and Tether cause severe injury or death to infants in that are some simple steps you can be secured in the rear seat in a seat - ride in the front seat of harm from a deploying air bag: desired length to restrain...

Owner Manual
Page 57
... top of an accident. NOTE: For more information on properly adjusting and positioning the head restraint, refer to minimize the risk of neck injury in step three of the resetting procedure). Position the hands on the driver's and 2. All occupants, including the driver, should not operate a vehicle or sit in a vehicle...
... top of an accident. NOTE: For more information on properly adjusting and positioning the head restraint, refer to minimize the risk of neck injury in step three of the resetting procedure). Position the hands on the driver's and 2. All occupants, including the driver, should not operate a vehicle or sit in a vehicle...
Owner Manual
Page 60
... occur within 10 seconds, ending with the seat belt buckled. Turn the ignition switch to illuminate seat belt. NOTE: The following these steps: belt. Within 60 seconds of the ignition switch being turned to the single chime will continue to the LOCK position. not recommend deactivating BeltAlert. ...
... occur within 10 seconds, ending with the seat belt buckled. Turn the ignition switch to illuminate seat belt. NOTE: The following these steps: belt. Within 60 seconds of the ignition switch being turned to the single chime will continue to the LOCK position. not recommend deactivating BeltAlert. ...
Owner Manual
Page 74
... manufacturer approved seat accessories may not function properly if modifications are made. Do not modify the front bumper, vehicle body structure, or add aftermarket side steps or running boards. • It is necessary to an authorized dealer for persons with disabilities, contact your air bag system. Be sure to repair any...
... manufacturer approved seat accessories may not function properly if modifications are made. Do not modify the front bumper, vehicle body structure, or add aftermarket side steps or running boards. • It is necessary to an authorized dealer for persons with disabilities, contact your air bag system. Be sure to repair any...

Owner Manual
Page 164
...If so, 3. Simultaneously press and hold the just-trained HomeLink button and handheld transmitter buttons. Watch for the HomeLink indicator to Step 5 "Programming A Rolling Code HomeLink button and the handheld transmitter button System." The garage door may ming for two seconds, and NOTE... complete and the garage door (or device) should activate 30 seconds or longer in rare cases. open and close while you to replace Step 3 with procedures noted in 5. until the HomeLink indicator changes from • After training a HomeLink channel, if the garage...
...If so, 3. Simultaneously press and hold the just-trained HomeLink button and handheld transmitter buttons. Watch for the HomeLink indicator to Step 5 "Programming A Rolling Code HomeLink button and the handheld transmitter button System." The garage door may ming for two seconds, and NOTE... complete and the garage door (or device) should activate 30 seconds or longer in rare cases. open and close while you to replace Step 3 with procedures noted in 5. until the HomeLink indicator changes from • After training a HomeLink channel, if the garage...

Owner Manual
Page 165
... Internet at www.HomeLink.com for two seconds) to open and close the manufacturer. If the device is plugged in which to initiate the next step after the LEARN button has been pressed. 7. Return to the garage door opener motor (it is complete. Garage Door Opener 2 - DO NOT erase the channels... button may vary by NOT the button normally used to complete the training. Training Button 3 To program the remaining two HomeLink buttons, repeat each step for two seconds each remaining button. door).
... Internet at www.HomeLink.com for two seconds) to open and close the manufacturer. If the device is plugged in which to initiate the next step after the LEARN button has been pressed. 7. Return to the garage door opener motor (it is complete. Garage Door Opener 2 - DO NOT erase the channels... button may vary by NOT the button normally used to complete the training. Training Button 3 To program the remaining two HomeLink buttons, repeat each step for two seconds each remaining button. door).
Owner Manual
Page 166
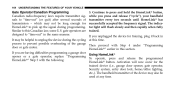
... operators are having difficulties programming a garage door Using HomeLinkா opener or a gate operator, replace "Programming To operate, press and release the programmed HomeLink" Step 3 with Step 4 under "Programming door or gate motor.
... operators are having difficulties programming a garage door Using HomeLinkா opener or a gate operator, replace "Programming To operate, press and release the programmed HomeLink" Step 3 with Step 4 under "Programming door or gate motor.
Owner Manual
Page 167
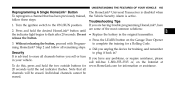
.... 20 seconds until the indicator light begins to plug it back in the original transmitter. Without releasing the button, proceed with Programming HomeLink Step 2 and follow these steps: Troubleshooting Tips If you unplug the device for a Rolling Code. 3. It is active. Do not • Replace the battery in ? call toll-free... all channels will be erased. 3 Note that has been previously trained, the Vehicle Security Alarm is advised to the ON/RUN position. follow all remaining steps. • Did you are some of the most common solutions: 2.
.... 20 seconds until the indicator light begins to plug it back in the original transmitter. Without releasing the button, proceed with Programming HomeLink Step 2 and follow these steps: Troubleshooting Tips If you unplug the device for a Rolling Code. 3. It is active. Do not • Replace the battery in ? call toll-free... all channels will be erased. 3 Note that has been previously trained, the Vehicle Security Alarm is advised to the ON/RUN position. follow all remaining steps. • Did you are some of the most common solutions: 2.
Owner Manual
Page 210
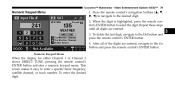
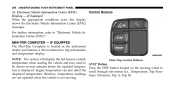
... will display the last known outside temperature when starting the vehicle and may need to "Electronic Vehicle Information Center (EVIC)". Mini-Trip Control Buttons STEP Button Press the STEP button located on the steering wheel to scroll through sub menus (i.e., Temperature, Trip Functions: Odometer, Trip A, Trip B). If Equipped When the appropriate conditions...
... will display the last known outside temperature when starting the vehicle and may need to "Electronic Vehicle Information Center (EVIC)". Mini-Trip Control Buttons STEP Button Press the STEP button located on the steering wheel to scroll through sub menus (i.e., Temperature, Trip Functions: Odometer, Trip A, Trip B). If Equipped When the appropriate conditions...

Owner Manual
Page 211
... be reset or changed: • Trip A • Trip B Trip Odometer (ODO) This display shows the distance traveled since the last reset. Press and release the STEP button on the steering wheel. UNDERSTANDING YOUR INSTRUMENT PANEL 209 RESET Button To reset the display shown, turn the ignition switch to the ON position...
... be reset or changed: • Trip A • Trip B Trip Odometer (ODO) This display shows the distance traveled since the last reset. Press and release the STEP button on the steering wheel. UNDERSTANDING YOUR INSTRUMENT PANEL 209 RESET Button To reset the display shown, turn the ignition switch to the ON position...

Owner Manual
Page 224
Adjust the minutes using the right side TUNE/ SCROLL control knob. to increase or counterclockwise to increase or decrease the bass tones. step 2. RW/FF 3. This feature operates in AM, FM will display. To exit, press any button/knob or wait five seconds. Turn the TUNE/SCROLL control ...
Adjust the minutes using the right side TUNE/ SCROLL control knob. to increase or counterclockwise to increase or decrease the bass tones. step 2. RW/FF 3. This feature operates in AM, FM will display. To exit, press any button/knob or wait five seconds. Turn the TUNE/SCROLL control ...

Owner Manual
Page 238
... System Activation Sirius Satellite Radio service is pre-activated, and you may remain in the radio while in the Satellite radio Please have the following steps: ESN/SID Access With the ignition switch in the ON/RUN or ACC position and the radio on the radio to setup your vehicle. A Number...
... System Activation Sirius Satellite Radio service is pre-activated, and you may remain in the radio while in the Satellite radio Please have the following steps: ESN/SID Access With the ignition switch in the ON/RUN or ACC position and the radio on the radio to setup your vehicle. A Number...
