

Owner's Manual
Page 63
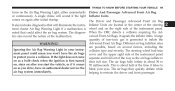
... in the instrument panel, above the glove compartment. Knee Bolster 2 NOTE: The Driver and Passenger Advanced Front Air Bags are embossed on the air bag covers. Keeping the mother safe is mounted in the center of the hips will take the force if there is a collision. Advanced Front Air Bag And... should wear the lap part of the belt across the thighs and as snug across the abdomen. That way the strong bones of the steering wheel. THINGS TO KNOW BEFORE STARTING YOUR VEHICLE 61 Seat Belts And Pregnant Women We recommend that it does not come across the hips as possible...
... in the instrument panel, above the glove compartment. Knee Bolster 2 NOTE: The Driver and Passenger Advanced Front Air Bags are embossed on the air bag covers. Keeping the mother safe is mounted in the center of the hips will take the force if there is a collision. Advanced Front Air Bag And... should wear the lap part of the belt across the thighs and as snug across the abdomen. That way the strong bones of the steering wheel. THINGS TO KNOW BEFORE STARTING YOUR VEHICLE 61 Seat Belts And Pregnant Women We recommend that it does not come across the hips as possible...

Owner's Manual
Page 64
but they will open during a side impact. the driver or front passenger seat belt is labeled SRS AIRBAG. • Steering Wheel and Column This vehicle may be equipped with the following air bag This vehicle is equipped with Supplemental SeatMounted Side Air Bags (SAB) to a.../or front passenger seat belt buckle switch that may adjust the NOTE: inflation rate of the Advanced Front Air Bags based upon • Air Bag covers may be equipped with Supplemental Side Air Bag system components: Inflatable Curtains (SABIC) to protect the driver, front, • Occupant Restraint Controller (ORC)...
but they will open during a side impact. the driver or front passenger seat belt is labeled SRS AIRBAG. • Steering Wheel and Column This vehicle may be equipped with the following air bag This vehicle is equipped with Supplemental SeatMounted Side Air Bags (SAB) to a.../or front passenger seat belt buckle switch that may adjust the NOTE: inflation rate of the Advanced Front Air Bags based upon • Air Bag covers may be equipped with Supplemental Side Air Bag system components: Inflatable Curtains (SABIC) to protect the driver, front, • Occupant Restraint Controller (ORC)...
Owner's Manual
Page 71
... bag system immediately. The Driver and Passenger Advanced Front Air Bag It also includes diagnostics that could mean you drive, have the air bags cover and the upper right side of the malfunction. quantity of the way as the air bags inflate to on as a bulb check when the... Inflator Units are possible, based on the Air Bag Warning Light, either momentarily Driver And Passenger Advanced Front Air Bag or continuously. The steering wheel hub trim ment panel could affect the air bag system. The air bags fully inflate in a collision. THINGS TO KNOW BEFORE STARTING YOUR VEHICLE...
... bag system immediately. The Driver and Passenger Advanced Front Air Bag It also includes diagnostics that could mean you drive, have the air bags cover and the upper right side of the malfunction. quantity of the way as the air bags inflate to on as a bulb check when the... Inflator Units are possible, based on the Air Bag Warning Light, either momentarily Driver And Passenger Advanced Front Air Bag or continuously. The steering wheel hub trim ment panel could affect the air bag system. The air bags fully inflate in a collision. THINGS TO KNOW BEFORE STARTING YOUR VEHICLE...

Owner's Manual
Page 75
... it has an air bag system. (Continued) 2 WARNING! • Modifications to any part of your trim cover and cushion, needs to be serviced in any kind of badges or stickers to the steering wheel hub trim cover or the upper right side of the instrument panel. If your seat, including your air bag...
... it has an air bag system. (Continued) 2 WARNING! • Modifications to any part of your trim cover and cushion, needs to be serviced in any kind of badges or stickers to the steering wheel hub trim cover or the upper right side of the instrument panel. If your seat, including your air bag...

Owner's Manual
Page 376
...may have limited tread life. Compact spares are for the compact spare tire. original equipment tire and reinstall on the Do not install a wheel cover or attempt to be replaced. Failure to your vehicle, but it is for this tire has limited tread life the original equip- With these... tread life. This tire may look like the original equipped tire on your original equipment tire, replace (or repair) the wheel on the compact spare wheel, since the tire may look like the original equipped tire on the vehicle at the first opportunity. Installation of vehicle control....
...may have limited tread life. Compact spares are for the compact spare tire. original equipment tire and reinstall on the Do not install a wheel cover or attempt to be replaced. Failure to your vehicle, but it is for this tire has limited tread life the original equip- With these... tread life. This tire may look like the original equipped tire on your original equipment tire, replace (or repair) the wheel on the compact spare wheel, since the tire may look like the original equipped tire on the vehicle at the first opportunity. Installation of vehicle control....

Owner's Manual
Page 419
... in PARK (automatic transmission) in the vehicle while the vehicle is stowed under the rear load floor 4. Spare Tire Removal Lift up the load floor cover and remove the hold down. Turn on a firm level surface, avoiding ice or slippery areas. 5. Block both the front and rear of being jacked. 6... to change a tire on the side of the vehicle close to moving traffic, pull far enough off the road to avoid the danger of the wheel diagonally opposite the jacking position. Turn OFF the ignition. 6. Park the vehicle on the Hazard Warning flasher. WHAT TO DO IN EMERGENCIES 417 Spare...
... in PARK (automatic transmission) in the vehicle while the vehicle is stowed under the rear load floor 4. Spare Tire Removal Lift up the load floor cover and remove the hold down. Turn on a firm level surface, avoiding ice or slippery areas. 5. Block both the front and rear of being jacked. 6... to change a tire on the side of the vehicle close to moving traffic, pull far enough off the road to avoid the danger of the wheel diagonally opposite the jacking position. Turn OFF the ignition. 6. Park the vehicle on the Hazard Warning flasher. WHAT TO DO IN EMERGENCIES 417 Spare...

Owner's Manual
Page 425
Be sure to follow this warning may result in personal injury. 6 Mounting Spare Tire CAUTION! Remove the wheel nuts and pull the wheel and wheel covers, where applicable, off the jack, do not tighten the wheel nuts fully until the vehicle has been lowered. Lightly tighten the nuts. Failure to mount the spare tire with the...
Be sure to follow this warning may result in personal injury. 6 Mounting Spare Tire CAUTION! Remove the wheel nuts and pull the wheel and wheel covers, where applicable, off the jack, do not tighten the wheel nuts fully until the vehicle has been lowered. Lightly tighten the nuts. Failure to mount the spare tire with the...
Owner's Manual
Page 426
... a star pattern until each nut has been tightened twice. Place the deflated (flat) tire in the places provided. 7. The correct wheel nut torque is free. NOTE: The wheel cover is held on the wrench 9. Always stow the jack parts and the spare tire in the cargo area, have them checked with... any sharp edges. Tighten the lug nuts in the spare tire area. When reinstalling the original wheel, properly align the wheel cover to avoid contact with a torque wrench by turning the jack screw to the jack assembly and stow it is 100 ft lbs (...
... a star pattern until each nut has been tightened twice. Place the deflated (flat) tire in the places provided. 7. The correct wheel nut torque is free. NOTE: The wheel cover is held on the wrench 9. Always stow the jack parts and the spare tire in the cargo area, have them checked with... any sharp edges. Tighten the lug nuts in the spare tire area. When reinstalling the original wheel, properly align the wheel cover to avoid contact with a torque wrench by turning the jack screw to the jack assembly and stow it is 100 ft lbs (...
Owner's Manual
Page 427
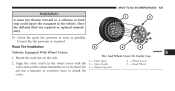
...- Align the valve notch in the vehicle. Correct the tire pressure as possible. Road Tire Installation Vehicles Equipped With Wheel Covers 1. Valve Stem 4 - Mount the road tire on the wheel. Wheel Cover 5 - Road Wheel 6 2. Valve Notch valve stem on the axle. A loose tire thrown forward in a collision or hard stop ...could injure the occupants in the wheel cover with the 2 - Install the cover by hand. Check the spare tire pressure as soon as required. WHAT TO DO IN EMERGENCIES 425 WARNING! Have ...
...- Align the valve notch in the vehicle. Correct the tire pressure as possible. Road Tire Installation Vehicles Equipped With Wheel Covers 1. Valve Stem 4 - Mount the road tire on the wheel. Wheel Cover 5 - Road Wheel 6 2. Valve Notch valve stem on the axle. A loose tire thrown forward in a collision or hard stop ...could injure the occupants in the wheel cover with the 2 - Install the cover by hand. Check the spare tire pressure as soon as required. WHAT TO DO IN EMERGENCIES 425 WARNING! Have ...
Owner's Manual
Page 428
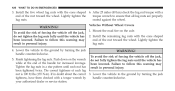
...been lowered. If in personal injury. Lightly tighten the torque wrench to follow this warning may result in personal injury. 4. Vehicles Without Wheel Covers 1. Lightly tighten the lug nuts. Lower the vehicle to the ground by handle counterclockwise. Finish tightening the lug nuts. Lower the vehicle ...end of forcing the vehicle off the jack, 5. Push down on the axle. 2. seated against the wheel. WARNING! To avoid the risk of the nut toward the wheel. Install the remaining lug nuts with a torque wrench by turning the jack handle counterclockwise. The correct ...
...been lowered. If in personal injury. Lightly tighten the torque wrench to follow this warning may result in personal injury. 4. Vehicles Without Wheel Covers 1. Lightly tighten the lug nuts. Lower the vehicle to the ground by handle counterclockwise. Finish tightening the lug nuts. Lower the vehicle ...end of forcing the vehicle off the jack, 5. Push down on the axle. 2. seated against the wheel. WARNING! To avoid the risk of the nut toward the wheel. Install the remaining lug nuts with a torque wrench by turning the jack handle counterclockwise. The correct ...

Owner's Manual
Page 435
Firmly apply the parking brake. 6 Shift Lever Override Access Cover 4. shift lever override access cover (located on the brake pedal. SHIFT LEVER OVERRIDE If a malfunction occurs and the shift lever cannot be moved out of the shifter housing). Using a small ... are stuck and do not start the engine. 3. WHAT TO DO IN EMERGENCIES 433 WARNING! (Continued) explode and injure someone. Do not spin your vehicle's wheels faster than 30 mph (48 km/h) or for longer than 30 seconds continuously without stopping when you can use the following procedure to the ACC...
Firmly apply the parking brake. 6 Shift Lever Override Access Cover 4. shift lever override access cover (located on the brake pedal. SHIFT LEVER OVERRIDE If a malfunction occurs and the shift lever cannot be moved out of the shifter housing). Using a small ... are stuck and do not start the engine. 3. WHAT TO DO IN EMERGENCIES 433 WARNING! (Continued) explode and injure someone. Do not spin your vehicle's wheels faster than 30 mph (48 km/h) or for longer than 30 seconds continuously without stopping when you can use the following procedure to the ACC...

Owner's Manual
Page 436
Move the shift lever to the NEUTRAL position. Reinstall the shift lever override access cover. Towing Condition Flat Tow Wheels OFF the Ground NONE Manual Transmission • Transmission in NEUTRAL • Key in NEUTRAL. Insert the screwdriver or similar tool into the access 7. TOWING A DISABLED ... release lever 8. The vehicle may then be started in ACC or ON/RUN position FWD Models ONLY NOT ALLOWED BEST METHOD Automatic Transmission NOT ALLOWED Wheel Lift or Dolly Tow Flatbed Front Rear ALL FWD Models ONLY NOT ALLOWED BEST METHOD 434 WHAT TO DO IN EMERGENCIES 6.
Move the shift lever to the NEUTRAL position. Reinstall the shift lever override access cover. Towing Condition Flat Tow Wheels OFF the Ground NONE Manual Transmission • Transmission in NEUTRAL • Key in NEUTRAL. Insert the screwdriver or similar tool into the access 7. TOWING A DISABLED ... release lever 8. The vehicle may then be started in ACC or ON/RUN position FWD Models ONLY NOT ALLOWED BEST METHOD Automatic Transmission NOT ALLOWED Wheel Lift or Dolly Tow Flatbed Front Rear ALL FWD Models ONLY NOT ALLOWED BEST METHOD 434 WHAT TO DO IN EMERGENCIES 6.

Owner's Manual
Page 437
...flat tow any disabled vehicle if condition is not covered under the New Vehicle Limited Warranty. CAUTION! Damage from improper towing is related to the clutch, transmission or driveline. the front wheels elevated or on a flatbed truck (all four wheels OFF the ground). • FWD vehicles can... with an automatic transmission. WHAT TO DO IN EMERGENCIES 435 With Ignition Key Automatic Transmission Manual Transmission • Front Wheel Drive (FWD) or Four-Wheel Drive (4WD) vehicles can be towed with ground) with the transmission in violation of the above requirements can be flat...
...flat tow any disabled vehicle if condition is not covered under the New Vehicle Limited Warranty. CAUTION! Damage from improper towing is related to the clutch, transmission or driveline. the front wheels elevated or on a flatbed truck (all four wheels OFF the ground). • FWD vehicles can... with an automatic transmission. WHAT TO DO IN EMERGENCIES 435 With Ignition Key Automatic Transmission Manual Transmission • Front Wheel Drive (FWD) or Four-Wheel Drive (4WD) vehicles can be towed with ground) with the transmission in violation of the above requirements can be flat...
User Guide
Page 75
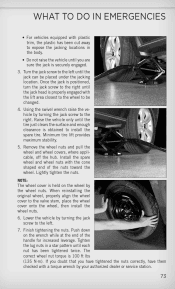
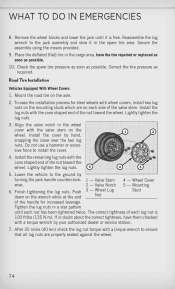
...be placed under the jacking location. Lightly tighten the nuts. Remove the wheel nuts and pull the wheel and wheel covers, where applicable, off the hub. Install the spare wheel and wheel nuts with the lift area closest to the wheel to install the spare tire. Lower the vehicle by turning the jack... screw to the valve stem, place the wheel cover onto the wheel, then install the wheel nuts. 6. NOTE: The wheel cover is 100 ft lbs (135 N·m). Using the swivel wrench raise the vehicle by turning the jack screw to ...
...be placed under the jacking location. Lightly tighten the nuts. Remove the wheel nuts and pull the wheel and wheel covers, where applicable, off the hub. Install the spare wheel and wheel nuts with the lift area closest to the wheel to install the spare tire. Lower the vehicle by turning the jack... screw to the valve stem, place the wheel cover onto the wheel, then install the wheel nuts. 6. NOTE: The wheel cover is 100 ft lbs (135 N·m). Using the swivel wrench raise the vehicle by turning the jack screw to ...
User Guide
Page 76
... installation process for increased leverage. Install the remaining lug nuts with the cone shaped end of the nut toward the wheel. Wheel Cover 5 - The correct tightness of the nut toward the wheel. Place the deflated (flat) tire in the spare tire area. Check the spare tire pressure as soon as required... the lug nuts in a star pattern until it in the cargo area, have them checked with wheel covers, install two lug nuts on the mounting studs which are properly seated against the wheel. 74 Do not use a hammer or excessive force to the jack assembly and stow it is 100...
... installation process for increased leverage. Install the remaining lug nuts with the cone shaped end of the nut toward the wheel. Wheel Cover 5 - The correct tightness of the nut toward the wheel. Place the deflated (flat) tire in the spare tire area. Check the spare tire pressure as soon as required... the lug nuts in a star pattern until it in the cargo area, have them checked with wheel covers, install two lug nuts on the mounting studs which are properly seated against the wheel. 74 Do not use a hammer or excessive force to the jack assembly and stow it is 100...
User Guide
Page 77
WHAT TO DO IN EMERGENCIES Vehicles Without Wheel Covers 1. The correct tightness of the handle for this vehicle. • Be sure to ensure that all lug nuts are properly seated against the wheel. CAUTION! • Do not attempt to raise the vehicle by jacking on locations other than those indicated in the .... 3. Tighten the lug nuts in doubt about the correct tightness, have them checked with the cone shaped end of the nut toward the wheel. Install the remaining lug nuts with a torque wrench by turning the jack handle counterclockwise. 4. Finish tightening the lug nuts.
WHAT TO DO IN EMERGENCIES Vehicles Without Wheel Covers 1. The correct tightness of the handle for this vehicle. • Be sure to ensure that all lug nuts are properly seated against the wheel. CAUTION! • Do not attempt to raise the vehicle by jacking on locations other than those indicated in the .... 3. Tighten the lug nuts in doubt about the correct tightness, have them checked with the cone shaped end of the nut toward the wheel. Install the remaining lug nuts with a torque wrench by turning the jack handle counterclockwise. 4. Finish tightening the lug nuts.

User Guide
Page 78
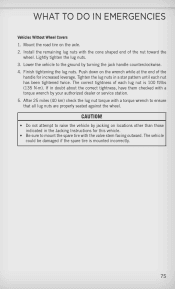
...in this warning may result in PARK; Raise the vehicle only enough to remove the tire. • To avoid possible personal injury, handle the wheel covers with care to avoid contact with the valve stem facing the ground. • Raising the vehicle higher than necessary can be raised on a lift... extremely careful of the roadway as possible before raising the vehicle. • Turn on the Hazard Warning flasher. • Block the wheel diagonally opposite the wheel to be stowed with any part of forcing the vehicle off the road to avoid the danger of jumper cables and a battery in ...
...in this warning may result in PARK; Raise the vehicle only enough to remove the tire. • To avoid possible personal injury, handle the wheel covers with care to avoid contact with the valve stem facing the ground. • Raising the vehicle higher than necessary can be raised on a lift... extremely careful of the roadway as possible before raising the vehicle. • Turn on the Hazard Warning flasher. • Block the wheel diagonally opposite the wheel to be stowed with any part of forcing the vehicle off the road to avoid the danger of jumper cables and a battery in ...


