
Owners Manual
Page 6
... the maintenance and adjustment requirements contained in part on the good mechanical condition of checking all instructions and warnings with suitable protective gear and riding apparel. Do not allow your commitment to always provide a safe riding environment and a properly maintained vehicle. Never allow your child understands the importance of the motorcycle. Your child should a problem occur...
... the maintenance and adjustment requirements contained in part on the good mechanical condition of checking all instructions and warnings with suitable protective gear and riding apparel. Do not allow your commitment to always provide a safe riding environment and a properly maintained vehicle. Never allow your child understands the importance of the motorcycle. Your child should a problem occur...

Owners Manual
Page 11
... ADJUSTMENT...EMISSION CONTROL INFORMATION ...Periodic Maintenance Chart ...Engine Oil...Spark Plug...Air Cleaner ...Throttle Cable...Choke Knob...Idle Speed ...10 14 14 17 17 18 21 22 22 23 25 26 27 27 28 29 31 31 34 38 42 43 48 51 52 Clutch ...Valve Clearance ...Spark Arrester ...Drive Chain...Handlebar...Brakes ...Steering ...Front Suspension ...Rear Suspension ...Wheels ...Hoses Inspection ...Battery ...Fuse ...Tightening Torques of Nuts and Bolts...Cleaning Your Motorcycle...Lubrication...TROUBLESHOOTING GUIDE...STORAGE ...Before...
... ADJUSTMENT...EMISSION CONTROL INFORMATION ...Periodic Maintenance Chart ...Engine Oil...Spark Plug...Air Cleaner ...Throttle Cable...Choke Knob...Idle Speed ...10 14 14 17 17 18 21 22 22 23 25 26 27 27 28 29 31 31 34 38 42 43 48 51 52 Clutch ...Valve Clearance ...Spark Arrester ...Drive Chain...Handlebar...Brakes ...Steering ...Front Suspension ...Rear Suspension ...Wheels ...Hoses Inspection ...Battery ...Fuse ...Tightening Torques of Nuts and Bolts...Cleaning Your Motorcycle...Lubrication...TROUBLESHOOTING GUIDE...STORAGE ...Before...
Owners Manual
Page 12
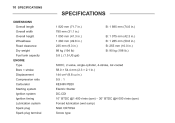
10 SPECIFICATIONS SPECIFICATIONS DIMENSIONS Overall length Overall width Overall height Wheelbase Road clearance Dry weight Fuel tank capacity ENGINE Type Bore × stroke Displacement Compression ratio Carburetor Starting system Ignition system Ignition timing Lubrication system Spark plug Spark plug terminal SOHC, 2-valve, single-cylinder, 4-stroke, Air-cooled 58.0 × 54.4 mm (2.3 × 2.1 in.) 144 cm³ (8.8 cu in.) 9.5 : 1 KEIHIN PB20 Electric Starter DC-CDI 10° BTDC @1 400 r/min (rpm) ∼ 30° BTDC @4 000 r/min...
10 SPECIFICATIONS SPECIFICATIONS DIMENSIONS Overall length Overall width Overall height Wheelbase Road clearance Dry weight Fuel tank capacity ENGINE Type Bore × stroke Displacement Compression ratio Carburetor Starting system Ignition system Ignition timing Lubrication system Spark plug Spark plug terminal SOHC, 2-valve, single-cylinder, 4-stroke, Air-cooled 58.0 × 54.4 mm (2.3 × 2.1 in.) 144 cm³ (8.8 cu in.) 9.5 : 1 KEIHIN PB20 Electric Starter DC-CDI 10° BTDC @1 400 r/min (rpm) ∼ 30° BTDC @4 000 r/min...
Owners Manual
Page 21
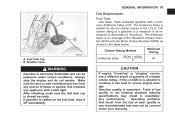
... sure the fuel tank cap is a measure of low quality or not meeting standard industry specifications may not be explosive under your warranty. Octane Rating Method A. The Antiknock Index is spilled on service station pumps in unsatisfactory performance. Always stop the engine and do not smoke. GENERAL INFORMATION 19 Fuel Requirements: j Fuel Type Use clean, fresh unleaded gasoline with a pilot light. If gasoline...
... sure the fuel tank cap is a measure of low quality or not meeting standard industry specifications may not be explosive under your warranty. Octane Rating Method A. The Antiknock Index is spilled on service station pumps in unsatisfactory performance. Always stop the engine and do not smoke. GENERAL INFORMATION 19 Fuel Requirements: j Fuel Type Use clean, fresh unleaded gasoline with a pilot light. If gasoline...

Owners Manual
Page 23
... or leave the motorcycle idling after starting the engine for a long time (1 hour or longer). If you turn the ignition switch to the "OFF" position, while driving the motorcycle, all the electrical systems will cease working and you leave the ignition switch in an accident. Ignition Button OFF ON Engine off. (Red light off ) or open (ON: red light on ) A. WARNING Never operate the ignition switch, while driving the motorcycle.
... or leave the motorcycle idling after starting the engine for a long time (1 hour or longer). If you turn the ignition switch to the "OFF" position, while driving the motorcycle, all the electrical systems will cease working and you leave the ignition switch in an accident. Ignition Button OFF ON Engine off. (Red light off ) or open (ON: red light on ) A. WARNING Never operate the ignition switch, while driving the motorcycle.

Owners Manual
Page 26
the throttle completely closed, push the • Leaving starter button until the engine starts. NOTE żWhen the clutch lever is pulled, the motorcycle can be started with the transmission in the ignition button to the ON position (red • Push light is lit). Ignition Button A. Choke Knob WARNING Do not start the engine or attempt to let it cool and the battery power recover. CAUTION Do...
the throttle completely closed, push the • Leaving starter button until the engine starts. NOTE żWhen the clutch lever is pulled, the motorcycle can be started with the transmission in the ignition button to the ON position (red • Push light is lit). Ignition Button A. Choke Knob WARNING Do not start the engine or attempt to let it cool and the battery power recover. CAUTION Do...
Owners Manual
Page 28
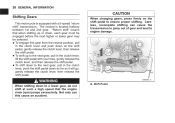
... engine damage. • • • WARNING When shifting down , each gear must be engaged before the next higher or lower gear may be selected. Not only can cause the transmission to jump out of gear and lead to a lower gear, do not shift at such a high speed that when shifting up to ensure proper shifting. To engage first gear from the neutral position, pull in the clutch...
... engine damage. • • • WARNING When shifting down , each gear must be engaged before the next higher or lower gear may be selected. Not only can cause the transmission to jump out of gear and lead to a lower gear, do not shift at such a high speed that when shifting up to ensure proper shifting. To engage first gear from the neutral position, pull in the clutch...

Owners Manual
Page 29
Stopping the Engine Shift the transmission into the neutral position. • Close the throttle completely. • Push the ignition button (red light is off). • A. OFF Position • Turn the fuel tap lever to ensure good engine response at all speeds. Shift down progressively to the OFF position. Independent use of the front or rear brake may be advantageous in the clutch lever as the motorcycle...
Stopping the Engine Shift the transmission into the neutral position. • Close the throttle completely. • Push the ignition button (red light is off). • A. OFF Position • Turn the fuel tap lever to ensure good engine response at all speeds. Shift down progressively to the OFF position. Independent use of the front or rear brake may be advantageous in the clutch lever as the motorcycle...

Owners Manual
Page 32
... damage Air pressure correct Air valve cap installed Spokes ...No looseness Drive Chain ...Overall condition good Chain slack correct Oil if necessary Front and Rear Brakes ...Function properly Lever and pedal play correct No leakage Throttle ...Functions properly Throttle grip returns smoothly Steering ...Smooth but not loose from lock to lock No binding due to control cables Front Fork ...Functions properly No leakage Rear Shock Absorber ...Functions properly No leakage Fuel Tank ...Mounted...
... damage Air pressure correct Air valve cap installed Spokes ...No looseness Drive Chain ...Overall condition good Chain slack correct Oil if necessary Front and Rear Brakes ...Function properly Lever and pedal play correct No leakage Throttle ...Functions properly Throttle grip returns smoothly Steering ...Smooth but not loose from lock to lock No binding due to control cables Front Fork ...Functions properly No leakage Rear Shock Absorber ...Functions properly No leakage Fuel Tank ...Mounted...

Owners Manual
Page 33
... through an oil separator to ensure an efficient engine with applicable regulations of the United States Environmental Protection Agency. 1. Exhaust Emission Control System This system reduces the amount of the maintenance items described in this chapter. The fuel and ignition systems of this vehicle have been carefully designed and constructed to the intake side of low permeation fuel hoses and a fuel tank. MAINTENANCE AND ADJUSTMENT...
... through an oil separator to ensure an efficient engine with applicable regulations of the United States Environmental Protection Agency. 1. Exhaust Emission Control System This system reduces the amount of the maintenance items described in this chapter. The fuel and ignition systems of this vehicle have been carefully designed and constructed to the intake side of low permeation fuel hoses and a fuel tank. MAINTENANCE AND ADJUSTMENT...

Owners Manual
Page 34
... with applicable regulation. As the owner of this maintenance. To obtain warranty service, the Kawasaki Limited Emission Control Systems Warranty requires that your vehicle to ensure that you have low emission levels. 32 MAINTENANCE AND ADJUSTMENT High Altitude Performance Adjustment Information To improve the EMISSION CONTROL PERFORMANCE of vehicles operated above 4 000 feet, Kawasaki recommends the following repair recommendations specified in the Periodic Maintenance Chart. Warranty This vehicle is...
... with applicable regulation. As the owner of this maintenance. To obtain warranty service, the Kawasaki Limited Emission Control Systems Warranty requires that your vehicle to ensure that you have low emission levels. 32 MAINTENANCE AND ADJUSTMENT High Altitude Performance Adjustment Information To improve the EMISSION CONTROL PERFORMANCE of vehicles operated above 4 000 feet, Kawasaki recommends the following repair recommendations specified in the Periodic Maintenance Chart. Warranty This vehicle is...
Owners Manual
Page 40
... been changed, start the engine • If and run it for the oil to settle. Oil Filler Cap/Dipstick B. Check the engine oil level on the dipstick. Stop the engine and wait several minutes for several • If minutes for the engine, transmission and clutch to function properly, maintain the engine oil at idle speed. High Level Line C. A. j the motorcycle has just been used too long. WARNING Motorcycle...
... been changed, start the engine • If and run it for the oil to settle. Oil Filler Cap/Dipstick B. Check the engine oil level on the dipstick. Stop the engine and wait several minutes for several • If minutes for the engine, transmission and clutch to function properly, maintain the engine oil at idle speed. High Level Line C. A. j the motorcycle has just been used too long. WARNING Motorcycle...

Owners Manual
Page 41
... oil drain plugs and position the vehicle by using a syringe or • some other suitable device. High Level Line B. A. Contact your local authorities for approved disposal methods or possible recycling. MAINTENANCE AND ADJUSTMENT 39 Oil and/or Oil Filter Change The engine oil and/or oil filter should be changed periodically to drain. Low Level Line the oil level is too low, add the oil...
... oil drain plugs and position the vehicle by using a syringe or • some other suitable device. High Level Line B. A. Contact your local authorities for approved disposal methods or possible recycling. MAINTENANCE AND ADJUSTMENT 39 Oil and/or Oil Filter Change The engine oil and/or oil filter should be changed periodically to drain. Low Level Line the oil level is too low, add the oil...

Owners Manual
Page 42
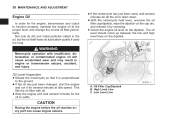
...-Out installation stop oil flow, the causing engine seizure. 40 MAINTENANCE AND ADJUSTMENT the oil filter is replaced, remove the oil filter • When cover and take off the cover with the grommet to- j A. the oil filter element with the grease applied to a new O-ring and tighten its bolts to the grommet. • Install the grease oil filter • ward the engine. the oil filter cover facing the up...
...-Out installation stop oil flow, the causing engine seizure. 40 MAINTENANCE AND ADJUSTMENT the oil filter is replaced, remove the oil filter • When cover and take off the cover with the grommet to- j A. the oil filter element with the grease applied to a new O-ring and tighten its bolts to the grommet. • Install the grease oil filter • ward the engine. the oil filter cover facing the up...

Owners Manual
Page 57
... open, which lowers performances, burns the valves and valve seats, and may cause serious engine damage. It must be checked and adjusted in accordance with the Periodic Maintenance Chart. j CAUTION If valve clearance is started. MAINTENANCE AND ADJUSTMENT 55 Valve Clearance Valve and valve seat wear decreases valve clearance, upsetting valve timing. Valve clearance for each valve should be sure the exhaust system is cold (room temperature). Spark Arrester This vehicle is hot...
... open, which lowers performances, burns the valves and valve seats, and may cause serious engine damage. It must be checked and adjusted in accordance with the Periodic Maintenance Chart. j CAUTION If valve clearance is started. MAINTENANCE AND ADJUSTMENT 55 Valve Clearance Valve and valve seat wear decreases valve clearance, upsetting valve timing. Valve clearance for each valve should be sure the exhaust system is cold (room temperature). Spark Arrester This vehicle is hot...

Owners Manual
Page 68
..., the brake fluid must always be changed when contaminated with dirt or water. j WARNING If the brake lever or pedal feels mushy, there might be air in accordance with the Periodic Maintenance Chart. 66 MAINTENANCE AND ADJUSTMENT the braking power and check that has been unsealed for a long time. Since it is dangerous to operate the motorcycle under such conditions, have the brake checked...
..., the brake fluid must always be changed when contaminated with dirt or water. j WARNING If the brake lever or pedal feels mushy, there might be air in accordance with the Periodic Maintenance Chart. 66 MAINTENANCE AND ADJUSTMENT the braking power and check that has been unsealed for a long time. Since it is dangerous to operate the motorcycle under such conditions, have the brake checked...

Owners Manual
Page 74
... the rear shock absorber rebound damping, turn the rebound damping adjuster at the bottom of the shock absorber can be adjusted or the spring can be replaced with an optional one to change the oil viscosity. A. 72 MAINTENANCE AND ADJUSTMENT Rear Suspension Rear Shock Absorber Inspection the seat down and up by an authorized • If Kawasaki dealer. necessary, repair or replace by 4 or 5 times, and • Pump inspect...
... the rear shock absorber rebound damping, turn the rebound damping adjuster at the bottom of the shock absorber can be adjusted or the spring can be replaced with an optional one to change the oil viscosity. A. 72 MAINTENANCE AND ADJUSTMENT Rear Suspension Rear Shock Absorber Inspection the seat down and up by an authorized • If Kawasaki dealer. necessary, repair or replace by 4 or 5 times, and • Pump inspect...

Owners Manual
Page 91
... its surfaces. Avoid all other abrasive pads or brushes. water can damage parts of your Kawasaki motorcycle will enhance its appearance, optimize overall performance, and extend its finish from a garden • Rinse hose to dry your motorcycle for motor• Mix cycles or automobiles) and water in air intakes, carburetors, brake components, electrical components, muffler outlets, and fuel tank openings. Use a soft cloth or sponge...
... its surfaces. Avoid all other abrasive pads or brushes. water can damage parts of your Kawasaki motorcycle will enhance its appearance, optimize overall performance, and extend its finish from a garden • Rinse hose to dry your motorcycle for motor• Mix cycles or automobiles) and water in air intakes, carburetors, brake components, electrical components, muffler outlets, and fuel tank openings. Use a soft cloth or sponge...
Owners Manual
Page 97
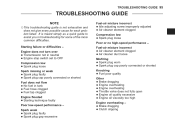
... low-speed performance - Spark weak Spark plug faulty Spark plug gap excessive Engine does not turn over • • • • Misfiring plug worn • Spark • Spark plug cap poorly connected or shorted Knocking • Fuel poor quality Other dragging • Brake Engine • Engine overheating • Throttleoverheating valve does not fully open • Engine oil quality excessive • Engine oil viscosity too high • Engine overheating - Starting failure or difficulties - dragging • Brake Clutch slipping • Fuel-air mixture incorrect Air...
... low-speed performance - Spark weak Spark plug faulty Spark plug gap excessive Engine does not turn over • • • • Misfiring plug worn • Spark • Spark plug cap poorly connected or shorted Knocking • Fuel poor quality Other dragging • Brake Engine • Engine overheating • Throttleoverheating valve does not fully open • Engine oil quality excessive • Engine oil viscosity too high • Engine overheating - Starting failure or difficulties - dragging • Brake Clutch slipping • Fuel-air mixture incorrect Air...

Owners Manual
Page 99
... prepared for storage as Kawasaki K-Kare Fogging oil (part number K61030-002), directly into the cylinder. Install the spark plug. Lift the motorcycle on a box or stand so that both wheels are raised off the ground. (If this includes any source of time, it and drain the engine oil. the oil drain plugs and fill in fresh engine oil. • Install Empty the fuel tank and the carburetor...
... prepared for storage as Kawasaki K-Kare Fogging oil (part number K61030-002), directly into the cylinder. Install the spark plug. Lift the motorcycle on a box or stand so that both wheels are raised off the ground. (If this includes any source of time, it and drain the engine oil. the oil drain plugs and fill in fresh engine oil. • Install Empty the fuel tank and the carburetor...