

Owners Manual
Page 4
... the intake manifold. Then, it is separated from the crankcase, and then returned back to the bottom of the crankcase. 2. Exhaust Emission Control System The exhaust emission control system applied to this vehicle consists of low permeation fuel hoses and fuel tank. A maintenance free ignition system provides the most favorable ignition timing and helps maintain a thorough combustion process within the engine which we all live, Kawasaki has...
... the intake manifold. Then, it is separated from the crankcase, and then returned back to the bottom of the crankcase. 2. Exhaust Emission Control System The exhaust emission control system applied to this vehicle consists of low permeation fuel hoses and fuel tank. A maintenance free ignition system provides the most favorable ignition timing and helps maintain a thorough combustion process within the engine which we all live, Kawasaki has...
Owners Manual
Page 5
... Services Kawasaki Motors Corp., U.S.A. Maintenance and Warranty Proper maintenance is necessary to ensure that the recommended maintenance is used at high altitude, optional replacement of this maintenance. However the carburetor must be returned to an authorized Kawasaki dealer for your vehicle. Kawasaki will work orders, bills, etc., as verification of vehicles operated at high altitude, the thinner atmosphere makes the air/fuel mixture richer reducing performance and...
... Services Kawasaki Motors Corp., U.S.A. Maintenance and Warranty Proper maintenance is necessary to ensure that the recommended maintenance is used at high altitude, optional replacement of this maintenance. However the carburetor must be returned to an authorized Kawasaki dealer for your vehicle. Kawasaki will work orders, bills, etc., as verification of vehicles operated at high altitude, the thinner atmosphere makes the air/fuel mixture richer reducing performance and...
Owners Manual
Page 7
... and maintenance described in the Service Manual. Dec. 27, 2013. (1) To ensure a long, trouble-free life for purchase from any authorized Kawasaki Mule dealer. FOREWORD Congratulations on their own work should remain with the proper operation of your purchase of a new Kawasaki Mule. Those who would like more detailed information on your vehicle's controls, its features, capabilities, and limitations. Motorcycle & Engine Company...
... and maintenance described in the Service Manual. Dec. 27, 2013. (1) To ensure a long, trouble-free life for purchase from any authorized Kawasaki Mule dealer. FOREWORD Congratulations on their own work should remain with the proper operation of your purchase of a new Kawasaki Mule. Those who would like more detailed information on your vehicle's controls, its features, capabilities, and limitations. Motorcycle & Engine Company...
Owners Manual
Page 8
... SAFE DRIVING ...SPECIFICATIONS...SERIAL NUMBER LOCATIONS ...LOCATION OF PARTS ...LOCATION OF LABELS...LOADING INFORMATION ...GENERAL INFORMATION ...Lighting/Electrical Accessory Connector ...Brake Pedal...Cargo Bed ...Tailgate ...Cargo Bed ...Choke Knob...Engine Oil Temperature Warning Light...Fuel Tank...Fuel Gauge...Glove Compartment ...Front Cargo Compartment ...Ignition Switch ...Keys ...Hour Meter ...Light Switch ...Shift Levers ...Gear Shift Lever ...2WD-4WD Shift Lever ...Differential Shift Lever ...Parking Brake Lever ...Parking Brake Warning Light...Seat ...Seat Belts ...Throttle...
... SAFE DRIVING ...SPECIFICATIONS...SERIAL NUMBER LOCATIONS ...LOCATION OF PARTS ...LOCATION OF LABELS...LOADING INFORMATION ...GENERAL INFORMATION ...Lighting/Electrical Accessory Connector ...Brake Pedal...Cargo Bed ...Tailgate ...Cargo Bed ...Choke Knob...Engine Oil Temperature Warning Light...Fuel Tank...Fuel Gauge...Glove Compartment ...Front Cargo Compartment ...Ignition Switch ...Keys ...Hour Meter ...Light Switch ...Shift Levers ...Gear Shift Lever ...2WD-4WD Shift Lever ...Differential Shift Lever ...Parking Brake Lever ...Parking Brake Warning Light...Seat ...Seat Belts ...Throttle...
Owners Manual
Page 9
Transmission Case Oil ...Cooling Fan ...Spark Plug ...Valve Clearance ...Engine Air Cleaner ...Spark Arrester ...Throttle Pedal ...Choke Knob...Carburetor ...Fuel System ...Fuel Filter ...Evaporative Emission Control System ...Belt Drive Torque Converter ...Belt Drive Torque Converter Air Cleaner ...Brakes ...Brake Pedal...Brake Light Switch...Parking Brake Lever ...Steering Wheel...Wheels ...Rims ...Wheel Nuts...Tires ...Joint Boots...Suspension...Seat Belts ...Headlight Beam...Battery ...Fuse ...General Lubrication ...Cleaning ...Bolt and Nut Tightening ...STORAGE ...TROUBLESHOOTING GUIDE......
Transmission Case Oil ...Cooling Fan ...Spark Plug ...Valve Clearance ...Engine Air Cleaner ...Spark Arrester ...Throttle Pedal ...Choke Knob...Carburetor ...Fuel System ...Fuel Filter ...Evaporative Emission Control System ...Belt Drive Torque Converter ...Belt Drive Torque Converter Air Cleaner ...Brakes ...Brake Pedal...Brake Light Switch...Parking Brake Lever ...Steering Wheel...Wheels ...Rims ...Wheel Nuts...Tires ...Joint Boots...Suspension...Seat Belts ...Headlight Beam...Battery ...Fuse ...General Lubrication ...Cleaning ...Bolt and Nut Tightening ...STORAGE ...TROUBLESHOOTING GUIDE......

Owners Manual
Page 12
SPECIFICATIONS 11 SPECIFICATIONS PERFORMANCE Maximum Torque Minimum Turning Radius Differential Mode: DIMENSIONS Overall Length Overall Width Overall Height Wheelbase Tread: Front Rear Ground Clearance Curb Mass Cargo Bed (L × W × H) ENGINE Type Displacement Bore × Stroke Compression Ratio OHV, 1-cylinder, 4-stroke, positive air-cooled 401 cm³ (24.47 cu in.) 82 × 76 mm (3.23 × 2.99 in.) 8.6:1 1 085 mm (42.72 in.) 1 050 mm (41...
SPECIFICATIONS 11 SPECIFICATIONS PERFORMANCE Maximum Torque Minimum Turning Radius Differential Mode: DIMENSIONS Overall Length Overall Width Overall Height Wheelbase Tread: Front Rear Ground Clearance Curb Mass Cargo Bed (L × W × H) ENGINE Type Displacement Bore × Stroke Compression Ratio OHV, 1-cylinder, 4-stroke, positive air-cooled 401 cm³ (24.47 cu in.) 82 × 76 mm (3.23 × 2.99 in.) 8.6:1 1 085 mm (42.72 in.) 1 050 mm (41...
Owners Manual
Page 19
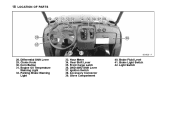
Hour Meter Gear Shift Lever Front Cargo Latch 2WD-4WD Shift Lever Ignition Switch Accessory Connector Glove Compartment 40. Brake Fluid Level 41. Light Switch 18 LOCATION OF PARTS 28. 29. 30. 31. Parking Brake Warning Light 33. 34. 35. 36. 37. 38. 39. Brake Light Switch 42. Differential Shift Lever Choke Knob Horn Button Engine Oil Temperature Warning Light 32.
Hour Meter Gear Shift Lever Front Cargo Latch 2WD-4WD Shift Lever Ignition Switch Accessory Connector Glove Compartment 40. Brake Fluid Level 41. Light Switch 18 LOCATION OF PARTS 28. 29. 30. 31. Parking Brake Warning Light 33. 34. 35. 36. 37. 38. 39. Brake Light Switch 42. Differential Shift Lever Choke Knob Horn Button Engine Oil Temperature Warning Light 32.
Owners Manual
Page 22
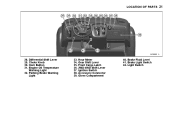
Brake Fluid Level 41. Parking Brake Warning Light 33. 34. 35. 36. 37. 38. 39. Light Switch Brake Light Switch 42. Hour Meter Gear Shift Lever Front Cargo Latch 2WD-4WD Shift Lever Ignition Switch Accessory Connector Glove Compartment 40. Differential Shift Lever Choke Knob Horn Button Engine Oil Temperature Warning Light 32. LOCATION OF PARTS 21 28. 29. 30. 31.
Brake Fluid Level 41. Parking Brake Warning Light 33. 34. 35. 36. 37. 38. 39. Light Switch Brake Light Switch 42. Hour Meter Gear Shift Lever Front Cargo Latch 2WD-4WD Shift Lever Ignition Switch Accessory Connector Glove Compartment 40. Differential Shift Lever Choke Knob Horn Button Engine Oil Temperature Warning Light 32. LOCATION OF PARTS 21 28. 29. 30. 31.
Owners Manual
Page 33
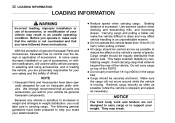
...and accessories you add to support your determinations. Do not carry more than 16 km/h (10 mph) when pulling a trailer. NOTICE The front body work and fenders are personally responsible for use on the vehicle's center of gravity. speed when carrying cargo. Cargo weight ... vehicle warranty. NOTE • • cially designed for your own safety and the safety of accessories. Because any vehicle is stopped) and adjust as possible to steer and may break. They may affect vehicle handling in the cargo bed. This helps maintain stability by centralizing weight...
...and accessories you add to support your determinations. Do not carry more than 16 km/h (10 mph) when pulling a trailer. NOTICE The front body work and fenders are personally responsible for use on the vehicle's center of gravity. speed when carrying cargo. Cargo weight ... vehicle warranty. NOTE • • cially designed for your own safety and the safety of accessories. Because any vehicle is stopped) and adjust as possible to steer and may break. They may affect vehicle handling in the cargo bed. This helps maintain stability by centralizing weight...

Owners Manual
Page 38
...lower and latch the bed after tilting. Refer to the "Starting the Engine" section in handling which can cause changes in the "HOW TO OPERATE" chapter for cold starting. Driving with the cargo bed tilted may cause severe injury or death. Choke Knob Follow guidelines provided in the cargo bed. Do not install seating or carry passengers...the cargo bed WARNING j Choke Knob The choke knob located on the dashboard, to the left of your body, such as hands or arms, between the bed and ROPS or vehicle frame when lifting and lowering the bed. Failure to start the engine. A.
...lower and latch the bed after tilting. Refer to the "Starting the Engine" section in handling which can cause changes in the "HOW TO OPERATE" chapter for cold starting. Driving with the cargo bed tilted may cause severe injury or death. Choke Knob Follow guidelines provided in the cargo bed. Do not install seating or carry passengers...the cargo bed WARNING j Choke Knob The choke knob located on the dashboard, to the left of your body, such as hands or arms, between the bed and ROPS or vehicle frame when lifting and lowering the bed. Failure to start the engine. A.

Owners Manual
Page 46
... the starter continuously for the ignition switch, and one spare key. Do not turn the ignition switch key to the "START" position with the engine running, or damage to the starter can be used for more than 5 seconds, or the starter will overheat and the battery power will return to recover power. Hour meter works. Wait 15 seconds between each operation of the starter to let it cool and...
... the starter continuously for the ignition switch, and one spare key. Do not turn the ignition switch key to the "START" position with the engine running, or damage to the starter can be used for more than 5 seconds, or the starter will overheat and the battery power will return to recover power. Hour meter works. Wait 15 seconds between each operation of the starter to let it cool and...
Owners Manual
Page 58
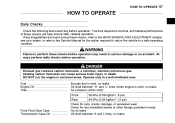
... each day before operation. Always perform daily checks before operation. j WARNING Failure to a safe operating condition. The time required is cold), no leaks. If any imbedded stones or other foreign particles in tank, no leaks. Fuel ...Enough fuel in tread. Front Final Gear Case ...No oil leaks Transmission Case Oil ...Oil level between "H" and "L" lines (when engine is minimal, and habitual performance of these checks before operation may...
... each day before operation. Always perform daily checks before operation. j WARNING Failure to a safe operating condition. The time required is cold), no leaks. If any imbedded stones or other foreign particles in tank, no leaks. Fuel ...Enough fuel in tread. Front Final Gear Case ...No oil leaks Transmission Case Oil ...Oil level between "H" and "L" lines (when engine is minimal, and habitual performance of these checks before operation may...

Owners Manual
Page 80
...; Evaporative emission control system-function* CHASSIS Steering-inspect Steering and axle shaft joint dust boots-inspect Brake pedal play-inspect* Parking brake lever-inspect Brake hose and pipe-inspect Brake fluid level-inspect Brake wear-inspect* Tire wear-inspect* Brake light switch-inspect Seat belt-inspect General lubrication-perform* Bolts, nuts, and fasteners tightness-inspect Wheel nuts tightness-inspect • D • D j D D D D D D • MAINTENANCE AND ADJUSTMENT 79 FREQUENCY First Service OPERATION Fuel hose-replace 5 years (D) Regular Service Every 500...
...; Evaporative emission control system-function* CHASSIS Steering-inspect Steering and axle shaft joint dust boots-inspect Brake pedal play-inspect* Parking brake lever-inspect Brake hose and pipe-inspect Brake fluid level-inspect Brake wear-inspect* Tire wear-inspect* Brake light switch-inspect Seat belt-inspect General lubrication-perform* Bolts, nuts, and fasteners tightness-inspect Wheel nuts tightness-inspect • D • D j D D D D D D • MAINTENANCE AND ADJUSTMENT 79 FREQUENCY First Service OPERATION Fuel hose-replace 5 years (D) Regular Service Every 500...

Owners Manual
Page 88
... B. Bottom Thread A. WARNING Gear case oil is already Oil Change NOTE NOTE the vehicle level, place an oil pan beneath the • With gear case. • Remove the filler cap and drain plug. Front Final Gear Case B. Filler Opening C. in the gear case. ○Use the same type and brand of used oil properly. Dispose of oil that is a toxic substance. Warm oil drains easily...
... B. Bottom Thread A. WARNING Gear case oil is already Oil Change NOTE NOTE the vehicle level, place an oil pan beneath the • With gear case. • Remove the filler cap and drain plug. Front Final Gear Case B. Filler Opening C. in the gear case. ○Use the same type and brand of used oil properly. Dispose of oil that is a toxic substance. Warm oil drains easily...

Owners Manual
Page 91
... on tires can get extremely hot during oil draining. 90 MAINTENANCE AND ADJUSTMENT Oil Change WARNING NOTE The exhaust system can make them with soap and water. If the gasket is damaged, replace it up to the spec- • A. the vehicle level, apply the parking brake se• With curely. Transmission Case B. Guard Plate ified torque. the cargo bed and support it with the hook. • Lift Remove...
... on tires can get extremely hot during oil draining. 90 MAINTENANCE AND ADJUSTMENT Oil Change WARNING NOTE The exhaust system can make them with soap and water. If the gasket is damaged, replace it up to the spec- • A. the vehicle level, apply the parking brake se• With curely. Transmission Case B. Guard Plate ified torque. the cargo bed and support it with the hook. • Lift Remove...

Owners Manual
Page 103
...; Remove the guard plate by releasing the two air • intake ducts and the 6 quick rivets. Operate only in enclosed areas. Cap the gear shift lever in the "N" (Neutral) position. • Put • Start the engine, and warm it with the Periodic Maintenance Chart or whenever the idle speed is changed. Quick Rivets (6 p.c.s.) E. 102 MAINTENANCE AND ADJUSTMENT Carburetor The idle speed adjustment should be performed in accordance...
...; Remove the guard plate by releasing the two air • intake ducts and the 6 quick rivets. Operate only in enclosed areas. Cap the gear shift lever in the "N" (Neutral) position. • Put • Start the engine, and warm it with the Periodic Maintenance Chart or whenever the idle speed is changed. Quick Rivets (6 p.c.s.) E. 102 MAINTENANCE AND ADJUSTMENT Carburetor The idle speed adjustment should be performed in accordance...

Owners Manual
Page 112
... the brake fluid changed by an authorized Kawasaki dealer. MAINTENANCE AND ADJUSTMENT 111 WARNING Air in an accident. The brake light switch should • go on after about 10 mm (0.4 in.) of pedal travel is depressed, the brake light goes on. Brake Pedal B. 10 mm (0.4 in accordance with the Periodic Maintenance Chart. Fluid Change the ignition switch to the "ON" position. • Turn Depress the brake pedal. Brake Light Switch When the brake pedal...
... the brake fluid changed by an authorized Kawasaki dealer. MAINTENANCE AND ADJUSTMENT 111 WARNING Air in an accident. The brake light switch should • go on after about 10 mm (0.4 in.) of pedal travel is depressed, the brake light goes on. Brake Pedal B. 10 mm (0.4 in accordance with the Periodic Maintenance Chart. Fluid Change the ignition switch to the "ON" position. • Turn Depress the brake pedal. Brake Light Switch When the brake pedal...

Owners Manual
Page 113
Brake Light Switch B. Brake Light Switch Adjusting Nut Lights sooner. Lights later. B. D. NOTICE To avoid damaging the electrical connections inside the switch, be sure that the switch body does not turn during adjustment. Throttle Pedal A. 112 MAINTENANCE AND ADJUSTMENT Adjustment light • Brake pedal. adjust the brake light switch, move the switch • To forward or rearward, by turning the adjusting nut. C. switch is located above the brake j A.
Brake Light Switch B. Brake Light Switch Adjusting Nut Lights sooner. Lights later. B. D. NOTICE To avoid damaging the electrical connections inside the switch, be sure that the switch body does not turn during adjustment. Throttle Pedal A. 112 MAINTENANCE AND ADJUSTMENT Adjustment light • Brake pedal. adjust the brake light switch, move the switch • To forward or rearward, by turning the adjusting nut. C. switch is located above the brake j A.
Owners Manual
Page 127
... the general lubrication performed by an authorized Kawasaki dealer or perform it has been splashed with sea water or exposed to the Service Manual for this vehicle. Allow the engine to keep water off the following parts. j WARNING Build-up of fire. cover with tape. 126 MAINTENANCE AND ADJUSTMENT General Lubrication In accordance with the Periodic Maintenance Chart, have collected, park the vehicle outside and stop...
... the general lubrication performed by an authorized Kawasaki dealer or perform it has been splashed with sea water or exposed to the Service Manual for this vehicle. Allow the engine to keep water off the following parts. j WARNING Build-up of fire. cover with tape. 126 MAINTENANCE AND ADJUSTMENT General Lubrication In accordance with the Periodic Maintenance Chart, have collected, park the vehicle outside and stop...

Owners Manual
Page 132
...; Engine flooded or intake blocked • Fuel tank vent clogged • Spark plug wire not on spark plug • Spark plug dirty • Engine Stops fuel in tank • No Water in fuel • Fuel filter • Choke leftclogged on too long • Air filter clogged or intake blocked • Fuel tank cap vent clogged • overheated • Engine Too much idling or low speed • enough air flow) • Overloaded spark plug • Wrong Cooling fan screen clogged • Engine oil low • No Power overheated...
...; Engine flooded or intake blocked • Fuel tank vent clogged • Spark plug wire not on spark plug • Spark plug dirty • Engine Stops fuel in tank • No Water in fuel • Fuel filter • Choke leftclogged on too long • Air filter clogged or intake blocked • Fuel tank cap vent clogged • overheated • Engine Too much idling or low speed • enough air flow) • Overloaded spark plug • Wrong Cooling fan screen clogged • Engine oil low • No Power overheated...