

Owners Manual
Page 5
... special tools described in the Service Manual. Keep this Owner's Manual aboard your purchase of a new Kawasaki motorcycle. Your new motorcycle is not to provide instruction in all operators of this vehicle enroll in a motorcycle rider ...work should, of course, be thoroughly familiar with the proper operation of your motorcycle's controls, its purpose is the product of Kawasaki's advanced engineering, exhaustive testing, and continuous striving for superior reliability, safety and performance. Please read this manual. The Service Manual contains detailed disassembly and maintenance...
... special tools described in the Service Manual. Keep this Owner's Manual aboard your purchase of a new Kawasaki motorcycle. Your new motorcycle is not to provide instruction in all operators of this vehicle enroll in a motorcycle rider ...work should, of course, be thoroughly familiar with the proper operation of your motorcycle's controls, its purpose is the product of Kawasaki's advanced engineering, exhaustive testing, and continuous striving for superior reliability, safety and performance. Please read this manual. The Service Manual contains detailed disassembly and maintenance...
Owners Manual
Page 11
... for High Speed Operation ...13 13 13 13 14 15 16 16 17 17 18 18 19 19 19 20 22 GENERAL INFORMATION ...Specifications ...Serial Number Locations...Location of Labels ...Location of Parts ...Meter Instruments ...Indicators ...Speedometer/Tachometer ...Display Setting...Clock...Features ...Keys ...Ignition Switch/Steering Lock ...Right Handlebar Switches...Left Handlebar Switches ...Brake Lever Adjuster...Clutch Lever Adjuster...Fuel ...Fuel Requirements ...Filling the Tank...24...
... for High Speed Operation ...13 13 13 13 14 15 16 16 17 17 18 18 19 19 19 20 22 GENERAL INFORMATION ...Specifications ...Serial Number Locations...Location of Labels ...Location of Parts ...Meter Instruments ...Indicators ...Speedometer/Tachometer ...Display Setting...Clock...Features ...Keys ...Ignition Switch/Steering Lock ...Right Handlebar Switches...Left Handlebar Switches ...Brake Lever Adjuster...Clutch Lever Adjuster...Fuel ...Fuel Requirements ...Filling the Tank...24...
Owners Manual
Page 12
... ...Starting the Engine ...Jump Starting ...Moving Off...Shifting Gears ...Braking ...Anti-lock Brake System (ABS) ...Stopping the Engine...Stopping the Motorcycle in an Emergency ...Parking ...MAINTENANCE AND ADJUSTMENT Daily Checks ... 67 68 69 69 70 71 71 72 73 76 76 77 80 82 83 85 86 88 89 90 92 94 Periodic Maintenance...Engine Oil ...Coolant...Air Cleaner ...Throttle Control System ...Idle Speed ...Clutch ...Drive Chain ...Brakes ...Brake Light Switches...Suspension System ...Front Fork ...Rear Shock Absorber ...Setting Tables ...Wheels ...Battery...Headlight ...Fuses ...General...
... ...Starting the Engine ...Jump Starting ...Moving Off...Shifting Gears ...Braking ...Anti-lock Brake System (ABS) ...Stopping the Engine...Stopping the Motorcycle in an Emergency ...Parking ...MAINTENANCE AND ADJUSTMENT Daily Checks ... 67 68 69 69 70 71 71 72 73 76 76 77 80 82 83 85 86 88 89 90 92 94 Periodic Maintenance...Engine Oil ...Coolant...Air Cleaner ...Throttle Control System ...Idle Speed ...Clutch ...Drive Chain ...Brakes ...Brake Light Switches...Suspension System ...Front Fork ...Rear Shock Absorber ...Setting Tables ...Wheels ...Battery...Headlight ...Fuses ...General...

Owners Manual
Page 17
Instruct any lighting components, road clearance, banking capability (i.e., lean angle), control operation, wheel travel, front fork movement, Baggage and Luggage 1. Do not install accessories or carry baggage that extends beyond the rear of the motorcycle. Avoid carrying baggage that impairs the performance of the motorcycle. 2. It is designed for light items, and overloading can affect handling due to reach the footpegs...
Instruct any lighting components, road clearance, banking capability (i.e., lean angle), control operation, wheel travel, front fork movement, Baggage and Luggage 1. Do not install accessories or carry baggage that extends beyond the rear of the motorcycle. Avoid carrying baggage that impairs the performance of the motorcycle. 2. It is designed for light items, and overloading can affect handling due to reach the footpegs...

Owners Manual
Page 18
... fork will not be remedied under warranty. Fairings, windshields, backrests, and other vehicles. Poorly designed or installed items can result in an unsafe riding condition. This motorcycle is in an Accident Make sure of any trailers or other large items have the capability of adversely affecting stability and handling of the steering assembly and can result in an...
... fork will not be remedied under warranty. Fairings, windshields, backrests, and other vehicles. Poorly designed or installed items can result in an unsafe riding condition. This motorcycle is in an Accident Make sure of any trailers or other large items have the capability of adversely affecting stability and handling of the steering assembly and can result in an...

Owners Manual
Page 22
... front and rear brakes. Rely more on the front and rear brakes. SAFETY INFORMATION 21 view mirror; Applying only one brake for primary braking. Accelerate and Brake Smoothly When going up steep slopes, shift to a lower gear so that the engine can act as sudden acceleration, braking or turning may not see it at a slow speed and apply the brakes several times to help control vehicle speed by closing the throttle so...
... front and rear brakes. Rely more on the front and rear brakes. SAFETY INFORMATION 21 view mirror; Applying only one brake for primary braking. Accelerate and Brake Smoothly When going up steep slopes, shift to a lower gear so that the engine can act as sudden acceleration, braking or turning may not see it at a slow speed and apply the brakes several times to help control vehicle speed by closing the throttle so...

Owners Manual
Page 24
... high speed operation. SAFETY INFORMATION 23 The importance of control. Examine their overall condition, inflate them to see that the headlight, tail/brake light, turn signals, horn, etc., all work properly. Make sure that all safety related parts are crucial for the high fuel consumption during high speed operation, cannot be overemphasized. Engine Oil Coolant Steering Electrical Equipment Tires Miscellaneous Fuel Check to the proper pressure, and check the wheel balance. Brakes To avoid engine seizure...
... high speed operation. SAFETY INFORMATION 23 The importance of control. Examine their overall condition, inflate them to see that the headlight, tail/brake light, turn signals, horn, etc., all work properly. Make sure that all safety related parts are crucial for the high fuel consumption during high speed operation, cannot be overemphasized. Engine Oil Coolant Steering Electrical Equipment Tires Miscellaneous Fuel Check to the proper pressure, and check the wheel balance. Brakes To avoid engine seizure...

Owners Manual
Page 32
GENERAL INFORMATION 31 5. 6. 7. *8. *9. Radiator Cap Danger Weight and Manufacture Vehicle Emission Control Information Vacuum hose Routing Diagram Fuel Level *: only on California model
GENERAL INFORMATION 31 5. 6. 7. *8. *9. Radiator Cap Danger Weight and Manufacture Vehicle Emission Control Information Vacuum hose Routing Diagram Fuel Level *: only on California model

Owners Manual
Page 40
Idle Adjusting Screw Oil Level Inspection Window Rear Brake Pedal Rear Brake Light Switch Muffler Rear Shock Absorber Spring Preload Adjuster GENERAL INFORMATION 39 1. 2. 3. 4. 5. 6. 7. 8. Tail/Brake Light Brake Fluid Reservoir (Rear) Fuse Boxes Battery Fuel Tank Cap Coolant Reserve Tank Brake Discs Brake Calipers 9. 10. 11. 12. 13. 14. 15.
Idle Adjusting Screw Oil Level Inspection Window Rear Brake Pedal Rear Brake Light Switch Muffler Rear Shock Absorber Spring Preload Adjuster GENERAL INFORMATION 39 1. 2. 3. 4. 5. 6. 7. 8. Tail/Brake Light Brake Fluid Reservoir (Rear) Fuse Boxes Battery Fuel Tank Cap Coolant Reserve Tank Brake Discs Brake Calipers 9. 10. 11. 12. 13. 14. 15.
Owners Manual
Page 47
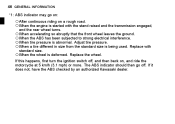
Replace with the stand raised and the transmission engaged, and the rear wheel turns. ○When accelerating so abruptly that the front wheel leaves the ground. ○When the ABS has been subjected to strong electrical interference. ○When tire pressure is abnormal. If this happens, first turn the ignition switch off . Adjust tire pressure. ○When a tire different in size from the standard size is deformed. The ABS indicator should...
Replace with the stand raised and the transmission engaged, and the rear wheel turns. ○When accelerating so abruptly that the front wheel leaves the ground. ○When the ABS has been subjected to strong electrical interference. ○When tire pressure is abnormal. If this happens, first turn the ignition switch off . Adjust tire pressure. ○When a tire different in size from the standard size is deformed. The ABS indicator should...

Owners Manual
Page 67
Fuel Tank Cap ○Do NOTE not exceed the maximum fuel level as shown. A. C. Ignition Key C. 66 GENERAL INFORMATION the key hole cover. • Lift Insert the ignition key into • Push place with the key inserted. D. Key Hole Cover B. the fuel tank cap. • Open Add fuel. • the fuel tank cap down the fuel tank cap. the key clockwise while pushing • Turn down into the fuel • tank cap. Tank Cap Fuel Tank Top Level Bottom of Filler Neck (Maximum Fuel Level) A. B.
Fuel Tank Cap ○Do NOTE not exceed the maximum fuel level as shown. A. C. Ignition Key C. 66 GENERAL INFORMATION the key hole cover. • Lift Insert the ignition key into • Push place with the key inserted. D. Key Hole Cover B. the fuel tank cap. • Open Add fuel. • the fuel tank cap down the fuel tank cap. the key clockwise while pushing • Turn down into the fuel • tank cap. Tank Cap Fuel Tank Top Level Bottom of Filler Neck (Maximum Fuel Level) A. B.

Owners Manual
Page 69
... the fuel tank bracket. down the rear part of the seat while • Lift turning the key clockwise. Latch Hole A. 68 GENERAL INFORMATION Seat The seat can be removed using the ignition key. the rear part of the seat • Push until the lock clicks. Seat B. Fuel Tank Bracket D. Tab C. Ignition Key the hook at the front part of the • Insert seat into the seat • Insert lock. Hook E. Seat Removal Seat Installation the ignition key...
... the fuel tank bracket. down the rear part of the seat while • Lift turning the key clockwise. Latch Hole A. 68 GENERAL INFORMATION Seat The seat can be removed using the ignition key. the rear part of the seat • Push until the lock clicks. Seat B. Fuel Tank Bracket D. Tab C. Ignition Key the hook at the front part of the • Insert seat into the seat • Insert lock. Hook E. Seat Removal Seat Installation the ignition key...

Owners Manual
Page 70
... Kit The tool kit is located under the seat. assembly. ○The upper hexagonal area (locknut) has left hand threads. Hold the tool kit with the band securely. Tool Kit B. Keep the tool kit in the original place. the rear view mirror by slightly • Adjust moving only the mirror portion of the • Lift seat to make sure they are securely locked...
... Kit The tool kit is located under the seat. assembly. ○The upper hexagonal area (locknut) has left hand threads. Hold the tool kit with the band securely. Tool Kit B. Keep the tool kit in the original place. the rear view mirror by slightly • Adjust moving only the mirror portion of the • Lift seat to make sure they are securely locked...

Owners Manual
Page 73
... erased when the ignition is switched off. ○At no time other vehicle manufacturers, Kawasaki has equipped this ...vehicle was performing at the time of an accident such information as: Vehicle speed, • 72 GENERAL INFORMATION WARNING Riding with helmets attached to record only data that assists with understanding of how a vehicle's systems were performing during a short period of time...vehicle's running condition at the time of an accident and of the circumstances in which crashes occur. name, gender, age). The EDR in the event of this motorcycle with normal vehicle...
... erased when the ignition is switched off. ○At no time other vehicle manufacturers, Kawasaki has equipped this ...vehicle was performing at the time of an accident such information as: Vehicle speed, • 72 GENERAL INFORMATION WARNING Riding with helmets attached to record only data that assists with understanding of how a vehicle's systems were performing during a short period of time...vehicle's running condition at the time of an accident and of the circumstances in which crashes occur. name, gender, age). The EDR in the event of this motorcycle with normal vehicle...
Owners Manual
Page 85
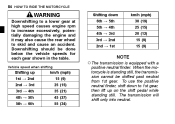
...) 15 (9) 15 (9) ○The transmission is standing still, the transmission cannot be done below the vehicle speeds for each gear shown in the table. 84 HOW TO RIDE THE MOTORCYCLE WARNING Downshifting to a lower gear at high speed causes engine rpm to increase excessively, potentially damaging the engine and it may also cause the rear wheel to 1st gear, then lift up 1st → 2nd...
...) 15 (9) 15 (9) ○The transmission is standing still, the transmission cannot be done below the vehicle speeds for each gear shown in the table. 84 HOW TO RIDE THE MOTORCYCLE WARNING Downshifting to a lower gear at high speed causes engine rpm to increase excessively, potentially damaging the engine and it may also cause the rear wheel to 1st gear, then lift up 1st → 2nd...

Owners Manual
Page 102
MAINTENANCE AND ADJUSTMENT 101 year (*A) Items Brake pad wear (*C) Brake light switch operation Suspension system Steering play Steering stem bearings Electrical system :1 :1 :2 :1 Odometer Reading (*B) × 1 000 km (× 1 000 mile) See 1 6 12 18 24 Page (0.6) (3.8) (7.6) (11.4) (15.2) 126 127 - - - - - ○ Spark plugs Chassis parts Condition of bolts, nuts and fasteners :1 - -
MAINTENANCE AND ADJUSTMENT 101 year (*A) Items Brake pad wear (*C) Brake light switch operation Suspension system Steering play Steering stem bearings Electrical system :1 :1 :2 :1 Odometer Reading (*B) × 1 000 km (× 1 000 mile) See 1 6 12 18 24 Page (0.6) (3.8) (7.6) (11.4) (15.2) 126 127 - - - - - ○ Spark plugs Chassis parts Condition of bolts, nuts and fasteners :1 - -

Owners Manual
Page 128
Pad replacement should go on when • The the front brake is less than 1 mm (0.04 in.), replace both pads in the caliper as a set. Lining Thickness C. 1 mm (0.04 in .) Brake Light Switch Inspection the ignition switch on. • Turn brake light should be done by an authorized Kawasaki dealer. Rear Brake Pads B. Lining Thickness C. 1 mm (0.04 in .) Brake Light Switches A. A. Front Brake Pads B. MAINTENANCE AND ADJUSTMENT 127 thickness of either pad lining is applied.
Pad replacement should go on when • The the front brake is less than 1 mm (0.04 in.), replace both pads in the caliper as a set. Lining Thickness C. 1 mm (0.04 in .) Brake Light Switch Inspection the ignition switch on. • Turn brake light should be done by an authorized Kawasaki dealer. Rear Brake Pads B. Lining Thickness C. 1 mm (0.04 in .) Brake Light Switches A. A. Front Brake Pads B. MAINTENANCE AND ADJUSTMENT 127 thickness of either pad lining is applied.

Owners Manual
Page 151
... stop the engine. 150 MAINTENANCE AND ADJUSTMENT WARNING Build-up of debris or flammable materials. sure the engine and exhaust are • Be cool before washing. Allow the engine to seals, • Avoid brake pads, and tires. When operating the vehicle in conditions that allow debris or flammable material to inspecting for build-up of debris or flammable material in air intakes, fuel Avoid wire brushes...
... stop the engine. 150 MAINTENANCE AND ADJUSTMENT WARNING Build-up of debris or flammable materials. sure the engine and exhaust are • Be cool before washing. Allow the engine to seals, • Avoid brake pads, and tires. When operating the vehicle in conditions that allow debris or flammable material to inspecting for build-up of debris or flammable material in air intakes, fuel Avoid wire brushes...
Owners Manual
Page 161
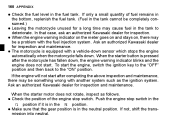
... be a problem with a vehicle-down sensor which stops the engine automatically when the motorcycle falls down , the engine warning indicator blinks and the engine does not start the engine, switch the ignition key to the "OFF" position and then back to • Leaving deteriorate. To start . In that the gear position is pressed after completing the above inspection and maintenance, there may cause fuel in the neutral position...
... be a problem with a vehicle-down sensor which stops the engine automatically when the motorcycle falls down , the engine warning indicator blinks and the engine does not start the engine, switch the ignition key to the "OFF" position and then back to • Leaving deteriorate. To start . In that the gear position is pressed after completing the above inspection and maintenance, there may cause fuel in the neutral position...

Owners Manual
Page 162
... overheat, catch fire and/or fail. the battery cable connections etc. (see page 141) and check if the starter motor rotates. Even after completing the above inspection and maintenance, there may have deteriorated. Ask an authorized Kawasaki dealer for inspection and maintenance. case of slow blinking of the turn signal lights, low volume of the correct capacity and specifications. APPENDIX 161 the fuse condition.
... overheat, catch fire and/or fail. the battery cable connections etc. (see page 141) and check if the starter motor rotates. Even after completing the above inspection and maintenance, there may have deteriorated. Ask an authorized Kawasaki dealer for inspection and maintenance. case of slow blinking of the turn signal lights, low volume of the correct capacity and specifications. APPENDIX 161 the fuse condition.