
Owners Manual
Page 9
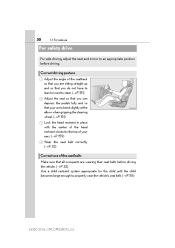
...) Adjust the seat so that you can depress the pedals fully and so that your arms bend slightly at the elbow when gripping the steering wheel. (→P. 151) Lock the head restraint in place with the center of the seatback so that you are wearing their seat belts before driving...
...) Adjust the seat so that you can depress the pedals fully and so that your arms bend slightly at the elbow when gripping the steering wheel. (→P. 151) Lock the head restraint in place with the center of the seatback so that you are wearing their seat belts before driving...
Owners Manual
Page 130
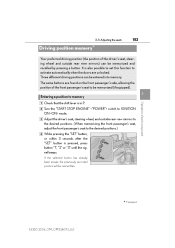
... (if equipped). 3-3. Adjusting the seats 153 Driving position memory∗ Your preferred driving position (the position of the driver's seat, steering wheel and outside rear view mirrors to the desired positions. (When memorizing the front passenger's seat, adjust the front passenger's seat to be overwritten...the shift lever is pressed, press button "1", "2" or "3" until the signal beeps. Adjust the driver's seat, steering wheel, and outside rear view mirrors) can be memorized and recalled by pressing a button. Three different driving positions can be entered into memory....
... (if equipped). 3-3. Adjusting the seats 153 Driving position memory∗ Your preferred driving position (the position of the driver's seat, steering wheel and outside rear view mirrors to the desired positions. (When memorizing the front passenger's seat, adjust the front passenger's seat to be overwritten...the shift lever is pressed, press button "1", "2" or "3" until the signal beeps. Adjust the driver's seat, steering wheel, and outside rear view mirrors) can be memorized and recalled by pressing a button. Three different driving positions can be entered into memory....
Owners Manual
Page 139
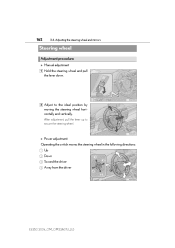
Adjusting the steering wheel and mirrors Steering wheel Adjustment procedure Manual adjustment 1 Hold the steering wheel and pull the lever down. 2 Adjust to secure the steering wheel. 162 3-4. After adjustment, pull the lever up to the ideal position by moving the steering wheel horizontally and vertically. Power adjustment Operating the switch moves the steering wheel in the following directions: 1 2 3 4 Up Down Toward the driver Away from the driver ES350 300h_OM_OM33A01U_(U)
Adjusting the steering wheel and mirrors Steering wheel Adjustment procedure Manual adjustment 1 Hold the steering wheel and pull the lever down. 2 Adjust to secure the steering wheel. 162 3-4. After adjustment, pull the lever up to the ideal position by moving the steering wheel horizontally and vertically. Power adjustment Operating the switch moves the steering wheel in the following directions: 1 2 3 4 Up Down Toward the driver Away from the driver ES350 300h_OM_OM33A01U_(U)
Owners Manual
Page 140
Adjusting the steering wheel and mirrors 3-4.
Adjusting the steering wheel and mirrors 3-4.
Owners Manual
Page 141
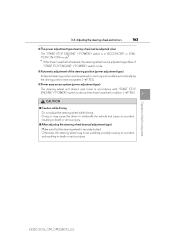
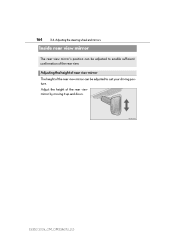
Adjusting the height of rear view mirror The height of the rear view mirror can be adjusted to enable sufficient confirmation of the rear view mirror by moving it up and down. ES350 300h_OM_OM33A01U_(U) Adjusting the steering wheel and mirrors Inside rear view mirror The rear view mirror's position can be adjusted to suit your driving posture. 164 3-4. Adjust the height of the rear view.
Adjusting the height of rear view mirror The height of the rear view mirror can be adjusted to enable sufficient confirmation of the rear view mirror by moving it up and down. ES350 300h_OM_OM33A01U_(U) Adjusting the steering wheel and mirrors Inside rear view mirror The rear view mirror's position can be adjusted to suit your driving posture. 164 3-4. Adjust the height of the rear view.

Owners Manual
Page 142
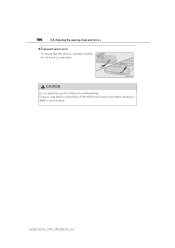
... compass Changing automatic function mode 1 2 anti-glare ON OFF When the automatic anti-glare function is in ON mode, the indicator illuminates. Adjusting the steering wheel and mirrors 165 Anti-glare function Responding to the level of brightness of the headlights of each time the "START STOP ENGINE" switch is turned...
... compass Changing automatic function mode 1 2 anti-glare ON OFF When the automatic anti-glare function is in ON mode, the indicator illuminates. Adjusting the steering wheel and mirrors 165 Anti-glare function Responding to the level of brightness of the headlights of each time the "START STOP ENGINE" switch is turned...
Owners Manual
Page 143
Adjusting the steering wheel and mirrors 166 3-4.
Adjusting the steering wheel and mirrors 166 3-4.

Owners Manual
Page 144
3-4. ES350 300h_OM_OM33A01U_(U) Adjusting the steering wheel and mirrors 167 Outside rear view mirrors Adjustment procedure 1 To select a mirror to adjust, press the switch. 1 2 Left Right 3 2 To adjust the mirror, press the switch. 1 2 3 4 Operation of each component Up Right Down Left Folding the mirrors Push the mirror back in the direction of the vehicle's rear.
3-4. ES350 300h_OM_OM33A01U_(U) Adjusting the steering wheel and mirrors 167 Outside rear view mirrors Adjustment procedure 1 To select a mirror to adjust, press the switch. 1 2 Left Right 3 2 To adjust the mirror, press the switch. 1 2 3 4 Operation of each component Up Right Down Left Folding the mirrors Push the mirror back in the direction of the vehicle's rear.
Owners Manual
Page 145
168 3-4. Adjusting the steering wheel and mirrors
168 3-4. Adjusting the steering wheel and mirrors
Owners Manual
Page 146
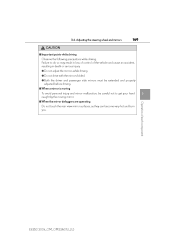
Adjusting the steering wheel and mirrors 169 CAUTION 3-4.
Adjusting the steering wheel and mirrors 169 CAUTION 3-4.
Owners Manual
Page 157
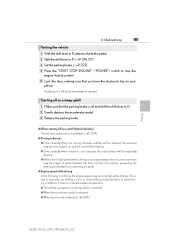
4-1. If parking on a hill, block the wheels as needed. 5 Starting off on your person. Gently depress the accelerator pedal. Release the parking brake. 4 Driving Shift the shift lever to P. (→P. 214, 217) Set the parking brake. (→P. 222) Press the "START STOP ENGINE" switch to D. Lock the door, making sure that you have the electronic key on a steep uphill 1 2 3 Make sure that the parking brake is set and shift the shift lever to stop the engine . Before driving Parking the vehicle 1 2 3 4 With the shift lever in D, depress the brake pedal.
4-1. If parking on a hill, block the wheels as needed. 5 Starting off on your person. Gently depress the accelerator pedal. Release the parking brake. 4 Driving Shift the shift lever to P. (→P. 214, 217) Set the parking brake. (→P. 222) Press the "START STOP ENGINE" switch to D. Lock the door, making sure that you have the electronic key on a steep uphill 1 2 3 Make sure that the parking brake is set and shift the shift lever to stop the engine . Before driving Parking the vehicle 1 2 3 4 With the shift lever in D, depress the brake pedal.
Owners Manual
Page 172
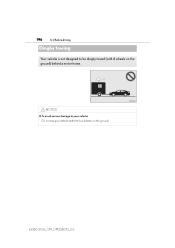
Before driving Dinghy towing Your vehicle is not designed to be dinghy towed (with 4 wheels on the ground) behind a motor home. NOTICE 196 4-1.
Before driving Dinghy towing Your vehicle is not designed to be dinghy towed (with 4 wheels on the ground) behind a motor home. NOTICE 196 4-1.
Owners Manual
Page 274
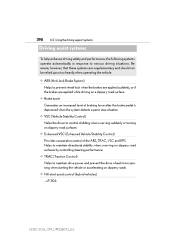
...supplementary and should not be relied upon too heavily when operating the vehicle. ◆ ABS (Anti-lock Brake System) Helps to prevent wheel lock when the brakes are applied suddenly, or if the brakes are applied while driving on a slippery road surface ◆ Brake ... on slippery road surfaces by controlling steering performance. ◆ TRAC (Traction Control) Helps to maintain drive power and prevent the drive wheels from spinning when starting the vehicle or accelerating on slippery road surfaces ◆ Enhanced VSC (Enhanced Vehicle Stability Control) Provides cooperative control...
...supplementary and should not be relied upon too heavily when operating the vehicle. ◆ ABS (Anti-lock Brake System) Helps to prevent wheel lock when the brakes are applied suddenly, or if the brakes are applied while driving on a slippery road surface ◆ Brake ... on slippery road surfaces by controlling steering performance. ◆ TRAC (Traction Control) Helps to maintain drive power and prevent the drive wheels from spinning when starting the vehicle or accelerating on slippery road surfaces ◆ Enhanced VSC (Enhanced Vehicle Stability Control) Provides cooperative control...
Owners Manual
Page 275
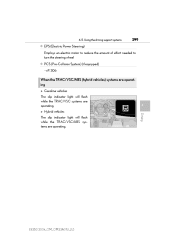
Using the driving support systems 299 ◆ EPS (Electric Power Steering) Employs an electric motor to reduce the amount of effort needed to turn the steering wheel ◆ PCS (Pre-Collision System) (if equipped) →P. 306 When the TRAC/VSC/ABS (hybrid vehicles) systems are operating Gasoline vehicles The slip indicator light will flash while the TRAC/VSC/ABS systems are operating. 4-5. Hybrid vehicles The slip indicator light will flash while the TRAC/VSC systems are operating. 4 Driving ES350 300h_OM_OM33A01U_(U)
Using the driving support systems 299 ◆ EPS (Electric Power Steering) Employs an electric motor to reduce the amount of effort needed to turn the steering wheel ◆ PCS (Pre-Collision System) (if equipped) →P. 306 When the TRAC/VSC/ABS (hybrid vehicles) systems are operating Gasoline vehicles The slip indicator light will flash while the TRAC/VSC/ABS systems are operating. 4-5. Hybrid vehicles The slip indicator light will flash while the TRAC/VSC systems are operating. 4 Driving ES350 300h_OM_OM33A01U_(U)
Owners Manual
Page 276
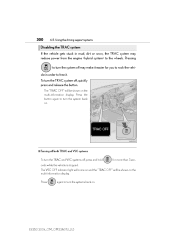
The "TRAC OFF" will be shown on . Press the button again to turn the system back on the multi-information display. Pressing to turn the TRAC system off may reduce power from the engine to free it. 4-5. Using the driving support systems Disabling the TRAC system If the vehicle gets stuck in mud, dirt or snow, the TRAC system may make it easier for you to rock the vehicle in order to the wheels. To turn the system off , quickly press and release the button.
The "TRAC OFF" will be shown on . Press the button again to turn the system back on the multi-information display. Pressing to turn the TRAC system off may reduce power from the engine to free it. 4-5. Using the driving support systems Disabling the TRAC system If the vehicle gets stuck in mud, dirt or snow, the TRAC system may make it easier for you to rock the vehicle in order to the wheels. To turn the system off , quickly press and release the button.
Owners Manual
Page 303
... the driving conditions: ● Do not try to prevent it from the bottom of your shoes before getting 4 in the vehicle. If necessary, block the wheels to P without setting the parking brake. lated on the exterior lights, vehicle's roof, chassis, around the tires or on the air inlet vents in front...
... the driving conditions: ● Do not try to prevent it from the bottom of your shoes before getting 4 in the vehicle. If necessary, block the wheels to P without setting the parking brake. lated on the exterior lights, vehicle's roof, chassis, around the tires or on the air inlet vents in front...
Owners Manual
Page 351
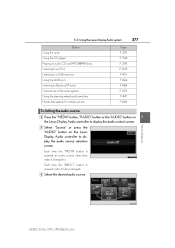
...is changed . 5 Interior features 2 3 Select the desired audio source. ES350 300h_OM_OM33A01U_(U) Select "Source" or press the "AUDIO" button on the Lexus Display Audio controller to display the audio source selection screen. Each time the "MEDIA" button is pressed, an audio source other than radio is changed... to an iPod Listening to a USB memory Using the AUX port Listening to Bluetooth® audio Optimal use of the audio system Using the steering wheel audio switches Hands-free system for cellular phone Page P. 379 P. 394 P. 395 P. 405 P. 413 P. 422 P. 424 P. 439 P. 441 P. 444 ...
...is changed . 5 Interior features 2 3 Select the desired audio source. ES350 300h_OM_OM33A01U_(U) Select "Source" or press the "AUDIO" button on the Lexus Display Audio controller to display the audio source selection screen. Each time the "MEDIA" button is pressed, an audio source other than radio is changed... to an iPod Listening to a USB memory Using the AUX port Listening to Bluetooth® audio Optimal use of the audio system Using the steering wheel audio switches Hands-free system for cellular phone Page P. 379 P. 394 P. 395 P. 405 P. 413 P. 422 P. 424 P. 439 P. 441 P. 444 ...
Owners Manual
Page 415
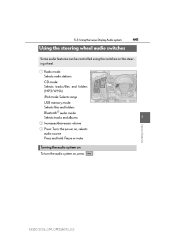
ES350 300h_OM_OM33A01U_(U) Using the Lexus Display Audio system Using the steering wheel audio switches Some audio features can be controlled using the switches on the steering wheel. 1 Radio mode: Selects radio stations CD mode: Selects tracks/files and folders (MP3/WMA) iPod mode: Selects songs USB memory mode: Selects files and folders ...
ES350 300h_OM_OM33A01U_(U) Using the Lexus Display Audio system Using the steering wheel audio switches Some audio features can be controlled using the switches on the steering wheel. 1 Radio mode: Selects radio stations CD mode: Selects tracks/files and folders (MP3/WMA) iPod mode: Selects songs USB memory mode: Selects files and folders ...
Owners Manual
Page 426
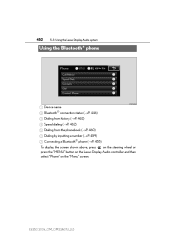
ES350 300h_OM_OM33A01U_(U) 5-3. Using the Lexus Display Audio system Using the Bluetooth® phone 1 2 3 4 5 6 7 Device name Bluetooth® connection status (→P. 446) Dialing from history (→P. 462) Speed dialing (→P. 462) Dialing from the phonebook (→P. 460) Dialing by inputting a number (→P. 459) Connecting a Bluetooth® phone (→P. 455) To display the screen shown above, press on the steering wheel or press the "MENU" button on the Lexus Display Audio controller and then select "Phone" on the "Menu" screen.
ES350 300h_OM_OM33A01U_(U) 5-3. Using the Lexus Display Audio system Using the Bluetooth® phone 1 2 3 4 5 6 7 Device name Bluetooth® connection status (→P. 446) Dialing from history (→P. 462) Speed dialing (→P. 462) Dialing from the phonebook (→P. 460) Dialing by inputting a number (→P. 459) Connecting a Bluetooth® phone (→P. 455) To display the screen shown above, press on the steering wheel or press the "MENU" button on the Lexus Display Audio controller and then select "Phone" on the "Menu" screen.
Owners Manual
Page 437
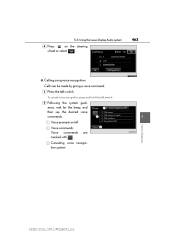
5-3. Using the Lexus Display Audio system 4 Press on the steering wheel or select .
5-3. Using the Lexus Display Audio system 4 Press on the steering wheel or select .


