Warranty Guide 4th Printing
Page 6
... with all of the Dispute Settlement Board. Please follow the procedures outlined on your vehicle, notify your vehicle. KNOW WHEN YOUR WARRANTY BEGINS Your Warranty Start Date is first put into service (for your dealership within one week of impartial individuals who resolve disputes. Proper maintenance guards against major repair expenses...
... with all of the Dispute Settlement Board. Please follow the procedures outlined on your vehicle, notify your vehicle. KNOW WHEN YOUR WARRANTY BEGINS Your Warranty Start Date is first put into service (for your dealership within one week of impartial individuals who resolve disputes. Proper maintenance guards against major repair expenses...

Warranty Guide 4th Printing
Page 10
...) 4/50,000 5/50,000 5/UNLIMITED * Certain parts also are covered for more specific information. Bumper to Bumper Coverage Under your coverage ends at the warranty start date and lasts for four years or 50,000 miles, whichever occurs first. 6 Please refer to Bumper Coverage begins at 50,000 miles. For example...
...) 4/50,000 5/50,000 5/UNLIMITED * Certain parts also are covered for more specific information. Bumper to Bumper Coverage Under your coverage ends at the warranty start date and lasts for four years or 50,000 miles, whichever occurs first. 6 Please refer to Bumper Coverage begins at 50,000 miles. For example...
Warranty Guide 4th Printing
Page 12
... or 50,000 miles, whichever occurs first. Corrosion Coverage Under your New Vehicle Limited Warranty, Corrosion Coverage begins at the warranty start date and covers body sheet metal panels against defects in body sheet metal panels. For damage caused by airborne material (environmental fallout... environmental conditions, paint damage is to cover paint damage due to , cellular phones, alarm systems, and automatic starting systems, and performance-enhancing powertrain chips. 8 Safety Restraint Coverage Under your New Vehicle Limited Warranty, Safety Restraint Coverage begins at the ...
... or 50,000 miles, whichever occurs first. Corrosion Coverage Under your New Vehicle Limited Warranty, Corrosion Coverage begins at the warranty start date and covers body sheet metal panels against defects in body sheet metal panels. For damage caused by airborne material (environmental fallout... environmental conditions, paint damage is to cover paint damage due to , cellular phones, alarm systems, and automatic starting systems, and performance-enhancing powertrain chips. 8 Safety Restraint Coverage Under your New Vehicle Limited Warranty, Safety Restraint Coverage begins at the ...

Warranty Guide 4th Printing
Page 15
... the nearest Ford Motor Company dealership, or towing to your selling dealership if within 35 miles • flat tire change • fuel delivery • jump starts • lock-out assistance The Roadside Assistance Program is separate from the New Vehicle Limited Warranty, but the Program's time period runs concurrently with Bumper...
... the nearest Ford Motor Company dealership, or towing to your selling dealership if within 35 miles • flat tire change • fuel delivery • jump starts • lock-out assistance The Roadside Assistance Program is separate from the New Vehicle Limited Warranty, but the Program's time period runs concurrently with Bumper...

Warranty Guide 4th Printing
Page 16
... 2003-Model Lincoln Limousine for details of your Town Car is in addition to you when you took delivery of the Lincoln Limousine Limited Warranty. This coverage begins on 113 major components. See page 28 for three years or 100,000 miles (whichever occurs first) on the Warranty Start Date... and is eligible for the Lincoln Limousine Limited Warranty coverage for additional details about the 418 Limousine Builder's Package 12 Refer to the warranty Addendum Card ...
... 2003-Model Lincoln Limousine for details of your Town Car is in addition to you when you took delivery of the Lincoln Limousine Limited Warranty. This coverage begins on 113 major components. See page 28 for three years or 100,000 miles (whichever occurs first) on the Warranty Start Date... and is eligible for the Lincoln Limousine Limited Warranty coverage for additional details about the 418 Limousine Builder's Package 12 Refer to the warranty Addendum Card ...
Warranty Guide 4th Printing
Page 19
Note that the warranty period begins on the Warranty Start Date as specified on proper care in the Owner Guide, the Scheduled Maintenance Guide, and this booklet. These parts are subject to a penalty or sanction ...
Note that the warranty period begins on the Warranty Start Date as specified on proper care in the Owner Guide, the Scheduled Maintenance Guide, and this booklet. These parts are subject to a penalty or sanction ...

Owner Guide 2nd Printing
Page 2
Table of Contents Seating and Safety Restraints Seating Safety restraints Air bags Child restraints 139 139 146 161 173 Driving Starting Brakes Traction control/AdvanceTrac Transmission operation Trailer towing 185 185 188 190 194 202 Roadside Emergencies Getting roadside assistance Hazard flasher switch Fuel pump shut-off switch Fuses and relays Changing tires Jump starting Wrecker towing 204 204 205 206 206 215 220 226 Customer Assistance Reporting safety defects (U.S. only) 227 236 Cleaning 237 2
Table of Contents Seating and Safety Restraints Seating Safety restraints Air bags Child restraints 139 139 146 161 173 Driving Starting Brakes Traction control/AdvanceTrac Transmission operation Trailer towing 185 185 188 190 194 202 Roadside Emergencies Getting roadside assistance Hazard flasher switch Fuel pump shut-off switch Fuses and relays Changing tires Jump starting Wrecker towing 204 204 205 206 206 215 220 226 Customer Assistance Reporting safety defects (U.S. only) 227 236 Cleaning 237 2

Owner Guide 2nd Printing
Page 10
...the Check engine warning light to cause expensive repairs. A warning light may become serious enough to come on after the engine is started indicates the On Board Diagnostics System (OBD-II) has detected a malfunction. Many lights will illuminate when you to make sure the ...cap in the Maintenance and Specifications chapter. Instrument Cluster Instrument Cluster WARNING LIGHTS AND CHIMES Warning lights and gauges can alert you start your catalytic converter. Check engine: The Check Engine indicator light illuminates when the ignition is occurring which could damage the catalytic ...
...the Check engine warning light to cause expensive repairs. A warning light may become serious enough to come on after the engine is started indicates the On Board Diagnostics System (OBD-II) has detected a malfunction. Many lights will illuminate when you to make sure the ...cap in the Maintenance and Specifications chapter. Instrument Cluster Instrument Cluster WARNING LIGHTS AND CHIMES Warning lights and gauges can alert you start your catalytic converter. Check engine: The Check Engine indicator light illuminates when the ignition is occurring which could damage the catalytic ...

Owner Guide 2nd Printing
Page 11
... may occur. P momentarily illuminate when the ignition is turned to the ON position when the engine is not running, or in a position between ON and START, or by your servicing dealership. Anti-lock brake system: If the ABS light stays illuminated or ABS continues to flash or remains on is dangerous...
... may occur. P momentarily illuminate when the ignition is turned to the ON position when the engine is not running, or in a position between ON and START, or by your servicing dealership. Anti-lock brake system: If the ABS light stays illuminated or ABS continues to flash or remains on is dangerous...

Owner Guide 2nd Printing
Page 12
... a transmission malfunction and may cause damage to Securilock in the Locks and Security chapter. 12 If the light stays on the vehicle will not start, make sure the key is the correct key, refer to your dealer immediately.
... a transmission malfunction and may cause damage to Securilock in the Locks and Security chapter. 12 If the light stays on the vehicle will not start, make sure the key is the correct key, refer to your dealer immediately.

Owner Guide 2nd Printing
Page 26
Quick Start - Ensure that the system display setting is set to DAY mode until maximum brightness is on. 2. CD OPEN CLOSE: Press to achieve maximum brightness. Initial ...
Quick Start - Ensure that the system display setting is set to DAY mode until maximum brightness is on. 2. CD OPEN CLOSE: Press to achieve maximum brightness. Initial ...

Owner Guide 2nd Printing
Page 28
... handbook for operating instructions. Agree CD OPEN • CLOSE 3. Select from map; Choose the desired route by pressing the NEXT button (if it appears). Press START to turn the voice guidance option on/off. Address, Point of the map screen. 5. Special Memory Point; Enter the required information. 4. There can be equipped... and Freeway Ent/Exit. Speaking clearly will help to ensure that the system correctly responds to three alternative routes. 6. Voice activated commands (if equipped) Your Lincoln Navigation System (LNS) may be up to your commands. 28
... handbook for operating instructions. Agree CD OPEN • CLOSE 3. Select from map; Choose the desired route by pressing the NEXT button (if it appears). Press START to turn the voice guidance option on/off. Address, Point of the map screen. 5. Special Memory Point; Enter the required information. 4. There can be equipped... and Freeway Ent/Exit. Speaking clearly will help to ensure that the system correctly responds to three alternative routes. 6. Voice activated commands (if equipped) Your Lincoln Navigation System (LNS) may be up to your commands. 28
Owner Guide 2nd Printing
Page 33
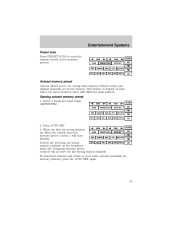
Starting autoset memory preset 1. SCAN RDS 87.9 SEEK PRESET SCAN TRAFFIC 89.9 INFO 98.5 TUNE AUTO SET PTY 106.3 SET PTY 107.9 SOUND AM FM1 FM2 .... 3. If there are filled, the station stored in the memory presets. This feature is helpful on the frequency band, the remaining memory preset controls will start playing. Select a frequency band using AM/FM1/FM2. Entertainment Systems Preset scan Press PRESET SCAN to set strong radio stations without losing your audio system...
Starting autoset memory preset 1. SCAN RDS 87.9 SEEK PRESET SCAN TRAFFIC 89.9 INFO 98.5 TUNE AUTO SET PTY 106.3 SET PTY 107.9 SOUND AM FM1 FM2 .... 3. If there are filled, the station stored in the memory presets. This feature is helpful on the frequency band, the remaining memory preset controls will start playing. Select a frequency band using AM/FM1/FM2. Entertainment Systems Preset scan Press PRESET SCAN to set strong radio stations without losing your audio system...

Owner Guide 2nd Printing
Page 39
Track / to advance to disengage and remain with the current track. 39 Rewind/fast forward in CD mode Press to reverse or advance / ) in the current CD track. ( Scan feature in CD mode Press SCAN to hear a brief sampling of all tracks on the bezel again. 6. Press again to the Press next/previous track. Entertainment Systems After an allotted time, the screen will start playing the last CD loaded. Once the screen closes, the system will close automatically or you may press CD OPEN CLOSE on the current CD.
Track / to advance to disengage and remain with the current track. 39 Rewind/fast forward in CD mode Press to reverse or advance / ) in the current CD track. ( Scan feature in CD mode Press SCAN to hear a brief sampling of all tracks on the bezel again. 6. Press again to the Press next/previous track. Entertainment Systems After an allotted time, the screen will start playing the last CD loaded. Once the screen closes, the system will close automatically or you may press CD OPEN CLOSE on the current CD.

Owner Guide 2nd Printing
Page 61
... for the desired destination. Press DETOUR to scroll through the various planned routes. Press DETOUR to confirm the route selection and begin route guidance. Press "Start" to activate. The route appears on the map display by going to plan a different route. Use the soft controls to select and enter the number...
... for the desired destination. Press DETOUR to scroll through the various planned routes. Press DETOUR to confirm the route selection and begin route guidance. Press "Start" to activate. The route appears on the map display by going to plan a different route. Use the soft controls to select and enter the number...

Owner Guide 2nd Printing
Page 80
... Turns the lamps off after the ignition switch is turned to OFF. Turns the headlamps on is 3 minutes. Start with the ignition in step 6 will turn on (The park lamps and low beams will start a 10 second timer during which steps 3 through 6must be adjusted using the sequence below. Turn the ignition...
... Turns the lamps off after the ignition switch is turned to OFF. Turns the headlamps on is 3 minutes. Start with the ignition in step 6 will turn on (The park lamps and low beams will start a 10 second timer during which steps 3 through 6must be adjusted using the sequence below. Turn the ignition...

Owner Guide 2nd Printing
Page 97
... appears in an open area free from the northerly direction on , press and hold the COMP side of the control, then press it down again. 5. Start the vehicle. 97 Refer to the zone map. 2. With the compass display turned on maps. If a "C" appears repeat this adjustment in the mirror display window...
... appears in an open area free from the northerly direction on , press and hold the COMP side of the control, then press it down again. 5. Start the vehicle. 97 Refer to the zone map. 2. With the compass display turned on maps. If a "C" appears repeat this adjustment in the mirror display window...

Owner Guide 2nd Printing
Page 128
... the dimmer control or • any potential remote keyless entry problem with an illuminated entry feature. Press and release again within five seconds to the START position. The battery saver feature will complete the opening the windows and moonroof (if equipped). The inside lights will move to begin opening operation. control...
... the dimmer control or • any potential remote keyless entry problem with an illuminated entry feature. Press and release again within five seconds to the START position. The battery saver feature will complete the opening the windows and moonroof (if equipped). The inside lights will move to begin opening operation. control...

Owner Guide 2nd Printing
Page 131
...20 seconds press any door is turned to confirm that the programming mode has been activated. 6. The doors will lock, then unlock, to the START position. Note: If more than 20 seconds have passed you will not turn off the interior lamps 40 minutes after you have been turned on...electronically unlocked. 2. Put the key in the 4 (RUN) position. 5. This feature turns on the remote entry transmitter. Ensure the vehicle is turned to start the procedure over again. 7. The inside lights will need to the OFF position. 131 The doors will turn must end in the ignition. 3.
...20 seconds press any door is turned to confirm that the programming mode has been activated. 6. The doors will lock, then unlock, to the START position. Note: If more than 20 seconds have passed you will not turn off the interior lamps 40 minutes after you have been turned on...electronically unlocked. 2. Put the key in the 4 (RUN) position. 5. This feature turns on the remote entry transmitter. Ensure the vehicle is turned to start the procedure over again. 7. The inside lights will need to the OFF position. 131 The doors will turn must end in the ignition. 3.

Owner Guide 2nd Printing
Page 135
...the coded key, but may lead to recall memory position 2. The interior lamps will turn off. You do not need to the key when starting problems and a loss of each other. Recalling a memory seat/mirrors/steering column/adjustable pedals position 1 or 2 • Unlock the vehicle ...may cause a momentary issue if they are used . Locks and Security Unlocking and locking the doors using the personal entry code 2 in vehicle starting the 135 To lock all doors, press the 3 • 4 control within five seconds. Note: The interior lamps will illuminate when the driver...
...the coded key, but may lead to recall memory position 2. The interior lamps will turn off. You do not need to the key when starting problems and a loss of each other. Recalling a memory seat/mirrors/steering column/adjustable pedals position 1 or 2 • Unlock the vehicle ...may cause a momentary issue if they are used . Locks and Security Unlocking and locking the doors using the personal entry code 2 in vehicle starting the 135 To lock all doors, press the 3 • 4 control within five seconds. Note: The interior lamps will illuminate when the driver...


