

Owners Manual
Page 9
Safety Precautions ... Ignition Key ...Steering Lock ...Ignition Switch ...Off Position ...On Position ...P (Park) Position ...Instrument Cluster ...Speedometer ...Tachometer ...Indicator Lights ...Low Oil Pressure Indicator ...Low Fuel Indicator ...Neutral Indicator ...Turn Signal Indicators ... 29 29 29 30 30 30 31 31 31 31 32 32 32 32 32 iii Table of Safety and Vehicle Information Labels ... 4 4 5 8 9 10 12 13 14 14 15 15 16 17 19 3 Vehicle Identification Number ...Engine Identification Number ...Ignition Key Number...
Safety Precautions ... Ignition Key ...Steering Lock ...Ignition Switch ...Off Position ...On Position ...P (Park) Position ...Instrument Cluster ...Speedometer ...Tachometer ...Indicator Lights ...Low Oil Pressure Indicator ...Low Fuel Indicator ...Neutral Indicator ...Turn Signal Indicators ... 29 29 29 30 30 30 31 31 31 31 32 32 32 32 32 iii Table of Safety and Vehicle Information Labels ... 4 4 5 8 9 10 12 13 14 14 15 15 16 17 19 3 Vehicle Identification Number ...Engine Identification Number ...Ignition Key Number...

Owners Manual
Page 10
... 39 39 39 39 40 40 40 Throttle Control Grip ...Multi--Function Display (MFD) Mode Button ...Gear Shift Pedal ...Rear Brake Pedal ...Fuel Cap ...Auxiliary Light Switch ...Saddlebags ...Side Covers ...Sidestand ...40 40 41 41 41 42 42 43 43 Pre-Operation Check ... Check Electrical Equipment ...Instrument Cluster ...Headlamp ...Taillight ...Turn Signals/Running Lights ...Emergency Flashers ...Horn ...Engine Stop/Run Switch ...Check Engine Oil Level ...Fuel ...Check Fuel Level ...Check Fuel Hose, Rail, and Connections ... 45 45 45...
... 39 39 39 39 40 40 40 Throttle Control Grip ...Multi--Function Display (MFD) Mode Button ...Gear Shift Pedal ...Rear Brake Pedal ...Fuel Cap ...Auxiliary Light Switch ...Saddlebags ...Side Covers ...Sidestand ...40 40 41 41 41 42 42 43 43 Pre-Operation Check ... Check Electrical Equipment ...Instrument Cluster ...Headlamp ...Taillight ...Turn Signals/Running Lights ...Emergency Flashers ...Horn ...Engine Stop/Run Switch ...Check Engine Oil Level ...Fuel ...Check Fuel Level ...Check Fuel Hose, Rail, and Connections ... 45 45 45...

Owners Manual
Page 11
... of Contents Check Evaporative Emission Control System (California model only) ...Tires ...Check Tire Pressure ...Tire Pressure Table ...Check Tire Condition ...Check Tread Depth ...Brakes ...Check Front Brake Lever Movement ...Check Front Brake Fluid Level ...Check Rear Brake Pedal Freeplay and Movement ...Check Rear Brake Fluid Level ...Check Hoses and Connections ...Check Brake Pads ...Check Throttle Control Grip and Cables ...Check Clutch ...Check Fast Idle Lever ...Check Front Suspension ...Check Steering ...Check Rear Suspension ...Check Drive Belt ...Check Sidestand ...48 49 49...
... of Contents Check Evaporative Emission Control System (California model only) ...Tires ...Check Tire Pressure ...Tire Pressure Table ...Check Tire Condition ...Check Tread Depth ...Brakes ...Check Front Brake Lever Movement ...Check Front Brake Fluid Level ...Check Rear Brake Pedal Freeplay and Movement ...Check Rear Brake Fluid Level ...Check Hoses and Connections ...Check Brake Pads ...Check Throttle Control Grip and Cables ...Check Clutch ...Check Fast Idle Lever ...Check Front Suspension ...Check Steering ...Check Rear Suspension ...Check Drive Belt ...Check Sidestand ...48 49 49...

Owners Manual
Page 12
...Check Drive Belt Tension ...Adjust Drive Belt Tension ...Align Rear Wheel ...Rear Suspension ...Adjust Rear Shock Absorber ...Inspect Swing Arm and Rear Axle ...Front Suspension and Steering ...Check Front Forks ...Replace Front Fork Oil ...Inspect Steering and Front Axle ...Fuel System ...Check Fuel Hose, Rail, and Connections ...Check Crankcase Ventilation Hose and Connections ...Evaporative Emission Control System (California models only) ...Fuel Tank ...Replace Fuel Filter ...Fast Idle Lever ...Check Fast Idle Lever and Cable ...Adjust Fast Idle Lever Freeplay ...Throttle ...Check Throttle...
...Check Drive Belt Tension ...Adjust Drive Belt Tension ...Align Rear Wheel ...Rear Suspension ...Adjust Rear Shock Absorber ...Inspect Swing Arm and Rear Axle ...Front Suspension and Steering ...Check Front Forks ...Replace Front Fork Oil ...Inspect Steering and Front Axle ...Fuel System ...Check Fuel Hose, Rail, and Connections ...Check Crankcase Ventilation Hose and Connections ...Evaporative Emission Control System (California models only) ...Fuel Tank ...Replace Fuel Filter ...Fast Idle Lever ...Check Fast Idle Lever and Cable ...Adjust Fast Idle Lever Freeplay ...Throttle ...Check Throttle...

Owners Manual
Page 13
..., Polishing, and Applying Protectants (Items Other Than Windshields) ...Windshield Care ...Repairing Painted Surface Damage ...Storage ...Preparing for Storage ...Clean and Protect the Motorcycle ...Stabilize Fuel ...Protect Engine Components ...Inflate Tires ...Remove, Clean, and Store Battery ...Park and Cover the Motorcycle ...Maintaining During Storage ...Removing from Storage ...Motorcycle Noise Regulation ...Noise Emission Warranty ...Emissions Control System Warranty ...Your Warranty Rights and Obligations ...Manufacturer's Warranty Coverage ...Owner's Warranty Responsibilities ...I.
..., Polishing, and Applying Protectants (Items Other Than Windshields) ...Windshield Care ...Repairing Painted Surface Damage ...Storage ...Preparing for Storage ...Clean and Protect the Motorcycle ...Stabilize Fuel ...Protect Engine Components ...Inflate Tires ...Remove, Clean, and Store Battery ...Park and Cover the Motorcycle ...Maintaining During Storage ...Removing from Storage ...Motorcycle Noise Regulation ...Noise Emission Warranty ...Emissions Control System Warranty ...Your Warranty Rights and Obligations ...Manufacturer's Warranty Coverage ...Owner's Warranty Responsibilities ...I.
Owners Manual
Page 18
... or assistance regarding technical service specified in " on page 57. Break-in the Owner's Manual or required by mechanical circumstances, see Specifications or the certification label on -road use with one rider and one passenger, or carrying weight exceeding the maximum weight rating can result in "Engine S Some Victory motorcycles include saddlebags, auxiliary lights, a windshield, a passenger backrest, and a highway bar as standard equipment. Riding...
... or assistance regarding technical service specified in " on page 57. Break-in the Owner's Manual or required by mechanical circumstances, see Specifications or the certification label on -road use with one rider and one passenger, or carrying weight exceeding the maximum weight rating can result in "Engine S Some Victory motorcycles include saddlebags, auxiliary lights, a windshield, a passenger backrest, and a highway bar as standard equipment. Riding...
Owners Manual
Page 24
... exhaust system heat. S The weight of the operator or passenger includes: body weight, all its fluids; For the gross vehicle weight rating of your legs, ankles, and feet, protecting you to lose control of the motorcycle. The engine and exhaust system get caught in or on pedals or footrests. S The weight of the motorcycle includes: the motorcycle and all apparel, and objects in the wheels...
... exhaust system heat. S The weight of the operator or passenger includes: body weight, all its fluids; For the gross vehicle weight rating of your legs, ankles, and feet, protecting you to lose control of the motorcycle. The engine and exhaust system get caught in or on pedals or footrests. S The weight of the motorcycle includes: the motorcycle and all apparel, and objects in the wheels...
Owners Manual
Page 32
... clean. Operating the motorcycle with improper tire pressure or tread condition, or improper wheel or tire balance, can make the motorcycle hard to lose control of the motorcycle. Safety Precautions see the Victory Service Manual or your authorized Victory Dealer. Operating the motorcycle with a loose, worn, or damaged steering system or front or rear suspension system can reveal items in the motorcycle...
... clean. Operating the motorcycle with improper tire pressure or tread condition, or improper wheel or tire balance, can make the motorcycle hard to lose control of the motorcycle. Safety Precautions see the Victory Service Manual or your authorized Victory Dealer. Operating the motorcycle with a loose, worn, or damaged steering system or front or rear suspension system can reveal items in the motorcycle...

Owners Manual
Page 44
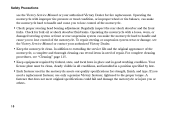
... starting the engine on page 60. 30 Turn the ignition switch to the Run position (see page 39) you can be removed. Off Position In the Off position, all electrical switches and buttons. With the engine stop/run switch set to the Off position and remove the ignition key when leaving the motorcycle unattended. 3 2 1 On Position In the On position, all other electrical features. 1. Instruments and Controls Ignition Switch...
... starting the engine on page 60. 30 Turn the ignition switch to the Run position (see page 39) you can be removed. Off Position In the Off position, all electrical switches and buttons. With the engine stop/run switch set to the Off position and remove the ignition key when leaving the motorcycle unattended. 3 2 1 On Position In the On position, all other electrical features. 1. Instruments and Controls Ignition Switch...

Owners Manual
Page 45
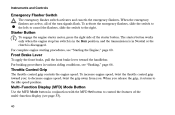
... current engine speed in you losing control of the motorcycle. 1. Turn Signal Indicators 7. Instrument Cluster The instrument cluster includes the speedometer, the tachometer, the indicator lights, and the multi-function display. 8 6 7 1 5 6 Speedometer The speedometer reports current motorcycle speed in miles per hour or kilometers per minute (RPM). Multi--Function Display (MFD) 31 Low Oil Pressure Indicator 4. Instruments and Controls P (Park) Position In the Park position, the taillight and running lights...
... current engine speed in you losing control of the motorcycle. 1. Turn Signal Indicators 7. Instrument Cluster The instrument cluster includes the speedometer, the tachometer, the indicator lights, and the multi-function display. 8 6 7 1 5 6 Speedometer The speedometer reports current motorcycle speed in miles per hour or kilometers per minute (RPM). Multi--Function Display (MFD) 31 Low Oil Pressure Indicator 4. Instruments and Controls P (Park) Position In the Park position, the taillight and running lights...

Owners Manual
Page 53
... the engine from starting when the transmission is in the Stop position. To engage the clutch, gradually release the clutch lever. Instruments and Controls Clutch Lever To disengage the clutch, pull the clutch lever toward the handlebar. Use the engine stop/run when the switch is equipped with the MFD Mode button to turn the engine off under normal or emergency conditions. 2 4 3 5 1. 2. 3. 4. 5. Engine Stop/Run Switch Emergency Flasher Switch Starter Button Throttle Control Grip...
... the engine from starting when the transmission is in the Stop position. To engage the clutch, gradually release the clutch lever. Instruments and Controls Clutch Lever To disengage the clutch, pull the clutch lever toward the handlebar. Use the engine stop/run when the switch is equipped with the MFD Mode button to turn the engine off under normal or emergency conditions. 2 4 3 5 1. 2. 3. 4. 5. Engine Stop/Run Switch Emergency Flasher Switch Starter Button Throttle Control Grip...
Owners Manual
Page 54
... engine starter motor, press the right side of the turn signals flash. When you . to cancel the flashers, slide the switch to the left; Front Brake Lever To apply the front brake, pull the front brake lever toward you; Throttle Control Grip The throttle control grip controls the engine speed. The starter button works only when the engine stop/run switch is in the Run position, and the transmission is in various riding conditions...
... engine starter motor, press the right side of the turn signals flash. When you . to cancel the flashers, slide the switch to the left; Front Brake Lever To apply the front brake, pull the front brake lever toward you; Throttle Control Grip The throttle control grip controls the engine speed. The starter button works only when the engine stop/run switch is in the Run position, and the transmission is in various riding conditions...
Owners Manual
Page 59
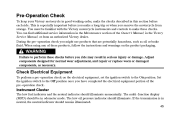
..., and repair or replace worn or damaged components, as oil or brake fluid. During the pre-operation check you might use products that are potentially hazardous, such as necessary. Instrument Cluster The low fuel indicator and the neutral indicator should illuminate. The low oil pressure indicator should illuminate momentarily. Check Electrical Equipment To perform a pre-operation check on the product packaging. Set the ignition switch to...
..., and repair or replace worn or damaged components, as oil or brake fluid. During the pre-operation check you might use products that are potentially hazardous, such as necessary. Instrument Cluster The low fuel indicator and the neutral indicator should illuminate. The low oil pressure indicator should illuminate momentarily. Check Electrical Equipment To perform a pre-operation check on the product packaging. Set the ignition switch to...
Owners Manual
Page 76
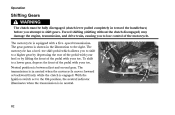
... the Ignition switch set to the right. The motorcycle has a heel-toe shift pedal which allows you to shift to a lower gear, depress the front of the pedal with your heel or by lifting the front of the pedal with a five-speed transmission. Forced shifting (shifting without the clutch disengaged) may damage the engine, transmission, and drive train, causing you to shift gears. Operation Shifting Gears WARNING The clutch must be...
... the Ignition switch set to the right. The motorcycle has a heel-toe shift pedal which allows you to shift to a lower gear, depress the front of the pedal with your heel or by lifting the front of the pedal with a five-speed transmission. Forced shifting (shifting without the clutch disengaged) may damage the engine, transmission, and drive train, causing you to shift gears. Operation Shifting Gears WARNING The clutch must be...

Owners Manual
Page 81
... the clutch disengaged. In either in neutral or with the transmission in neutral, shift into neutral. Parking When parking the motorcycle, choose a flat, firm surface. To stop the engine, set the engine stop , if it is in motion and the transmission is at a complete stop /run switch to the Stop position, turn the handlebars to the left until the sidestand firmly supports the motorcycle. WARNING...
... the clutch disengaged. In either in neutral or with the transmission in neutral, shift into neutral. Parking When parking the motorcycle, choose a flat, firm surface. To stop the engine, set the engine stop , if it is in motion and the transmission is at a complete stop /run switch to the Stop position, turn the handlebars to the left until the sidestand firmly supports the motorcycle. WARNING...

Owners Manual
Page 98
... arm, check the swing arm pivot nut torque. If movement is movement at the rear axle, inspect the wheel bearings and rear axle (see the Victory Service Manual or an authorized Victory dealer). Reinstall the pivot nut covers. 3. Grasp the rear tire and attempt to move the rear wheel side-to-side. Sit in neutral, slowly rotate the rear wheel. Use an appropriate motorcycle lift or a block of the ground...
... arm, check the swing arm pivot nut torque. If movement is movement at the rear axle, inspect the wheel bearings and rear axle (see the Victory Service Manual or an authorized Victory dealer). Reinstall the pivot nut covers. 3. Grasp the rear tire and attempt to move the rear wheel side-to-side. Sit in neutral, slowly rotate the rear wheel. Use an appropriate motorcycle lift or a block of the ground...

Owners Manual
Page 102
For fuel filter replacement procedures and special tools required, see the Victory Service Manual or contact an authorized Victory dealer. Fast idle lever freeplay - Adjust Fast Idle Lever Freeplay 1. Maintenance 5. 6. 7. 8. Reinstall the fuel tank mounting screws. Replace Fuel Filter The fuel filter is associated with engine performance and fuel economy. Move the fast idle lever. Disconnect the fuel line. the amount of cable resistance - Disconnect the tank vent line. Fuel filter condition is attached to the...
For fuel filter replacement procedures and special tools required, see the Victory Service Manual or contact an authorized Victory dealer. Fast idle lever freeplay - Adjust Fast Idle Lever Freeplay 1. Maintenance 5. 6. 7. 8. Reinstall the fuel tank mounting screws. Replace Fuel Filter The fuel filter is associated with engine performance and fuel economy. Move the fast idle lever. Disconnect the fuel line. the amount of cable resistance - Disconnect the tank vent line. Fuel filter condition is attached to the...

Owners Manual
Page 118
... shift in riding position, causing you to clear the rear mounting stud and slide seat rearward and off of the motorcycle. 1. Remove the acorn nut from behind the seat. 2. To reinstall the seat, slide it forward and into position on the motorcycle. Maintenance Remove and Install Seat The V92TC Touring and Deluxe Touring Cruiser has a combined operator and passenger seat. Lower the seat onto the rear mounting...
... shift in riding position, causing you to clear the rear mounting stud and slide seat rearward and off of the motorcycle. 1. Remove the acorn nut from behind the seat. 2. To reinstall the seat, slide it forward and into position on the motorcycle. Maintenance Remove and Install Seat The V92TC Touring and Deluxe Touring Cruiser has a combined operator and passenger seat. Lower the seat onto the rear mounting...

Owners Manual
Page 141
..., Minnesota 55340-9960, or the California Air Resources Board, P.O. Victory Motorcycle Division, Polaris Sales Inc. - If an emission-related part on your motorcycle is your emission control system DEFECTS WARRANTY. As the motorcycle owner, you retain all receipts covering maintenance on Emission Control System 127 The warranty repairs should be repaired or replaced by Victory. Limited Warranty on your motorcycle, but Victory cannot deny...
..., Minnesota 55340-9960, or the California Air Resources Board, P.O. Victory Motorcycle Division, Polaris Sales Inc. - If an emission-related part on your motorcycle is your emission control system DEFECTS WARRANTY. As the motorcycle owner, you retain all receipts covering maintenance on Emission Control System 127 The warranty repairs should be repaired or replaced by Victory. Limited Warranty on your motorcycle, but Victory cannot deny...

Owners Manual
Page 142
Warranties Victory Motorcycle Division, Polaris Sales Inc., (hereinafter Victory) warrants that each new 2002 and later Victory Motorcycle that includes as to conform with the Clean Air Act and applicable regulations of 18,000 kilometers (11,185 miles), if the motorcycle's engine displacement is street legal: A. These warranted parts are specifically defined by the state's Emission Warranty Parts List. oil filler cap; pressure control valve; or...
Warranties Victory Motorcycle Division, Polaris Sales Inc., (hereinafter Victory) warrants that each new 2002 and later Victory Motorcycle that includes as to conform with the Clean Air Act and applicable regulations of 18,000 kilometers (11,185 miles), if the motorcycle's engine displacement is street legal: A. These warranted parts are specifically defined by the state's Emission Warranty Parts List. oil filler cap; pressure control valve; or...