

Owners Manual
Page 14
... loss of control. SAFETY Safe Riding Practices S Ground clearance is not holding on properly, or who cannot reach the passenger footrests, can shift their body erratically, which could cause loss of control. S Do not tow a trailer. S Adjust your motorcycle hard to handle and can make your riding style to contact the road surface when leaning the motorcycle in handling, acceleration and braking caused...
... loss of control. SAFETY Safe Riding Practices S Ground clearance is not holding on properly, or who cannot reach the passenger footrests, can shift their body erratically, which could cause loss of control. S Do not tow a trailer. S Adjust your motorcycle hard to handle and can make your riding style to contact the road surface when leaning the motorcycle in handling, acceleration and braking caused...

Owners Manual
Page 19
... of control. S Distribute weight evenly in each S Do not exceed the motorcycle's gross vehicle weight rating. Transporting the Motorcycle If you must transport the motorcycle: S Use a truck or trailer. Gasoline is a fire hazard and it remains upright on load and weather conditions, the maximum safe operating speed may leak out of the fuel tank if the motorcycle leans to avoid the brake line, exhaust, and drive belt...
... of control. S Distribute weight evenly in each S Do not exceed the motorcycle's gross vehicle weight rating. Transporting the Motorcycle If you must transport the motorcycle: S Use a truck or trailer. Gasoline is a fire hazard and it remains upright on load and weather conditions, the maximum safe operating speed may leak out of the fuel tank if the motorcycle leans to avoid the brake line, exhaust, and drive belt...
Owners Manual
Page 21
... suspension or steering travel or your ability to the lifting or buffeting effects of wind) and loss of engine power or lights or damage to add a windshield, backrest or luggage rack, choose one designed and approved by Victory specifically for your normal riding position. - An electrical failure could result and cause hazardous loss of control. Obscure lights or reflectors. Before installing an accessory...
... suspension or steering travel or your ability to the lifting or buffeting effects of wind) and loss of engine power or lights or damage to add a windshield, backrest or luggage rack, choose one designed and approved by Victory specifically for your normal riding position. - An electrical failure could result and cause hazardous loss of control. Obscure lights or reflectors. Before installing an accessory...

Owners Manual
Page 23
... improper tire pressure or tread condition, or improper wheel or tire balance, can make the motorcycle hard to handle and cause loss of control. Use only an approved replacement tire and see the Victory Service Manual or contact your authorized Victory Dealer for fork oil or shock absorber fluid leaks. Check for tire replacement. Inspect tires regularly and replace them if they're worn or damaged. To repair steering or suspension system...
... improper tire pressure or tread condition, or improper wheel or tire balance, can make the motorcycle hard to handle and cause loss of control. Use only an approved replacement tire and see the Victory Service Manual or contact your authorized Victory Dealer for fork oil or shock absorber fluid leaks. Check for tire replacement. Inspect tires regularly and replace them if they're worn or damaged. To repair steering or suspension system...

Owners Manual
Page 34
Gear Shift Lever 20. Operator's Foot Rest 19. COMPONENT IDENTIFICATION VEGASt Components 1. 2. 3. 4. 5. 6. 7. 8. 9. 10. 11. 12. 13. 14. 15. 16. 17. Front Brake Caliper 5 4 3 2 1 6 10 7 8 9 13 20 19 18 17 16 15 14 11 12 32 Front Fork Front Turn Signal Headlamp Air Filter Spark Plug (2) Ignition Switch Left Side Cover Battery (under side cover) Rear Turn Signal Taillight Rear Brake Caliper Rear Axle Adjuster (1 each side) Horn Passenger's Foot Rest Oil Filter Sidestand Evaporative Canister - California Models (lower left by swingarm) 18.
Gear Shift Lever 20. Operator's Foot Rest 19. COMPONENT IDENTIFICATION VEGASt Components 1. 2. 3. 4. 5. 6. 7. 8. 9. 10. 11. 12. 13. 14. 15. 16. 17. Front Brake Caliper 5 4 3 2 1 6 10 7 8 9 13 20 19 18 17 16 15 14 11 12 32 Front Fork Front Turn Signal Headlamp Air Filter Spark Plug (2) Ignition Switch Left Side Cover Battery (under side cover) Rear Turn Signal Taillight Rear Brake Caliper Rear Axle Adjuster (1 each side) Horn Passenger's Foot Rest Oil Filter Sidestand Evaporative Canister - California Models (lower left by swingarm) 18.

Owners Manual
Page 38
... page 44) you can also activate the emergency flashers, turn signals and all electrical switches and buttons. With the engine stop/run switch set to the OFF position and remove the ignition key when leaving the motorcycle unattended. 2 3 On Position In the ON position, all electrical circuits are energized and the ignition key cannot be removed. Off 2. INSTRUMENTS, FEATURES AND CONTROLS Ignition Key The ignition key operates the ignition switch and parking lights.
... page 44) you can also activate the emergency flashers, turn signals and all electrical switches and buttons. With the engine stop/run switch set to the OFF position and remove the ignition key when leaving the motorcycle unattended. 2 3 On Position In the ON position, all electrical circuits are energized and the ignition key cannot be removed. Off 2. INSTRUMENTS, FEATURES AND CONTROLS Ignition Key The ignition key operates the ignition switch and parking lights.

Owners Manual
Page 44
... beam. To cancel the turn signals. INSTRUMENTS, FEATURES AND CONTROLS Left Handlebar Controls Fast Idle Lever (1) The fast idle lever increases the engine idle speed when starting a cold engine (see page 66). to the right. To engage the fast idle lever, move the lever toward the housing when in toward the rear of the switch. 3 4 Turn Signal Switch (3) The turn signal switch activates and cancels the turn signals, push the switch in the centered position. 1. 2. 3. 4. To activate...
... beam. To cancel the turn signals. INSTRUMENTS, FEATURES AND CONTROLS Left Handlebar Controls Fast Idle Lever (1) The fast idle lever increases the engine idle speed when starting a cold engine (see page 66). to the right. To engage the fast idle lever, move the lever toward the housing when in toward the rear of the switch. 3 4 Turn Signal Switch (3) The turn signal switch activates and cancels the turn signals, push the switch in the centered position. 1. 2. 3. 4. To activate...
Owners Manual
Page 46
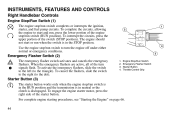
... transmission is in neutral or the clutch is in the STOP position. INSTRUMENTS, FEATURES AND CONTROLS Right Handlebar Controls Engine Stop/Run Switch (1) The engine stop/run when the switch is disengaged. Use the engine stop/run switch (RUN position). To activate the emergency flashers, slide the switch to the left (to start or run switch completes or interrupts the ignition, starter, and fuel pump circuits. The engine should not start and run, press the lower portion of the turn...
... transmission is in neutral or the clutch is in the STOP position. INSTRUMENTS, FEATURES AND CONTROLS Right Handlebar Controls Engine Stop/Run Switch (1) The engine stop/run when the switch is disengaged. Use the engine stop/run switch (RUN position). To activate the emergency flashers, slide the switch to the left (to start or run switch completes or interrupts the ignition, starter, and fuel pump circuits. The engine should not start and run, press the lower portion of the turn...

Owners Manual
Page 52
... illuminate. Apply slight pressure to the ON position. Taillight / Brake Light With the ignition switch in neutral, the neutral indicator should remain illuminated. The headlamp brightness should increase and the headlamp high beam indicator light should illuminate. PRE-OPERATION CHECK Check Electrical Equipment To perform a pre-operation check on . If the transmission is started. Set the headlamp switch to the front brake lever; taillight...
... illuminate. Apply slight pressure to the ON position. Taillight / Brake Light With the ignition switch in neutral, the neutral indicator should remain illuminated. The headlamp brightness should increase and the headlamp high beam indicator light should illuminate. PRE-OPERATION CHECK Check Electrical Equipment To perform a pre-operation check on . If the transmission is started. Set the headlamp switch to the front brake lever; taillight...
Owners Manual
Page 70
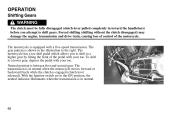
... the engine, transmission and drive train, causing loss of control of the pedal with your toe. To shift to a higher gear by lifting the front of the motorcycle. With the Ignition switch set to the ON position, the neutral indicator illuminates when the transmission is in toward the handlebars) before you to shift to a lower gear, depress the pedal with a five-speed transmission. OPERATION Shifting Gears WARNING The clutch must...
... the engine, transmission and drive train, causing loss of control of the pedal with your toe. To shift to a higher gear by lifting the front of the motorcycle. With the Ignition switch set to the ON position, the neutral indicator illuminates when the transmission is in toward the handlebars) before you to shift to a lower gear, depress the pedal with a five-speed transmission. OPERATION Shifting Gears WARNING The clutch must...

Owners Manual
Page 75
In either in neutral or with the clutch disengaged. WARNING • Stopping the engine while the motorcycle is in motion and the transmission is in neutral, shift into neutral. Once the motorcycle is at a complete stop /run switch to the STOP position, turn the ignition switch to the OFF position, and remove the ignition key. To stop the engine, set the engine stop , if it is not already...
In either in neutral or with the clutch disengaged. WARNING • Stopping the engine while the motorcycle is in motion and the transmission is in neutral, shift into neutral. Once the motorcycle is at a complete stop /run switch to the STOP position, turn the ignition switch to the OFF position, and remove the ignition key. To stop the engine, set the engine stop , if it is not already...

Owners Manual
Page 94
... of a turn the axle adjuster bolt IN (clockwise) to draw the axle back or OUT (counterclockwise) to swingarm marks and the drive belt tension is correct, tighten the axle nut. Torque: 65 ft-lbs (88 Nm) 4 92 Recheck rear wheel alignment as you proceed. 5. MAINTENANCE Align Rear Wheel (Cont.) NOTE: Turn the axle adjusters about 1/16 of the swingarm and turn at a time and monitor wheel alignment...
... of a turn the axle adjuster bolt IN (clockwise) to draw the axle back or OUT (counterclockwise) to swingarm marks and the drive belt tension is correct, tighten the axle nut. Torque: 65 ft-lbs (88 Nm) 4 92 Recheck rear wheel alignment as you proceed. 5. MAINTENANCE Align Rear Wheel (Cont.) NOTE: Turn the axle adjusters about 1/16 of the swingarm and turn at a time and monitor wheel alignment...

Owners Manual
Page 99
... swing arm pivot nut torque. Sit in neutral, slowly rotate the rear wheel. With the transmission in the operator 's seat and slowly bounce the rear suspension a few times. Torque: 85 ft-lbs (115 Nm) 2. If the wheel does not rotate smoothly, inspect the wheel bearings, rear axle, belt adjustment, and wheels alignment (see the Victory Service Manual or an authorized Victory dealer). MAINTENANCE Rear Suspension Inspect Swing Arm and Rear Axle 1. Elevate the rear of...
... swing arm pivot nut torque. Sit in neutral, slowly rotate the rear wheel. With the transmission in the operator 's seat and slowly bounce the rear suspension a few times. Torque: 85 ft-lbs (115 Nm) 2. If the wheel does not rotate smoothly, inspect the wheel bearings, rear axle, belt adjustment, and wheels alignment (see the Victory Service Manual or an authorized Victory dealer). MAINTENANCE Rear Suspension Inspect Swing Arm and Rear Axle 1. Elevate the rear of...

Owners Manual
Page 101
... wheel. MAINTENANCE Front Suspension and Steering WARNING Care should be smooth but not loose or interfered with by wires, hoses, or control cables. 3. Point the front wheel straight ahead. The steering head bearings require periodic lubrication even if there is off of the ground. Grasp the front tire and attempt to move the front wheel front-to -back movement at the front axle, inspect the wheel bearings...
... wheel. MAINTENANCE Front Suspension and Steering WARNING Care should be smooth but not loose or interfered with by wires, hoses, or control cables. 3. Point the front wheel straight ahead. The steering head bearings require periodic lubrication even if there is off of the ground. Grasp the front tire and attempt to move the front wheel front-to -back movement at the front axle, inspect the wheel bearings...

Owners Manual
Page 124
... Seat Screw 4. Lift Rear of fuel tank. Ensure front seat mount is not necessary to remove. Remove Left Seat Screw 2. The passenger 's seat mounting screws are securely fastened before riding the motorcycle. Reinstall left side covers. The VEGASt has two separate seats, the operator 's seat and the passenger 's seat. Remove screw located on left side of seat. A loose seat could cause a sudden shift in front rubber mount. MAINTENANCE Seat Removal and Installation WARNING...
... Seat Screw 4. Lift Rear of fuel tank. Ensure front seat mount is not necessary to remove. Remove Left Seat Screw 2. The passenger 's seat mounting screws are securely fastened before riding the motorcycle. Reinstall left side covers. The VEGASt has two separate seats, the operator 's seat and the passenger 's seat. Remove screw located on left side of seat. A loose seat could cause a sudden shift in front rubber mount. MAINTENANCE Seat Removal and Installation WARNING...

Owners Manual
Page 141
... of clean motor oil into each spark plug. Settled carbon deposits can cause engine damage. 2. Set the main switch to the engine. Start and run switch set to RUN, and the transmission in a well ventilated area to crank the engine a few times. WARNING Wear face protection when using pressurized air. 3. With the main switch in the ON position, the stop/run the engine for 15 minutes in neutral, press the electric starter button...
... of clean motor oil into each spark plug. Settled carbon deposits can cause engine damage. 2. Set the main switch to the engine. Start and run switch set to RUN, and the transmission in a well ventilated area to crank the engine a few times. WARNING Wear face protection when using pressurized air. 3. With the main switch in the ON position, the stop/run the engine for 15 minutes in neutral, press the electric starter button...
Owners Manual
Page 146
... or the California Air Resources Board for your motorcycle or part has failed due to ensure the performance of all applicable regulations of 30,000 kilometers (18,641 miles), if the motorcycle's engine displacement is 280 cubic centimeters or greater; WARRANTIES Owner 's Warranty Responsibilities As the motorcycle owner, you should contact Victory Motorcycle Division, Polaris Sales Inc., P.O. The warranty repairs should be aware...
... or the California Air Resources Board for your motorcycle or part has failed due to ensure the performance of all applicable regulations of 30,000 kilometers (18,641 miles), if the motorcycle's engine displacement is 280 cubic centimeters or greater; WARRANTIES Owner 's Warranty Responsibilities As the motorcycle owner, you should contact Victory Motorcycle Division, Polaris Sales Inc., P.O. The warranty repairs should be aware...

Owners Manual
Page 161
INDEX A Accelerating ...Accessory Selection/Installation ...Air Filter ...Axle, Front ...Axle, Rear ...71 19 86 99 97 C Changing Oil ...83-84 Changing Oil Filter ...83-84 Check Engine Indicator ...39 Clutch ...58, 104-106 Clutch Freeplay ...106 Clutch Lever ...43 Clutch Lever and Cable ...104 Clutch Lever Lubrication ...105 Components ...32-33 Control Cable Lubrication ...107 Crankcase Ventilation Hose ...100 E Engine Identification Number ...35 Engine Oil ...83-85 Engine Oil Level ...52, 85 Engine Oil Specifications ...157 Engine Stop/Run Switch ...44...
INDEX A Accelerating ...Accessory Selection/Installation ...Air Filter ...Axle, Front ...Axle, Rear ...71 19 86 99 97 C Changing Oil ...83-84 Changing Oil Filter ...83-84 Check Engine Indicator ...39 Clutch ...58, 104-106 Clutch Freeplay ...106 Clutch Lever ...43 Clutch Lever and Cable ...104 Clutch Lever Lubrication ...105 Components ...32-33 Control Cable Lubrication ...107 Crankcase Ventilation Hose ...100 E Engine Identification Number ...35 Engine Oil ...83-85 Engine Oil Level ...52, 85 Engine Oil Specifications ...157 Engine Stop/Run Switch ...44...

Owners Manual
Page 162
... Fuel Specifications ...156 Fuel Stabilizer ...139 Fuel System ...100-101 Fuel Tank ...100 Fueling and Fill Height ...65 Fuses ...127 I Ignition Key ...36 Ignition Key Number ...35 Ignition Switch ...36 Indicator Lights ...39, 41, 50 Initial Maintenance ...77 Instrument Cluster ...37 P Park Position (P) ...36 Parking the Motorcycle ...18, 74-75 Periodic Maintenance Intervals ...77 Protective Apparel ...13 R Rear Axle ...97 Rear Brake Fluid Level ...56 Rear Brake Pedal ...46 Rear Brake Pedal Freeplay ...56 Rear Shock Absorber ...94-95 Rear Suspension ...60, 94-97 Rear Wheel...
... Fuel Specifications ...156 Fuel Stabilizer ...139 Fuel System ...100-101 Fuel Tank ...100 Fueling and Fill Height ...65 Fuses ...127 I Ignition Key ...36 Ignition Key Number ...35 Ignition Switch ...36 Indicator Lights ...39, 41, 50 Initial Maintenance ...77 Instrument Cluster ...37 P Park Position (P) ...36 Parking the Motorcycle ...18, 74-75 Periodic Maintenance Intervals ...77 Protective Apparel ...13 R Rear Axle ...97 Rear Brake Fluid Level ...56 Rear Brake Pedal ...46 Rear Brake Pedal Freeplay ...56 Rear Shock Absorber ...94-95 Rear Suspension ...60, 94-97 Rear Wheel...

Owners Manual
Page 163
... Sidestand Pad ...129 Spark Plugs ...119-120 Speedometer ...37 Starter Button ...44 Starting the Engine ...66-67 Steering ...59, 98-99 Stop/Run Switch ...44, 51 Stopping the Engine ...73 Storage ...138 Suspension, Front ...59, 98-99 Suspension, Rear ...60, 94-97 Swing Arm ...97 Symbols and Terms Used in the Owner's Manual ...6 T Tachometer (Optional) ...38 Taillight / Brake Light ...50 Test Drive ...131 Throttle ...103 Throttle Control Cable ...103 Throttle Control Cables ...57 Throttle Control Grip...
... Sidestand Pad ...129 Spark Plugs ...119-120 Speedometer ...37 Starter Button ...44 Starting the Engine ...66-67 Steering ...59, 98-99 Stop/Run Switch ...44, 51 Stopping the Engine ...73 Storage ...138 Suspension, Front ...59, 98-99 Suspension, Rear ...60, 94-97 Swing Arm ...97 Symbols and Terms Used in the Owner's Manual ...6 T Tachometer (Optional) ...38 Taillight / Brake Light ...50 Test Drive ...131 Throttle ...103 Throttle Control Cable ...103 Throttle Control Cables ...57 Throttle Control Grip...