

Owners Manual
Page 12
..., avoid sudden braking or sharp turns. DREVERSE operation can be dangerous, even at low speeds. NEVER operate this ATV if you may relax when used for off-road use throttle and brakes gradually. E1997, 2000 7172560 Location B 9 Safety Decals and Locations WARNING DNever SAFETY WARNING WARNING operate this vehicle on HILLS steeper than 5 minutes. This category S (Sport) ATV is a high performance vehicle for more...
..., avoid sudden braking or sharp turns. DREVERSE operation can be dangerous, even at low speeds. NEVER operate this ATV if you may relax when used for off-road use throttle and brakes gradually. E1997, 2000 7172560 Location B 9 Safety Decals and Locations WARNING DNever SAFETY WARNING WARNING operate this vehicle on HILLS steeper than 5 minutes. This category S (Sport) ATV is a high performance vehicle for more...

Owners Manual
Page 14
... your Owner's Manual. Safety Decals and Locations ATTENTION S S Operation of this vehicle without the air filter element will severely damage the engine. Read Owner's Manual for more frequent cleaning required in SEVERE INJURY OR DEATH. Clean pre-filter element often, more detailed loading information. 7172668 Location I (under seat) THIS VEHICLE IS AN ALL TERRAIN VEHICLE AND IS NOT INTENDED FOR USE ON PUBLIC ROADS. S SAFETY Specific...
... your Owner's Manual. Safety Decals and Locations ATTENTION S S Operation of this vehicle without the air filter element will severely damage the engine. Read Owner's Manual for more frequent cleaning required in SEVERE INJURY OR DEATH. Clean pre-filter element often, more detailed loading information. 7172668 Location I (under seat) THIS VEHICLE IS AN ALL TERRAIN VEHICLE AND IS NOT INTENDED FOR USE ON PUBLIC ROADS. S SAFETY Specific...

Owners Manual
Page 26
... vehicle. NOTE: The addition of certain accessories may increase the speed or power of bodily injury. Any modifications to the original equipment of the vehicle create a substantial safety hazard and increase the risk of the vehicle, or make any other modifications to the vehicle, that may change the handling characteristics of our customers and for these purposes. Use only Polaris-approved accessories...
... vehicle. NOTE: The addition of certain accessories may increase the speed or power of bodily injury. Any modifications to the original equipment of the vehicle create a substantial safety hazard and increase the risk of the vehicle, or make any other modifications to the vehicle, that may change the handling characteristics of our customers and for these purposes. Use only Polaris-approved accessories...

Owners Manual
Page 62
RES: For reserve supply if main supply is located under the fuel tank on reserve gas. ON: For normal operation. NOTE: There's about a 5 to 8 mile (8 to the ON position after refueling. Always refill the gas tank as soon as possible after using the main supply. 1 Always return the valve to 13 km) range on the left side of the ATV. RES OFF ON FUEL OFF ON FUEL RES OFF ON FUEL RES 59 Fuel Valve FEATURES AND CONTROLS The fuel valve (1) is exhausted. It has three positions: OFF: For vehicle storage and when transporting.
RES: For reserve supply if main supply is located under the fuel tank on reserve gas. ON: For normal operation. NOTE: There's about a 5 to 8 mile (8 to the ON position after refueling. Always refill the gas tank as soon as possible after using the main supply. 1 Always return the valve to 13 km) range on the left side of the ATV. RES OFF ON FUEL OFF ON FUEL RES OFF ON FUEL RES 59 Fuel Valve FEATURES AND CONTROLS The fuel valve (1) is exhausted. It has three positions: OFF: For vehicle storage and when transporting.

Owners Manual
Page 63
... pump octane number of 87=(R+ M/2) octane. The choke is off when the knob is plugged. Refer to clean the fuel filter. The choke is fully on page 70 for service if you suspect the fuel filter is pushed completely in starting . See your Polaris dealer for correct choke and throttle settings during starting a cold engine. Fuel Filter The fuel valve has an internal fuel filter. FEATURES AND CONTROLS Fuel Tank The fuel tank filler cap is...
... pump octane number of 87=(R+ M/2) octane. The choke is off when the knob is plugged. Refer to clean the fuel filter. The choke is fully on page 70 for service if you suspect the fuel filter is pushed completely in starting . See your Polaris dealer for correct choke and throttle settings during starting a cold engine. Fuel Filter The fuel valve has an internal fuel filter. FEATURES AND CONTROLS Fuel Tank The fuel tank filler cap is...

Owners Manual
Page 70
... 1. Fill the fuel tank with vehicle operation and handling. 5. Drive slowly at sustained idle. 6. Select an open area that allows room to maintain the level between the safe and add marks. 3. Vary the throttle positions. Perform regular checks on fluid levels, controls and areas outlined on the dipstick. During the break-in period, change both the oil and the filter after one hour...
... 1. Fill the fuel tank with vehicle operation and handling. 5. Drive slowly at sustained idle. 6. Select an open area that allows room to maintain the level between the safe and add marks. 3. Vary the throttle positions. Perform regular checks on fluid levels, controls and areas outlined on the dipstick. During the break-in period, change both the oil and the filter after one hour...

Owners Manual
Page 72
... 114 -52, 155 49 49 111 116 -12 94 69 If the tire moves excessively, do not operate. Pre-Ride Inspection Pre-Ride Checklist Frame nuts, bolts, fasteners Fuel and oil Coolant level (if applicable) Coolant hoses (if applicable) Throttle Indicator lights / switches Engine stop switch Air filter, pre-filter Headlamp Brake light / tail lamp Riding gear A-arm ball joints OPERATION Inspect, ensure tightness Ensure proper levels Ensure proper level Inspect for...
... 114 -52, 155 49 49 111 116 -12 94 69 If the tire moves excessively, do not operate. Pre-Ride Inspection Pre-Ride Checklist Frame nuts, bolts, fasteners Fuel and oil Coolant level (if applicable) Coolant hoses (if applicable) Throttle Indicator lights / switches Engine stop switch Air filter, pre-filter Headlamp Brake light / tail lamp Riding gear A-arm ball joints OPERATION Inspect, ensure tightness Ensure proper levels Ensure proper level Inspect for...
Owners Manual
Page 73
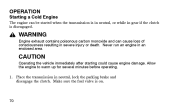
... started when the transmission is in neutral, or while in gear if the clutch is on. 70 Allow the engine to warm up for several minutes before operating. 1. Never run an engine in severe injury or death. Make sure the fuel valve is disengaged. OPERATION Starting a Cold Engine The engine can cause loss of consciousness resulting in an enclosed area. Place the transmission in neutral, lock the parking brake...
... started when the transmission is in neutral, or while in gear if the clutch is on. 70 Allow the engine to warm up for several minutes before operating. 1. Never run an engine in severe injury or death. Make sure the fuel valve is disengaged. OPERATION Starting a Cold Engine The engine can cause loss of consciousness resulting in an enclosed area. Place the transmission in neutral, lock the parking brake...

Owners Manual
Page 84
... slowly allow the vehicle to roll around to your right until more level ground is reached. Release the park brake and slowly release the clutch lever, allowing the ATV to unlock the park brake. 6. Staying uphill of the ATV, turn the handlebars full left. Remount from the uphill side, keeping body weight uphill. 8. Stay in first gear, using the brakes for additional speed control if necessary...
... slowly allow the vehicle to roll around to your right until more level ground is reached. Release the park brake and slowly release the clutch lever, allowing the ATV to unlock the park brake. 6. Staying uphill of the ATV, turn the handlebars full left. Remount from the uphill side, keeping body weight uphill. 8. Stay in first gear, using the brakes for additional speed control if necessary...
Owners Manual
Page 96
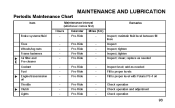
...Maintenance Chart Item Hours Brake systems/fluid Tires Wheels/lug nuts Frame fasteners " MAINTENANCE AND LUBRICATION Remarks Maintenance Interval (whichever comes first) Calendar Pre-Ride Pre-Ride Pre-Ride Pre-Ride Pre-Ride Pre-Ride Pre-Ride Pre-Ride Pre-Ride Pre-Ride Pre-Ride Miles... (Km) - add as needed Fill to proper levels Fill to proper level with Polaris PS-4 oil Check operation Check operation and adjustment Check operation E Air filter and Pre-cleaner Coolant Fuel " Engine/transmission oil Throttle Clutch Lights " 93 tighten Inspect; replace as needed ...
...Maintenance Chart Item Hours Brake systems/fluid Tires Wheels/lug nuts Frame fasteners " MAINTENANCE AND LUBRICATION Remarks Maintenance Interval (whichever comes first) Calendar Pre-Ride Pre-Ride Pre-Ride Pre-Ride Pre-Ride Pre-Ride Pre-Ride Pre-Ride Pre-Ride Pre-Ride Pre-Ride Miles... (Km) - add as needed Fill to proper levels Fill to proper level with Polaris PS-4 oil Check operation Check operation and adjustment Check operation E Air filter and Pre-cleaner Coolant Fuel " Engine/transmission oil Throttle Clutch Lights " 93 tighten Inspect; replace as needed ...
Owners Manual
Page 97
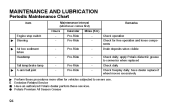
... 94 have dealer replace if wheel moves excessively " A-arm ball joint E " Perform these services. MAINTENANCE AND LUBRICATION Periodic Maintenance Chart Item Hours Engine stop switch " " Maintenance Interval (whichever comes first) Calendar Pre-Ride Pre-Ride Pre-Ride Pre-Ride Pre-Ride Pre-Ride Miles (Km) Check operation - Remarks Steering Air box sediment tubes Headlamp Tail lamp/brake lamp Check for vehicles subjected to connector when replaced Check daily Check...
... 94 have dealer replace if wheel moves excessively " A-arm ball joint E " Perform these services. MAINTENANCE AND LUBRICATION Periodic Maintenance Chart Item Hours Engine stop switch " " Maintenance Interval (whichever comes first) Calendar Pre-Ride Pre-Ride Pre-Ride Pre-Ride Pre-Ride Pre-Ride Miles (Km) Check operation - Remarks Steering Air box sediment tubes Headlamp Tail lamp/brake lamp Check for vehicles subjected to connector when replaced Check daily Check...

Owners Manual
Page 101
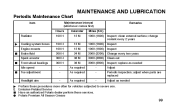
... needed Remarks E J Spark plug Fuel system E E E J Ignition Timing - 12 M - Polaris Premium All Season Grease 98 replace as needed Check for vehicles subjected to severe use. J F Emission-Related Service Have an authorized Polaris dealer perform these procedures more often for leaks at tank cap, lines, fuel valve, pump and carburetor; " Perform these services. pressure test system annually Pressure test system annually Inspect; MAINTENANCE AND LUBRICATION Periodic Maintenance Chart Item Hours Coolant strength Coolant system pressure test 50...
... needed Remarks E J Spark plug Fuel system E E E J Ignition Timing - 12 M - Polaris Premium All Season Grease 98 replace as needed Check for vehicles subjected to severe use. J F Emission-Related Service Have an authorized Polaris dealer perform these procedures more often for leaks at tank cap, lines, fuel valve, pump and carburetor; " Perform these services. pressure test system annually Pressure test system annually Inspect; MAINTENANCE AND LUBRICATION Periodic Maintenance Chart Item Hours Coolant strength Coolant system pressure test 50...
Owners Manual
Page 102
... Change every two years Clean out Inspect; adjust when parts are replaced Adjust as needed Cooling system hoses Engine mounts Brake fluid Spark arrestor Front wheel bearings Idle speed Toe adjustment Headlight aim J J J E " Perform these services. J F Emission-Related Service Have an authorized Polaris dealer perform these procedures more often for vehicles subjected to severe use. Polaris Premium All Season Grease 99 clean external surface; Periodic Maintenance Chart Item Hours Radiator " MAINTENANCE AND LUBRICATION Remarks Maintenance...
... Change every two years Clean out Inspect; adjust when parts are replaced Adjust as needed Cooling system hoses Engine mounts Brake fluid Spark arrestor Front wheel bearings Idle speed Toe adjustment Headlight aim J J J E " Perform these services. J F Emission-Related Service Have an authorized Polaris dealer perform these procedures more often for vehicles subjected to severe use. Polaris Premium All Season Grease 99 clean external surface; Periodic Maintenance Chart Item Hours Radiator " MAINTENANCE AND LUBRICATION Remarks Maintenance...

Owners Manual
Page 122
... the bracket is 90 degrees to the headlamp. 10. Lights MAINTENANCE AND LUBRICATION Headlight Assembly Replacement 5. Install the adjuster bracket onto the inboard pivot pin of the headlight. Install the adjusting screw, leaving it loose so the headlight can move freely. 8. Reinstall the front cab and connect the wire harness to the pivot pin so the lamp can be adjusted...
... the bracket is 90 degrees to the headlamp. 10. Lights MAINTENANCE AND LUBRICATION Headlight Assembly Replacement 5. Install the adjuster bracket onto the inboard pivot pin of the headlight. Install the adjusting screw, leaving it loose so the headlight can move freely. 8. Reinstall the front cab and connect the wire harness to the pivot pin so the lamp can be adjusted...

Owners Manual
Page 141
... ground. 5. MAINTENANCE AND LUBRICATION Wheel Installation WARNING Improperly installed wheels can adversely affect tire wear and vehicle handling, which can result in gear and lock the parking brake. 2. Place the transmission in serious injury or death. Always ensure that have a cotter pin installed. Install the wheel nuts and finger tighten. 4. See page 139. 138 Do not service axle nuts that all nuts are torqued to specification. Lower the vehicle...
... ground. 5. MAINTENANCE AND LUBRICATION Wheel Installation WARNING Improperly installed wheels can adversely affect tire wear and vehicle handling, which can result in gear and lock the parking brake. 2. Place the transmission in serious injury or death. Always ensure that have a cotter pin installed. Install the wheel nuts and finger tighten. 4. See page 139. 138 Do not service axle nuts that all nuts are torqued to specification. Lower the vehicle...

Owners Manual
Page 160
Adjust the carburetor idle screw (1) either in or out until operating temperature is reached. 2. Turning the screw in neutral. 3. Warm up the engine by running the vehicle for five minutes, or until the desired idle RPM is not satisfactory, and all other conditions are favorable, the carburetor can be adjusted. 1. Turning the screw out (counterclockwise) will raise RPM. ADJUSTMENTS 1 157 Carburetor/Idle RPM If the engine idle speed is reached. Apply the park brake and place the transmission in (clockwise) will lower RPM.
Adjust the carburetor idle screw (1) either in or out until operating temperature is reached. 2. Turning the screw in neutral. 3. Warm up the engine by running the vehicle for five minutes, or until the desired idle RPM is not satisfactory, and all other conditions are favorable, the carburetor can be adjusted. 1. Turning the screw out (counterclockwise) will raise RPM. ADJUSTMENTS 1 157 Carburetor/Idle RPM If the engine idle speed is reached. Apply the park brake and place the transmission in (clockwise) will lower RPM.

Owners Manual
Page 162
... also extend the life of various components. Rinse with water frequently and dry with a garden hose and a pail of Polaris products. Washing the ATV CAUTION Do not use a high pressure washer for free replacement. NOTE: If warning and safety decals are damaged, contact your ATV clean will result to evaporate any water that may have entered the engine or exhaust system...
... also extend the life of various components. Rinse with water frequently and dry with a garden hose and a pail of Polaris products. Washing the ATV CAUTION Do not use a high pressure washer for free replacement. NOTE: If warning and safety decals are damaged, contact your ATV clean will result to evaporate any water that may have entered the engine or exhaust system...

Owners Manual
Page 184
... are traveling within the country where your vehicle was purchased: Warranty or Service Bulletin repairs must show the dealer photo identification from Polaris Industries in order to register your vehicle in your vehicle was purchased, you move to Polaris Industries in order to perform the warranty repair. Vehicles importation rules vary considerably from any authorized Polaris dealer who sells the same line as...
... are traveling within the country where your vehicle was purchased: Warranty or Service Bulletin repairs must show the dealer photo identification from Polaris Industries in order to register your vehicle in your vehicle was purchased, you move to Polaris Industries in order to perform the warranty repair. Vehicles importation rules vary considerably from any authorized Polaris dealer who sells the same line as...

Owners Manual
Page 188
... Control System . 89 E Index B Battery ...132 Battery Charging ...134-135 Battery Installation ...133 Battery Removal ...132 Battery Storage ...133 Brake Fluid ...56 Brake Levers ...55 Brakes ...140-141 Break-in Period ...66-67 Engine Cooling System ...115 Engine Oil Level ...103-104 Equipment Modifications ...23 Exhaust Emission Control System . . 89 F Features ...48-64 Foot Brake ...54 Front Suspension ...149-150 Fuel Filter ...60 Fuel Safety ...65 Fuel Tank ...60 Fuel Valve ...59 D Driving Across Hills ...78 Driving Downhill ...79 Driving...
... Control System . 89 E Index B Battery ...132 Battery Charging ...134-135 Battery Installation ...133 Battery Removal ...132 Battery Storage ...133 Brake Fluid ...56 Brake Levers ...55 Brakes ...140-141 Break-in Period ...66-67 Engine Cooling System ...115 Engine Oil Level ...103-104 Equipment Modifications ...23 Exhaust Emission Control System . . 89 F Features ...48-64 Foot Brake ...54 Front Suspension ...149-150 Fuel Filter ...60 Fuel Safety ...65 Fuel Tank ...60 Fuel Valve ...59 D Driving Across Hills ...78 Driving Downhill ...79 Driving...
Owners Manual
Page 189
... Maintenance Schedule . . 90-92 Polaris Products ...173 Pre-Ride Inspection ...68-69 S Starting a Warm Engine ...73 Steering Assembly ...147 Storage Recommendations ...161-164 Suspension Adjustments ...149-153 Suspension Settings ...148 Light Switches ...51 Lights ...50, 116-120 Lubrication Recommendations ...102 Maintenance ...90-139 Maintenance Record ...100-101 Making Turns ...75 Manual Shift ...61-64 Master Cylinder ...56 R Rear Suspension ...151-153 Rebound Damping ...152 Reverse Lock-Out Switch ...63 T Throttle Cable Freeplay ...155 Throttle...
... Maintenance Schedule . . 90-92 Polaris Products ...173 Pre-Ride Inspection ...68-69 S Starting a Warm Engine ...73 Steering Assembly ...147 Storage Recommendations ...161-164 Suspension Adjustments ...149-153 Suspension Settings ...148 Light Switches ...51 Lights ...50, 116-120 Lubrication Recommendations ...102 Maintenance ...90-139 Maintenance Record ...100-101 Making Turns ...75 Manual Shift ...61-64 Master Cylinder ...56 R Rear Suspension ...151-153 Rebound Damping ...152 Reverse Lock-Out Switch ...63 T Throttle Cable Freeplay ...155 Throttle...