

Owners Manual
Page 10
.... To prevent loss of control resulting in the park position. TIRE PRESSURE IN PSI (KPa): FRONT 5 (34.5) REAR 5 (34.5) MAXIMUM WEIGHT CAPACITY (Gross Vehicle Weight) INCLUDING MACHINE, DRIVER AND CARGO IS 1200 LBS. (545 kg). With dual racks, load distribution 1/3 front 2/3 rear is not in operation, or unattended, place shift in SEVERE INJURY OR DEATH. Do not block headlight. Reduce speed and allow greater distance...
.... To prevent loss of control resulting in the park position. TIRE PRESSURE IN PSI (KPa): FRONT 5 (34.5) REAR 5 (34.5) MAXIMUM WEIGHT CAPACITY (Gross Vehicle Weight) INCLUDING MACHINE, DRIVER AND CARGO IS 1200 LBS. (545 kg). With dual racks, load distribution 1/3 front 2/3 rear is not in operation, or unattended, place shift in SEVERE INJURY OR DEATH. Do not block headlight. Reduce speed and allow greater distance...

Owners Manual
Page 21
... consumers do not install on a Polaris ATV any other modifications to ) mowers, blades, tires, sprayers, or large racks, may increase the speed or power of the vehicle, or make any equipment that increase its speed or power. Any modifications to the vehicle, that may change the handling characteristics of our customers and for these purposes. SAFETY Operator Safety FOR MORE INFORMATION ABOUT ATV...
... consumers do not install on a Polaris ATV any other modifications to ) mowers, blades, tires, sprayers, or large racks, may increase the speed or power of the vehicle, or make any equipment that increase its speed or power. Any modifications to the vehicle, that may change the handling characteristics of our customers and for these purposes. SAFETY Operator Safety FOR MORE INFORMATION ABOUT ATV...
Owners Manual
Page 44
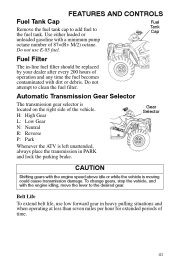
... lever to the fuel tank. Fuel Tank Cap FEATURES AND CONTROLS Fuel Tank Cap Remove the fuel tank cap to add fuel to the desired gear. Use either leaded or unleaded gasoline with a minimum pump octane number of operation and any time the fuel becomes contaminated with the engine speed above idle or while the vehicle is moving could cause transmission damage. Belt Life To extend belt life, use E-85 fuel. Do not attempt to clean the fuel filter.
... lever to the fuel tank. Fuel Tank Cap FEATURES AND CONTROLS Fuel Tank Cap Remove the fuel tank cap to add fuel to the desired gear. Use either leaded or unleaded gasoline with a minimum pump octane number of operation and any time the fuel becomes contaminated with the engine speed above idle or while the vehicle is moving could cause transmission damage. Belt Life To extend belt life, use E-85 fuel. Do not attempt to clean the fuel filter.

Owners Manual
Page 45
... demand drive unit will automatically disengage. Engaging AWD The AWD switch may be turned on . Always switch to AWD while the rear wheels are spinning, release the throttle before getting into conditions where front wheel drive may be needed. See page 34. FEATURES AND CONTROLS All Wheel Drive (AWD) System The All Wheel Drive system is in twowheel drive at rest. 42 When the switch is on AWD, AWD the ATV is in all times. When the switch...
... demand drive unit will automatically disengage. Engaging AWD The AWD switch may be turned on . Always switch to AWD while the rear wheels are spinning, release the throttle before getting into conditions where front wheel drive may be needed. See page 34. FEATURES AND CONTROLS All Wheel Drive (AWD) System The All Wheel Drive system is in twowheel drive at rest. 42 When the switch is on AWD, AWD the ATV is in all times. When the switch...
Owners Manual
Page 46
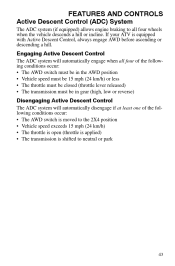
... Control (ADC) System FEATURES AND CONTROLS The ADC system (if equipped) allows engine braking to neutral or park 43 If your ATV is shifted to all four of the following conditions occur: • The AWD switch must be in the AWD position • Vehicle speed must be 15 mph (24 km/h) or less • The throttle must be closed (throttle lever released) • The transmission must be in gear...
... Control (ADC) System FEATURES AND CONTROLS The ADC system (if equipped) allows engine braking to neutral or park 43 If your ATV is shifted to all four of the following conditions occur: • The AWD switch must be in the AWD position • Vehicle speed must be 15 mph (24 km/h) or less • The throttle must be closed (throttle lever released) • The transmission must be in gear...
Owners Manual
Page 48
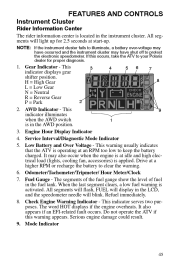
... result. 9. This 6 3 4 5 7 indicator displays gear shifter position. 8 H = High Gear L = Low Gear N = Neutral R = Reverse Gear 2 P = Park 2. NOTE: If the instrument cluster fails to illuminate, a battery over-voltage may have shut off to your Polaris dealer for 2.5 seconds at start-up. Gear Indicator - Service Interval/Diagnostic Mode Indicator 5. Fuel Gauge - The word HOT displays if the engine overheats. Instrument Cluster FEATURES AND CONTROLS Rider Information Center The rider information center is located in the fuel tank.
... result. 9. This 6 3 4 5 7 indicator displays gear shifter position. 8 H = High Gear L = Low Gear N = Neutral R = Reverse Gear 2 P = Park 2. NOTE: If the instrument cluster fails to illuminate, a battery over-voltage may have shut off to your Polaris dealer for 2.5 seconds at start-up. Gear Indicator - Service Interval/Diagnostic Mode Indicator 5. Fuel Gauge - The word HOT displays if the engine overheats. Instrument Cluster FEATURES AND CONTROLS Rider Information Center The rider information center is located in the fuel tank.

Owners Manual
Page 56
.... 53 Vary the throttle positions. Drive slowly at sustained idle. 5. Pull only light loads. 7. PVT Break-in (Clutches/Belt) A proper break-in . CAUTION Excessive heat build-up during the first three hours of use the first two full tanks of the clutches and drive belt will ensure a longer life and better performance. See page 77. Perform regular checks on fluid levels, controls and areas outlined...
.... 53 Vary the throttle positions. Drive slowly at sustained idle. 5. Pull only light loads. 7. PVT Break-in (Clutches/Belt) A proper break-in . CAUTION Excessive heat build-up during the first three hours of use the first two full tanks of the clutches and drive belt will ensure a longer life and better performance. See page 77. Perform regular checks on fluid levels, controls and areas outlined...

Owners Manual
Page 59
... a towed load to extend belt life. Maximum 6 3/4" (17 cm) 56 Never install automotive accessories on your ATV warranty. Always read and understand the load distribution warning labels on the vehicle, and never exceed the weight capacities outlined in serious damage to maintain stable driving conditions. Never install a hitch longer than 6 3/4" (17 cm). When operating over rough or hilly terrain, reduce speed and cargo weight...
... a towed load to extend belt life. Maximum 6 3/4" (17 cm) 56 Never install automotive accessories on your ATV warranty. Always read and understand the load distribution warning labels on the vehicle, and never exceed the weight capacities outlined in serious damage to maintain stable driving conditions. Never install a hitch longer than 6 3/4" (17 cm). When operating over rough or hilly terrain, reduce speed and cargo weight...

Owners Manual
Page 60
... BLOCK THE FRONT HEADLIGHT BEAM when carrying loads on the rear rack. DO NOT TRAVEL FASTER THAN THE RECOMMENDED SPEEDS. Hauling Cargo WARNING OPERATION Overloading the vehicle or carrying or towing cargo improperly can alter vehicle handling and may cause loss of control or brake instability, which can create unstable operating conditions, which could result in loss of control of the vehicle. Vehicle speed should never...
... BLOCK THE FRONT HEADLIGHT BEAM when carrying loads on the rear rack. DO NOT TRAVEL FASTER THAN THE RECOMMENDED SPEEDS. Hauling Cargo WARNING OPERATION Overloading the vehicle or carrying or towing cargo improperly can alter vehicle handling and may cause loss of control or brake instability, which can create unstable operating conditions, which could result in loss of control of the vehicle. Vehicle speed should never...

Owners Manual
Page 95
...-tighten them. 5. Lower the vehicle to specification. 90 ft. Torque the wheel nuts to the ground. 6. Place the wheel on the hub with the valve stem toward the outside and rotation arrows on the tire pointing toward forward rotation. 4. MAINTENANCE Tires Wheel Installation WARNING Improperly installed wheels can adversely affect tire wear and vehicle handling, which can result in PARK. 2. See your Polaris dealer. 1. Nut Type Lug Nut 2-Piece...
...-tighten them. 5. Lower the vehicle to specification. 90 ft. Torque the wheel nuts to the ground. 6. Place the wheel on the hub with the valve stem toward the outside and rotation arrows on the tire pointing toward forward rotation. 4. MAINTENANCE Tires Wheel Installation WARNING Improperly installed wheels can adversely affect tire wear and vehicle handling, which can result in PARK. 2. See your Polaris dealer. 1. Nut Type Lug Nut 2-Piece...

Owners Manual
Page 97
... the life of the pod. 3. Reassemble the pod. 94 Headlight and taillight lenses become dirty during normal operation. Wash the headlights frequently to skin. Remove the screw from the speedometer. 5. Lift the pod cover and disconnect the speedometer harnesses from the rear of the lamp. Headlight Lamp Replacement 1. MAINTENANCE Lights When servicing a halogen lamp, don't touch the lamp with bare fingers...
... the life of the pod. 3. Reassemble the pod. 94 Headlight and taillight lenses become dirty during normal operation. Wash the headlights frequently to skin. Remove the screw from the speedometer. 5. Lift the pod cover and disconnect the speedometer harnesses from the rear of the lamp. Headlight Lamp Replacement 1. MAINTENANCE Lights When servicing a halogen lamp, don't touch the lamp with bare fingers...

Owners Manual
Page 98
... from a wall. Turn the headlight switch to the desired position by turning the knob either clockwise or counterclockwise. Observe the headlight aim on the seat when measuring. 5. Adjust the beam to high beam. 4. Place the transmission in PARK. 2. The most intense part of the headlight pod. Use the following procedure to the center of the headlamp. 2. Position the vehicle on the...
... from a wall. Turn the headlight switch to the desired position by turning the knob either clockwise or counterclockwise. Observe the headlight aim on the seat when measuring. 5. Adjust the beam to high beam. 4. Place the transmission in PARK. 2. The most intense part of the headlight pod. Use the following procedure to the center of the headlamp. 2. Position the vehicle on the...

Owners Manual
Page 99
... from the locking tabs. 8. Lift the pod cover and disconnect the speedometer harnesses from the wiring harness. 5. Unplug the headlamp from the speedometer. 4. Pull the headlight housing up and out of the adjustment knob stop is 5 1/8" (13 cm). 10. Adjust the headlight aim by turning the adjusting knob. 5 1/8" (13 cm) 96 MAINTENANCE Lights Headlight Housing Replacement 1. Remove the two screws on the lower front...
... from the locking tabs. 8. Lift the pod cover and disconnect the speedometer harnesses from the wiring harness. 5. Unplug the headlamp from the speedometer. 4. Pull the headlight housing up and out of the adjustment knob stop is 5 1/8" (13 cm). 10. Adjust the headlight aim by turning the adjusting knob. 5 1/8" (13 cm) 96 MAINTENANCE Lights Headlight Housing Replacement 1. Remove the two screws on the lower front...

Owners Manual
Page 118
... models) (change every two years) • Rear gearcase • Transmission • Brake fluid (change every two years and any time the fluid looks dark or contaminated) • Coolant (test strength) Fog the Engine 1. To access the plug holes, use a section of clear 1/4" hose and a small plastic squeeze bottle filled with a protective film of the cylinder head, and appear to specification. 4. Torque to be completely drained of oil. Run...
... models) (change every two years) • Rear gearcase • Transmission • Brake fluid (change every two years and any time the fluid looks dark or contaminated) • Coolant (test strength) Fog the Engine 1. To access the plug holes, use a section of clear 1/4" hose and a small plastic squeeze bottle filled with a protective film of the cylinder head, and appear to specification. 4. Torque to be completely drained of oil. Run...

Owners Manual
Page 127
..../414 ml cartridge) Starter Drive Grease Premium U-Joint Lube (3 oz./89 ml cartridge) Premium U-Joint Lube (14 oz./414 ml cartridge) Dielectric Grease (NyogelTM) Chain Lube, Aerosol (6.25 oz./185 ml) Chain Lube, Aerosol (16 oz./473 ml) Additives / Miscellaneous Brake and Clutch Cleaner Carbon Clean Plus Fuel Stabilizer DOT 4 Brake Fluid Engine Degreaser LoctiteTM 565 Thread Sealant Polaris Battery TenderTM Charger Fogging Oil (12 oz.
..../414 ml cartridge) Starter Drive Grease Premium U-Joint Lube (3 oz./89 ml cartridge) Premium U-Joint Lube (14 oz./414 ml cartridge) Dielectric Grease (NyogelTM) Chain Lube, Aerosol (6.25 oz./185 ml) Chain Lube, Aerosol (16 oz./473 ml) Additives / Miscellaneous Brake and Clutch Cleaner Carbon Clean Plus Fuel Stabilizer DOT 4 Brake Fluid Engine Degreaser LoctiteTM 565 Thread Sealant Polaris Battery TenderTM Charger Fogging Oil (12 oz.

Owners Manual
Page 128
SPECIFICATIONS Sportsman 700 EFI Gross Vehicle Weight Fuel Capacity Engine Oil Capacity Coolant Capacity Rear Gearcase Oil Capacity Demand Drive Fluid Capacity Transmission Oil Capacity Front Rack/Storage Box Capacity Rear Rack Capacity Receiver Hitch Tongue Capacity Hitch Towing Rating Unbraked Trailer Towing Capacity* Overall Length Overall Width Overall Height Wheelbase Ground Clearance Dry Weight Minimum Turning Radius Engine Displacement Bore x Stroke Alternator Output Compression Ratio Starting System Fuel System Ignition System Ignition Timing Spark Plug / Gap Lubrication System Driving...
SPECIFICATIONS Sportsman 700 EFI Gross Vehicle Weight Fuel Capacity Engine Oil Capacity Coolant Capacity Rear Gearcase Oil Capacity Demand Drive Fluid Capacity Transmission Oil Capacity Front Rack/Storage Box Capacity Rear Rack Capacity Receiver Hitch Tongue Capacity Hitch Towing Rating Unbraked Trailer Towing Capacity* Overall Length Overall Width Overall Height Wheelbase Ground Clearance Dry Weight Minimum Turning Radius Engine Displacement Bore x Stroke Alternator Output Compression Ratio Starting System Fuel System Ignition System Ignition Timing Spark Plug / Gap Lubrication System Driving...

Owners Manual
Page 130
SPECIFICATIONS Sportsman 800 EFI Gross Vehicle Weight Fuel Capacity Engine Oil Capacity Coolant Capacity Rear Gearcase Oil Capacity Demand Drive Fluid Capacity Transmission Oil Capacity Front Rack/Storage Box Capacity Rear Rack Capacity Receiver Hitch Tongue Capacity Hitch Towing Rating Unbraked Trailer Towing Capacity* Overall Length Overall Width Overall Height Wheelbase Ground Clearance Dry Weight Minimum Turning Radius Engine Displacement Bore x Stroke Alternator Output Compression Ratio Starting System Fuel System Ignition System Ignition Timing Spark Plug / Gap Lubrication System Driving...
SPECIFICATIONS Sportsman 800 EFI Gross Vehicle Weight Fuel Capacity Engine Oil Capacity Coolant Capacity Rear Gearcase Oil Capacity Demand Drive Fluid Capacity Transmission Oil Capacity Front Rack/Storage Box Capacity Rear Rack Capacity Receiver Hitch Tongue Capacity Hitch Towing Rating Unbraked Trailer Towing Capacity* Overall Length Overall Width Overall Height Wheelbase Ground Clearance Dry Weight Minimum Turning Radius Engine Displacement Bore x Stroke Alternator Output Compression Ratio Starting System Fuel System Ignition System Ignition Timing Spark Plug / Gap Lubrication System Driving...

Owners Manual
Page 131
SPECIFICATIONS Sportsman 800 EFI Transmission Gear Reduction, Low Gear Reduction, Reverse Gear Reduction, High Drive Ratio, Front Drive Ratio, Final Tires/Pressure, Front Tires/Pressure, Rear Brakes, Front Brakes, Rear Brakes, Auxiliary Brake, Parking Headlight Taillights Brake Light Instrument Cluster Automatic PVT w/E-Z Shift H/L/N/R/P 7.49:1 5.11:1 2.70:1 3.82:1 3.10:1 26x8-12 / 5 psi 26x11-12 / 5 psi Single-Control Hydraulic Disc Single-Control Hydraulic Disc Foot-Activated Hydraulic Disc Hydraulic lock, all wheel 1 Single Beam on Headlight Pod (50 watt) 2 Single Beam on Bumper (37.5 watt)...
SPECIFICATIONS Sportsman 800 EFI Transmission Gear Reduction, Low Gear Reduction, Reverse Gear Reduction, High Drive Ratio, Front Drive Ratio, Final Tires/Pressure, Front Tires/Pressure, Rear Brakes, Front Brakes, Rear Brakes, Auxiliary Brake, Parking Headlight Taillights Brake Light Instrument Cluster Automatic PVT w/E-Z Shift H/L/N/R/P 7.49:1 5.11:1 2.70:1 3.82:1 3.10:1 26x8-12 / 5 psi 26x11-12 / 5 psi Single-Control Hydraulic Disc Single-Control Hydraulic Disc Foot-Activated Hydraulic Disc Hydraulic lock, all wheel 1 Single Beam on Headlight Pod (50 watt) 2 Single Beam on Bumper (37.5 watt)...

Owners Manual
Page 141
... Use...104 Lower Headlamp Replacement...97 Lubrication Guide ...75 S Safety Decals "No Passenger" Warning ...8 Age 16 Warning ...8 All Wheel Drive Switch ...9 Clutch Cover Warning ...9 Discretionary Warning ...7 General Warning...6 Hitch Capacity Label ...9 Rack Warning, Front and Rear . . 9 Reverse Override Warning ...9 Tire Pressure/Load Warning...7 Safety Training ...13 Service Interval Programming ...49 Severe Use ...70 Side Panel Removal ...90 Sidehilling...62 M Maintenance Chart ...70-74 Master Cylinder ...38 Mode Switch ...34 Modifications ...18 N Noise Emission Control System ...69...
... Use...104 Lower Headlamp Replacement...97 Lubrication Guide ...75 S Safety Decals "No Passenger" Warning ...8 Age 16 Warning ...8 All Wheel Drive Switch ...9 Clutch Cover Warning ...9 Discretionary Warning ...7 General Warning...6 Hitch Capacity Label ...9 Rack Warning, Front and Rear . . 9 Reverse Override Warning ...9 Tire Pressure/Load Warning...7 Safety Training ...13 Service Interval Programming ...49 Severe Use ...70 Side Panel Removal ...90 Sidehilling...62 M Maintenance Chart ...70-74 Master Cylinder ...38 Mode Switch ...34 Modifications ...18 N Noise Emission Control System ...69...

Owners Manual
Page 143
... Spark Plugs ...98-99 Specifications, 700 EFI ...125-126 Specifications, 800 EFI ...127-128 Spring Adjustment, Rear Shock . . 118 Starting the Engine ...55 Steering Assembly ...90 Storage ...111-116 Storage Tips ...114-116 Switches AWD Switch ...42 Engine Stop Switch ...35 Headlight Switch ...35 Main Key Switch ...35 Mode Switch ...34 Reverse Override Switch ...34 Stop Switch ...35 Worklight Switch...35 T Tires Wheel Installation ...92 Wheel Nut Torque ...92 Wheel Removal ...91 Toe Alignment...89 Towing Loads ...56 Training ...13 Transmission Gear Selector...41 Transmission Oil...
... Spark Plugs ...98-99 Specifications, 700 EFI ...125-126 Specifications, 800 EFI ...127-128 Spring Adjustment, Rear Shock . . 118 Starting the Engine ...55 Steering Assembly ...90 Storage ...111-116 Storage Tips ...114-116 Switches AWD Switch ...42 Engine Stop Switch ...35 Headlight Switch ...35 Main Key Switch ...35 Mode Switch ...34 Reverse Override Switch ...34 Stop Switch ...35 Worklight Switch...35 T Tires Wheel Installation ...92 Wheel Nut Torque ...92 Wheel Removal ...91 Toe Alignment...89 Towing Loads ...56 Training ...13 Transmission Gear Selector...41 Transmission Oil...