

Owners Manual
Page 2
Copyright 2007 Polaris Sales Inc. Due to constant improvements in the design and quality of production components, some minor discrepancies may result between the actual vehicle and the information presented in this publication are registered trademarks of Polaris Industries Inc.... within , whether whole or in U.S.A. 2008 Sportsman 800 EFI Owner's Manual P/N 9921169 2 Printed in part, is based on the latest product information at the time of the depictions and/or procedures contained within this publication. POLARIS and POLARIS THE WAY OUT are intended for omissions ...
Copyright 2007 Polaris Sales Inc. Due to constant improvements in the design and quality of production components, some minor discrepancies may result between the actual vehicle and the information presented in this publication are registered trademarks of Polaris Industries Inc.... within , whether whole or in U.S.A. 2008 Sportsman 800 EFI Owner's Manual P/N 9921169 2 Printed in part, is based on the latest product information at the time of the depictions and/or procedures contained within this publication. POLARIS and POLARIS THE WAY OUT are intended for omissions ...

Owners Manual
Page 7
With dual racks, load distribution 1/3 front 2/3 rear is not in operation, or unattended, place shift in SEVERE INJURY OR DEATH. Steering becomes difficult. To prevent loss of control resulting in the park position. Do not block headlight. Tire Pressure/Load Warning WARNING IMPROPER TIRE PRESSURE OR OVERLOADING can be centered, carried as low as possible, and firmly secured to the racks. Read Owner's Manual for braking when carrying cargo...
With dual racks, load distribution 1/3 front 2/3 rear is not in operation, or unattended, place shift in SEVERE INJURY OR DEATH. Steering becomes difficult. To prevent loss of control resulting in the park position. Do not block headlight. Tire Pressure/Load Warning WARNING IMPROPER TIRE PRESSURE OR OVERLOADING can be centered, carried as low as possible, and firmly secured to the racks. Read Owner's Manual for braking when carrying cargo...

Owners Manual
Page 18
Any modifications to the vehicle, that may change the handling characteristics of the vehicle, or make any equipment that increase its speed or power. The warranty on your Polaris ATV is terminated if any equipment has been added to the vehicle, or if any modifications have been made to the original equipment of the vehicle create a substantial safety hazard and increase the...
Any modifications to the vehicle, that may change the handling characteristics of the vehicle, or make any equipment that increase its speed or power. The warranty on your Polaris ATV is terminated if any equipment has been added to the vehicle, or if any modifications have been made to the original equipment of the vehicle create a substantial safety hazard and increase the...
Owners Manual
Page 41
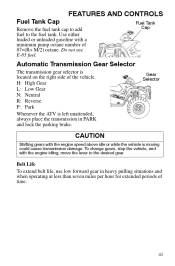
... cause transmission damage. Belt Life To extend belt life, use E-85 fuel. H: High Gear L: Low Gear N: Neutral R: Reverse P: Park Whenever the ATV is left unattended, always place the transmission in heavy pulling situations and when operating at less than seven miles per hour for extended periods of 87=(R+ M/2) octane. Gear Selector CAUTION Shifting gears with a minimum pump octane number of time. 41 Fuel Tank Cap FEATURES AND CONTROLS Fuel Tank Cap Remove the fuel tank cap to add fuel...
... cause transmission damage. Belt Life To extend belt life, use E-85 fuel. H: High Gear L: Low Gear N: Neutral R: Reverse P: Park Whenever the ATV is left unattended, always place the transmission in heavy pulling situations and when operating at less than seven miles per hour for extended periods of 87=(R+ M/2) octane. Gear Selector CAUTION Shifting gears with a minimum pump octane number of time. 41 Fuel Tank Cap FEATURES AND CONTROLS Fuel Tank Cap Remove the fuel tank cap to add fuel...

Owners Manual
Page 42
... drive unit will automatically engage any time the rear wheels lose traction. ADC 4X4 Mode When the switch is on 2X4, the ATV is on . See page 44. 4X4 Mode When the switch is on 4X4, the ATV is controlled by the 4X4 switch. FEATURES AND CONTROLS All Wheel Drive System The All Wheel Drive system is in 4X4, and the 4X4 indicator light in the instrument cluster...
... drive unit will automatically engage any time the rear wheels lose traction. ADC 4X4 Mode When the switch is on 2X4, the ATV is on . See page 44. 4X4 Mode When the switch is on 4X4, the ATV is controlled by the 4X4 switch. FEATURES AND CONTROLS All Wheel Drive System The All Wheel Drive system is in 4X4, and the 4X4 indicator light in the instrument cluster...
Owners Manual
Page 44
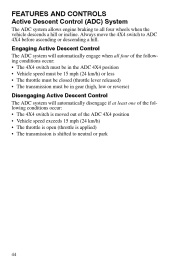
FEATURES AND CONTROLS Active Descent Control (ADC) System The ADC system allows engine braking to all four of the following conditions occur: • The 4X4 switch is moved out of the ADC 4X4 position • Vehicle speed exceeds 15 mph (24 km/h) • The throttle is open (throttle is applied) • The transmission is shifted to ADC 4X4 before ascending or descending a hill. Always...
FEATURES AND CONTROLS Active Descent Control (ADC) System The ADC system allows engine braking to all four of the following conditions occur: • The 4X4 switch is moved out of the ADC 4X4 position • Vehicle speed exceeds 15 mph (24 km/h) • The throttle is open (throttle is applied) • The transmission is shifted to ADC 4X4 before ascending or descending a hill. Always...

Owners Manual
Page 46
... high electrical load (lights, cooling fan, accessories) is operating at a higher RPM or recharge the battery to keep the battery charged. Gear Indicator - Drive at an RPM too low to clear the warning. 6. FEATURES AND CONTROLS Instrument Cluster Rider Information Center The rider information center is 1 on either ADC 4X4 or 4X4. 3. All segments will blink. This 6 3 4 5 7 indicator displays gear shifter position. 8 H = High Gear L = Low Gear N = Neutral R = Reverse Gear 2 P = Park 2. 4X4 Indicator - Engine...
... high electrical load (lights, cooling fan, accessories) is operating at a higher RPM or recharge the battery to keep the battery charged. Gear Indicator - Drive at an RPM too low to clear the warning. 6. FEATURES AND CONTROLS Instrument Cluster Rider Information Center The rider information center is 1 on either ADC 4X4 or 4X4. 3. All segments will blink. This 6 3 4 5 7 indicator displays gear shifter position. 8 H = High Gear L = Low Gear N = Neutral R = Reverse Gear 2 P = Park 2. 4X4 Indicator - Engine...

Owners Manual
Page 53
... Sensor Low Throttle Position Sensor High Gear Sensor Signal System Voltage Low System Voltage High Ignition Coil A Prim/Sec Circuit Malfunction: Open Load/Short-to-Ground Ignition Coil A Prim/Sec Circuit Malfunction: Shorted Load/Short-to-Battery Ignition Coil B Prim/Sec Circuit Malfunction: Open Load/Short-to-Ground Ignition Coil B Prim/Sec Circuit Malfunction: Shorted Load/Short-to-Battery Air Temp Sensor Low Voltage Air Temp Sensor High Voltage Engine Coolant Temp Low Voltage Engine Coolant...
... Sensor Low Throttle Position Sensor High Gear Sensor Signal System Voltage Low System Voltage High Ignition Coil A Prim/Sec Circuit Malfunction: Open Load/Short-to-Ground Ignition Coil A Prim/Sec Circuit Malfunction: Shorted Load/Short-to-Battery Ignition Coil B Prim/Sec Circuit Malfunction: Open Load/Short-to-Ground Ignition Coil B Prim/Sec Circuit Malfunction: Shorted Load/Short-to-Battery Air Temp Sensor Low Voltage Air Temp Sensor High Voltage Engine Coolant Temp Low Voltage Engine Coolant...

Owners Manual
Page 55
Fill the fuel tank with vehicle operation and handling. 4. Add oil if necessary to use . Break in the clutches and belt by operating at slower speeds during the first three hours of operation will ensure a longer life and better performance. Pull only light loads. Engine and Drivetrain Break-in period. 55 Perform regular checks on fluid levels, controls and areas outlined on the dipstick. Do...
Fill the fuel tank with vehicle operation and handling. 4. Add oil if necessary to use . Break in the clutches and belt by operating at slower speeds during the first three hours of operation will ensure a longer life and better performance. Pull only light loads. Engine and Drivetrain Break-in period. 55 Perform regular checks on fluid levels, controls and areas outlined on the dipstick. Do...

Owners Manual
Page 58
... driving conditions. Towing Loads Always attach a towed load to extend belt life. CAUTION Using an improper hitch or exceeding the maximum tongue weight capacity can result in the specifications section of rear rack cargo weight and tongue weight must not exceed the rear rack capacity. Never install automotive accessories on the safety decals. When operating over rough or hilly terrain, reduce speed and cargo weight to the vehicle and will void your Polaris...
... driving conditions. Towing Loads Always attach a towed load to extend belt life. CAUTION Using an improper hitch or exceeding the maximum tongue weight capacity can result in the specifications section of rear rack cargo weight and tongue weight must not exceed the rear rack capacity. Never install automotive accessories on the safety decals. When operating over rough or hilly terrain, reduce speed and cargo weight to the vehicle and will void your Polaris...

Owners Manual
Page 59
... operating condition. SECURE ALL LOADS BEFORE OPERATING. HEAVY LOADS CAN CAUSE BRAKING AND CONTROL PROBLEMS. Use extreme caution when applying brakes with loads that extend over rough or hilly terrain, reduce speed and cargo to the hitch point designated for your vehicle. DO NOT BLOCK THE FRONT HEADLIGHT BEAM when carrying loads on a level surface. CARGO WEIGHT DISTRIBUTION should be centered, securely...
... operating condition. SECURE ALL LOADS BEFORE OPERATING. HEAVY LOADS CAN CAUSE BRAKING AND CONTROL PROBLEMS. Use extreme caution when applying brakes with loads that extend over rough or hilly terrain, reduce speed and cargo to the hitch point designated for your vehicle. DO NOT BLOCK THE FRONT HEADLIGHT BEAM when carrying loads on a level surface. CARGO WEIGHT DISTRIBUTION should be centered, securely...
Owners Manual
Page 74
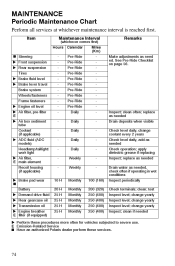
... X Front suspension X Rear suspension Tires X Brake fluid level X Brake lever travel Brake system Wheels/fasteners Frame fasteners X Engine oil level X Air filter, pre-filter E X Air box sediment tube Coolant (if applicable) X ADC fluid (ADC models) Headlamp/taillight/ work light X Air filter, E main element Recoil housing (if applicable) X Brake pad wear Q Battery X Demand drive fluid X Rear gearcase oil X Transmission oil X Engine breather E filter (if equipped) X Perform these services. 74 Item Maintenance Interval (whichever comes first) Hours Calendar Q Steering Remarks Miles (Km...
... X Front suspension X Rear suspension Tires X Brake fluid level X Brake lever travel Brake system Wheels/fasteners Frame fasteners X Engine oil level X Air filter, pre-filter E X Air box sediment tube Coolant (if applicable) X ADC fluid (ADC models) Headlamp/taillight/ work light X Air filter, E main element Recoil housing (if applicable) X Brake pad wear Q Battery X Demand drive fluid X Rear gearcase oil X Transmission oil X Engine breather E filter (if equipped) X Perform these services. 74 Item Maintenance Interval (whichever comes first) Hours Calendar Q Steering Remarks Miles (Km...

Owners Manual
Page 94
... tire pointing toward forward rotation. 4. lbs. (122 Nm) Cast Aluminum Steel 27 ft. Always ensure that have a cotter pin installed. Lock the parking brake. 3. Lower the vehicle to specification. 90 ft. Do not service axle nuts that all nuts are torqued to specification. Torque the wheel nuts to the ground. 6. MAINTENANCE Tires Wheel Installation WARNING Improperly installed wheels can adversely affect tire wear and vehicle handling, which can result in PARK...
... tire pointing toward forward rotation. 4. lbs. (122 Nm) Cast Aluminum Steel 27 ft. Always ensure that have a cotter pin installed. Lock the parking brake. 3. Lower the vehicle to specification. 90 ft. Do not service axle nuts that all nuts are torqued to specification. Torque the wheel nuts to the ground. 6. MAINTENANCE Tires Wheel Installation WARNING Improperly installed wheels can adversely affect tire wear and vehicle handling, which can result in PARK...

Owners Manual
Page 96
WARNING Poor lighting while driving can cause serious burns to cool before servicing. Headlight Lamp Replacement 1. Lift the pod cover and disconnect the speedometer harnesses from the wiring harness. Oil from the rear of the lamp. Remove the two screws on the lamp locates properly in severe injury or death. Turn the lamp counterclockwise to maintain lighting quality. Wash the headlights frequently to remove it. 7. Unplug the headlamp...
WARNING Poor lighting while driving can cause serious burns to cool before servicing. Headlight Lamp Replacement 1. Lift the pod cover and disconnect the speedometer harnesses from the wiring harness. Oil from the rear of the lamp. Remove the two screws on the lamp locates properly in severe injury or death. Turn the lamp counterclockwise to maintain lighting quality. Wash the headlights frequently to remove it. 7. Unplug the headlamp...

Owners Manual
Page 97
...wall at the rear of the headlight and make the adjustment. 25 ft. (7.6 m) 2" (5 cm) 1. Phillips Screw 97 NOTE: Include rider weight on the wall. Turn the headlight switch to the desired position by turning the knob ...Start the engine. The most intense part of the headlight pod. Adjust the beam to high beam. 4. Low Beam Adjustment The low beam can be adjusted slightly upward or downward. Use the following procedure to the center of the headlamp. 2. Tighten the screw. Tilt the headlamp upward or downward. 3. Place the transmission in PARK. 2. Lights MAINTENANCE...
...wall at the rear of the headlight and make the adjustment. 25 ft. (7.6 m) 2" (5 cm) 1. Phillips Screw 97 NOTE: Include rider weight on the wall. Turn the headlight switch to the desired position by turning the knob ...Start the engine. The most intense part of the headlight pod. Adjust the beam to high beam. 4. Low Beam Adjustment The low beam can be adjusted slightly upward or downward. Use the following procedure to the center of the headlamp. 2. Tighten the screw. Tilt the headlamp upward or downward. 3. Place the transmission in PARK. 2. Lights MAINTENANCE...

Owners Manual
Page 98
... turning the adjusting knob. 5 1/8" (13 cm) 98 MAINTENANCE Lights Headlight Housing Replacement 1. Unplug the headlamp from the speedometer. 4. Lift the pod cover and disconnect the speedometer harnesses from the wiring harness. 5. Use a small screwdriver to remove it from the headlight mounting tabs. 6. Lift the adjusting knob up to remove the o-rings from the locking tabs. 7. Lift the pod slightly while depressing the tabs at the rear...
... turning the adjusting knob. 5 1/8" (13 cm) 98 MAINTENANCE Lights Headlight Housing Replacement 1. Unplug the headlamp from the speedometer. 4. Lift the pod cover and disconnect the speedometer harnesses from the wiring harness. 5. Use a small screwdriver to remove it from the headlight mounting tabs. 6. Lift the adjusting knob up to remove the o-rings from the locking tabs. 7. Lift the pod slightly while depressing the tabs at the rear...

Owners Manual
Page 117
... instructions on page 72. • Demand drive unit (front gearcase) • ADC fluid (ADC models) (change every two years) • Rear gearcase • Transmission • Brake fluid (change every two years and any time the fluid looks dark or contaminated) • Coolant (test strength) Fog the Engine 1. Run the engine for several times. To access the plug holes, use a section of clear 1/4" hose and a small plastic squeeze bottle filled...
... instructions on page 72. • Demand drive unit (front gearcase) • ADC fluid (ADC models) (change every two years) • Rear gearcase • Transmission • Brake fluid (change every two years and any time the fluid looks dark or contaminated) • Coolant (test strength) Fog the Engine 1. Run the engine for several times. To access the plug holes, use a section of clear 1/4" hose and a small plastic squeeze bottle filled...

Owners Manual
Page 127
SPECIFICATIONS Sportsman 800 EFI Maximum Weight Capacity Fuel Capacity Engine Oil Capacity Coolant Capacity Rear Gearcase Oil Capacity Demand Drive Fluid Capacity Transmission Oil Capacity Front Rack/Storage Box Capacity Rear Rack Capacity Receiver Hitch Tongue Capacity Hitch Towing Rating Unbraked Trailer Towing Capacity* Overall Length Overall Width Overall Height Wheelbase Ground Clearance Dry Weight Minimum Turning Radius Engine Displacement Bore x Stroke Alternator Output Compression Ratio Starting System Fuel System Ignition System Ignition Timing Spark Plug / Gap Lubrication System ...
SPECIFICATIONS Sportsman 800 EFI Maximum Weight Capacity Fuel Capacity Engine Oil Capacity Coolant Capacity Rear Gearcase Oil Capacity Demand Drive Fluid Capacity Transmission Oil Capacity Front Rack/Storage Box Capacity Rear Rack Capacity Receiver Hitch Tongue Capacity Hitch Towing Rating Unbraked Trailer Towing Capacity* Overall Length Overall Width Overall Height Wheelbase Ground Clearance Dry Weight Minimum Turning Radius Engine Displacement Bore x Stroke Alternator Output Compression Ratio Starting System Fuel System Ignition System Ignition Timing Spark Plug / Gap Lubrication System ...

Owners Manual
Page 128
SPECIFICATIONS Sportsman 800 EFI Transmission Gear Reduction, Low Gear Reduction, Reverse Gear Reduction, High Drive Ratio, Front Drive Ratio, Final Tires/Pressure, Front Tires/Pressure, Rear Brakes, Front Brakes, Rear Brakes, Auxiliary Brake, Parking Headlight Taillights Brake Light Instrument Cluster Automatic PVT with E-Z Shift H/L/N/R/P 7.49:1 5.11:1 2.88:1 3.82:1 3.10:1 26x8-12 / 5 psi (34.5 KPa) 26x11-12 / 5 psi (34.5 KPa) Single-Control Hydraulic Disc Single-Control Hydraulic Disc Foot-Activated Hydraulic Disc Hydraulic lock, all wheel 1 Single Beam on Headlight Pod (50 watt) 2 Single ...
SPECIFICATIONS Sportsman 800 EFI Transmission Gear Reduction, Low Gear Reduction, Reverse Gear Reduction, High Drive Ratio, Front Drive Ratio, Final Tires/Pressure, Front Tires/Pressure, Rear Brakes, Front Brakes, Rear Brakes, Auxiliary Brake, Parking Headlight Taillights Brake Light Instrument Cluster Automatic PVT with E-Z Shift H/L/N/R/P 7.49:1 5.11:1 2.88:1 3.82:1 3.10:1 26x8-12 / 5 psi (34.5 KPa) 26x11-12 / 5 psi (34.5 KPa) Single-Control Hydraulic Disc Single-Control Hydraulic Disc Foot-Activated Hydraulic Disc Hydraulic lock, all wheel 1 Single Beam on Headlight Pod (50 watt) 2 Single ...

Owners Manual
Page 132
... purchased, you have received authorization for export. Upon residence verification, the servicing dealer will be required to obtain documentation from country to determine this vehicle's warranty or service bulletin coverage if you should consult an authorized dealer to country. Vehicles importation rules vary considerably from Polaris Industries in order to register your vehicle in order to perform the warranty repair.
... purchased, you have received authorization for export. Upon residence verification, the servicing dealer will be required to obtain documentation from country to determine this vehicle's warranty or service bulletin coverage if you should consult an authorized dealer to country. Vehicles importation rules vary considerably from Polaris Industries in order to register your vehicle in order to perform the warranty repair.