
Owners Manual
Page 17
... of accessories. • Never exceed the stated load capacity for obstacles before operating in use to prevent unauthorized use or accidental starting. If necessary apply them lightly several times to operate over obstacles as described in this manual. • Never modify an ATV through deep or fast flowing water. Always maintain proper tire pressure as described in this manual. •...
... of accessories. • Never exceed the stated load capacity for obstacles before operating in use to prevent unauthorized use or accidental starting. If necessary apply them lightly several times to operate over obstacles as described in this manual. • Never modify an ATV through deep or fast flowing water. Always maintain proper tire pressure as described in this manual. •...

Owners Manual
Page 18
... power of the ATV. Use only Polaris-approved accessories, and familiarize yourself with their function and effect on your Polaris ATV is terminated if any equipment has been added to the vehicle, or if any modifications have been made to the vehicle, that may change the handling characteristics of the vehicle, or make any equipment that increase its speed or power. Safety...
... power of the ATV. Use only Polaris-approved accessories, and familiarize yourself with their function and effect on your Polaris ATV is terminated if any equipment has been added to the vehicle, or if any modifications have been made to the vehicle, that may change the handling characteristics of the vehicle, or make any equipment that increase its speed or power. Safety...

Owners Manual
Page 26
The ignition switch key must always be turned on before pushing the starter button. Ignition Switch 9. Ignition Switch 10. Ignition Switch - Tether Strap and Switch - Tether Switch OUTLAW SPORTSMAN Never ride without the tether strap attached to your right wrist and to let the cord get tangled around the handlebars or any part of your ATV. If you drive. Be careful not to your body. 23 Know...
The ignition switch key must always be turned on before pushing the starter button. Ignition Switch 9. Ignition Switch 10. Ignition Switch - Tether Strap and Switch - Tether Switch OUTLAW SPORTSMAN Never ride without the tether strap attached to your right wrist and to let the cord get tangled around the handlebars or any part of your ATV. If you drive. Be careful not to your body. 23 Know...

Owners Manual
Page 38
... - FOLLOW ALL INSTRUCTIONS AND WARNINGS. a collision can result in turns; at speeds too fast for your skills or the conditions; LOCATE AND READ OWNER'S MANUAL. Never carry passengers. with drugs or alcohol. Never use on public roads - Operation Warning WARNING Safety Decals Improper ATV use can occur with another vehicle; passengers affect balance and steering and increase risk of losing control. ALWAYS use proper riding...
... - FOLLOW ALL INSTRUCTIONS AND WARNINGS. a collision can result in turns; at speeds too fast for your skills or the conditions; LOCATE AND READ OWNER'S MANUAL. Never carry passengers. with drugs or alcohol. Never use on public roads - Operation Warning WARNING Safety Decals Improper ATV use can occur with another vehicle; passengers affect balance and steering and increase risk of losing control. ALWAYS use proper riding...

Owners Manual
Page 41
... For stability on rough or hilly terrain, reduce speed and cargo. Safety Decals Sportsman 90 Tire Pressure Warning WARNING IMPROPER TIRE PRESSURE OR OVERLOADING can cause loss of the rack. Overloading or carrying tall, off-center, or unsecured loads will increase your risk of losing control. TIRE PRESSURE IN PSI (KPa): FRONT 3 (20.7) REAR 3 (20.7) MAXIMUM WEIGHT CAPACITY (Gross Vehicle Weight) INCLUDING MACHINE, DRIVER AND CARGO IS 528 LBS. (240 KG).
... For stability on rough or hilly terrain, reduce speed and cargo. Safety Decals Sportsman 90 Tire Pressure Warning WARNING IMPROPER TIRE PRESSURE OR OVERLOADING can cause loss of the rack. Overloading or carrying tall, off-center, or unsecured loads will increase your risk of losing control. TIRE PRESSURE IN PSI (KPa): FRONT 3 (20.7) REAR 3 (20.7) MAXIMUM WEIGHT CAPACITY (Gross Vehicle Weight) INCLUDING MACHINE, DRIVER AND CARGO IS 528 LBS. (240 KG).

Owners Manual
Page 83
Gas Cap 80 Refer to the specifications section beginning on page 178 for fuel tank capacity. Use unleaded gasoline with a minimum pump octane of 87. Features and Controls Fuel System Gas Cap The fuel tank filler cap is located directly below the handlebars.
Gas Cap 80 Refer to the specifications section beginning on page 178 for fuel tank capacity. Use unleaded gasoline with a minimum pump octane of 87. Features and Controls Fuel System Gas Cap The fuel tank filler cap is located directly below the handlebars.

Owners Manual
Page 84
Always return the valve to the ON position after using the main supply. It has three settings. NOTE: The reserve setting allows Features and Controls Sportsman 90 Fuel Valve operation for approximately 7-10 miles (11-16 km). RES: For reserve supply if main supply is located on the left side of the ATV. OFF: For vehicle storage and when transporting. ON: For normal operation. Always refill the gas tank as soon as possible after refueling. OFF Outlaw 90 Fuel Valve ON RES 81 Fuel Valve The fuel valve is exhausted.
Always return the valve to the ON position after using the main supply. It has three settings. NOTE: The reserve setting allows Features and Controls Sportsman 90 Fuel Valve operation for approximately 7-10 miles (11-16 km). RES: For reserve supply if main supply is located on the left side of the ATV. OFF: For vehicle storage and when transporting. ON: For normal operation. Always refill the gas tank as soon as possible after refueling. OFF Outlaw 90 Fuel Valve ON RES 81 Fuel Valve The fuel valve is exhausted.

Owners Manual
Page 85
... key to neutral. 3. Position the vehicle on the left side of the ATV. Lock the parking brake. 4. Store the lever under the seat when it's not installed. 5. Kick-Start Lever 7. Shift the transmission to ON. NOTE: A 10/12mm wrench is on the kick-start shaft to protect the rider. Fold out the kick-start , then thrust your heel downward to crank the engine...
... key to neutral. 3. Position the vehicle on the left side of the ATV. Lock the parking brake. 4. Store the lever under the seat when it's not installed. 5. Kick-Start Lever 7. Shift the transmission to ON. NOTE: A 10/12mm wrench is on the kick-start shaft to protect the rider. Fold out the kick-start , then thrust your heel downward to crank the engine...

Owners Manual
Page 87
... handling. 4. Select an open area that allows room to maintain the oil level in period. Vary throttle positions. Do not operate at the end of the break-in the proper range. Item Engine oil change Oil pre-filter screen Transmission oil Valve clearance Remarks Perform break-in oil change Clean filter with oil change Perform break-in Period 1. See page 78. 2. Perform the following maintenance at sustained idle. 5. Check the oil level. Drive...
... handling. 4. Select an open area that allows room to maintain the oil level in period. Vary throttle positions. Do not operate at the end of the break-in the proper range. Item Engine oil change Oil pre-filter screen Transmission oil Valve clearance Remarks Perform break-in oil change Clean filter with oil change Perform break-in Period 1. See page 78. 2. Perform the following maintenance at sustained idle. 5. Check the oil level. Drive...

Owners Manual
Page 92
... pushing the choke lever all the way to the left . Push the engine stop switch up to neutral. NOTE: The choke is pushed completely to the left . Turn the fuel valve on when the lever is fully on . NOTE: Do not press the throttle while starting . The choke is pushed completely to ON. Turn the ignition key to the right. Starting the Engine 1. 2. 3. 4.
... pushing the choke lever all the way to the left . Push the engine stop switch up to neutral. NOTE: The choke is pushed completely to the left . Turn the fuel valve on when the lever is fully on . NOTE: Do not press the throttle while starting . The choke is pushed completely to ON. Turn the ignition key to the right. Starting the Engine 1. 2. 3. 4.

Owners Manual
Page 122
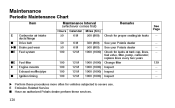
... ------ Periodic Maintenance Chart Item Battery X X X X QE Engine oil change ; Check clearance; clean annually if ATV is operated less than 10 hours Lubricate all fittings, pivots, cables, etc. adjust; adjust; test Drain and change the oil Drain and change the oil Clean filter at every oil change Transmission oil Oil pre-filter screen General lubrication Valve clearance Carburetor float bowl QE QE Throttle cable/ETC switch Choke cable Maintenance Remarks Check...
... ------ Periodic Maintenance Chart Item Battery X X X X QE Engine oil change ; Check clearance; clean annually if ATV is operated less than 10 hours Lubricate all fittings, pivots, cables, etc. adjust; adjust; test Drain and change the oil Drain and change the oil Clean filter at every oil change Transmission oil Oil pre-filter screen General lubrication Valve clearance Carburetor float bowl QE QE Throttle cable/ETC switch Choke cable Maintenance Remarks Check...
Owners Manual
Page 123
X Perform these services. 120 E Emission-Related Service Q Have an authorized Polaris dealer perform these procedures more often for leaks at tank cap, lines, fuel valve, filter, pump, carburetor; Maintenance Item E Q XQ QE QE X Q Periodic Maintenance Chart Maintenance Interval (whichever comes first) Hours Carburetor air intake ducts/flange Drive belt Brake pad wear Fuel system Fuel filter Engine mounts Exhaust muffler/pipe Ignition timing 50 50 50 100 100 100 100 100 Calendar 6M 6M 6M 12 M 12 M 12 M 12 M 12 M Miles (Km...
X Perform these services. 120 E Emission-Related Service Q Have an authorized Polaris dealer perform these procedures more often for leaks at tank cap, lines, fuel valve, filter, pump, carburetor; Maintenance Item E Q XQ QE QE X Q Periodic Maintenance Chart Maintenance Interval (whichever comes first) Hours Carburetor air intake ducts/flange Drive belt Brake pad wear Fuel system Fuel filter Engine mounts Exhaust muffler/pipe Ignition timing 50 50 50 100 100 100 100 100 Calendar 6M 6M 6M 12 M 12 M 12 M 12 M 12 M Miles (Km...

Owners Manual
Page 124
Periodic Maintenance Chart Item Wiring Clutches (drive and driven) Front wheel bearings Spark arrestor Q Toe adjustment Maintenance Remarks Inspect for wear, routing, security; clean; adjust when parts are replaced See Page ---138 150 Maintenance Interval (whichever comes first) Hours Calendar 12 M 12 M 12 M 36 M -Miles (Km) 1000 (1600) 1000 (1600) 1000 (1600) 3000 (4800) 100 100 100 300 X Q Q 121 apply dielectric grease to connectors subjected to water, mud, etc. Inspect; replace as needed Clean out Inspect periodically; replace worn parts Inspect;
Periodic Maintenance Chart Item Wiring Clutches (drive and driven) Front wheel bearings Spark arrestor Q Toe adjustment Maintenance Remarks Inspect for wear, routing, security; clean; adjust when parts are replaced See Page ---138 150 Maintenance Interval (whichever comes first) Hours Calendar 12 M 12 M 12 M 36 M -Miles (Km) 1000 (1600) 1000 (1600) 1000 (1600) 3000 (4800) 100 100 100 300 X Q Q 121 apply dielectric grease to connectors subjected to water, mud, etc. Inspect; replace as needed Clean out Inspect periodically; replace worn parts Inspect;

Owners Manual
Page 144
Adjust the carburetor idle screw either in (clockwise) will lower RPM. 141 Turning the screw out (counterclockwise) will raise RPM. Turning the screw in or out until the desired idle RPM is not satisfactory, and all other conditions are favorable, the carburetor can be adjusted. 1. Start the engine. 2. Carburetor Maintenance If the engine idle speed is reached. Allow the engine to run for approximately five minutes. 4. Lock the parking brake. 3.
Adjust the carburetor idle screw either in (clockwise) will lower RPM. 141 Turning the screw out (counterclockwise) will raise RPM. Turning the screw in or out until the desired idle RPM is not satisfactory, and all other conditions are favorable, the carburetor can be adjusted. 1. Start the engine. 2. Carburetor Maintenance If the engine idle speed is reached. Allow the engine to run for approximately five minutes. 4. Lock the parking brake. 3.

Owners Manual
Page 183
Specifications Sportsman 90 Rider Capacity/Maximum Weight Displacement Cooling Engine type Lubrication Oil Capacity Fuel Capacity Fuel Reserve Capacity Starting Drive System Final Drive Front Suspension Rear Suspension 1 Rider/170 lbs. (77 kg) 89cc Air Cooled 4-Stroke Wet Sump 30 oz. (900 ml) 2 gallons (7.7 liters) .22 gallons (.85 liters) Electric with kick-start backup Automatic CVT Chain Single A-arm with 5" (12.7 cm) of travel Swing arm with 6" (15.2 cm) of travel 180
Specifications Sportsman 90 Rider Capacity/Maximum Weight Displacement Cooling Engine type Lubrication Oil Capacity Fuel Capacity Fuel Reserve Capacity Starting Drive System Final Drive Front Suspension Rear Suspension 1 Rider/170 lbs. (77 kg) 89cc Air Cooled 4-Stroke Wet Sump 30 oz. (900 ml) 2 gallons (7.7 liters) .22 gallons (.85 liters) Electric with kick-start backup Automatic CVT Chain Single A-arm with 5" (12.7 cm) of travel Swing arm with 6" (15.2 cm) of travel 180
Owners Manual
Page 196
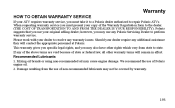
... not be covered by warranty. 193 Recommended Lubricants 1. We recommend the use any warranty issues. Polaris suggests that you must present your copy of the Warranty Registration form to perform warranty service. Please work with your dealer to resolve any Polaris Servicing Dealer to the dealer. (THE COST OF TRANSPORTATION TO AND FROM THE DEALER IS YOUR RESPONSIBILITY). Warranty HOW TO OBTAIN WARRANTY SERVICE If...
... not be covered by warranty. 193 Recommended Lubricants 1. We recommend the use any warranty issues. Polaris suggests that you must present your copy of the Warranty Registration form to perform warranty service. Please work with your dealer to resolve any Polaris Servicing Dealer to the dealer. (THE COST OF TRANSPORTATION TO AND FROM THE DEALER IS YOUR RESPONSIBILITY). Warranty HOW TO OBTAIN WARRANTY SERVICE If...

Owners Manual
Page 197
...Polaris dealer. If you are traveling within the country where your vehicle to determine this vehicle's warranty or service bulletin coverage if you have received authorization for export. How to perform the warranty repair. 194 Outside the country where your vehicle was purchased: Warranty or Service Bulletin repairs... Warranty EXPORTED VEHICLES EXCEPT WHERE SPECIFICALLY REQUIRED BY LAW, THERE IS NO WARRANTY OR SERVICE BULLETIN COVERAGE ON THIS VEHICLE IF IT IS SOLD OUTSIDE THE COUNTRY OF THE SELLING DEALER'S AUTHORIZED LOCATION. This policy does not apply to Safety Recalls. ...
...Polaris dealer. If you are traveling within the country where your vehicle to determine this vehicle's warranty or service bulletin coverage if you have received authorization for export. How to perform the warranty repair. 194 Outside the country where your vehicle was purchased: Warranty or Service Bulletin repairs... Warranty EXPORTED VEHICLES EXCEPT WHERE SPECIFICALLY REQUIRED BY LAW, THERE IS NO WARRANTY OR SERVICE BULLETIN COVERAGE ON THIS VEHICLE IF IT IS SOLD OUTSIDE THE COUNTRY OF THE SELLING DEALER'S AUTHORIZED LOCATION. This policy does not apply to Safety Recalls. ...
Owners Manual
Page 205
... ...100-101 Driving Downhill ...104 Driving in Reverse...109 Driving on Slippery Surfaces . 96-97 Driving Over Obstacles ...108 Driving Procedure ...94 Driving Through Water ...106-107 Driving Uphill ...98-99 C Electronic Throttle Control...71 Emission Control Systems . . 112-113 Engine Start Button ...69 Engine Stop Switch ...68 Equipment Modifications ...15 Eye Protection...93 Fuel Filter ...129 Fuel Stabilizer...174 Fuel System ...78-80 Fuel Valve...81 Gas Cap...21, 80 Gearcase Capacity ...131...
... ...100-101 Driving Downhill ...104 Driving in Reverse...109 Driving on Slippery Surfaces . 96-97 Driving Over Obstacles ...108 Driving Procedure ...94 Driving Through Water ...106-107 Driving Uphill ...98-99 C Electronic Throttle Control...71 Emission Control Systems . . 112-113 Engine Start Button ...69 Engine Stop Switch ...68 Equipment Modifications ...15 Eye Protection...93 Fuel Filter ...129 Fuel Stabilizer...174 Fuel System ...78-80 Fuel Valve...81 Gas Cap...21, 80 Gearcase Capacity ...131...

Owners Manual
Page 206
..., Transmission ...130 Oil, Engine ...124 Operation Warning...35 Parking on a Hill or Incline ...105 Passenger Warning...39 Periodic Maintenance Chart. 114-121 Polaris Products ...182 Polishing...172 Pre-Ride Inspection ...85-87 Product Safety Commission...14 Rack Warning ...40 Riding Gear ...92-93 N O L P M R Safety Training ...7 Seat Latch ...21 Severe Use...115 Shift Lever...20, 72 Shock Spring Adjustment ...152 Signal words ...8 Spark Arrestor ...138-139 Spark Plug Change ...133 Spark Plugs ...132-133 Specifications Outlaw 90 ...178-179 Sportsman 90...
..., Transmission ...130 Oil, Engine ...124 Operation Warning...35 Parking on a Hill or Incline ...105 Passenger Warning...39 Periodic Maintenance Chart. 114-121 Polaris Products ...182 Polishing...172 Pre-Ride Inspection ...85-87 Product Safety Commission...14 Rack Warning ...40 Riding Gear ...92-93 N O L P M R Safety Training ...7 Seat Latch ...21 Severe Use...115 Shift Lever...20, 72 Shock Spring Adjustment ...152 Signal words ...8 Spark Arrestor ...138-139 Spark Plug Change ...133 Spark Plugs ...132-133 Specifications Outlaw 90 ...178-179 Sportsman 90...

Owners Manual
Page 207
Index Switches Engine Start Button ...69 Engine Stop Switch ...19, 68 Horn Button...19 Ignition Switch ...23 Main Key Switch...67 Tether Switch ...23 S Tail Light ...163 Tether Strap ...23 Throttle ...70 Throttle Cable Adjustment ...144 Throttle Control ...19 Throttle Lever ...71 Throttle Stop Speed Control System . . 143 Tire Pressure Warning Outlaw 90 ...37 Sportsman 90 ...38 Tire Tread Depth ...160 Tires...159 Toe Alignment...150-151 Transmission Oil ...130-131 Transporting the ATV ...177 Turning Around on a Hill . . 102-103 T Vehicle Identification Numbers...
Index Switches Engine Start Button ...69 Engine Stop Switch ...19, 68 Horn Button...19 Ignition Switch ...23 Main Key Switch...67 Tether Switch ...23 S Tail Light ...163 Tether Strap ...23 Throttle ...70 Throttle Cable Adjustment ...144 Throttle Control ...19 Throttle Lever ...71 Throttle Stop Speed Control System . . 143 Tire Pressure Warning Outlaw 90 ...37 Sportsman 90 ...38 Tire Tread Depth ...160 Tires...159 Toe Alignment...150-151 Transmission Oil ...130-131 Transporting the ATV ...177 Turning Around on a Hill . . 102-103 T Vehicle Identification Numbers...