

Owners Manual
Page 4
... omissions or inaccuracies. Depictions and/or procedures in the design and quality of publication. Any reprinting or reuse of Polaris Industries Inc. Copyright 2009 Polaris Sales Inc. Due to constant improvements in this publication. No liability can be accepted for reference use only. All information contained within , whether whole or in Taiwan 2010 Phoenix 200 Quadricycle Owner's Manual P/N 9922500 2
... omissions or inaccuracies. Depictions and/or procedures in the design and quality of publication. Any reprinting or reuse of Polaris Industries Inc. Copyright 2009 Polaris Sales Inc. Due to constant improvements in this publication. No liability can be accepted for reference use only. All information contained within , whether whole or in Taiwan 2010 Phoenix 200 Quadricycle Owner's Manual P/N 9922500 2

Owners Manual
Page 22
... brakes gradually, and shift weight uphill. • Never operate this ATV on HILLS steeper than 25 degrees 25°. MAXIMUM TOWING CAPACITY: 136 KG (300 lbs) Trailer Tongue Weight should not exceed 13.6 kg (30 lbs). Rack 70 lbs. (31.7 kg) 7173312 Hitch Warning Exceeding vehicle towing limit could lead to an accident. Gross Trailer Weight, and should 7173312 be about 10% of the owner's manual...
... brakes gradually, and shift weight uphill. • Never operate this ATV on HILLS steeper than 25 degrees 25°. MAXIMUM TOWING CAPACITY: 136 KG (300 lbs) Trailer Tongue Weight should not exceed 13.6 kg (30 lbs). Rack 70 lbs. (31.7 kg) 7173312 Hitch Warning Exceeding vehicle towing limit could lead to an accident. Gross Trailer Weight, and should 7173312 be about 10% of the owner's manual...

Owners Manual
Page 24
... end all electrical power to engage the starter. Start Switch Press the start switch toward the handlebar to the vehicle. Tip: The starter will not engage unless the rear brakes are not on . See page 32 for engine starting the engine. Move the key switch to the LIGHTS ON position to turn the headlight on in the ON position before starting procedures. 22 WARNING! It may contact the gas tank cap when turning, causing an...
... end all electrical power to engage the starter. Start Switch Press the start switch toward the handlebar to the vehicle. Tip: The starter will not engage unless the rear brakes are not on . See page 32 for engine starting the engine. Move the key switch to the LIGHTS ON position to turn the headlight on in the ON position before starting procedures. 22 WARNING! It may contact the gas tank cap when turning, causing an...

Owners Manual
Page 25
... the switch to the center position to turn signal. Move the main key switch to the LIGHTS ON position to end the signal. 23 Hazard Warning Switch Push the hazard warning switch to cause all turn indicators to activate the corresponding turn the headlight on. See page 32. Turn Signal Switch Move the switch either left or right to flash simultaneously. FEATURES AND CONTROLS Switches and Levers Light Switch Use the headlight switch to change the lights from...
... the switch to the center position to turn signal. Move the main key switch to the LIGHTS ON position to end the signal. 23 Hazard Warning Switch Push the hazard warning switch to cause all turn indicators to activate the corresponding turn the headlight on. See page 32. Turn Signal Switch Move the switch either left or right to flash simultaneously. FEATURES AND CONTROLS Switches and Levers Light Switch Use the headlight switch to change the lights from...
Owners Manual
Page 30
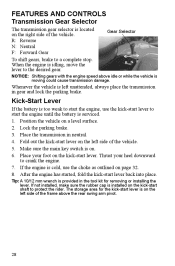
... the transmission in gear and lock the parking brake. Make sure the main key switch is on page 32. 8. After the engine has started, fold the kick-start lever is on the right side of the vehicle. If not installed, make sure the rubber cap is installed on the kick-start the engine until the battery is serviced. 1. R: Reverse N: Neutral F: Forward Gear To shift gears, brake to the desired gear. Kick-Start Lever...
... the transmission in gear and lock the parking brake. Make sure the main key switch is on page 32. 8. After the engine has started, fold the kick-start lever is on the right side of the vehicle. If not installed, make sure the rubber cap is installed on the kick-start the engine until the battery is serviced. 1. R: Reverse N: Neutral F: Forward Gear To shift gears, brake to the desired gear. Kick-Start Lever...
Owners Manual
Page 31
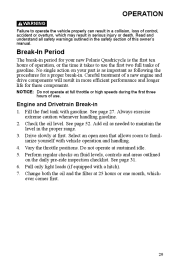
... at full throttle or high speeds during the first three hours of use the first two full tanks of gasoline. Check the oil level. Drive slowly at 25 hours or one month, whichever comes first. 29 Change both the oil and the filter at first. OPERATION WARNING Failure to operate the vehicle properly can result in a collision, loss of control, accident...
... at full throttle or high speeds during the first three hours of use the first two full tanks of gasoline. Check the oil level. Drive slowly at 25 hours or one month, whichever comes first. 29 Change both the oil and the filter at first. OPERATION WARNING Failure to operate the vehicle properly can result in a collision, loss of control, accident...
Owners Manual
Page 36
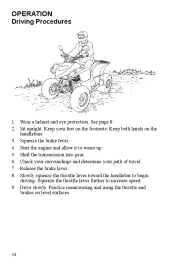
... both hands on level surfaces. 34 Shift the transmission into gear. 6. Squeeze the throttle lever further to begin driving. Practice maneuvering and using the throttle and brakes on the handlebars. 3. Drive slowly. Slowly squeeze the throttle lever toward the handlebar to increase speed. 9. Squeeze the brake lever. 4. Release the brake lever. 8. Wear a helmet and eye protection. Start the engine and allow it to warm up...
... both hands on level surfaces. 34 Shift the transmission into gear. 6. Squeeze the throttle lever further to begin driving. Practice maneuvering and using the throttle and brakes on the handlebars. 3. Drive slowly. Slowly squeeze the throttle lever toward the handlebar to increase speed. 9. Squeeze the brake lever. 4. Release the brake lever. 8. Wear a helmet and eye protection. Start the engine and allow it to warm up...
Owners Manual
Page 46
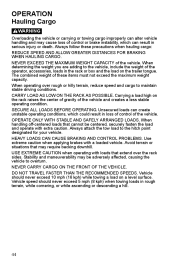
... adversely affected, causing the vehicle to maintain stable driving conditions. OPERATION Hauling Cargo WARNING Overloading the vehicle or carrying or towing cargo improperly can result in loss of control of the vehicle. When operating over the rack sides. When handling off-centered loads that may be centered, securely fasten the load and operate with a loaded vehicle. When determining the weight you are adding to...
... adversely affected, causing the vehicle to maintain stable driving conditions. OPERATION Hauling Cargo WARNING Overloading the vehicle or carrying or towing cargo improperly can result in loss of control of the vehicle. When operating over the rack sides. When handling off-centered loads that may be centered, securely fasten the load and operate with a loaded vehicle. When determining the weight you are adding to...

Owners Manual
Page 47
... the maximum capacities when towing. Phoenix 200 Quadricycle Maximum Towed Load (Level Ground) 136 kg Maximum Vertical Hitch Weight 13.6 kg 45 Load cargo as low as possible. Operate with a maximum tongue weight of the vehicle. Operating a Quadricycle/trailer combination on the rear rack. Slow down. Towing Towing is prohibited. Do not tow any trailer on the vehicle warning labels. When operating over rough or hilly terrain, reduce cargo and drive slowly...
... the maximum capacities when towing. Phoenix 200 Quadricycle Maximum Towed Load (Level Ground) 136 kg Maximum Vertical Hitch Weight 13.6 kg 45 Load cargo as low as possible. Operate with a maximum tongue weight of the vehicle. Operating a Quadricycle/trailer combination on the rear rack. Slow down. Towing Towing is prohibited. Do not tow any trailer on the vehicle warning labels. When operating over rough or hilly terrain, reduce cargo and drive slowly...
Owners Manual
Page 51
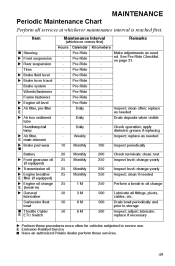
.... E Emission-Related Service Q Have an authorized Polaris dealer perform these procedures more often for vehicles subjected to storage Inspect; X Front suspension X Rear suspension Tires X Brake fluid level X Brake lever travel Brake system Wheels/fasteners Frame fasteners X Engine oil level X Air filter, pre-filter E X Air box sediment tube Headlamp/tail lamp X Air filter, E main element X Brake pad wear Q Inspect; clean if needed Perform a break-in ) X General lubrication Carburetor float bowl Q Throttle Cable/ E ETC Switch X Perform these services. 49 adjust; lubricate...
.... E Emission-Related Service Q Have an authorized Polaris dealer perform these procedures more often for vehicles subjected to storage Inspect; X Front suspension X Rear suspension Tires X Brake fluid level X Brake lever travel Brake system Wheels/fasteners Frame fasteners X Engine oil level X Air filter, pre-filter E X Air box sediment tube Headlamp/tail lamp X Air filter, E main element X Brake pad wear Q Inspect; clean if needed Perform a break-in ) X General lubrication Carburetor float bowl Q Throttle Cable/ E ETC Switch X Perform these services. 49 adjust; lubricate...

Owners Manual
Page 52
... air intake ducts/flange Drive belt Shift linkage Q Steering X Front suspension X Rear suspension X Engine oil change E X Oil filter change Inspect; replace if necessary Inspect duct for leaks at 25 hours Replace with oil change E E E Q Valve clearance Q Fuel system/filter X Engine mounts Exhaust muffler/ pipe E E Q Spark plug Q Ignition Timing 100 100 100 100 100 12 M 12 M 12 M 12 M 12 M 1000 1000 1000 1000 1000 X Wiring Q Clutches (drive and driven) bearings 100 100 200 12 M 12 M 24 M - 1000 1000 2000 Q Front wheel Q Brake fluid E Idle speed Q Toe adjustment Headlight...
... air intake ducts/flange Drive belt Shift linkage Q Steering X Front suspension X Rear suspension X Engine oil change E X Oil filter change Inspect; replace if necessary Inspect duct for leaks at 25 hours Replace with oil change E E E Q Valve clearance Q Fuel system/filter X Engine mounts Exhaust muffler/ pipe E E Q Spark plug Q Ignition Timing 100 100 100 100 100 12 M 12 M 12 M 12 M 12 M 1000 1000 1000 1000 1000 X Wiring Q Clutches (drive and driven) bearings 100 100 200 12 M 12 M 24 M - 1000 1000 2000 Q Front wheel Q Brake fluid E Idle speed Q Toe adjustment Headlight...
Owners Manual
Page 65
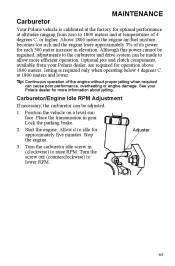
... minutes. Start the engine. Turn the carburetor idle screw in gear. or higher. Carburetor/Engine Idle RPM Adjustment If necessary, the carburetor can cause poor performance, overheating or engine damage. Although this power cannot be regained, adjustments to the carburetor and drive system can be adjusted. 1. at altitudes ranging from your Polaris dealer for optimal performance at 1800 meters and lower. Place the transmission in (clockwise...
... minutes. Start the engine. Turn the carburetor idle screw in gear. or higher. Carburetor/Engine Idle RPM Adjustment If necessary, the carburetor can cause poor performance, overheating or engine damage. Although this power cannot be regained, adjustments to the carburetor and drive system can be adjusted. 1. at altitudes ranging from your Polaris dealer for optimal performance at 1800 meters and lower. Place the transmission in (clockwise...

Owners Manual
Page 68
Carefully remove the jackstands. Lock the parking brake. 2. Loosen the wheel nuts slightly. 3. Place the wheel on a level surface. Wheel Installation 1. 2. 3. 4. Install the wheel nuts finger tight. Position the vehicle on the wheel hub. Safely place jackstands under the vehicle. 4. MAINTENANCE Tires Wheel Removal 1. Torque the wheel nuts to 37 Nm. 66 Remove the wheel nuts. Place the transmission in gear. Remove the wheel.
Carefully remove the jackstands. Lock the parking brake. 2. Loosen the wheel nuts slightly. 3. Place the wheel on a level surface. Wheel Installation 1. 2. 3. 4. Install the wheel nuts finger tight. Position the vehicle on the wheel hub. Safely place jackstands under the vehicle. 4. MAINTENANCE Tires Wheel Removal 1. Torque the wheel nuts to 37 Nm. 66 Remove the wheel nuts. Place the transmission in gear. Remove the wheel.

Owners Manual
Page 72
.... MAINTENANCE Lights Poor lighting can result in reduced visibility when driving. Headlamp Replacement To access the assembly from the back of the headCover light. 2. Rotate the socket counterclockwise and pull it away from the vehicle. Taillight/Brake Light Lamp Replacement 1. 2. 3. 4. 5. 6. Remove the taillight lens cover mounting screws. Always make sure lights are adjusted properly for proper operation. Remove the lens cover. Remove the headlight assembly from the headlight assembly...
.... MAINTENANCE Lights Poor lighting can result in reduced visibility when driving. Headlamp Replacement To access the assembly from the back of the headCover light. 2. Rotate the socket counterclockwise and pull it away from the vehicle. Taillight/Brake Light Lamp Replacement 1. 2. 3. 4. 5. 6. Remove the taillight lens cover mounting screws. Always make sure lights are adjusted properly for proper operation. Remove the lens cover. Remove the headlight assembly from the headlight assembly...

Owners Manual
Page 88
SPECIFICATIONS Phoenix 200 Quadricycle Maximum Weight Capacity Dry Weight Fuel Capacity Engine Oil Capacity Transmission Oil Rear Gearcase Oil Rear Rack Capacity Hitch Tongue Weight Capacity Hitch Towing Weight Capacity Overall Length Overall Width Overall Height Seat Height Wheelbase Ground Clearance Minimum Turning Radius Engine Type Lubrication Engine Cooling Displacement Bore x Stroke Alternator Output Compression Ratio Carburetor Pilot Jet Main Jet Air Screw Jet Needle Ignition System Ignition Timing Spark Plug / Gap Driving System Type Shift Type 129 kg 179 kg 9.5 liters 1200 ml 550 ml ...
SPECIFICATIONS Phoenix 200 Quadricycle Maximum Weight Capacity Dry Weight Fuel Capacity Engine Oil Capacity Transmission Oil Rear Gearcase Oil Rear Rack Capacity Hitch Tongue Weight Capacity Hitch Towing Weight Capacity Overall Length Overall Width Overall Height Seat Height Wheelbase Ground Clearance Minimum Turning Radius Engine Type Lubrication Engine Cooling Displacement Bore x Stroke Alternator Output Compression Ratio Carburetor Pilot Jet Main Jet Air Screw Jet Needle Ignition System Ignition Timing Spark Plug / Gap Driving System Type Shift Type 129 kg 179 kg 9.5 liters 1200 ml 550 ml ...

Owners Manual
Page 89
SPECIFICATIONS Phoenix 200 Quadricycle Drive Ratio, Front Tires, Front Tires, Rear Front Suspension Rear Suspension Shock Adjustment Brakes, Rear (Handlebar) Brake, Foot Brake, Parking Headlight Taillight Brake Light Battery Electric Start Speedometer Neutral Indicator Reverse Indicator Tool Kit DC Plug-In (rear) Windshield N/A 21x7-10 / 27.6 kPa 20x10-9 / 27.6 kPa Dual A-Arm w/17.8 cm travel Mono-Shock Swing Arm w/16.5 cm travel CAM Mechanical Drum Hydraulic, All Wheel Mechanical, Rear Front Cover, Hi/Lo 35W Halogen 12V 5W 12V 21W 12V 12 AH Standard Standard...
SPECIFICATIONS Phoenix 200 Quadricycle Drive Ratio, Front Tires, Front Tires, Rear Front Suspension Rear Suspension Shock Adjustment Brakes, Rear (Handlebar) Brake, Foot Brake, Parking Headlight Taillight Brake Light Battery Electric Start Speedometer Neutral Indicator Reverse Indicator Tool Kit DC Plug-In (rear) Windshield N/A 21x7-10 / 27.6 kPa 20x10-9 / 27.6 kPa Dual A-Arm w/17.8 cm travel Mono-Shock Swing Arm w/16.5 cm travel CAM Mechanical Drum Hydraulic, All Wheel Mechanical, Rear Front Cover, Hi/Lo 35W Halogen 12V 5W 12V 21W 12V 12 AH Standard Standard...

Owners Manual
Page 90
... sale, the Warranty Registration Form must be the warranty entitlement. This warranty does not cover accidental damage, normal wear and tear, abuse or improper handling. Warranty does not apply to parts exposed to the following items Wheels and tires Suspension components Brake components Seat components Clutches and components Steering components Batteries Light bulbs/Sealed beam lamps Finished and unfinished surfaces Carburetor/Throttle body components Engine components Drive belts Hydraulic components Circuit breakers/Fuses...
... sale, the Warranty Registration Form must be the warranty entitlement. This warranty does not cover accidental damage, normal wear and tear, abuse or improper handling. Warranty does not apply to parts exposed to the following items Wheels and tires Suspension components Brake components Seat components Clutches and components Steering components Batteries Light bulbs/Sealed beam lamps Finished and unfinished surfaces Carburetor/Throttle body components Engine components Drive belts Hydraulic components Circuit breakers/Fuses...
Owners Manual
Page 91
... damage/repair • Loss of aftermarket components resulting in effect. 89 POLARIS FURTHER DISCLAIMS ALL EXPRESS WARRANTIES NOT STATED IN THIS WARRANTY. HOW TO OBTAIN WARRANTY SERVICE If your dealer to resolve any product which vary from warranty coverage in the event of a warranty claim: • Spark Plugs • Mileage • Coolants • Filters • Rentals/Loss of product use of vacation/personal time • Towing...
... damage/repair • Loss of aftermarket components resulting in effect. 89 POLARIS FURTHER DISCLAIMS ALL EXPRESS WARRANTIES NOT STATED IN THIS WARRANTY. HOW TO OBTAIN WARRANTY SERVICE If your dealer to resolve any product which vary from warranty coverage in the event of a warranty claim: • Spark Plugs • Mileage • Coolants • Filters • Rentals/Loss of product use of vacation/personal time • Towing...

Owners Manual
Page 94
... Boots ...9 Brake All-Wheel Brake ...25 Foot Brake ...25 Parking Brake ...25 Rear Brake Lever...24 Brake Check...58 Brake Fluid ...57 Brake Fluid (Foot Brake)...58 Brake Freeplay...59 Brake Lever Travel ...59 Brake Light ...70 Brake Maintenance ...57-59 Break-In Period ...29 E Engine Break-In...29 Engine Fogging ...80 Engine Idle RPM Adjustment ...63 Engine Oil ...52 Equipment Modifications ...7 Exhaust Emission Control System . . 47 Eye Protection ...9 F Fuel Safety...11 Fuel Tank Cap ...27 Fuel Valve ...27 G Gasoline Handling ...11 Gear Selector ...28 Gearcase Oil ...56 Gloves...
... Boots ...9 Brake All-Wheel Brake ...25 Foot Brake ...25 Parking Brake ...25 Rear Brake Lever...24 Brake Check...58 Brake Fluid ...57 Brake Fluid (Foot Brake)...58 Brake Freeplay...59 Brake Lever Travel ...59 Brake Light ...70 Brake Maintenance ...57-59 Break-In Period ...29 E Engine Break-In...29 Engine Fogging ...80 Engine Idle RPM Adjustment ...63 Engine Oil ...52 Equipment Modifications ...7 Exhaust Emission Control System . . 47 Eye Protection ...9 F Fuel Safety...11 Fuel Tank Cap ...27 Fuel Valve ...27 G Gasoline Handling ...11 Gear Selector ...28 Gearcase Oil ...56 Gloves...

Owners Manual
Page 95
... Panel Removal ...61 Sidehilling...38 Signal Words ...4 Spark Plugs ...68-69 Spring Adjustments, Rear ...61 Start Switch...22 Starting the Engine ...32-33 Starting, Kick-Start Lever...28 Steering Assembly ...61 Storage ...77-80 Switches ...22-24 Hazard Warning Switch ...23 Horn Switch ...23 Light Switch ...23 Main Key Switch ...22 Start Switch...22 Turn Signal Switch ...23 M Maintenance Chart ...48-50 Maintenance Chart Key ...48 Mirrors ...26 Modifications ...7 N Noise Emission Control System ...47 O Oil Engine ...52 Rear Gearcase ...56 Transmission ...55 Oil and Filter Change ...53-54 Oil...
... Panel Removal ...61 Sidehilling...38 Signal Words ...4 Spark Plugs ...68-69 Spring Adjustments, Rear ...61 Start Switch...22 Starting the Engine ...32-33 Starting, Kick-Start Lever...28 Steering Assembly ...61 Storage ...77-80 Switches ...22-24 Hazard Warning Switch ...23 Horn Switch ...23 Light Switch ...23 Main Key Switch ...22 Start Switch...22 Turn Signal Switch ...23 M Maintenance Chart ...48-50 Maintenance Chart Key ...48 Mirrors ...26 Modifications ...7 N Noise Emission Control System ...47 O Oil Engine ...52 Rear Gearcase ...56 Transmission ...55 Oil and Filter Change ...53-54 Oil...