
Owners Manual
Page 37
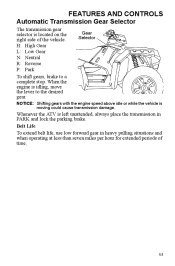
... extend belt life, use low forward gear in PARK and lock the parking brake. Gear Selector NOTICE: Shifting gears with the engine speed above idle or while the vehicle is left unattended, always place the transmission in heavy pulling situations and when operating at less than seven miles per hour for extended periods of the vehicle. When the engine is idling, move the lever to a complete stop. FEATURES AND CONTROLS Automatic Transmission Gear Selector The transmission gear...
... extend belt life, use low forward gear in PARK and lock the parking brake. Gear Selector NOTICE: Shifting gears with the engine speed above idle or while the vehicle is left unattended, always place the transmission in heavy pulling situations and when operating at less than seven miles per hour for extended periods of the vehicle. When the engine is idling, move the lever to a complete stop. FEATURES AND CONTROLS Automatic Transmission Gear Selector The transmission gear...
Owners Manual
Page 43
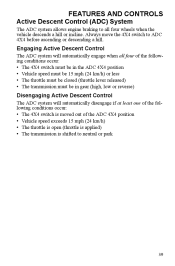
... allows engine braking to ADC 4X4 before ascending or descending a hill. Always move the 4X4 switch to all four of the following conditions occur: • The 4X4 switch must be in the ADC 4X4 position • Vehicle speed must be 15 mph (24 km/h) or less • The throttle must be closed (throttle lever released) • The transmission must be in gear...
... allows engine braking to ADC 4X4 before ascending or descending a hill. Always move the 4X4 switch to all four of the following conditions occur: • The 4X4 switch must be in the ADC 4X4 position • Vehicle speed must be 15 mph (24 km/h) or less • The throttle must be closed (throttle lever released) • The transmission must be in gear...

Owners Manual
Page 46
... RPM too low to clear the warning. 10. EPS Warning Indicator - See your dealer for service. 42 Speed Display - The segments of the fuel gauge show the level of fuel in the fuel sensor circuit. All segments including the fuel icon will automatically reduce engine power. 8. The clock displays time in a 12-hour or 24-hour format. Service Indicator - The vehicle should be brought to the ON...
... RPM too low to clear the warning. 10. EPS Warning Indicator - See your dealer for service. 42 Speed Display - The segments of the fuel gauge show the level of fuel in the fuel sensor circuit. All segments including the fuel icon will automatically reduce engine power. 8. The clock displays time in a 12-hour or 24-hour format. Service Indicator - The vehicle should be brought to the ON...

Owners Manual
Page 52
... 105 102 102 636 523 523 523 651 651 1268 1268 1347 1347 1071 1071 FMI 3 4 3 4 16 0 3 4 3 4 8 4 3 2 5 3 5 3 5 3 5 3 Intake Air Temperature Sensor Manifold Absolute Pressure Sensor Crankshaft Position Sensor Gear Sensor Signal Injector 1 (MAG) Ignition Coil Primary Driver 1 (MAG) Fuel Pump Driver Circuit Fan Relay Driver Circuit 48 Short-to-Battery: The wire leading from the item listed in the chart are shorted together, or the item has shorted internally. Shorted...
... 105 102 102 636 523 523 523 651 651 1268 1268 1347 1347 1071 1071 FMI 3 4 3 4 16 0 3 4 3 4 8 4 3 2 5 3 5 3 5 3 5 3 Intake Air Temperature Sensor Manifold Absolute Pressure Sensor Crankshaft Position Sensor Gear Sensor Signal Injector 1 (MAG) Ignition Coil Primary Driver 1 (MAG) Fuel Pump Driver Circuit Fan Relay Driver Circuit 48 Short-to-Battery: The wire leading from the item listed in the chart are shorted together, or the item has shorted internally. Shorted...

Owners Manual
Page 53
... CONTROLS Instrument Cluster Rider Information Center SPORTSMAN 550 Touring EPS Diagnostic Codes Component Idle Air Control Starter Enable Circuit All Wheel Drive Control System Power Throttle Safety Signal Condition Driver Circuit Grounded Shorted Load* Driver Circuit Short to B+ Driver Circuit Short to B+ Voltage Too High Voltage Too low Voltage Too High Voltage Too Low Signal Out of Range Throttle Stuck Driver Circuit Short to B+ EPS Models Only Current Above Normal or Grounded Steering Excessive Current Error Current Above Normal or Grounded Steering Torque Sensor...
... CONTROLS Instrument Cluster Rider Information Center SPORTSMAN 550 Touring EPS Diagnostic Codes Component Idle Air Control Starter Enable Circuit All Wheel Drive Control System Power Throttle Safety Signal Condition Driver Circuit Grounded Shorted Load* Driver Circuit Short to B+ Driver Circuit Short to B+ Voltage Too High Voltage Too low Voltage Too High Voltage Too Low Signal Out of Range Throttle Stuck Driver Circuit Short to B+ EPS Models Only Current Above Normal or Grounded Steering Excessive Current Error Current Above Normal or Grounded Steering Torque Sensor...

Owners Manual
Page 54
... 523 523 651 651 651 652 652 652 1268 1269 1347 1347 1347 1071 1071 1071 634 634 634 634 1321 1321 1321 FMI 3 4 3 4 16 0 3 4 3 4 2 8 2 8 2 4 3 2 5 3 4 5 3 4 3 3 5 3 4 5 3 4 5 3 4 7 5 3 4 Intake Air Temperature Sensor Manifold Absolute Pressure Sensor Crankshaft Position Sensor Vehicle Speed Signal Gear Sensor Signal Injector 1 (MAG) (SDI Part Load) Injector 2 (PTO) (SDI Part Load) Ignition Coil Primary Driver 1 (MAG) Ignition Coil Primary Driver 2 (PTO) Fuel Pump Driver Circuit Fan Relay Driver Circuit Idle Air Control Starter Enable Circuit 50
... 523 523 651 651 651 652 652 652 1268 1269 1347 1347 1347 1071 1071 1071 634 634 634 634 1321 1321 1321 FMI 3 4 3 4 16 0 3 4 3 4 2 8 2 8 2 4 3 2 5 3 4 5 3 4 3 3 5 3 4 5 3 4 5 3 4 7 5 3 4 Intake Air Temperature Sensor Manifold Absolute Pressure Sensor Crankshaft Position Sensor Vehicle Speed Signal Gear Sensor Signal Injector 1 (MAG) (SDI Part Load) Injector 2 (PTO) (SDI Part Load) Ignition Coil Primary Driver 1 (MAG) Ignition Coil Primary Driver 2 (PTO) Fuel Pump Driver Circuit Fan Relay Driver Circuit Idle Air Control Starter Enable Circuit 50

Owners Manual
Page 55
... EPAS CAN Comm. FEATURES AND CONTROLS Instrument Cluster Rider Information Center SPORTSMAN 850 Touring EPS Diagnostic Codes Component Chassis Relay Condition Driver Circuit Open/Grounded Driver Circuit Short to B+ Driver Circuit Grounded Driver Circuit Open/Grounded Driver Circuit Short to B+ Driver Circuit Grounded Voltage Too High Voltage Too low Voltage Too High Voltage Too Low Signal Out of Range Throttle Stuck Driver Circuit Open/Grounded Driver Circuit Short to B+ Driver Circuit Grounded Speed Too High Speed Too Low SPN 520208...
... EPAS CAN Comm. FEATURES AND CONTROLS Instrument Cluster Rider Information Center SPORTSMAN 850 Touring EPS Diagnostic Codes Component Chassis Relay Condition Driver Circuit Open/Grounded Driver Circuit Short to B+ Driver Circuit Grounded Driver Circuit Open/Grounded Driver Circuit Short to B+ Driver Circuit Grounded Voltage Too High Voltage Too low Voltage Too High Voltage Too Low Signal Out of Range Throttle Stuck Driver Circuit Open/Grounded Driver Circuit Short to B+ Driver Circuit Grounded Speed Too High Speed Too Low SPN 520208...

Owners Manual
Page 57
.... See page 81. Do not operate at slower speeds during the break-in the clutches and belt by operating at sustained idle. 5. Pull only light loads. Add oil if necessary to familiarize yourself with gasoline. Fill the fuel tank with vehicle operation and handling. 4. Pull only light loads. 7. Perform regular checks on fluid levels, controls and areas outlined on the dipstick. Vary the throttle positions.
.... See page 81. Do not operate at slower speeds during the break-in the clutches and belt by operating at sustained idle. 5. Pull only light loads. Add oil if necessary to familiarize yourself with gasoline. Fill the fuel tank with vehicle operation and handling. 4. Pull only light loads. 7. Perform regular checks on fluid levels, controls and areas outlined on the dipstick. Vary the throttle positions.

Owners Manual
Page 77
... weight to extend belt life. 6. Slow down. 5. Always operate the vehicle with cargo. 4. OPERATION Hauling Cargo Never exceed the weight capacities specified for your ATV on the rear rack) and mounted as low as possible. 2. Cargo weight should be affected. 73 Balance, handling, and control may be evenly distributed (1/3 on the front rack and 2/3 on warning 2/3 labels and in the specifications sec1/3 tion of this manual...
... weight to extend belt life. 6. Slow down. 5. Always operate the vehicle with cargo. 4. OPERATION Hauling Cargo Never exceed the weight capacities specified for your ATV on the rear rack) and mounted as low as possible. 2. Cargo weight should be affected. 73 Balance, handling, and control may be evenly distributed (1/3 on the front rack and 2/3 on warning 2/3 labels and in the specifications sec1/3 tion of this manual...

Owners Manual
Page 78
... rear rack capacity. • The total load (operator, passenger, accessories, cargo and weight on inclines. 550 EFI Maximum Towed Load (Level Ground) Maximum Vertical Hitch Weight 1500 lbs. (680 kg) 150 lbs. (68 kg) 850 EFI 1500 lbs. (680 kg) 150 lbs. (68 kg) 74 Remove the hitch from the ATV when not towing a trailer. OPERATION Hauling Cargo Towing Loads Always attach a towed load to the vehicle...
... rear rack capacity. • The total load (operator, passenger, accessories, cargo and weight on inclines. 550 EFI Maximum Towed Load (Level Ground) Maximum Vertical Hitch Weight 1500 lbs. (680 kg) 150 lbs. (68 kg) 850 EFI 1500 lbs. (680 kg) 150 lbs. (68 kg) 74 Remove the hitch from the ATV when not towing a trailer. OPERATION Hauling Cargo Towing Loads Always attach a towed load to the vehicle...

Owners Manual
Page 83
... 2000 (3200) Change every two years; replace as needed 100 H 100 H 12 M 12 M X Wiring Q Clutches (drive and driven) bearings 100 H 100 H 200 H 200 H 300 H 1000 H 12 M 12 M 24 M 24 M 36 M - Q Front wheel Q Brake fluid X ADC fluid Q Spark arrestor E Q Valve clearance Q Toe adjustment Headlight aim X Perform these services. 79 replace worn parts 1000 (1600) Inspect; MAINTENANCE Periodic Maintenance Chart Item Maintenance Interval (whichever comes first) Hours Calendar E Q Spark plug Remarks Miles (Km) 1000...
... 2000 (3200) Change every two years; replace as needed 100 H 100 H 12 M 12 M X Wiring Q Clutches (drive and driven) bearings 100 H 100 H 200 H 200 H 300 H 1000 H 12 M 12 M 24 M 24 M 36 M - Q Front wheel Q Brake fluid X ADC fluid Q Spark arrestor E Q Valve clearance Q Toe adjustment Headlight aim X Perform these services. 79 replace worn parts 1000 (1600) Inspect; MAINTENANCE Periodic Maintenance Chart Item Maintenance Interval (whichever comes first) Hours Calendar E Q Spark plug Remarks Miles (Km) 1000...

Owners Manual
Page 104
... all nuts are torqued to come off during operation, which could result in PARK. 2. lbs. (102 Nm) Cast Aluminum Steel 45 ft. lbs. (61 Nm) 100 Wheel Type Aluminum Steel Nut Type Lug Nut Lug Nut Nut Torque 75 ft. MAINTENANCE Tires Wheel Installation 1. Loose nuts could cause a tire to specification. 75 ft. Lock the parking brake. 3. WARNING! lbs. (102 Nm) 45 ft.
... all nuts are torqued to come off during operation, which could result in PARK. 2. lbs. (102 Nm) Cast Aluminum Steel 45 ft. lbs. (61 Nm) 100 Wheel Type Aluminum Steel Nut Type Lug Nut Lug Nut Nut Torque 75 ft. MAINTENANCE Tires Wheel Installation 1. Loose nuts could cause a tire to specification. 75 ft. Lock the parking brake. 3. WARNING! lbs. (102 Nm) 45 ft.

Owners Manual
Page 107
... headlights frequently and replace burned out headlamps promptly. Always make sure lights are adjusted properly for best visibility. CAUTION! Install the new lamp. Headlight Lamp Replacement When servicing a halogen lamp, avoid touching the lamp with denatured alcohol. 1. Remove the five (5) headlight pod screws. 2. Lift the pod cover and disconnect the speedometer harnesses from the wiring harness. Unplug the headlamp from the speedometer. Turn...
... headlights frequently and replace burned out headlamps promptly. Always make sure lights are adjusted properly for best visibility. CAUTION! Install the new lamp. Headlight Lamp Replacement When servicing a halogen lamp, avoid touching the lamp with denatured alcohol. 1. Remove the five (5) headlight pod screws. 2. Lift the pod cover and disconnect the speedometer harnesses from the wiring harness. Unplug the headlamp from the speedometer. Turn...

Owners Manual
Page 110
Reverse the steps to remove the o-rings from the locking tabs. 6. MAINTENANCE Lights Headlight Housing Replacement 1. Carefully pull the assembly up to release it from the headlight mounting tabs. 5. Lift the pod cover and disconnect the speedometer harnesses from the wiring harness. 4. Pull the headlight housing up and out of the pod. 7. Remove the five (5) headlight pod screws. 2. Unplug the headlamp from the speedometer. 3. Use a small screwdriver to install the new housing and reassemble the pod. 106
Reverse the steps to remove the o-rings from the locking tabs. 6. MAINTENANCE Lights Headlight Housing Replacement 1. Carefully pull the assembly up to release it from the headlight mounting tabs. 5. Lift the pod cover and disconnect the speedometer harnesses from the wiring harness. 4. Pull the headlight housing up and out of the pod. 7. Remove the five (5) headlight pod screws. 2. Unplug the headlamp from the speedometer. 3. Use a small screwdriver to install the new housing and reassemble the pod. 106

Owners Manual
Page 111
... of the headlight harness counter-clockwise and pull the harness assembly away from the back of the light assembly. 2. Reinstall the harness assembly into the headlight assembly. 4. Test the light for proper operation. Harness Taillight/Brakelight Lamp Replacement Connector Lamp 107 Turn the headlight harness clockwise to remove it. 3. Remove the harness connector from the headlight assembly. 2. MAINTENANCE Lights Lower Headlamp Replacement 1. Install the new lamp. 4. Reinstall the harness connector. 5. Remove the headlamp and...
... of the headlight harness counter-clockwise and pull the harness assembly away from the back of the light assembly. 2. Reinstall the harness assembly into the headlight assembly. 4. Test the light for proper operation. Harness Taillight/Brakelight Lamp Replacement Connector Lamp 107 Turn the headlight harness clockwise to remove it. 3. Remove the harness connector from the headlight assembly. 2. MAINTENANCE Lights Lower Headlamp Replacement 1. Install the new lamp. 4. Reinstall the harness connector. 5. Remove the headlamp and...

Owners Manual
Page 132
...; ADC fluid (ADC models) (change every two years) • Rear gearcase • Transmission • Brake fluid (change every two years and any time the fluid looks dark or contaminated) • Coolant (test strength/fill) Fog the Engine 1. Reinstall the spark plug. Remove the spark plug and add 2-3 tablespoons of gasoline. 128 Torque to the inside of oil. 3. To access the plug hole, use a section of fresh oil. 6. Add or change fluids as...
...; ADC fluid (ADC models) (change every two years) • Rear gearcase • Transmission • Brake fluid (change every two years and any time the fluid looks dark or contaminated) • Coolant (test strength/fill) Fog the Engine 1. Reinstall the spark plug. Remove the spark plug and add 2-3 tablespoons of gasoline. 128 Torque to the inside of oil. 3. To access the plug hole, use a section of fresh oil. 6. Add or change fluids as...
Owners Manual
Page 140
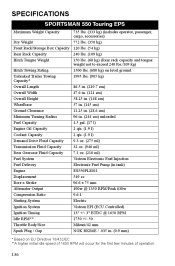
...) Transmission Fluid Capacity 32 oz. (946 ml) Rear Gearcase Fluid Capacity 7.1 oz. (210 ml) Fuel System Visteon Electronic Fuel Injection Fuel Delivery Electronic Fuel Pump (in tank) Engine ES550PLE011 Displacement 549 cc Bore x Stroke 96.6 x 75 mm Alternator Output 490w @ 1350 RPM/Peak 630w Compression Ratio 9.6:1 Starting System Electric Ignition System Visteon EFI (ECU Controlled) Ignition Timing 13° +/- 3° BTDC @ 1650 RPM Idle RPM** 1750 +/- 50 Throttle Body/Size Mikuni/42 mm Spark Plug / Gap...
...) Transmission Fluid Capacity 32 oz. (946 ml) Rear Gearcase Fluid Capacity 7.1 oz. (210 ml) Fuel System Visteon Electronic Fuel Injection Fuel Delivery Electronic Fuel Pump (in tank) Engine ES550PLE011 Displacement 549 cc Bore x Stroke 96.6 x 75 mm Alternator Output 490w @ 1350 RPM/Peak 630w Compression Ratio 9.6:1 Starting System Electric Ignition System Visteon EFI (ECU Controlled) Ignition Timing 13° +/- 3° BTDC @ 1650 RPM Idle RPM** 1750 +/- 50 Throttle Body/Size Mikuni/42 mm Spark Plug / Gap...

Owners Manual
Page 142
...) Rear Gearcase Fluid Capacity 7.1 oz. (210 ml) Fuel System Bosch Multi-Port Sequential Electronic Fuel Injection Fuel Delivery Electronic Fuel Pump (in tank) Engine EH085OLE013 Displacement 850 cc Bore x Stroke 87 x 71.5 mm Alternator Output 475w @ 1200 RPM/Peak 575w Compression Ratio 11.0:1 Starting System Electric Ignition System Bosch EFI (ECU Controlled) Ignition Timing 6° +/- 5° BTDC @ 1200 RPM Idle RPM 1200 +/- 50 Throttle Body/Size Mikuni Dual Bore/40 mm Spark Plug / Gap...
...) Rear Gearcase Fluid Capacity 7.1 oz. (210 ml) Fuel System Bosch Multi-Port Sequential Electronic Fuel Injection Fuel Delivery Electronic Fuel Pump (in tank) Engine EH085OLE013 Displacement 850 cc Bore x Stroke 87 x 71.5 mm Alternator Output 475w @ 1200 RPM/Peak 575w Compression Ratio 11.0:1 Starting System Electric Ignition System Bosch EFI (ECU Controlled) Ignition Timing 6° +/- 5° BTDC @ 1200 RPM Idle RPM 1200 +/- 50 Throttle Body/Size Mikuni Dual Bore/40 mm Spark Plug / Gap...

Owners Manual
Page 151
... vehicle's regulated emissions. Polaris warrants that at the time it is first purchased, this emissions-certified vehicle is to the Polaris standard limited warranty for your vehicle. Polaris Industries Inc. For exhaust emissions, emission-related components include any engine parts related to the evaporative emission control system. 147 The warranty period for evaporative emissions: • Fuel Tank • Vacuum Control Diaphragms* • Fuel Cap • Control Cables* • Fuel Line • Control...
... vehicle's regulated emissions. Polaris warrants that at the time it is first purchased, this emissions-certified vehicle is to the Polaris standard limited warranty for your vehicle. Polaris Industries Inc. For exhaust emissions, emission-related components include any engine parts related to the evaporative emission control system. 147 The warranty period for evaporative emissions: • Fuel Tank • Vacuum Control Diaphragms* • Fuel Cap • Control Cables* • Fuel Line • Control...

Owners Manual
Page 158
... Signal Words ...4 Spark Arrestor ...111 Spark Plug Inspection ...108-109 Spark Plug Recommendations...108 Spark Plug Torque Specification . . 108 Spark Plugs ...108-109 Specifications...136-139 Spring Adjustment, Rear Shock . . 121 Standard/Metric Display ...44 Starting the Engine ...57 Steering Assembly ...90 Storage ...124-129 Storage Box, Front...36 Storage Tips ...127-129 Suspension, Passenger Seat ...96 Switches 4X4 Switch ...26, 37 Engine Stop Switch ...27 Headlight Switch ...27 Main Key Switch ...27 Mode/Reverse Override Switch 26 T Taillight Lamp Replacement ...107 Throttle Body...
... Signal Words ...4 Spark Arrestor ...111 Spark Plug Inspection ...108-109 Spark Plug Recommendations...108 Spark Plug Torque Specification . . 108 Spark Plugs ...108-109 Specifications...136-139 Spring Adjustment, Rear Shock . . 121 Standard/Metric Display ...44 Starting the Engine ...57 Steering Assembly ...90 Storage ...124-129 Storage Box, Front...36 Storage Tips ...127-129 Suspension, Passenger Seat ...96 Switches 4X4 Switch ...26, 37 Engine Stop Switch ...27 Headlight Switch ...27 Main Key Switch ...27 Mode/Reverse Override Switch 26 T Taillight Lamp Replacement ...107 Throttle Body...