
Owners Manual
Page 19
... your motorcycle can reduce stability and handling and could cause loss of this manual for location on the motorcycle frame for model-specific information. When determining the weight you do not exceed the maximum load capacity, include the following: • operator body weight • passenger body weight • weight of your motorcycle's GVWR and wet weight. This capacity is determined by calculating the difference...
... your motorcycle can reduce stability and handling and could cause loss of this manual for location on the motorcycle frame for model-specific information. When determining the weight you do not exceed the maximum load capacity, include the following: • operator body weight • passenger body weight • weight of your motorcycle's GVWR and wet weight. This capacity is determined by calculating the difference...

Owners Manual
Page 22
... leak from the fuel tank and result in a fire hazard or damage to avoid the brake line, exhaust and drive belt. • Reposition the turn signals before operating the motorcycle. Loosen the front turn signal upward. Loosen screw. Kingpin Vegas Restrain with tiedowns around the fork tubes above the lower triple clamp. Slide turn signal mounts and slide them upward. Do not tow the motorcycle with another vehicle, as towing...
... leak from the fuel tank and result in a fire hazard or damage to avoid the brake line, exhaust and drive belt. • Reposition the turn signals before operating the motorcycle. Loosen the front turn signal upward. Loosen screw. Kingpin Vegas Restrain with tiedowns around the fork tubes above the lower triple clamp. Slide turn signal mounts and slide them upward. Do not tow the motorcycle with another vehicle, as towing...

Owners Manual
Page 23
... suspension or steering travel or your normal riding position. - Obscure lights or reflectors. • Do not install bulky or large accessories that can reduce stability, causing loss of control. Follow the instructions for your model, especially a windshield, backrest or luggage rack. Displace you from your ability to operate controls. - An electrical failure could result and cause hazardous loss of engine power or lights...
... suspension or steering travel or your normal riding position. - Obscure lights or reflectors. • Do not install bulky or large accessories that can reduce stability, causing loss of control. Follow the instructions for your model, especially a windshield, backrest or luggage rack. Displace you from your ability to operate controls. - An electrical failure could result and cause hazardous loss of engine power or lights...

Owners Manual
Page 25
... to the proper torque. Safety Maintenance WARNING Safety Failure to perform safety maintenance as recommended can result in difficult handling and loss of repair. Always perform the safety maintenance procedures as outlined in the periodic maintenance table beginning on page 72. • Always maintain proper tire pressure, tread condition and wheel and tire balance. Use only approved replacement tires. • Always ensure proper steering head bearing adjustment. Perform maintenance and repairs promptly as recommended. See...
... to the proper torque. Safety Maintenance WARNING Safety Failure to perform safety maintenance as recommended can result in difficult handling and loss of repair. Always perform the safety maintenance procedures as outlined in the periodic maintenance table beginning on page 72. • Always maintain proper tire pressure, tread condition and wheel and tire balance. Use only approved replacement tires. • Always ensure proper steering head bearing adjustment. Perform maintenance and repairs promptly as recommended. See...

Owners Manual
Page 34
Off Position In the OFF position, all electrical switches and buttons. Turn the ignition switch to the ignition, the lighting system and all electrical circuits are inactive and the ignition key can be removed. Park On Off 32 Before starting the engine, read the instructions for starting the engine. See page 62. Instruments, Features and Controls Ignition Switch The ignition key operates the ignition switch and parking lights. The ignition switch provides electrical power to the OFF position and remove the ignition key when leaving the motorcycle unattended.
Off Position In the OFF position, all electrical switches and buttons. Turn the ignition switch to the ignition, the lighting system and all electrical circuits are inactive and the ignition key can be removed. Park On Off 32 Before starting the engine, read the instructions for starting the engine. See page 62. Instruments, Features and Controls Ignition Switch The ignition key operates the ignition switch and parking lights. The ignition switch provides electrical power to the OFF position and remove the ignition key when leaving the motorcycle unattended.

Owners Manual
Page 35
... ignition key can be removed. Park Position (P) In the PARK position, the taillight, indicator lights, and license plate light illuminate. Ignition Switch Instruments, Features and Controls On Position In the ON position, all electrical circuits are energized and the ignition key cannot be removed. You must be in the RUN position to start the engine or activate the emergency flashers, turn signals and other electrical features. The engine stop/run switch must push the ignition key...
... ignition key can be removed. Park Position (P) In the PARK position, the taillight, indicator lights, and license plate light illuminate. Ignition Switch Instruments, Features and Controls On Position In the ON position, all electrical circuits are energized and the ignition key cannot be removed. You must be in the RUN position to start the engine or activate the emergency flashers, turn signals and other electrical features. The engine stop/run switch must push the ignition key...
Owners Manual
Page 42
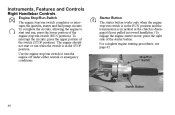
..., press the upper portion of the engine stop/run switch (RUN position). Instruments, Features and Controls Right Handlebar Controls Engine Stop/Run Switch The engine stop/run switch to start or run switch is in the RUN position and the transmission is in neutral or the clutch is in toward handlebar.) To engage the engine starter motor, press the right side of the starter button. Use the engine stop /run when the switch is disengaged (lever pulled in...
..., press the upper portion of the engine stop/run switch (RUN position). Instruments, Features and Controls Right Handlebar Controls Engine Stop/Run Switch The engine stop/run switch to start or run switch is in the RUN position and the transmission is in neutral or the clutch is in toward handlebar.) To engage the engine starter motor, press the right side of the starter button. Use the engine stop /run when the switch is disengaged (lever pulled in...

Owners Manual
Page 45
... fuel cap. Lift the key slot cover on the cap, turn the key counterclockwise to engage the latch. 4. Insert the key into the cap. 2. Instruments, Features and Controls Key Slot Cover 43 Turn the key clockwise while pushing downward lightly. Fuel Cap Use the ignition key to open and close the key slot cover. While maintaining downward pressure on the fuel cap and insert the key. 2. Open the fuel cap 1. Turn the key clockwise and press downward on the cap. 3. Prime the fuel pump if the tank...
... fuel cap. Lift the key slot cover on the cap, turn the key counterclockwise to engage the latch. 4. Insert the key into the cap. 2. Instruments, Features and Controls Key Slot Cover 43 Turn the key clockwise while pushing downward lightly. Fuel Cap Use the ignition key to open and close the key slot cover. While maintaining downward pressure on the fuel cap and insert the key. 2. Open the fuel cap 1. Turn the key clockwise and press downward on the cap. 3. Prime the fuel pump if the tank...

Owners Manual
Page 52
... Service Manual or your authorized VICTORY dealer. Resistance at 3/4 inch (19 mm) 50 It should move freely and smoothly, and it . You should return to the hand grip) is adjustable. 1. Pull and hold the lever away from the grip. 2. Lever Reach Adjuster Brake...release it should feel a firm resistance in the lever within the first 3/4 inch (19 mm) of lever travel. To decrease reach distance, turn the adjuster to align a lower number to the indicator mark on the lever. To increase reach distance, turn the adjuster to align a higher number to perform as stated, service the brake...
... Service Manual or your authorized VICTORY dealer. Resistance at 3/4 inch (19 mm) 50 It should move freely and smoothly, and it . You should return to the hand grip) is adjustable. 1. Pull and hold the lever away from the grip. 2. Lever Reach Adjuster Brake...release it should feel a firm resistance in the lever within the first 3/4 inch (19 mm) of lever travel. To decrease reach distance, turn the adjuster to align a lower number to the indicator mark on the lever. To increase reach distance, turn the adjuster to align a higher number to perform as stated, service the brake...

Owners Manual
Page 63
... or spilled gasoline could contact a hot engine or exhaust system and cause a fire, which could result in the fuel tank. To prevent leaks, make sure the fuel filler cap is properly seated and locked. Turn the ignition switch to five times. 61 Repeat steps 3-6 four to the ON position. 3. Priming the Fuel System If the motorcycle runs out of fuel, prime the fuel system before attempting to a level...
... or spilled gasoline could contact a hot engine or exhaust system and cause a fire, which could result in the fuel tank. To prevent leaks, make sure the fuel filler cap is properly seated and locked. Turn the ignition switch to five times. 61 Repeat steps 3-6 four to the ON position. 3. Priming the Fuel System If the motorcycle runs out of fuel, prime the fuel system before attempting to a level...
Owners Manual
Page 66
... pedal with your toe, or depress the rear peg of the pedal with clutch engaged) could result in first gear. If the ignition switch is on, the neutral indicator illuminates when the transmission is in neutral. Start the engine. Pull the clutch lever toward the handlebar. 3. Toe Shift Pedal: Shift to the engine, transmission and drive train. To shift to a lower gear, depress the front pedal with your toe...
... pedal with your toe, or depress the rear peg of the pedal with clutch engaged) could result in first gear. If the ignition switch is on, the neutral indicator illuminates when the transmission is in neutral. Start the engine. Pull the clutch lever toward the handlebar. 3. Toe Shift Pedal: Shift to the engine, transmission and drive train. To shift to a lower gear, depress the front pedal with your toe...

Owners Manual
Page 70
... the Engine Before stopping the engine, bring the motorcycle to neutral or disengage the clutch. Move the ignition switch to the STOP position. 3. WARNING! Move the engine stop /run switch to the OFF position. When fully stopped, shift into the STOP position or when the key is moving could cause loss of rear wheel traction or engine and transmission damage, which could cause loss of control and...
... the Engine Before stopping the engine, bring the motorcycle to neutral or disengage the clutch. Move the ignition switch to the STOP position. 3. WARNING! Move the engine stop /run switch to the OFF position. When fully stopped, shift into the STOP position or when the key is moving could cause loss of rear wheel traction or engine and transmission damage, which could cause loss of control and...

Owners Manual
Page 71
... the motorcycle's weight without sinking into the parking surface. When fully stopped, shift into soft asphalt and the motorcycle may fall. A sidestand can ignite a fire if exposed to flammable materials. Hot engine and exhaust components can cause burns to provide a firm surface. Place the transmission in hot weather, use a sidestand footrest. Stop the engine. 3. Parking on a Slope If parking on a soft...
... the motorcycle's weight without sinking into the parking surface. When fully stopped, shift into soft asphalt and the motorcycle may fall. A sidestand can ignite a fire if exposed to flammable materials. Hot engine and exhaust components can cause burns to provide a firm surface. Place the transmission in hot weather, use a sidestand footrest. Stop the engine. 3. Parking on a Slope If parking on a soft...

Owners Manual
Page 88
Maintenance Rear Wheel Alignment 4. Tip: If adjuster screws or nuts are turned OUT (counterclockwise) push the wheel and axle forward to move forward. Lock Nut Axle Adjuster Screw 5. Screw-Style Adjuster Axle Adjuster Nut 7. To adjust rear wheel alignment, loosen the rear axle nut about 1/16 of the swingarm before inspecting alignment or belt tension. Tip: Turn the axle adjusters about 1 1/2 turns. On nut style adjusters: Use a deep...
Maintenance Rear Wheel Alignment 4. Tip: If adjuster screws or nuts are turned OUT (counterclockwise) push the wheel and axle forward to move forward. Lock Nut Axle Adjuster Screw 5. Screw-Style Adjuster Axle Adjuster Nut 7. To adjust rear wheel alignment, loosen the rear axle nut about 1/16 of the swingarm before inspecting alignment or belt tension. Tip: Turn the axle adjusters about 1 1/2 turns. On nut style adjusters: Use a deep...

Owners Manual
Page 94
Elevate the rear of the swing arm, inspect the swing arm pivot bushings/bearings and pivot shaft nut torque. See the VICTORY Service Manual or your authorized VICTORY dealer. 92 With the transmission in the operator's seat and slowly bounce the rear suspension a few times. See the VICTORY Service Manual or your authorized VICTORY dealer. 4. Sit in neutral, slowly rotate the rear wheel. Injury may occur if...
Elevate the rear of the swing arm, inspect the swing arm pivot bushings/bearings and pivot shaft nut torque. See the VICTORY Service Manual or your authorized VICTORY dealer. 92 With the transmission in the operator's seat and slowly bounce the rear suspension a few times. See the VICTORY Service Manual or your authorized VICTORY dealer. 4. Sit in neutral, slowly rotate the rear wheel. Injury may occur if...

Owners Manual
Page 96
Maintenance Front Suspension Steering and Front Axle Inspection 1. Use an appropriate motorcycle lift or a block of the motorcycle until the front wheel is off the ground. Turn the handlebars from stop to the right or left. The action should be smooth but not loose. Make sure wires, hoses and control cables do not interfere with smooth steering. 3. Position the front wheel straight ahead. Lubricate...
Maintenance Front Suspension Steering and Front Axle Inspection 1. Use an appropriate motorcycle lift or a block of the motorcycle until the front wheel is off the ground. Turn the handlebars from stop to the right or left. The action should be smooth but not loose. Make sure wires, hoses and control cables do not interfere with smooth steering. 3. Position the front wheel straight ahead. Lubricate...

Owners Manual
Page 113
.... For more precise measurement, use a depth gauge or an accurate ruler to the top of the center tire tread. See the VICTORY Service Manual or your authorized VICTORY dealer. Replace damaged tires immediately. act as wear bars; Replace the tire if the tread depth is less than 1/16 inch (1.6 mm). 111 Tires Maintenance Tire Condition Inspect the tire sidewalls, road contact surface, and tread base for...
.... For more precise measurement, use a depth gauge or an accurate ruler to the top of the center tire tread. See the VICTORY Service Manual or your authorized VICTORY dealer. Replace damaged tires immediately. act as wear bars; Replace the tire if the tread depth is less than 1/16 inch (1.6 mm). 111 Tires Maintenance Tire Condition Inspect the tire sidewalls, road contact surface, and tread base for...
Owners Manual
Page 144
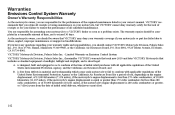
... performance of the United States environmental Protection Agency, and the California Air Resources Board; Limited Warranty on Emission Control System VICTORY Motorcycle Division, Polaris Sales Inc., (hereinafter VICTORY) warrants that each new 2010 and later VICTORY Motorcycle that you should be completed in a reasonable amount of time, not to conform with all applicable regulations of all receipts covering maintenance on the engine...
... performance of the United States environmental Protection Agency, and the California Air Resources Board; Limited Warranty on Emission Control System VICTORY Motorcycle Division, Polaris Sales Inc., (hereinafter VICTORY) warrants that each new 2010 and later VICTORY Motorcycle that you should be completed in a reasonable amount of time, not to conform with all applicable regulations of all receipts covering maintenance on the engine...

Owners Manual
Page 162
... Engine Oil Change...75-76 Engine Oil Level ...47 Engine Starting ...62-63 Engine Stopping...68 Equipment Modifications ...16 Evaporative Emission Control System 48, 95 Exhaust Safety ...22 Exhaust System Inspection ...114 F Fluid Level, Front Brake ...51 Fluid Level, Hydraulic Clutch...56 Fluid Level, Rear Brake ...53 Fork Inspection ...93 Front Axle Inspection ...94 Front Brake Lever ...41, 50 Front Fork Inspection ...93 Fuel Cap Access ...43 Fuel Fill Height ...61 Fuel Filters ...96 Fuel Hose Inspection...95 Fuel Hose...
... Engine Oil Change...75-76 Engine Oil Level ...47 Engine Starting ...62-63 Engine Stopping...68 Equipment Modifications ...16 Evaporative Emission Control System 48, 95 Exhaust Safety ...22 Exhaust System Inspection ...114 F Fluid Level, Front Brake ...51 Fluid Level, Hydraulic Clutch...56 Fluid Level, Rear Brake ...53 Fork Inspection ...93 Front Axle Inspection ...94 Front Brake Lever ...41, 50 Front Fork Inspection ...93 Fuel Cap Access ...43 Fuel Fill Height ...61 Fuel Filters ...96 Fuel Hose Inspection...95 Fuel Hose...

Owners Manual
Page 164
Index R Rear Axle Inspection ...92 Rear Brake Pedal ...42, 51-52 Refueling ...61 Ride Height Adjustment ...90-91 Ride Height Inspection ...88-89 Riding Apparel...15-16 Riding Practices ...8-16 Riding with a Passenger...14 Road Testing ...71 Rubber Care ...134 Running out of Fuel ...61 S Seat Removal ...115 Service Manual Availability ...154 Shift Pedal Adjustment ...109 Shift Point Recommendations...66 Shifting Gears ...64-66 Shock Ride Height...
Index R Rear Axle Inspection ...92 Rear Brake Pedal ...42, 51-52 Refueling ...61 Ride Height Adjustment ...90-91 Ride Height Inspection ...88-89 Riding Apparel...15-16 Riding Practices ...8-16 Riding with a Passenger...14 Road Testing ...71 Rubber Care ...134 Running out of Fuel ...61 S Seat Removal ...115 Service Manual Availability ...154 Shift Pedal Adjustment ...109 Shift Point Recommendations...66 Shifting Gears ...64-66 Shock Ride Height...