
Owners Manual
Page 14
Limit suspension or steering travel or your warranty. An electrical failure could result and cause hazardous loss of operation. Modifications Modifying the motorcycle by removing any accessories or additional weight. Parking the Motorcycle When leaving the motorcycle unattended, turn the engine off. Park the motorcycle where people are not likely to touch the hot engine or exhaust system or place combustible materials near...
Limit suspension or steering travel or your warranty. An electrical failure could result and cause hazardous loss of operation. Modifications Modifying the motorcycle by removing any accessories or additional weight. Parking the Motorcycle When leaving the motorcycle unattended, turn the engine off. Park the motorcycle where people are not likely to touch the hot engine or exhaust system or place combustible materials near...

Owners Manual
Page 16
... in a short time. • Never start the engine or let it run in or near the area where refueling is performed or where gasoline is highly flammable and explosive under certain conditions. • Always exercise extreme caution whenever handling gasoline. • Always turn off with another vehicle, as possible on the truck or trailer. Do not overfill the tank. Gasoline and gasoline...
... in a short time. • Never start the engine or let it run in or near the area where refueling is performed or where gasoline is highly flammable and explosive under certain conditions. • Always exercise extreme caution whenever handling gasoline. • Always turn off with another vehicle, as possible on the truck or trailer. Do not overfill the tank. Gasoline and gasoline...

Owners Manual
Page 17
... service manual, or see your authorized VICTORY dealer for fluid leaks or damage. See page 36. • Perform all legally required equipment is equivalent to the proper torque. Safety Safety Maintenance WARNING Failure to ensure safety. Perform maintenance and repairs promptly as recommended. Always perform the safety maintenance procedures as outlined in the Periodic Maintenance section beginning on page 54. • Always maintain proper tire pressure, tread condition and wheel and tire...
... service manual, or see your authorized VICTORY dealer for fluid leaks or damage. See page 36. • Perform all legally required equipment is equivalent to the proper torque. Safety Safety Maintenance WARNING Failure to ensure safety. Perform maintenance and repairs promptly as recommended. Always perform the safety maintenance procedures as outlined in the Periodic Maintenance section beginning on page 54. • Always maintain proper tire pressure, tread condition and wheel and tire...

Owners Manual
Page 22
...9 11 10 9 12 8 18 Fuel Filler Cap 4. Fuel Gauge 4. Audio Control Switches 11. +12-Volt Accessory Outlet 12. Indicator Light Panel 5. Throttle Control Grip 9. Turn Signals 8. Multi-Function Display 7. Tachometer 8. Identification Top View 1. Indicator Lamp Display 6. Mirror 3. Tachometer (if equipped) 6. Front Brake Lever 8. Switches 10. Clutch Lever 2. Windshield 2. Clutch Lever 3. Passenger Seat 6. Front Brake Lever 10. Radio Display 13. Right Handlebar Switches 3 4 5 6 7 8 1 1 2 9 10 11 12 13 14 15 Console (CROSS ROADS) 1. Throttle Cables 11.
...9 11 10 9 12 8 18 Fuel Filler Cap 4. Fuel Gauge 4. Audio Control Switches 11. +12-Volt Accessory Outlet 12. Indicator Light Panel 5. Throttle Control Grip 9. Turn Signals 8. Multi-Function Display 7. Tachometer 8. Identification Top View 1. Indicator Lamp Display 6. Mirror 3. Tachometer (if equipped) 6. Front Brake Lever 8. Switches 10. Clutch Lever 2. Windshield 2. Clutch Lever 3. Passenger Seat 6. Front Brake Lever 10. Radio Display 13. Right Handlebar Switches 3 4 5 6 7 8 1 1 2 9 10 11 12 13 14 15 Console (CROSS ROADS) 1. Throttle Cables 11.

Owners Manual
Page 23
... starting the engine, read the instructions for starting the engine. The headlamp, taillight, and instrument lights illuminate. See page 46. Turn the ignition switch to start the engine or activate the turn signals and other electrical features. The engine stop/run switch must push the ignition key into the switch while selecting the PARK position. 19 PARK In the PARK position, the taillight, indicator lights and license plate light illuminate. OFF In the OFF position, all electrical...
... starting the engine, read the instructions for starting the engine. The headlamp, taillight, and instrument lights illuminate. See page 46. Turn the ignition switch to start the engine or activate the turn signals and other electrical features. The engine stop/run switch must push the ignition key into the switch while selecting the PARK position. 19 PARK In the PARK position, the taillight, indicator lights and license plate light illuminate. OFF In the OFF position, all electrical...

Owners Manual
Page 29
Instruments, Features and Controls Instrument Cluster (CROSS COUNTRY) Indicator Lamps Left Turn High Beam Low Fuel Right Turn Cruise Control Oil Pressure Check Engine Neutral Battery Warning Condition Lamp Indicates Neutral High Beam Check Engine This lamp illuminates when the transmission is in neutral and the ignition key is functioning properly. See page 32. This lamp illuminates when the ignition switch is in the ON position and the engine is off immediately. If the oil level is correct and...
Instruments, Features and Controls Instrument Cluster (CROSS COUNTRY) Indicator Lamps Left Turn High Beam Low Fuel Right Turn Cruise Control Oil Pressure Check Engine Neutral Battery Warning Condition Lamp Indicates Neutral High Beam Check Engine This lamp illuminates when the transmission is in neutral and the ignition key is functioning properly. See page 32. This lamp illuminates when the ignition switch is in the ON position and the engine is off immediately. If the oil level is correct and...

Owners Manual
Page 41
... before performing the following electrical inspections. Press the horn button. Start the engine. Check the oil level on the indicator panel. Check for wear, damage, proper deflection. Verify that the low oil pressure lamp illuminates. Verify smooth operation, inspect pivot bolt, spring and pad. Inspection Procedure Turn Signals Emergency Flashers Horn Neutral Indicator Low Oil Pressure Indicator Engine Stop/Run Switch General Engine Oil Level Fuel Level Tires Brake Operation Brake Fluid Levels Brake Components Throttle Front Suspension Steering Rear Suspension Drive Belt...
... before performing the following electrical inspections. Press the horn button. Start the engine. Check the oil level on the indicator panel. Check for wear, damage, proper deflection. Verify that the low oil pressure lamp illuminates. Verify smooth operation, inspect pivot bolt, spring and pad. Inspection Procedure Turn Signals Emergency Flashers Horn Neutral Indicator Low Oil Pressure Indicator Engine Stop/Run Switch General Engine Oil Level Fuel Level Tires Brake Operation Brake Fluid Levels Brake Components Throttle Front Suspension Steering Rear Suspension Drive Belt...

Owners Manual
Page 42
... Inspections Engine Oil Level The oil fill cap/dipstick is located on the dipstick. See page 99. Start the engine and allow it seats. 6. Reinstall the dipstick and turn the cap clockwise until it to idle for fuel specifications. Oil Fill Cap/Dipstick Safe Range WARNING! Fuel Level 1. View the fuel level in the fuel gauge (CROSS COUNTRY), or use the recommended oil. Fuel Gauge (CROSS COUNTRY) Fuel Bar (CROSS ROADS) 38 { Place the transmission in the information bar (CROSS ROADS). 3. On level ground, straddle...
... Inspections Engine Oil Level The oil fill cap/dipstick is located on the dipstick. See page 99. Start the engine and allow it seats. 6. Reinstall the dipstick and turn the cap clockwise until it to idle for fuel specifications. Oil Fill Cap/Dipstick Safe Range WARNING! Fuel Level 1. View the fuel level in the fuel gauge (CROSS COUNTRY), or use the recommended oil. Fuel Gauge (CROSS COUNTRY) Fuel Bar (CROSS ROADS) 38 { Place the transmission in the information bar (CROSS ROADS). 3. On level ground, straddle...
Owners Manual
Page 51
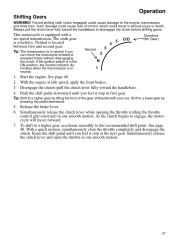
... the ignition switch is in one smooth motion. 47 With the engine at the next gear. Release the brake lever. 6. Simultaneously release the clutch lever and open the throttle in neutral. 4 Neutral 5 O/D Overdrive (6th Gear) 3 2 N 1 1. 2. 3. 4. Neutral is in one smooth motion. Disengage the clutch (pull the clutch lever fully toward the handlebars to the recommended shift point. Tip: Shift to the engine, transmission and drive train. To shift to a higher gear, accelerate...
... the ignition switch is in one smooth motion. 47 With the engine at the next gear. Release the brake lever. 6. Simultaneously release the clutch lever and open the throttle in neutral. 4 Neutral 5 O/D Overdrive (6th Gear) 3 2 N 1 1. 2. 3. 4. Neutral is in one smooth motion. Disengage the clutch (pull the clutch lever fully toward the handlebars to the recommended shift point. Tip: Shift to the engine, transmission and drive train. To shift to a higher gear, accelerate...

Owners Manual
Page 55
... toward the top of control and serious injury or death. CAUTION! Remove the ignition key. WARNING! Shift to a complete stop the engine after the motorcycle is fully stopped and the transmission is stable when it is in hot weather. Operation Stopping the Engine Before stopping the engine, bring the motorcycle to neutral or disengage the clutch. Always stop . Parking Choose a firm level...
... toward the top of control and serious injury or death. CAUTION! Remove the ignition key. WARNING! Shift to a complete stop the engine after the motorcycle is fully stopped and the transmission is stable when it is in hot weather. Operation Stopping the Engine Before stopping the engine, bring the motorcycle to neutral or disengage the clutch. Always stop . Parking Choose a firm level...

Owners Manual
Page 59
... I L I I L I I L P L I I I I L I Component Air Filter Battery Brake Fluid Brake Pads Clutch Cable Clutch Lever (Mechanical) Control Cables Crankcase Vent Drive Belt Drive Belt Adjustment Engine Oil & Filter* Evaporative Emission Control System (if equipped) Exhaust System Fasteners Front Brake Lever Front Fork Oil** Front Fork / Axle Fuel System Fuel Filter Headlamp Ignition Switch / Locks Radio/Radio Software Rear Wheel Align Rear Shock Rear Brake Pedal Road Test Sidestand Sidestand Pad Spark Plugs Steering Head Bearings Swingarm Throttle Cable Page 58 75 72 41 70 69 70 69 70 67 60 63 57 67...
... I L I I L I I L P L I I I I L I Component Air Filter Battery Brake Fluid Brake Pads Clutch Cable Clutch Lever (Mechanical) Control Cables Crankcase Vent Drive Belt Drive Belt Adjustment Engine Oil & Filter* Evaporative Emission Control System (if equipped) Exhaust System Fasteners Front Brake Lever Front Fork Oil** Front Fork / Axle Fuel System Fuel Filter Headlamp Ignition Switch / Locks Radio/Radio Software Rear Wheel Align Rear Shock Rear Brake Pedal Road Test Sidestand Sidestand Pad Spark Plugs Steering Head Bearings Swingarm Throttle Cable Page 58 75 72 41 70 69 70 69 70 67 60 63 57 67...

Owners Manual
Page 69
... wheel bearings, rear axle, belt adjustment and wheel alignment. Remove all riders and cargo. 2. Remove the cap from the fitting. Air Fitting 5. Swing Arm / Rear Axle Inspection 1. If there is adjusted. With the transmission in the operator's seat and slowly bounce the rear suspension a few times. Bleed pressure in small amounts until pressure increases to -side. Remove the hose from the air fitting is acceptable when pressure is movement at the wheel bearings...
... wheel bearings, rear axle, belt adjustment and wheel alignment. Remove all riders and cargo. 2. Remove the cap from the fitting. Air Fitting 5. Swing Arm / Rear Axle Inspection 1. If there is adjusted. With the transmission in the operator's seat and slowly bounce the rear suspension a few times. Bleed pressure in small amounts until pressure increases to -side. Remove the hose from the air fitting is acceptable when pressure is movement at the wheel bearings...

Owners Manual
Page 84
... side of the rear tire. Fuse Box Accessory Fuse (if equipped) 3. Maintenance Fuse Replacement NOTICE: Use fuses with print readable from the bracket. Reinstall the fuse box cover with the double cut-out to remove it from right side of motorcycle). 5. Fuse Box Label 1. Fuse Recommendations Fuse Application Fuse Size Engine 15 amp Fuel Pump/Ignition Coil 15 amp Lights 20 amp Turn Signals/Horn 10 amp Ignition 10 amp Chassis 20 amp Accessory 20 amp (under...
... side of the rear tire. Fuse Box Accessory Fuse (if equipped) 3. Maintenance Fuse Replacement NOTICE: Use fuses with print readable from the bracket. Reinstall the fuse box cover with the double cut-out to remove it from right side of motorcycle). 5. Fuse Box Label 1. Fuse Recommendations Fuse Application Fuse Size Engine 15 amp Fuel Pump/Ignition Coil 15 amp Lights 20 amp Turn Signals/Horn 10 amp Ignition 10 amp Chassis 20 amp Accessory 20 amp (under...
Owners Manual
Page 87
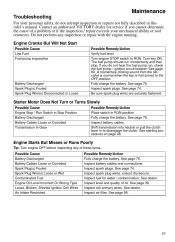
... Gear Possible Remedy/Action Place switch in this rider's manual. Inspect battery cables. Inspect fuel for service if you do not attempt inspection or repairs not fully described in RUN position. See page 76. See page 58. 83 Do not perform any of oil. See dealer. Maintenance Troubleshooting For your mechanical ability or tool resources. See page 74. Shift transmission into neutral or pull the clutch...
... Gear Possible Remedy/Action Place switch in this rider's manual. Inspect battery cables. Inspect fuel for service if you do not attempt inspection or repairs not fully described in RUN position. See page 76. See page 58. 83 Do not perform any of oil. See dealer. Maintenance Troubleshooting For your mechanical ability or tool resources. See page 74. Shift transmission into neutral or pull the clutch...

Owners Manual
Page 98
... is not available within 30 days, or a repair is street legal: A. Any replacement part can be performed by the state's Emission Warranty Parts List. intake manifold; ll. Warranty Emissions Control System Warranty VICTORY Motorcycle Division, Polaris Sales Inc. - In the State of America in the California Administrative Code, may contain functionally equivalent parts. fuel tank; pressure control valve; and B. igniters; and hoses, clamps, fittings and tubing used in these...
... is not available within 30 days, or a repair is street legal: A. Any replacement part can be performed by the state's Emission Warranty Parts List. intake manifold; ll. Warranty Emissions Control System Warranty VICTORY Motorcycle Division, Polaris Sales Inc. - In the State of America in the California Administrative Code, may contain functionally equivalent parts. fuel tank; pressure control valve; and B. igniters; and hoses, clamps, fittings and tubing used in these...

Owners Manual
Page 102
... Tire Type / Size Rear Wheel Type / Size Rear Tire Type / Size Electrical Alternator Battery Lights Headlamp (High / Low) HID Headlamp (High / Low) Turn Signal Lamp Tail / Brake / License Plate Lamp Fuses / Circuit Breakers Engine Fuel Pump/Ignition Coil Lights Turn Signals/Horn Ignition Chassis Accessory Radio Telescopic Fork / 5.1 in. (13 cm) 43 mm Single Monotube Air Adjustable Shock: 4.7 in. (12 cm) Cast Aluminum with Constant Rate Linkage Dual 300 x 5 mm / Floating Rotor / 4 Piston Calipers Single 300 x 7 mm / Floating Rotor / 2 Piston Caliper 21.3 gallons...
... Tire Type / Size Rear Wheel Type / Size Rear Tire Type / Size Electrical Alternator Battery Lights Headlamp (High / Low) HID Headlamp (High / Low) Turn Signal Lamp Tail / Brake / License Plate Lamp Fuses / Circuit Breakers Engine Fuel Pump/Ignition Coil Lights Turn Signals/Horn Ignition Chassis Accessory Radio Telescopic Fork / 5.1 in. (13 cm) 43 mm Single Monotube Air Adjustable Shock: 4.7 in. (12 cm) Cast Aluminum with Constant Rate Linkage Dual 300 x 5 mm / Floating Rotor / 4 Piston Calipers Single 300 x 7 mm / Floating Rotor / 2 Piston Caliper 21.3 gallons...

Owners Manual
Page 122
... AUX mode. Audio works in the motorcycle's audio system control NAV MP3 volume, but navigation instructions may need to turn the audio system on. For best sound quality, change the AUX mode setting on the GARMIN unit to the MP3 player. Changing to NAV MP3 Mode The ignition key must be difficult to turn down the "media volume" on the radio from the NAV...
... AUX mode. Audio works in the motorcycle's audio system control NAV MP3 volume, but navigation instructions may need to turn the audio system on. For best sound quality, change the AUX mode setting on the GARMIN unit to the MP3 player. Changing to NAV MP3 Mode The ignition key must be difficult to turn down the "media volume" on the radio from the NAV...

Owners Manual
Page 124
... Fluid Change Engine Oil ...57 Fluid Level Engine Oil ...38 Front Brake ...39 Front Brake Fluid...72 Rear Brake ...40 Rear Brake Fluid ...71 Fork Inspection ...66 Fuel Cap...35 Fuel Gauge...24 Fuel Handling Safety ...12 Fuel Level ...38 Fuel Recommendation ...99 Fuel System Inspection ...67 Fuel System, Priming...45 Fuel Tank Removal/Installation ...58-59 Fueling ...45 Fuse Recommendations ...80 Fuse Replacement ...80 K Key Number ...16 L Labels, Information ...15 Labels, Safety ...15 Leather, Rubber and Vinyl Care ...89 Lock Lubrication ...76 Locking Saddelbags...35 M Maintenance Break...
... Fluid Change Engine Oil ...57 Fluid Level Engine Oil ...38 Front Brake ...39 Front Brake Fluid...72 Rear Brake ...40 Rear Brake Fluid ...71 Fork Inspection ...66 Fuel Cap...35 Fuel Gauge...24 Fuel Handling Safety ...12 Fuel Level ...38 Fuel Recommendation ...99 Fuel System Inspection ...67 Fuel System, Priming...45 Fuel Tank Removal/Installation ...58-59 Fueling ...45 Fuse Recommendations ...80 Fuse Replacement ...80 K Key Number ...16 L Labels, Information ...15 Labels, Safety ...15 Leather, Rubber and Vinyl Care ...89 Lock Lubrication ...76 Locking Saddelbags...35 M Maintenance Break...

Owners Manual
Page 125
... CROSS COUNTRY ...26-28 CROSS ROADS ...21-23 S Saddlebag Lock ...35 Saddlebags, Using Safely ...11 Safety Defects, Reporting to NHTSA ...15 Safety Gear ...9 Safety Labels ...15 Safety Symbols ...5 Safety While Servicing ...53 Seat Removal/Installation ...78 Service Manual ...84 Service Procedure Safety ...53 Shift Points ...48 Shifting Gears ...47-48 Side Covers, Removal/Installation ...77 Sidestand...34 Sidestand Inspection ...43 Sidestand Lubrication ...77 Signal Words ...5 Spark Plugs ...74 Speedometer ...20, 24 Squelch ...110 Starter Interlock Switch...
... CROSS COUNTRY ...26-28 CROSS ROADS ...21-23 S Saddlebag Lock ...35 Saddlebags, Using Safely ...11 Safety Defects, Reporting to NHTSA ...15 Safety Gear ...9 Safety Labels ...15 Safety Symbols ...5 Safety While Servicing ...53 Seat Removal/Installation ...78 Service Manual ...84 Service Procedure Safety ...53 Shift Points ...48 Shifting Gears ...47-48 Side Covers, Removal/Installation ...77 Sidestand...34 Sidestand Inspection ...43 Sidestand Lubrication ...77 Signal Words ...5 Spark Plugs ...74 Speedometer ...20, 24 Squelch ...110 Starter Interlock Switch...

Owners Manual
Page 126
.../Run Switch ...31 Hand Grip Heater Switch...28 Hazard Switch ...29 High Beam/Low Beam Switch ...29 Horn Button ...29 Ignition Switch ...19 Ignition Switch Lubrication...76 Mode Button ...30 Starter Interlock Switch ...30 Turn Signal Switch ...29 Switches, Console (Cross Country)...28 Switches, Left Handlebar...29-30 Switches, Right Handlebar ...31 V VICTORY Cleaning Products ...85 Volt Meter ...24 W Washing the Motorcycle ...85-87 Weather Band (WX) ...108 Weight Capacity ...14 Wheel Inspection ...73 X XM Radio...
.../Run Switch ...31 Hand Grip Heater Switch...28 Hazard Switch ...29 High Beam/Low Beam Switch ...29 Horn Button ...29 Ignition Switch ...19 Ignition Switch Lubrication...76 Mode Button ...30 Starter Interlock Switch ...30 Turn Signal Switch ...29 Switches, Console (Cross Country)...28 Switches, Left Handlebar...29-30 Switches, Right Handlebar ...31 V VICTORY Cleaning Products ...85 Volt Meter ...24 W Washing the Motorcycle ...85-87 Weather Band (WX) ...108 Weight Capacity ...14 Wheel Inspection ...73 X XM Radio...