

Owners Manual
Page 1
PMS 419 Sportsman Touring 500 HO for those under 16 years of age. It contains important safety information. Operation is an adult vehicle only. This is prohibited for Maintenance and Safety Owner's Manual Read this manual carefully.
PMS 419 Sportsman Touring 500 HO for those under 16 years of age. It contains important safety information. Operation is an adult vehicle only. This is prohibited for Maintenance and Safety Owner's Manual Read this manual carefully.

Owners Manual
Page 6
... on the latest product information at the time of publication. Depictions and/or procedures in U.S.A. 2011 SPORTSMAN Touring 500 HO Owner's Manual P/N 9922809 2 POLARIS, THE WAY OUT and SPORTSMAN are provided as translations of the original instructions. Other languages are registered trademarks of production components, some minor discrepancies may result between the actual vehicle and the information presented in this publication...
... on the latest product information at the time of publication. Depictions and/or procedures in U.S.A. 2011 SPORTSMAN Touring 500 HO Owner's Manual P/N 9922809 2 POLARIS, THE WAY OUT and SPORTSMAN are provided as translations of the original instructions. Other languages are registered trademarks of production components, some minor discrepancies may result between the actual vehicle and the information presented in this publication...
Owners Manual
Page 37
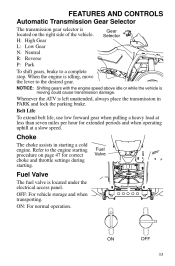
... electrical access panel. Fuel Valve Fuel Valve The fuel valve is left unattended, always place the transmission in starting . Refer to the engine starting procedure on the right side of the vehicle. FEATURES AND CONTROLS Automatic Transmission Gear Selector The transmission gear selector is moving could cause transmission damage. Belt Life To extend belt life, use low forward gear when pulling a heavy load at less than seven miles per hour for correct choke and throttle settings during starting a cold engine. Gear...
... electrical access panel. Fuel Valve Fuel Valve The fuel valve is left unattended, always place the transmission in starting . Refer to the engine starting procedure on the right side of the vehicle. FEATURES AND CONTROLS Automatic Transmission Gear Selector The transmission gear selector is moving could cause transmission damage. Belt Life To extend belt life, use low forward gear when pulling a heavy load at less than seven miles per hour for correct choke and throttle settings during starting a cold engine. Gear...
Owners Manual
Page 38
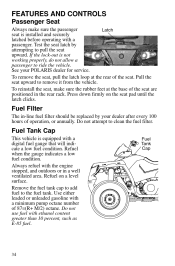
... on the seat pad until the latch clicks. Fuel Tank Cap 34 Test the seat latch by your POLARIS dealer for service. Fuel Tank Cap This vehicle is installed and securely latched before operating with a minimum pump octane number of the seat are positioned in the rear rack. Do not use fuel with the engine stopped, and outdoors or in -line fuel filter should be replaced by attempting to pull the seat upward. FEATURES AND CONTROLS Passenger Seat Always...
... on the seat pad until the latch clicks. Fuel Tank Cap 34 Test the seat latch by your POLARIS dealer for service. Fuel Tank Cap This vehicle is installed and securely latched before operating with a minimum pump octane number of the seat are positioned in the rear rack. Do not use fuel with the engine stopped, and outdoors or in -line fuel filter should be replaced by attempting to pull the seat upward. FEATURES AND CONTROLS Passenger Seat Always...

Owners Manual
Page 39
... light in the instrument cluster will be needed. Initially, the vehicle's electronic system will automatically engage any time the rear wheels lose traction. See page 26. FEATURES AND CONTROLS All Wheel Drive (AWD) System The All Wheel Drive system is moving . When the rear wheels regain traction, the demand drive unit will not disengage until the rear wheels regain traction. If the rear wheels are spinning, release the throttle before getting into conditions where front wheel drive...
... light in the instrument cluster will be needed. Initially, the vehicle's electronic system will automatically engage any time the rear wheels lose traction. See page 26. FEATURES AND CONTROLS All Wheel Drive (AWD) System The All Wheel Drive system is moving . When the rear wheels regain traction, the demand drive unit will not disengage until the rear wheels regain traction. If the rear wheels are spinning, release the throttle before getting into conditions where front wheel drive...

Owners Manual
Page 41
FEATURES AND CONTROLS Instrument Cluster Rider Information Center The rider information center is applied. Gear Indicator - Engine Hour Display Indicator 4. It may have occurred and the instrument cluster may also occur when the engine is at an RPM too low to clear the warning. 6. Drive at start-up for proper diagnosis. 1. When the last segment clears, a low fuel warning is operating at idle and high electrical load (lights, cooling fan, accessories) is located...
FEATURES AND CONTROLS Instrument Cluster Rider Information Center The rider information center is applied. Gear Indicator - Engine Hour Display Indicator 4. It may have occurred and the instrument cluster may also occur when the engine is at an RPM too low to clear the warning. 6. Drive at start-up for proper diagnosis. 1. When the last segment clears, a low fuel warning is operating at idle and high electrical load (lights, cooling fan, accessories) is located...

Owners Manual
Page 47
.... Change both the oil and the filter at sustained idle. 5. PVT Break-in (Clutches/Belt) A proper break-in period as recommended. See page 34. Always exercise extreme caution whenever handling gasoline. 2. Perform regular checks on fluid levels, controls and areas outlined on the dipstick. Pull only light loads. Fill the fuel tank with vehicle operation and handling. 4. Vary the throttle positions. Break in the clutches and belt by...
.... Change both the oil and the filter at sustained idle. 5. PVT Break-in (Clutches/Belt) A proper break-in period as recommended. See page 34. Always exercise extreme caution whenever handling gasoline. 2. Perform regular checks on fluid levels, controls and areas outlined on the dipstick. Pull only light loads. Fill the fuel tank with vehicle operation and handling. 4. Vary the throttle positions. Break in the clutches and belt by...

Owners Manual
Page 68
... on the rear rack) and mounted as low as possible. 2. Use low forward gear when hauling or towing heavy cargo to maintain stable driving conditions. 3. Slow down. 5. When operating over rough or hilly terrain, reduce speed and cargo weight to extend belt life. 6. Balance, handling, and control may be evenly distributed (1/3 on the front rack and 2/3 on warning labels and in 2/3 the specifications section of this manual. 1/3 1.
... on the rear rack) and mounted as low as possible. 2. Use low forward gear when hauling or towing heavy cargo to maintain stable driving conditions. 3. Slow down. 5. When operating over rough or hilly terrain, reduce speed and cargo weight to extend belt life. 6. Balance, handling, and control may be evenly distributed (1/3 on the front rack and 2/3 on warning labels and in 2/3 the specifications section of this manual. 1/3 1.
Owners Manual
Page 74
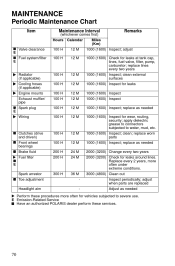
... surfaces 1000 (1600) Inspect for leaks at tank cap, lines, fuel valve, filter, pump, carburetor; replace as needed 1000 (1600) Inspect for wear, routing, security; replace as needed 100 H 100 H 12 M 12 M Radiator (if applicable) Cooling hoses (if applicable) Engine mounts Exhaust muffler/ pipe E Spark plug 100 H 100 H 100 H 100 H 100 H 100 H 12 M 12 M 12 M 12 M 12 M 12 M Wiring Clutches (drive 100 H 100 H 200 H 200...
... surfaces 1000 (1600) Inspect for leaks at tank cap, lines, fuel valve, filter, pump, carburetor; replace as needed 1000 (1600) Inspect for wear, routing, security; replace as needed 100 H 100 H 12 M 12 M Radiator (if applicable) Cooling hoses (if applicable) Engine mounts Exhaust muffler/ pipe E Spark plug 100 H 100 H 100 H 100 H 100 H 100 H 12 M 12 M 12 M 12 M 12 M 12 M Wiring Clutches (drive 100 H 100 H 200 H 200...

Owners Manual
Page 83
... on the right side of POLARIS products. See below for the part numbers of the demand drive unit. Fill Level Demand Drive Capacity SPORTSMAN Touring 500 HO 9 oz. (265 ml) 79 MAINTENANCE Front Gearcase (Demand Drive) Fluid Always check and change the demand drive fluid at Fill the bottom of the fill hole Plug threads. See page 126 for capacity. The fill plug is located on the...
... on the right side of POLARIS products. See below for the part numbers of the demand drive unit. Fill Level Demand Drive Capacity SPORTSMAN Touring 500 HO 9 oz. (265 ml) 79 MAINTENANCE Front Gearcase (Demand Drive) Fluid Always check and change the demand drive fluid at Fill the bottom of the fill hole Plug threads. See page 126 for capacity. The fill plug is located on the...

Owners Manual
Page 92
Lock the parking brake. 3. Lower the vehicle to specification. lbs. (41 Nm) PLUS 1/4 TURN 2-Piece Flange Nut (Steel Wheels) 27 ft. Install the wheel nuts and finger-tighten them. 5. Nut Type Lug Nut (Aluminum Wheels) Nut Torque 30 ft. MAINTENANCE Tires Wheel Installation 1. Place the wheel on the hub with the valve stem toward the outside and rotation arrows on the tire pointing toward forward rotation. 4. Torque the...
Lock the parking brake. 3. Lower the vehicle to specification. lbs. (41 Nm) PLUS 1/4 TURN 2-Piece Flange Nut (Steel Wheels) 27 ft. Install the wheel nuts and finger-tighten them. 5. Nut Type Lug Nut (Aluminum Wheels) Nut Torque 30 ft. MAINTENANCE Tires Wheel Installation 1. Place the wheel on the hub with the valve stem toward the outside and rotation arrows on the tire pointing toward forward rotation. 4. Torque the...

Owners Manual
Page 96
... Lift the pod cover and disconnect the speedometer harnesses from the wiring harness. Allow lamps to the socket and install the new lamp. Turn the lamp counter-clockwise to remove it with bare fingers. Reassemble the pod. 92 Headlight Lamp Replacement When servicing ...rear of the lamp. Remove the two screws on the wiring. 6. Remove the screw from your skin leaves a residue, causing a hot spot that will shorten the life of the pod. 3. Hot components can result in the housing. 8. Be sure to pull on the connector, not on the lower front corners of the pod. 4. MAINTENANCE Lights...
... Lift the pod cover and disconnect the speedometer harnesses from the wiring harness. Allow lamps to the socket and install the new lamp. Turn the lamp counter-clockwise to remove it with bare fingers. Reassemble the pod. 92 Headlight Lamp Replacement When servicing ...rear of the lamp. Remove the two screws on the wiring. 6. Remove the screw from your skin leaves a residue, causing a hot spot that will shorten the life of the pod. 3. Hot components can result in the housing. 8. Be sure to pull on the connector, not on the lower front corners of the pod. 4. MAINTENANCE Lights...

Owners Manual
Page 97
... downward. Observe the headlight aim on the seat when measuring. 5. Include rider weight on the wall. Adjust the beam to high beam. 4. Place the transmission in PARK. 2. Measure the distance from a wall. Tighten the screw. The adjustment knob is located on the wall at the rear of the headlamp. 2. MAINTENANCE Lights High Beam Adjustment The headlight beam can be...
... downward. Observe the headlight aim on the seat when measuring. 5. Include rider weight on the wall. Adjust the beam to high beam. 4. Place the transmission in PARK. 2. Measure the distance from a wall. Tighten the screw. The adjustment knob is located on the wall at the rear of the headlamp. 2. MAINTENANCE Lights High Beam Adjustment The headlight beam can be...

Owners Manual
Page 98
... depressing the tabs at the rear of the headlight pod. 2. Unplug the headlamp from the locking tabs. 8. MAINTENANCE Lights Headlight Housing Replacement 1. Adjust the headlight aim by 5 1/8" turning the adjusting knob. (13 cm) 94 Lift the adjusting knob up to the end of the pod. 9. Lift the pod cover and disconnect the speedometer harnesses from the locking tabs. 7. Pull the headlight housing up and out...
... depressing the tabs at the rear of the headlight pod. 2. Unplug the headlamp from the locking tabs. 8. MAINTENANCE Lights Headlight Housing Replacement 1. Adjust the headlight aim by 5 1/8" turning the adjusting knob. (13 cm) 94 Lift the adjusting knob up to the end of the pod. 9. Lift the pod cover and disconnect the speedometer harnesses from the locking tabs. 7. Pull the headlight housing up and out...

Owners Manual
Page 99
... and install the new lamp. 4. Turn the back of the headlight harness counter-clockwise and pull the harness assembly away from the back of the light assembly. 2. Apply dielectric grease to remove it. 3. Test the light for proper operation. Remove the headlamp and install the new headlamp. 3. Turn the headlight harness clockwise to secure the headlamp. 1. Reinstall the harness assembly into the headlight assembly. 4. MAINTENANCE Lights Lower Headlamp Replacement 1.
... and install the new lamp. 4. Turn the back of the headlight harness counter-clockwise and pull the harness assembly away from the back of the light assembly. 2. Apply dielectric grease to remove it. 3. Test the light for proper operation. Remove the headlamp and install the new headlamp. 3. Turn the headlight harness clockwise to secure the headlamp. 1. Reinstall the harness assembly into the headlight assembly. 4. MAINTENANCE Lights Lower Headlamp Replacement 1.

Owners Manual
Page 121
... the front end of fresh oil. 6. Torque to the inside of the spark plug cap. Oil will be completely drained of engine oil into the cylinder. 3. If POLARIS fuel system additive is level or tilted slightly rearward. 2. To eliminate any time the fluid looks dark or contaminated) • Coolant (test strength/fill) Fog the Engine 1. Reinstall the spark plug. Turn the engine over several times. Rotate the piston to BDC...
... the front end of fresh oil. 6. Torque to the inside of the spark plug cap. Oil will be completely drained of engine oil into the cylinder. 3. If POLARIS fuel system additive is level or tilted slightly rearward. 2. To eliminate any time the fluid looks dark or contaminated) • Coolant (test strength/fill) Fog the Engine 1. Reinstall the spark plug. Turn the engine over several times. Rotate the piston to BDC...
Owners Manual
Page 128
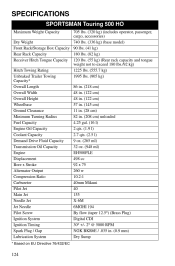
SPECIFICATIONS SPORTSMAN Touring 500 HO 705 lbs. (320 kg) (includes operator, passenger, cargo, accessories) Dry Weight 740 lbs. (336 kg) (base model) Front Rack/Storage Box Capacity 90 lbs. (41 kg) Rear Rack Capacity 180 lbs. (82 kg) Receiver Hitch Tongue Capacity 120 lbs. (55 kg) (Rear rack capacity and tongue weight not to exceed 180 lbs./92 kg) Hitch Towing Rating 1225 lbs. (555.7 kg) Unbraked Trailer Towing 1995 lbs. (905 kg) Capacity* Overall Length 86 in...
SPECIFICATIONS SPORTSMAN Touring 500 HO 705 lbs. (320 kg) (includes operator, passenger, cargo, accessories) Dry Weight 740 lbs. (336 kg) (base model) Front Rack/Storage Box Capacity 90 lbs. (41 kg) Rear Rack Capacity 180 lbs. (82 kg) Receiver Hitch Tongue Capacity 120 lbs. (55 kg) (Rear rack capacity and tongue weight not to exceed 180 lbs./92 kg) Hitch Towing Rating 1225 lbs. (555.7 kg) Unbraked Trailer Towing 1995 lbs. (905 kg) Capacity* Overall Length 86 in...

Owners Manual
Page 129
SPECIFICATIONS SPORTSMAN Touring 500 HO Driving System Type Front Suspension Rear Suspension Transmission Gear Reduction, Low Gear Reduction, Reverse Gear Reduction, High Drive Ratio, Front Tires/Pressure, Front Tires/Pressure, Rear Brakes, Front Brakes, Rear Brake, Auxiliary Brake, Parking Headlight Taillights Brake Light Instrument Cluster Automatic PVT (POLARIS Variable Transmission) MacPherson strut with 8.2" (21 cm) travel Progressive rate with 8.75" (22 cm) travel Automatic EBS (Engine Braking System) with E-Z Shift H/L/N/R/P 23.91:1 21.74:1 10.57:1 3.82:1 25x8-12 / 5 psi 25x11-12 / 5 ...
SPECIFICATIONS SPORTSMAN Touring 500 HO Driving System Type Front Suspension Rear Suspension Transmission Gear Reduction, Low Gear Reduction, Reverse Gear Reduction, High Drive Ratio, Front Tires/Pressure, Front Tires/Pressure, Rear Brakes, Front Brakes, Rear Brake, Auxiliary Brake, Parking Headlight Taillights Brake Light Instrument Cluster Automatic PVT (POLARIS Variable Transmission) MacPherson strut with 8.2" (21 cm) travel Progressive rate with 8.75" (22 cm) travel Automatic EBS (Engine Braking System) with E-Z Shift H/L/N/R/P 23.91:1 21.74:1 10.57:1 3.82:1 25x8-12 / 5 psi 25x11-12 / 5 ...

Owners Manual
Page 138
... for exhaust emissions: • Aftertreatment devices • Crankcase ventilation valves • Sensors • Electronic control units The following parts are considered emission-related components for evaporative emissions Fuel Tank Fuel Cap Fuel Line Fuel Line Fittings Clamps* Pressure Relief Valves* Control Valves* Control Solenoids* Electronic Controls Vacuum Control Diaphragms* Control Cables* Control Linkages* Purge Valves Vapor Hoses Liquid/Vapor Separator Carbon Canister Canister Mounting Brackets Carburetor Purge Port Connector *As related to the POLARIS...
... for exhaust emissions: • Aftertreatment devices • Crankcase ventilation valves • Sensors • Electronic control units The following parts are considered emission-related components for evaporative emissions Fuel Tank Fuel Cap Fuel Line Fuel Line Fittings Clamps* Pressure Relief Valves* Control Valves* Control Solenoids* Electronic Controls Vacuum Control Diaphragms* Control Cables* Control Linkages* Purge Valves Vapor Hoses Liquid/Vapor Separator Carbon Canister Canister Mounting Brackets Carburetor Purge Port Connector *As related to the POLARIS...
Owners Manual
Page 142
... A Accessories ...118 Air Filter ...89 All Wheel Drive System ...35 Auxiliary Foot Brake ...84 AWD Switch ...27, 35 C Cold Weather Operation ...48 Consumer Product Safety ...7 Coolant Bottle ...82 Coolant, Radiator...83 Cooling System ...81-83 Corrosion Removal, Chrome...115 Crankcase Emission Control System. 66 B Battery ...107-112 Charging (Conventional) ...111 Charging (Sealed) ...111-112 Fluid (Conventional) ...110 Installation ...109 Removal...108 Storage ...110 Belt Life ...33 Boots ...9 Brake Fluid, Auxiliary Foot Brake...
... A Accessories ...118 Air Filter ...89 All Wheel Drive System ...35 Auxiliary Foot Brake ...84 AWD Switch ...27, 35 C Cold Weather Operation ...48 Consumer Product Safety ...7 Coolant Bottle ...82 Coolant, Radiator...83 Cooling System ...81-83 Corrosion Removal, Chrome...115 Crankcase Emission Control System. 66 B Battery ...107-112 Charging (Conventional) ...111 Charging (Sealed) ...111-112 Fluid (Conventional) ...110 Installation ...109 Removal...108 Storage ...110 Belt Life ...33 Boots ...9 Brake Fluid, Auxiliary Foot Brake...