

Owners Manual
Page 11
... helmet. Laws in handling, acceleration and braking caused by the additional weight of control. • Before riding, be sure your riding style to handle and can make movements that you or the seat strap with safe riding procedures. To carry a passenger safely: • Do not exceed the gross vehicle weight rating (GVWR). • If necessary, adjust the rear shock preload. Improper preload...
... helmet. Laws in handling, acceleration and braking caused by the additional weight of control. • Before riding, be sure your riding style to handle and can make movements that you or the seat strap with safe riding procedures. To carry a passenger safely: • Do not exceed the gross vehicle weight rating (GVWR). • If necessary, adjust the rear shock preload. Improper preload...
Owners Manual
Page 12
... unexpected shifting. Cargo in the motorcycle's center of gravity. • Distribute weight evenly on both sides of this manual for model-specific information. Keep items as close to the motorcycle as sleeping bags, duffel bags or tents to your motorcycle. When determining the weight you will be adding to your motorcycle's GVWR and wet weight. Safety Gross Vehicle Weight Rating (GVWR) WARNING! NEVER...
... unexpected shifting. Cargo in the motorcycle's center of gravity. • Distribute weight evenly on both sides of this manual for model-specific information. Keep items as close to the motorcycle as sleeping bags, duffel bags or tents to your motorcycle. When determining the weight you will be adding to your motorcycle's GVWR and wet weight. Safety Gross Vehicle Weight Rating (GVWR) WARNING! NEVER...
Owners Manual
Page 15
... engine or let it does not: - An electrical failure could result and cause hazardous loss of consciousness or death in an enclosed area. • Never inhale exhaust gases. 13 Reduce ground clearance when the motorcycle is highly flammable and explosive under certain conditions. • Always exercise extreme caution whenever handling gasoline. • Always turn off with water. Fuel and Exhaust Safety WARNING...
... engine or let it does not: - An electrical failure could result and cause hazardous loss of consciousness or death in an enclosed area. • Never inhale exhaust gases. 13 Reduce ground clearance when the motorcycle is highly flammable and explosive under certain conditions. • Always exercise extreme caution whenever handling gasoline. • Always turn off with water. Fuel and Exhaust Safety WARNING...

Owners Manual
Page 16
Use only approved replacement tires. • Always ensure proper steering head bearing adjustment. • Regularly inspect the rear shock absorber and the front forks for quality, finish and type to ensure safety. See page 73. • Make sure all fasteners are tightened to the proper torque. Perform maintenance and repairs promptly as recommended. Electromagnetic Interference This vehicle complies with European directive 97...
Use only approved replacement tires. • Always ensure proper steering head bearing adjustment. • Regularly inspect the rear shock absorber and the front forks for quality, finish and type to ensure safety. See page 73. • Make sure all fasteners are tightened to the proper torque. Perform maintenance and repairs promptly as recommended. Electromagnetic Interference This vehicle complies with European directive 97...

Owners Manual
Page 19
Clutch Lever Mirror Speedometer Indicator Light Panel Tachometer (if equipped) Front Brake Fluid Reservoir Front Brake Lever Throttle Control Grip Switches Throttle Cables Fuel Cap 2 3 1 (Models differ in appearance, but locations are the same as shown) 5 6 4 7 9 11 9 10 8 Left Side View 1. 2. 3. 4. 5. 6. 7. 8. 9. 10. 11. 12. 13. 14. 15. 16. 17. 18. 19. Front Turn Signal Headlamp Air Filter Spark Plugs Ignition Switch Battery (under side cover) Taillight Rear Turn Signal Rear Axle Adjuster (each side) Rear Brake Caliper Passenger's Foot Rest Oil Filter Oil Drain Plug (under engine) ...
Clutch Lever Mirror Speedometer Indicator Light Panel Tachometer (if equipped) Front Brake Fluid Reservoir Front Brake Lever Throttle Control Grip Switches Throttle Cables Fuel Cap 2 3 1 (Models differ in appearance, but locations are the same as shown) 5 6 4 7 9 11 9 10 8 Left Side View 1. 2. 3. 4. 5. 6. 7. 8. 9. 10. 11. 12. 13. 14. 15. 16. 17. 18. 19. Front Turn Signal Headlamp Air Filter Spark Plugs Ignition Switch Battery (under side cover) Taillight Rear Turn Signal Rear Axle Adjuster (each side) Rear Brake Caliper Passenger's Foot Rest Oil Filter Oil Drain Plug (under engine) ...

Owners Manual
Page 22
... for starting the engine. The engine stop/run switch must be removed. Parking Lights On Engine On/All Lights On Engine Off 20 Turn the ignition switch to start the engine or activate the emergency flashers, turn signals and other electrical features. The emergency flashers can be activated, and the ignition key can be removed. Engine On/All Lights On In the ON position, all electrical switches and buttons. The ignition switch provides electrical power to the ignition, the lighting system...
... for starting the engine. The engine stop/run switch must be removed. Parking Lights On Engine On/All Lights On Engine Off 20 Turn the ignition switch to start the engine or activate the emergency flashers, turn signals and other electrical features. The emergency flashers can be activated, and the ignition key can be removed. Engine On/All Lights On In the ON position, all electrical switches and buttons. The ignition switch provides electrical power to the ignition, the lighting system...
Owners Manual
Page 30
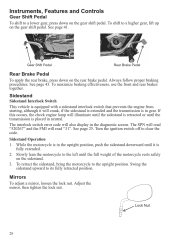
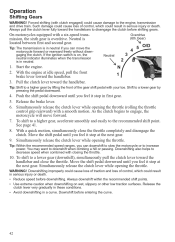
.... Mirrors To adjust a mirror, loosen the lock nut. The interlock switch error code will crank, if the sidestand is extended and the transmission is equipped with a sidestand interlock switch that prevents the engine from starting, although it is in neutral. The SPN will read "31". Instruments, Features and Controls Gear Shift Pedal To shift to a higher gear, lift up on the gear shift pedal. To shift to a lower gear, press down on the gear shift pedal...
.... Mirrors To adjust a mirror, loosen the lock nut. The interlock switch error code will crank, if the sidestand is extended and the transmission is equipped with a sidestand interlock switch that prevents the engine from starting, although it is in neutral. The SPN will read "31". Instruments, Features and Controls Gear Shift Pedal To shift to a higher gear, lift up on the gear shift pedal. To shift to a lower gear, press down on the gear shift pedal...

Owners Manual
Page 31
... steering locked, as the severely restricted steering could result in the steering lock and turn the engine off. The latch will release and allow you to secure. Remove the right side cover to access the battery. Tip: Prime the fuel pump if the tank is properly located. Turn the key clockwise while pushing downward lightly. Turn the handlebars fully to the left side cover to access the fuses and the rear brake fluid...
... steering locked, as the severely restricted steering could result in the steering lock and turn the engine off. The latch will release and allow you to secure. Remove the right side cover to access the battery. Tip: Prime the fuel pump if the tank is properly located. Turn the key clockwise while pushing downward lightly. Turn the handlebars fully to the left side cover to access the fuses and the rear brake fluid...

Owners Manual
Page 32
... signal. Push the switch inward to the OFF position after completing these products, always follow the instructions and warnings on this manual • refer to the VICTORY Service Manual • or see your authorized VICTORY dealer Electrical Components Move the ignition switch to the left . Verify that the low oil pressure display goes off in neutral. Horn Press the horn button. Verify that all instruments and controls to perform...
... signal. Push the switch inward to the OFF position after completing these products, always follow the instructions and warnings on this manual • refer to the VICTORY Service Manual • or see your authorized VICTORY dealer Electrical Components Move the ignition switch to the left . Verify that the low oil pressure display goes off in neutral. Horn Press the horn button. Verify that all instruments and controls to perform...

Owners Manual
Page 42
.... Do not allow the engine control module to reset. 7. To prevent leaks, make sure the fuel filler cap is properly seated and locked. Allow the fuel pump to the ON position. 3. NOTICE: Fuel can damage painted surfaces and plastic parts. Fill the fuel tank. 2. See page 13. Use only the recommended fuel. Fill the fuel tank to contact hot components. Turn the ignition switch to run until it off with the...
.... Do not allow the engine control module to reset. 7. To prevent leaks, make sure the fuel filler cap is properly seated and locked. Allow the fuel pump to the ON position. 3. NOTICE: Fuel can damage painted surfaces and plastic parts. Fill the fuel tank. 2. See page 13. Use only the recommended fuel. Fill the fuel tank to contact hot components. Turn the ignition switch to run until it off with the...
Owners Manual
Page 44
.... 3. Release the brake lever. 6. WARNING! Start the engine. 2. See page 41. 8. You may want to the recommended shift point. Simultaneously release the clutch lever while opening the throttle (rolling the throttle control grip rearward) with a smooth motion. On motorcycles equipped with closing the throttle. 10. If the ignition switch is on wet, slippery or other low traction surfaces. As the clutch begins to the engine, transmission and drive...
.... 3. Release the brake lever. 6. WARNING! Start the engine. 2. See page 41. 8. You may want to the recommended shift point. Simultaneously release the clutch lever while opening the throttle (rolling the throttle control grip rearward) with a smooth motion. On motorcycles equipped with closing the throttle. 10. If the ignition switch is on wet, slippery or other low traction surfaces. As the clutch begins to the engine, transmission and drive...

Owners Manual
Page 45
... or turn. Stopping the Engine Before stopping the engine, bring the motorcycle to a complete stop /run switch to neutral or disengage the clutch. When you open the throttle with the brakes, close the throttle and apply the front and rear brakes evenly and gradually. 2. Operation Accelerating Accelerate by opening the throttle (rolling the throttle control grip rearward). The more front brake than rear brake generally provides the best braking performance. 1. WARNING! WARNING! Shift...
... or turn. Stopping the Engine Before stopping the engine, bring the motorcycle to a complete stop /run switch to neutral or disengage the clutch. When you open the throttle with the brakes, close the throttle and apply the front and rear brakes evenly and gradually. 2. Operation Accelerating Accelerate by opening the throttle (rolling the throttle control grip rearward). The more front brake than rear brake generally provides the best braking performance. 1. WARNING! WARNING! Shift...

Owners Manual
Page 48
... Drive Belt 48 *Engine Oil 47 *Engine Oil Filter 47 Engine Compression 48 Exhaust System 64 Fasteners 38 Front Brake Lever 33, 62 **Front Fork Oil 55 Front Forks/Front Axle 55-56 Fuel Filter 56 Fuel System 56 Gear Shift Pedal 60 Headlamp 70 Rear Wheel Alignment 52 Rear Shock Absorber 53 Rear Brake Pedal 34 Road Test 45 Sidestand 71 Sidestand Rubber Pad 38 Spark Plugs 65 Steering Head Bearings 56 Swing Arm and Rear Axle 55 Throttle System 58 Tires 63 Wheel...
... Drive Belt 48 *Engine Oil 47 *Engine Oil Filter 47 Engine Compression 48 Exhaust System 64 Fasteners 38 Front Brake Lever 33, 62 **Front Fork Oil 55 Front Forks/Front Axle 55-56 Fuel Filter 56 Fuel System 56 Gear Shift Pedal 60 Headlamp 70 Rear Wheel Alignment 52 Rear Shock Absorber 53 Rear Brake Pedal 34 Road Test 45 Sidestand 71 Sidestand Rubber Pad 38 Spark Plugs 65 Steering Head Bearings 56 Swing Arm and Rear Axle 55 Throttle System 58 Tires 63 Wheel...

Owners Manual
Page 54
...-lbs (88 Nm) 9. Maintenance Rear Wheel Alignment WARNING! To adjust rear wheel alignment, loosen the rear axle nut about 1/16 of a turn the adjuster nut. 6. Use a deep 14-mm socket to the mark stamped on both sides of the alignment marks in neutral. 3. Place the transmission in relation to turn at a time and monitor wheel alignment as needed until alignment and drive belt tension are stamped...
...-lbs (88 Nm) 9. Maintenance Rear Wheel Alignment WARNING! To adjust rear wheel alignment, loosen the rear axle nut about 1/16 of a turn the adjuster nut. 6. Use a deep 14-mm socket to the mark stamped on both sides of the alignment marks in neutral. 3. Place the transmission in relation to turn at a time and monitor wheel alignment as needed until alignment and drive belt tension are stamped...

Owners Manual
Page 57
...Fork oil condition and level affects front suspension performance and internal component wear. See the VICTORY Service Manual or your authorized VICTORY dealer. Maintenance Rear Suspension Swing Arm and Rear Axle Inspection 1. With the transmission in the operator's seat and slowly bounce the rear suspension a few times. ...VICTORY Service Manual or your authorized VICTORY dealer. • If there is stable when elevated. Straddle the motorcycle and bring it to perform this procedure. Sit in neutral, slowly rotate the rear wheel. Grasp the rear tire and attempt to move the wheel...
...Fork oil condition and level affects front suspension performance and internal component wear. See the VICTORY Service Manual or your authorized VICTORY dealer. Maintenance Rear Suspension Swing Arm and Rear Axle Inspection 1. With the transmission in the operator's seat and slowly bounce the rear suspension a few times. ...VICTORY Service Manual or your authorized VICTORY dealer. • If there is stable when elevated. Straddle the motorcycle and bring it to perform this procedure. Sit in neutral, slowly rotate the rear wheel. Grasp the rear tire and attempt to move the wheel...

Owners Manual
Page 58
... steering head bearings should be inspected, lubricated and adjusted. If the wheel does not rotate smoothly, inspect the wheel bearings, front axle and brakes. If there is movement at the fuel rail for dampness or stains that would indicate a leak. See the VICTORY Service Manual or your authorized VICTORY dealer. 4. Inspect hose connections at the fuel pump and at the front axle, inspect the wheel bearings and front axle. Fuel Filters Fuel filter condition affects engine performance...
... steering head bearings should be inspected, lubricated and adjusted. If the wheel does not rotate smoothly, inspect the wheel bearings, front axle and brakes. If there is movement at the fuel rail for dampness or stains that would indicate a leak. See the VICTORY Service Manual or your authorized VICTORY dealer. 4. Inspect hose connections at the fuel pump and at the front axle, inspect the wheel bearings and front axle. Fuel Filters Fuel filter condition affects engine performance...
Owners Manual
Page 89
... Final Drive Type Transmission Type Primary Drive Primary Reduction Ratio Gear Shift Pattern Internal Gear Ratios 1st Gear 2nd Gear 3rd Gear 4th Gear 5th Gear 6th Gear (Overdrive) Final Drive Ratio Clutch Type Alternator Battery Fuse, Engine / ECM Fuse, Fuel Pump Fuse, Headlight / Brake Light Lamps Fuse, Tail Light Lamps / Flashers / Indicator Lamps / Horn Fuse, Ignition / Gauges Fuse, Accessory Bulb, Headlight (International) Bulb, Position Lamp Bulb, Taillight Bulb, Turn Signal Bulb, Indicator Bulb, License Plate Lamp Carbon Fiber Reinforced Belt 6 Speed Overdrive / Constant Mesh Gear Drive...
... Final Drive Type Transmission Type Primary Drive Primary Reduction Ratio Gear Shift Pattern Internal Gear Ratios 1st Gear 2nd Gear 3rd Gear 4th Gear 5th Gear 6th Gear (Overdrive) Final Drive Ratio Clutch Type Alternator Battery Fuse, Engine / ECM Fuse, Fuel Pump Fuse, Headlight / Brake Light Lamps Fuse, Tail Light Lamps / Flashers / Indicator Lamps / Horn Fuse, Ignition / Gauges Fuse, Accessory Bulb, Headlight (International) Bulb, Position Lamp Bulb, Taillight Bulb, Turn Signal Bulb, Indicator Bulb, License Plate Lamp Carbon Fiber Reinforced Belt 6 Speed Overdrive / Constant Mesh Gear Drive...
Owners Manual
Page 93
... ...88 Engine Oil Change ...47 Engine Oil Level...31 Engine Starting ...41 Engine Stopping ...43 Equipment Modifications ...11 Error Codes, Engine ...25 Exhaust Safety ...13 Exhaust System Inspection ...64 F Fastener Inspection ...38 Fluid Front Brake ...61 Rear Brake ...61 Fluid Level, Front Brake...33 Fluid Level, Rear Brake ...35 Fork Inspection ...55 Front Axle Inspection ...56 Front Brake Lever...27, 33 Front Fork Inspection ...55 Fuel Cap Access ...29 Fuel Fill Height...40 Fuel Filters ...56 Fuel Hose Inspection ...56 Fuel Hose, Rail...
... ...88 Engine Oil Change ...47 Engine Oil Level...31 Engine Starting ...41 Engine Stopping ...43 Equipment Modifications ...11 Error Codes, Engine ...25 Exhaust Safety ...13 Exhaust System Inspection ...64 F Fastener Inspection ...38 Fluid Front Brake ...61 Rear Brake ...61 Fluid Level, Front Brake...33 Fluid Level, Rear Brake ...35 Fork Inspection ...55 Front Axle Inspection ...56 Front Brake Lever...27, 33 Front Fork Inspection ...55 Fuel Cap Access ...29 Fuel Fill Height...40 Fuel Filters ...56 Fuel Hose Inspection ...56 Fuel Hose, Rail...

Owners Manual
Page 94
...-38 Instrument Cluster ...21-25 K Key Number...19 R Rear Axle Inspection ...55 Rear Brake Pedal ...28, 34 Refueling ...40 Ride Height Adjustment ...54 Ride Height Inspection ...53 Ride Height Specifications ...53 Riding Apparel ...9 Riding Practices...6-9 Riding with a Passenger ...9 Road Testing ...45 Rubber Care...77 Running out of Fuel...40 L Labels, Safety & Information ...15-16 Leather Care...77 License Plate ...19 Low Oil Pressure Display ...25 M Maintenance Record...
...-38 Instrument Cluster ...21-25 K Key Number...19 R Rear Axle Inspection ...55 Rear Brake Pedal ...28, 34 Refueling ...40 Ride Height Adjustment ...54 Ride Height Inspection ...53 Ride Height Specifications ...53 Riding Apparel ...9 Riding Practices...6-9 Riding with a Passenger ...9 Road Testing ...45 Rubber Care...77 Running out of Fuel...40 L Labels, Safety & Information ...15-16 Leather Care...77 License Plate ...19 Low Oil Pressure Display ...25 M Maintenance Record...

Owners Manual
Page 95
...37 Suspension Maintenance, Front ...55-56 Suspension Maintenance, Rear ...53-55 Swing Arm Inspection ...55 Switches Emergency Flasher Switch ...26 Engine Stop/Run Switch ...27 Hazard Switch ...26 High Beam/Low Beam Switch ...26 Horn Button ...26 Ignition Switch...20 Mode Button ...26 Starter Button ...27 Turn Signal Switch ...26 T Throttle Cable Lubrication ...58 Throttle Control Grip ...27 Throttle Freeplay ...35 Throttle Freeplay Adjustment...58 Throttle Inspection ...35 Throttle Operation ...43 Throttle System Maintenance ...58 Tilt Sensor...41 Tire Condition...32 Tire Pressure ...32 Tire...
...37 Suspension Maintenance, Front ...55-56 Suspension Maintenance, Rear ...53-55 Swing Arm Inspection ...55 Switches Emergency Flasher Switch ...26 Engine Stop/Run Switch ...27 Hazard Switch ...26 High Beam/Low Beam Switch ...26 Horn Button ...26 Ignition Switch...20 Mode Button ...26 Starter Button ...27 Turn Signal Switch ...26 T Throttle Cable Lubrication ...58 Throttle Control Grip ...27 Throttle Freeplay ...35 Throttle Freeplay Adjustment...58 Throttle Inspection ...35 Throttle Operation ...43 Throttle System Maintenance ...58 Tilt Sensor...41 Tire Condition...32 Tire Pressure ...32 Tire...