

Owners Manual
Page 7
... this vehicle. Your POLARIS BRUTUS is an ADULT VEHICLE ONLY. A hard hat or helmet and approved eye protection are recommended when appropriate for working or riding conditions. • Never use this manual with drugs or alcohol, as a passenger in this vehicle. This vehicle handles differently than other vehicles, such as cars, trucks or other body parts inside the vehicle at least age 16 and have a valid driver...
... this vehicle. Your POLARIS BRUTUS is an ADULT VEHICLE ONLY. A hard hat or helmet and approved eye protection are recommended when appropriate for working or riding conditions. • Never use this manual with drugs or alcohol, as a passenger in this vehicle. This vehicle handles differently than other vehicles, such as cars, trucks or other body parts inside the vehicle at least age 16 and have a valid driver...

Owners Manual
Page 11
... reach the floor and hand holds with back against the seat. • With non-POLARIS approved accessories - avoid sharp turns or sudden braking. • Make sure passengers read and understand all times. • Wear eye protection. Follow All Instructions And Warnings. 7182585 9 To Leave Vehicle • Place gear selector in PARK. • STOP engine. 7182465 Shift Caution CAUTION To avoid transmission damage, shift only when vehicle is...
... reach the floor and hand holds with back against the seat. • With non-POLARIS approved accessories - avoid sharp turns or sudden braking. • Make sure passengers read and understand all times. • Wear eye protection. Follow All Instructions And Warnings. 7182585 9 To Leave Vehicle • Place gear selector in PARK. • STOP engine. 7182465 Shift Caution CAUTION To avoid transmission damage, shift only when vehicle is...

Owners Manual
Page 22
... options. FEATURES AND CONTROLS Switches and Indicator Lights AWD/Differential Switch Mode Button Power Lift Assist Switch (if equipped) Blank Switch Openings (Available For Accessories) HVAC Switches (if equipped) Ignition Switch Light Switch Ignition Switch The ignition switch is used . OFF START ON Mode Button The button located on . OFF ON START The engine is off. The key returns to dump the cargo. Power Lift Assist Switch (Box Dump Switch) Use this switch to the ON position when released. The key can...
... options. FEATURES AND CONTROLS Switches and Indicator Lights AWD/Differential Switch Mode Button Power Lift Assist Switch (if equipped) Blank Switch Openings (Available For Accessories) HVAC Switches (if equipped) Ignition Switch Light Switch Ignition Switch The ignition switch is used . OFF START ON Mode Button The button located on . OFF ON START The engine is off. The key returns to dump the cargo. Power Lift Assist Switch (Box Dump Switch) Use this switch to the ON position when released. The key can...

Owners Manual
Page 23
... rear drive wheels to turn off the headlights. See page 61 for differential lock operating instructions. FEATURES AND CONTROLS Switches and Indicator Lights Light Switch The ignition switch must be in rear wheel drive. Press the bottom of the rocker switch to turn Air Conditioning ON, bottom for OFF) • Temperature Control Switch (Rotate clockwise to increase temperature, counter-clockwise to decrease) Fan A/C On-Off Temp Control Wiper Switch (if equipped) If equipped with a cab with HVAC (Heat and Air Conditioning): • Fan Switch...
... rear drive wheels to turn off the headlights. See page 61 for differential lock operating instructions. FEATURES AND CONTROLS Switches and Indicator Lights Light Switch The ignition switch must be in rear wheel drive. Press the bottom of the rocker switch to turn Air Conditioning ON, bottom for OFF) • Temperature Control Switch (Rotate clockwise to increase temperature, counter-clockwise to decrease) Fan A/C On-Off Temp Control Wiper Switch (if equipped) If equipped with a cab with HVAC (Heat and Air Conditioning): • Fan Switch...

Owners Manual
Page 26
... property damage, always heed the warnings and towing capacities outlined on this manual to avoid vehicle rollover. Apply the brakes while starting the engine. ROPS Storage Compartments A storage compartment is pressed, the faster the travel , press the heel of a rollover. The farther the pedal is located under both the driver's and passenger seat. Brake Pedal 24 FEATURES AND CONTROLS Rollover Protective Structure (ROPS) The...
... property damage, always heed the warnings and towing capacities outlined on this manual to avoid vehicle rollover. Apply the brakes while starting the engine. ROPS Storage Compartments A storage compartment is pressed, the faster the travel , press the heel of a rollover. The farther the pedal is located under both the driver's and passenger seat. Brake Pedal 24 FEATURES AND CONTROLS Rollover Protective Structure (ROPS) The...

Owners Manual
Page 29
... detected a Diagnostic Trouble Code in the Standard mode. Unit Lock - LED icon illuminates low engine oil or hydraulic fluid pressure is showing hours. 12. Power Steering System MIL - Illuminated when the glow plugs are active. Seat Belt Indicator - N/A on this model. 19. Preset at the factory and adjustable by the user, a flashing wrench symbol alerts the operator that the preset service interval has been...
... detected a Diagnostic Trouble Code in the Standard mode. Unit Lock - LED icon illuminates low engine oil or hydraulic fluid pressure is showing hours. 12. Power Steering System MIL - Illuminated when the glow plugs are active. Seat Belt Indicator - N/A on this model. 19. Preset at the factory and adjustable by the user, a flashing wrench symbol alerts the operator that the preset service interval has been...
Owners Manual
Page 34
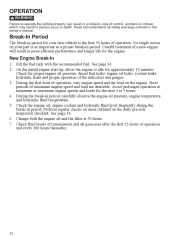
...-In 1. On the initial engine start-up, allow the engine to idle for proper engine oil pressure, diesel fuel leaks, engine oil leaks, coolant leaks, hydraulic leaks and proper operation of the indicators and gauges. 3. Check the engine oil, engine coolant and hydraulic fluid level frequently during the break-in period, carefully observe the engine oil pressure, engine temperature and hydraulic fluid temperature. 5. Change both the engine oil and the filter at minimum or maximum engine speeds and loads for the next 4 to...
...-In 1. On the initial engine start-up, allow the engine to idle for proper engine oil pressure, diesel fuel leaks, engine oil leaks, coolant leaks, hydraulic leaks and proper operation of the indicators and gauges. 3. Check the engine oil, engine coolant and hydraulic fluid level frequently during the break-in period, carefully observe the engine oil pressure, engine temperature and hydraulic fluid temperature. 5. Change both the engine oil and the filter at minimum or maximum engine speeds and loads for the next 4 to...

Owners Manual
Page 35
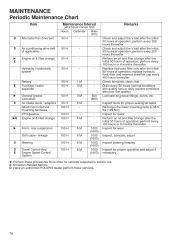
... level. Inspect for leaks. Clean and replace filter as needed during heating and cooling season. Inspect, lubricate if necessary. Inspect, ensure tightness. Item Brake system/pedal travel Brake fluid Front and Rear suspension Seat Belts ROPS Steering Tires/wheels/fasteners Safety Labels Frame nuts, bolts, fasteners Fuel and oil Coolant level Coolant hoses Treadle Pedal Indicator lights/switches Air filter Intake screen PTO Brake light/tail lamp / Headlamp Heater/Air Conditioning Filter Ensure proper level. Inspect, clean Inspect splines, guards, shields and hardware...
... level. Inspect for leaks. Clean and replace filter as needed during heating and cooling season. Inspect, lubricate if necessary. Inspect, ensure tightness. Item Brake system/pedal travel Brake fluid Front and Rear suspension Seat Belts ROPS Steering Tires/wheels/fasteners Safety Labels Frame nuts, bolts, fasteners Fuel and oil Coolant level Coolant hoses Treadle Pedal Indicator lights/switches Air filter Intake screen PTO Brake light/tail lamp / Headlamp Heater/Air Conditioning Filter Ensure proper level. Inspect, clean Inspect splines, guards, shields and hardware...

Owners Manual
Page 56
.... 4. WARNING! Stop the vehicle on the ground. 4. When parking inside a garage or other structure, be sure that the structure is not recommended to drive through water with your BRUTUS. Disengage the PTO and make sure all grease fittings. Turn the engine off and remove the key to a your dealer at the first opportunity. Determine water depths and current before starting the engine, perform the service outlined...
.... 4. WARNING! Stop the vehicle on the ground. 4. When parking inside a garage or other structure, be sure that the structure is not recommended to drive through water with your BRUTUS. Disengage the PTO and make sure all grease fittings. Turn the engine off and remove the key to a your dealer at the first opportunity. Determine water depths and current before starting the engine, perform the service outlined...

Owners Manual
Page 59
... WARNING! Stand clear and pull up on previous page. 4. Lift the front of a raised box, damaging the vehicle and creating hazardous driving conditions. If equipped with power lift assist, press and hold the top of the cargo box. 7. The rear tires will also catch the rear of the cargo box to any other location or you may lose control of control or brake...
... WARNING! Stand clear and pull up on previous page. 4. Lift the front of a raised box, damaging the vehicle and creating hazardous driving conditions. If equipped with power lift assist, press and hold the top of the cargo box. 7. The rear tires will also catch the rear of the cargo box to any other location or you may lose control of control or brake...

Owners Manual
Page 63
... front wheels will automatically disengage. Shift into conditions where front wheel drive may cause severe drive shaft and clutch damage. Engage the AWD before getting into low gear and drive forward. 3. Disengaging AWD Move the AWD switch to the center or bottom position to AWD while the rear wheels are spinning, release the treadle pedal before engaging the differential. If the switch is not required. 61 Locking the differential in rear wheel drive. NOTICE: Switching to disengage AWD.
... front wheels will automatically disengage. Shift into conditions where front wheel drive may cause severe drive shaft and clutch damage. Engage the AWD before getting into low gear and drive forward. 3. Disengaging AWD Move the AWD switch to the center or bottom position to AWD while the rear wheels are spinning, release the treadle pedal before engaging the differential. If the switch is not required. 61 Locking the differential in rear wheel drive. NOTICE: Switching to disengage AWD.

Owners Manual
Page 66
... PTO switch, press the center button and then pull up on the knob to the disengaged (OFF) position. Tip: When driving over objects (example: a curb), always drive at a slight angle and at a lower engine RPM and with the attachment under a no load condition. Disengaging PTO 1. Press down on the utility vehicle. WARNING Keep PTO shield and all guards in the dash will turn OFF and the PTO...
... PTO switch, press the center button and then pull up on the knob to the disengaged (OFF) position. Tip: When driving over objects (example: a curb), always drive at a slight angle and at a lower engine RPM and with the attachment under a no load condition. Disengaging PTO 1. Press down on the utility vehicle. WARNING Keep PTO shield and all guards in the dash will turn OFF and the PTO...
Owners Manual
Page 78
...Steering Travel Control And Engine Speed Control System Ź Perform these services. 76 Inspect ducts for proper sealing/air leaks Re-torque the lower mounting bolts to 95 ftlbs (129 Nm) Inspect for vehicles subjected to severe use. Maintenance Interval Remarks D D Ź E Alternator/Fan drive belt Air conditioning drive belt (if applicable) Engine oil & filter change Hydraulic / hydrostatic system Battery Fuel filter / water separator General grease lubrication Air intake ducts / adapters Attachment interface mounting hardware PTO gearbox Engine oil & filter change Front / rear...
...Steering Travel Control And Engine Speed Control System Ź Perform these services. 76 Inspect ducts for proper sealing/air leaks Re-torque the lower mounting bolts to 95 ftlbs (129 Nm) Inspect for vehicles subjected to severe use. Maintenance Interval Remarks D D Ź E Alternator/Fan drive belt Air conditioning drive belt (if applicable) Engine oil & filter change Hydraulic / hydrostatic system Battery Fuel filter / water separator General grease lubrication Air intake ducts / adapters Attachment interface mounting hardware PTO gearbox Engine oil & filter change Front / rear...

Owners Manual
Page 94
... fluid Sight Gauge Fill Cap level is not plugged. Use only the recommended POLARIS hydraulic fluid when adding or changing hydraulic fluid. Adding Fluid 1. See page 57. 92 An air intake water drain valve is located below the intake screen that should be inspected and clean at the center of the fluid in the reservoir will rise. 5. Always clean up spilled fuel or oil. Keep heat, flames, sparks or lighted tobacco...
... fluid Sight Gauge Fill Cap level is not plugged. Use only the recommended POLARIS hydraulic fluid when adding or changing hydraulic fluid. Adding Fluid 1. See page 57. 92 An air intake water drain valve is located below the intake screen that should be inspected and clean at the center of the fluid in the reservoir will rise. 5. Always clean up spilled fuel or oil. Keep heat, flames, sparks or lighted tobacco...

Owners Manual
Page 111
... lamp. The brake light should come on the wiring. 3. Headlight Lamp Replacement 1. Be sure to pull on the connector, not on , check the rear light assembly. Reinstall the harness assembly into the headlight assembly. 109 MAINTENANCE Lights Poor lighting can cause burns to skin. When servicing a halogen lamp, don't touch the lamp with bare fingers. Open the hood. Check the brake light before servicing. 2. Allow lamps to cool before each ride...
... lamp. The brake light should come on the wiring. 3. Headlight Lamp Replacement 1. Be sure to pull on the connector, not on , check the rear light assembly. Reinstall the harness assembly into the headlight assembly. 109 MAINTENANCE Lights Poor lighting can cause burns to skin. When servicing a halogen lamp, don't touch the lamp with bare fingers. Open the hood. Check the brake light before servicing. 2. Allow lamps to cool before each ride...

Owners Manual
Page 122
..., if equipped) Dry Weight (base model) Dry Weight (deluxe model) Fuel Capacity Engine Oil Capacity Radiator Coolant Capacity (base model) Radiator Coolant Capacity (deluxe model) Coolant Capacity (Overflow) Hydraulic Fluid Capacity (Reservoir at center of sight gauge) Hydraulic Fluid Capacity (System) A/C Refrigerant - R134A (if applicable) Front Differential Main Gearcase PTO Gearbox Towing Capacity Hitch Tongue Capacity Max. Below Differential Ground Clearance - Turning Radius (4 Wheel Drive) Engine Displacement Bore x Stroke Lubrication System High Idle Low Idle Alternator Output 1750 lbs...
..., if equipped) Dry Weight (base model) Dry Weight (deluxe model) Fuel Capacity Engine Oil Capacity Radiator Coolant Capacity (base model) Radiator Coolant Capacity (deluxe model) Coolant Capacity (Overflow) Hydraulic Fluid Capacity (Reservoir at center of sight gauge) Hydraulic Fluid Capacity (System) A/C Refrigerant - R134A (if applicable) Front Differential Main Gearcase PTO Gearbox Towing Capacity Hitch Tongue Capacity Max. Below Differential Ground Clearance - Turning Radius (4 Wheel Drive) Engine Displacement Bore x Stroke Lubrication System High Idle Low Idle Alternator Output 1750 lbs...

Owners Manual
Page 125
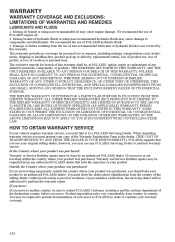
... your dealer and submitted to the following items Wheels and tires Suspension components Brake components Seat components Clutches and components Steering components Batteries Light bulbs/Sealed beam lamps Filters Lubricants Finished and unfinished surfaces Carburetor/Throttle body components Engine components Drive belts Hydraulic components and fluids Circuit breakers/Fuses Electronic components Spark plugs Sealants Coolants 123 improper fuel; This warranty covers parts and labor charges for repair or replacement of defective parts and begins on the...
... your dealer and submitted to the following items Wheels and tires Suspension components Brake components Seat components Clutches and components Steering components Batteries Light bulbs/Sealed beam lamps Filters Lubricants Finished and unfinished surfaces Carburetor/Throttle body components Engine components Drive belts Hydraulic components and fluids Circuit breakers/Fuses Electronic components Spark plugs Sealants Coolants 123 improper fuel; This warranty covers parts and labor charges for repair or replacement of defective parts and begins on the...
Owners Manual
Page 126
... hydraulic fluids is not covered by an authorized POLARIS dealer. We recommend the use any authorized POLARIS dealer that you should take it to country. If you move: If you move to perform warranty service. You may use of POLARIS engine oil. 2. If you move or are traveling temporarily outside the country where your product was purchased: Warranty or Service Bulletin repairs must...
... hydraulic fluids is not covered by an authorized POLARIS dealer. We recommend the use any authorized POLARIS dealer that you should take it to country. If you move: If you move to perform warranty service. You may use of POLARIS engine oil. 2. If you move or are traveling temporarily outside the country where your product was purchased: Warranty or Service Bulletin repairs must...

Owners Manual
Page 132
... Intake Water Drain Valve ...92 Clock ...29 Cold Starting Guidelines ...37 Cold Weather Operation ...37-38 Component Locations ...19 Condenser Cleaning...102 Console ...22 Console, Center ...23 Coolant Level, Overflow Bottle (Coolant) ...87 Coolant Level, Radiator...87 Coolant, Adding or Changing ...86 Cooling Fan ...86 Cooling System ...86-87 D Differential Locking ...61 Disengaging AWD ...61 Disengaging PTO ...64 Display, Information ...28-31 Drain Valve ...92 Driving Downhill...52 Driving in Reverse...53 Driving on a Sidehill ...51 Driving...
... Intake Water Drain Valve ...92 Clock ...29 Cold Starting Guidelines ...37 Cold Weather Operation ...37-38 Component Locations ...19 Condenser Cleaning...102 Console ...22 Console, Center ...23 Coolant Level, Overflow Bottle (Coolant) ...87 Coolant Level, Radiator...87 Coolant, Adding or Changing ...86 Cooling Fan ...86 Cooling System ...86-87 D Differential Locking ...61 Disengaging AWD ...61 Disengaging PTO ...64 Display, Information ...28-31 Drain Valve ...92 Driving Downhill...52 Driving in Reverse...53 Driving on a Sidehill ...51 Driving...

Owners Manual
Page 135
... Covers ...117 Supporting the Vehicle on Jack Stands...107 Suspension Adjustment...98 Switch, Lockout ...23 Switches AWD Switch ...61 AWD/Differential Lock Switch ...21 Box Dump Switch ...20 Front Auxiliary Hydraulic Switch ...23 HVAC Switch ...21 Ignition Switch...20 Joystick Lockout Switch ...23 Lift switch ...57 Light Switch...21 Mode Button ...20 Power Lift Assist Switch ...20 Tilt Lockout Switch ...23 Wiper Switch ...21 W Warning Symbols ...4 Washing the Vehicle...116 Water Separator ...89 Water, Immersion of Vehicle ...88 Wheel Installation ...108 Wheel Nut Inspection ...108 Wheel...
... Covers ...117 Supporting the Vehicle on Jack Stands...107 Suspension Adjustment...98 Switch, Lockout ...23 Switches AWD Switch ...61 AWD/Differential Lock Switch ...21 Box Dump Switch ...20 Front Auxiliary Hydraulic Switch ...23 HVAC Switch ...21 Ignition Switch...20 Joystick Lockout Switch ...23 Lift switch ...57 Light Switch...21 Mode Button ...20 Power Lift Assist Switch ...20 Tilt Lockout Switch ...23 Wiper Switch ...21 W Warning Symbols ...4 Washing the Vehicle...116 Water Separator ...89 Water, Immersion of Vehicle ...88 Wheel Installation ...108 Wheel Nut Inspection ...108 Wheel...