

Owners Manual
Page 4
...Polaris Industries Inc.: POLARIS®, FREEDOM®, VICTORY®, VICTORY MOTORCYCLES®, CROSS COUNTRY®, CROSS COUNTRY TOUR®, CROSS COUNTRY 8-BALL™ and MAGNUM™. Polaris Industries reserves the right to make changes at the time of the depictions and/or procedures contained within this manual and the motorcycle. Features...inaccuracies. iPod® is a registered trademark of Sirius XM Radio Inc. Pandora® , the Pandora logo, and the Pandora trade dress are trademarks of Dunlop Tire Corporation. P/N 9925277 2 Product improvements or other changes may...
...Polaris Industries Inc.: POLARIS®, FREEDOM®, VICTORY®, VICTORY MOTORCYCLES®, CROSS COUNTRY®, CROSS COUNTRY TOUR®, CROSS COUNTRY 8-BALL™ and MAGNUM™. Polaris Industries reserves the right to make changes at the time of the depictions and/or procedures contained within this manual and the motorcycle. Features...inaccuracies. iPod® is a registered trademark of Sirius XM Radio Inc. Pandora® , the Pandora logo, and the Pandora trade dress are trademarks of Dunlop Tire Corporation. P/N 9925277 2 Product improvements or other changes may...

Owners Manual
Page 16
... you must transport the motorcycle: • Use a truck or trailer. Do not tow the motorcycle with soap and water and change clothing. Safety Transporting the Motorcycle If you swallow gasoline, inhale more than a few breaths of consciousness or death in a short time. • Never start the engine or let it run in an enclosed area. • Never inhale exhaust gases. 14
... you must transport the motorcycle: • Use a truck or trailer. Do not tow the motorcycle with soap and water and change clothing. Safety Transporting the Motorcycle If you swallow gasoline, inhale more than a few breaths of consciousness or death in a short time. • Never start the engine or let it run in an enclosed area. • Never inhale exhaust gases. 14
Owners Manual
Page 21
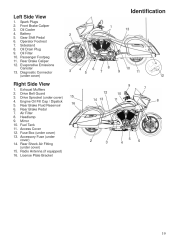
...Exhaust Mufflers Drive Belt Guard Drive Sprocket (under cover) Engine Oil Fill Cap / Dipstick Rear Brake Fluid Reservoir Rear Brake Pedal Air Filter Headlamp Mirror Fuel Tank Access Cover Fuse Box (under cover) Accessory Fuse (under cover) 1 2 13 3 4 5 6 8 7 9 10 11 12 9 Right Side View 1. 2. 3. 4. 5. 6. 7. 8. 9. 10. 11. 12. 13. Identification Left Side View 1. 2. 3. 4. 5. 6. 7. 8. 9. 10. 11. 12. Diagnostic Connector (under cover) 14. Spark Plugs Front Brake Caliper Oil Cooler Battery Gear Shift Pedal Operator Footrest Sidestand Oil Drain Plug Oil Filter Passenger Footpeg Rear Brake...
...Exhaust Mufflers Drive Belt Guard Drive Sprocket (under cover) Engine Oil Fill Cap / Dipstick Rear Brake Fluid Reservoir Rear Brake Pedal Air Filter Headlamp Mirror Fuel Tank Access Cover Fuse Box (under cover) Accessory Fuse (under cover) 1 2 13 3 4 5 6 8 7 9 10 11 12 9 Right Side View 1. 2. 3. 4. 5. 6. 7. 8. 9. 10. 11. 12. 13. Identification Left Side View 1. 2. 3. 4. 5. 6. 7. 8. 9. 10. 11. 12. Diagnostic Connector (under cover) 14. Spark Plugs Front Brake Caliper Oil Cooler Battery Gear Shift Pedal Operator Footrest Sidestand Oil Drain Plug Oil Filter Passenger Footpeg Rear Brake...

Owners Manual
Page 23
... active. Before starting the engine, read the instructions for starting the engine. Seat Heater Switches (CROSS COUNTRY TOUR) The seat heater switches are inactive and the ignition key can be removed. Instruments, Features and Controls Ignition Switch The ignition key operates the ignition switch and parking lights. Turn the ignition switch to the ignition, the lighting system and all electrical circuits are located on the lower left edge of the seat. OFF In the OFF position, all electrical switches and buttons. The ignition switch provides electrical power to the OFF...
... active. Before starting the engine, read the instructions for starting the engine. Seat Heater Switches (CROSS COUNTRY TOUR) The seat heater switches are inactive and the ignition key can be removed. Instruments, Features and Controls Ignition Switch The ignition key operates the ignition switch and parking lights. Turn the ignition switch to the ignition, the lighting system and all electrical circuits are located on the lower left edge of the seat. OFF In the OFF position, all electrical switches and buttons. The ignition switch provides electrical power to the OFF...

Owners Manual
Page 25
... until the anti-lock system activates, which occurs when vehicle speed exceeds 6 MPH (10 km/h). One arrow flashes when the corresponding turn signal is operating properly. Instruments, Features and Controls Instrument Cluster Indicator Lamps High Beam Left Turn Anti-Lock Brake System (ABS) Low Fuel Right Turn Cruise Control Oil Pressure Check Engine Lamp Indicates Neutral High Beam Check Engine Neutral Battery Warning Condition This lamp illuminates when the transmission is in neutral and the ignition key is in the...
... until the anti-lock system activates, which occurs when vehicle speed exceeds 6 MPH (10 km/h). One arrow flashes when the corresponding turn signal is operating properly. Instruments, Features and Controls Instrument Cluster Indicator Lamps High Beam Left Turn Anti-Lock Brake System (ABS) Low Fuel Right Turn Cruise Control Oil Pressure Check Engine Lamp Indicates Neutral High Beam Check Engine Neutral Battery Warning Condition This lamp illuminates when the transmission is in neutral and the ignition key is in the...
Owners Manual
Page 29
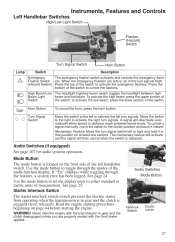
... of the turn signal switch left handlebar switch. If "Err" displays while toggling through the modes of the multi-function display. Starter Interlock Switch The starter interlock switch switch prevents the electric starter from operating when the transmission is released. Instruments, Features and Controls Left Handlebar Switches High/Low Light Switch Flasher (Hazard) Switch Turn Signal Switch Lamp Switch Horn Button Description Emergency The emergency flasher switch activates and cancels the emergency flashFlasher Switch ers. Audio Switches (if equipped...
... of the turn signal switch left handlebar switch. If "Err" displays while toggling through the modes of the multi-function display. Starter Interlock Switch The starter interlock switch switch prevents the electric starter from operating when the transmission is released. Instruments, Features and Controls Left Handlebar Switches High/Low Light Switch Flasher (Hazard) Switch Turn Signal Switch Lamp Switch Horn Button Description Emergency The emergency flasher switch activates and cancels the emergency flashFlasher Switch ers. Audio Switches (if equipped...

Owners Manual
Page 34
... Instruments, Features and Controls Tilt Sensor A tilt sensor stops the engine if the motorcycle tips beyond 45 degrees to ensure steering clearance. The check engine light or message will also activate. Optional door locks are located in serious injury or death. To open and close the vents. Door Handle Vent Handles 12-Volt Outlet and iPod Cord Vent Pivot Stop Deflector Fairing Vents and Deflectors (CROSS COUNTRY TOUR...
... Instruments, Features and Controls Tilt Sensor A tilt sensor stops the engine if the motorcycle tips beyond 45 degrees to ensure steering clearance. The check engine light or message will also activate. Optional door locks are located in serious injury or death. To open and close the vents. Door Handle Vent Handles 12-Volt Outlet and iPod Cord Vent Pivot Stop Deflector Fairing Vents and Deflectors (CROSS COUNTRY TOUR...

Owners Manual
Page 37
.... Rear Suspension Check shock movement and air pressure, verify ground clearance. Verify that the taillight and license plate light illuminate. Tires Inspect condition, pressure and tread depth. Brake Components Inspect hoses, connections, brake pads. Emergency Flashers Press the top of any electrical item reveals component failure, repair or replace the component before performing the following electrical inspections. Steering Check for leaks, debris and damage. If inspection of the hazard switch to turn signals flash...
.... Rear Suspension Check shock movement and air pressure, verify ground clearance. Verify that the taillight and license plate light illuminate. Tires Inspect condition, pressure and tread depth. Brake Components Inspect hoses, connections, brake pads. Emergency Flashers Press the top of any electrical item reveals component failure, repair or replace the component before performing the following electrical inspections. Steering Check for leaks, debris and damage. If inspection of the hazard switch to turn signals flash...
Owners Manual
Page 47
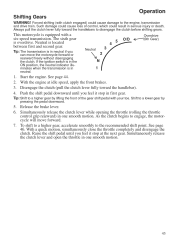
.... Shift to a lower gear by lifting the front of control, which could cause damage to engage, the motorcycle will move the motorcycle forward or rearward freely without disengaging the clutch. If the ignition switch is in the ON position, the neutral indicator illuminates when the transmission is equipped with your toe. As the clutch begins to the engine, transmission and drive train. Simultaneously release the clutch...
.... Shift to a lower gear by lifting the front of control, which could cause damage to engage, the motorcycle will move the motorcycle forward or rearward freely without disengaging the clutch. If the ignition switch is in the ON position, the neutral indicator illuminates when the transmission is equipped with your toe. As the clutch begins to the engine, transmission and drive train. Simultaneously release the clutch...

Owners Manual
Page 67
... recommended air pressure. 4. With the transmission in the operator's seat and slowly bounce the rear suspension a few times. If the wheel does not rotate smoothly, inspect the wheel bearings, rear axle, belt adjustment and wheel alignment. DO NOT exceed 72 PSI (496 kPa) in vice Manual or your VICTORY dealer for movement in the shock. 7. Swing Arm / Rear Axle Inspection 1. See the VICTORY SerCheck for service if you detect noise or...
... recommended air pressure. 4. With the transmission in the operator's seat and slowly bounce the rear suspension a few times. If the wheel does not rotate smoothly, inspect the wheel bearings, rear axle, belt adjustment and wheel alignment. DO NOT exceed 72 PSI (496 kPa) in vice Manual or your VICTORY dealer for movement in the shock. 7. Swing Arm / Rear Axle Inspection 1. See the VICTORY SerCheck for service if you detect noise or...

Owners Manual
Page 76
... tire pressure could cause loss of the wheel speed sensors. Tire Condition Inspect the tire sidewalls, road contact surface and tread base. Tire Tread Depth Use a depth gauge or an accurate ruler to the end of control or accident. If contamination is less than 1/16 inch (1.6 mm). 74 Always maintain proper tire pressure as possible. 2. See the VICTORY Service Manual or your vehicle. Maintenance Anti-Lock Brake System (ABS) Tone Ring/Sensor...
... tire pressure could cause loss of the wheel speed sensors. Tire Condition Inspect the tire sidewalls, road contact surface and tread base. Tire Tread Depth Use a depth gauge or an accurate ruler to the end of control or accident. If contamination is less than 1/16 inch (1.6 mm). 74 Always maintain proper tire pressure as possible. 2. See the VICTORY Service Manual or your vehicle. Maintenance Anti-Lock Brake System (ABS) Tone Ring/Sensor...

Owners Manual
Page 82
... bracket bushings. 5. Align each rubber grommet is properly positioned. Remove the left saddlebag and side cover. Disconnect the trunk wire harness. 3. Pull the two trunk latch levers fully upward to access the fuses, rear suspension air fitting, clutch cable adjuster, purge valve and flasher unit. Pull the trunk assembly rearward to engage the latches. Push both hands. When properly latched, theft prevention bolts prevent latches from rotating and releasing.
... bracket bushings. 5. Align each rubber grommet is properly positioned. Remove the left saddlebag and side cover. Disconnect the trunk wire harness. 3. Pull the two trunk latch levers fully upward to access the fuses, rear suspension air fitting, clutch cable adjuster, purge valve and flasher unit. Pull the trunk assembly rearward to engage the latches. Push both hands. When properly latched, theft prevention bolts prevent latches from rotating and releasing.

Owners Manual
Page 85
.... 1. Low Beam (7.6 cm) 2. Adjust rear shock air pressure for weight of the tighter screw. 3. See page 64. With the operator and cargo on the wall 3 inches (7.6 cm) below the center of the front wheel at Step 5 Step 6 specification. Move the ignition switch to the ON position and switch the headlamp to headlight aim. Headlight Aim Adjustment 1. Adjustment Screws Headlight Lamp Replacement High Intensity Discharge (HID...
.... 1. Low Beam (7.6 cm) 2. Adjust rear shock air pressure for weight of the tighter screw. 3. See page 64. With the operator and cargo on the wall 3 inches (7.6 cm) below the center of the front wheel at Step 5 Step 6 specification. Move the ignition switch to the ON position and switch the headlamp to headlight aim. Headlight Aim Adjustment 1. Adjustment Screws Headlight Lamp Replacement High Intensity Discharge (HID...
Owners Manual
Page 89
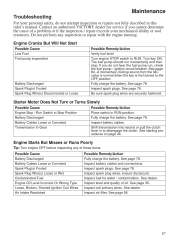
... Maintenance Troubleshooting For your mechanical ability or tool resources. Turn key ON. Shift transmission into neutral or pull the clutch lever in RUN position. Inspect battery cables and connections. See page 76. Inspect spark plugs. See page 78. The fuel pump should run , check the fuel pump / ignition circuit breaker. Engine Cranks But Will Not Start Possible Cause Low Fuel Fuel pump inoperative Possible Remedy/Action Verify fuel level Turn engine STOP switch to RUN. See page 78. Engine Starts...
... Maintenance Troubleshooting For your mechanical ability or tool resources. Turn key ON. Shift transmission into neutral or pull the clutch lever in RUN position. Inspect battery cables and connections. See page 76. Inspect spark plugs. See page 78. The fuel pump should run , check the fuel pump / ignition circuit breaker. Engine Cranks But Will Not Start Possible Cause Low Fuel Fuel pump inoperative Possible Remedy/Action Verify fuel level Turn engine STOP switch to RUN. See page 78. Engine Starts...

Owners Manual
Page 99
... or failures caused by abuse, accident, fire, or any parts exposed to the following items: Wheels and tires Suspension components Brake components Seat components Clutches and components Steering components Batteries Light bulbs/Sealed beam lamps Filters Lubricants Bushings Finished and unfinished surfaces Fuel injectors/Throttle body components Engine components Drive belts Hydraulic components and fluids Circuit breakers/Fuses Electronic components Spark plugs Sealants Coolants Bearings 97 This warranty is very important in the crate or...
... or failures caused by abuse, accident, fire, or any parts exposed to the following items: Wheels and tires Suspension components Brake components Seat components Clutches and components Steering components Batteries Light bulbs/Sealed beam lamps Filters Lubricants Bushings Finished and unfinished surfaces Fuel injectors/Throttle body components Engine components Drive belts Hydraulic components and fluids Circuit breakers/Fuses Electronic components Spark plugs Sealants Coolants Bearings 97 This warranty is very important in the crate or...
Owners Manual
Page 104
... Control System Warranty I. intake manifold; fuel tank cap for required maintenance C. igniters; condensers, and spark plugs if failure occurs prior to exceed VICTORY's suggested retail price for all of these parts. The owner may be readily determined. 102 Repair or replacement required as provided for the warranty repair and the geographically appropriate hourly labor rate. In the State of the United States Environmental Protection Agency and the California Air...
... Control System Warranty I. intake manifold; fuel tank cap for required maintenance C. igniters; condensers, and spark plugs if failure occurs prior to exceed VICTORY's suggested retail price for all of these parts. The owner may be readily determined. 102 Repair or replacement required as provided for the warranty repair and the geographically appropriate hourly labor rate. In the State of the United States Environmental Protection Agency and the California Air...

Owners Manual
Page 127
... through the headsets or speakers. Cross Country/Cross Country Tour Audio System NAV MP3 Navigation MP3 Introduction Please read this manual and the GARMIN ZUMO 660 NAV MP3 information provided with your player to use the audio system. The unit is the active source. The audio integration kit must set too low. Volume settings in the motorcycle's audio system control NAV MP3 volume, but...
... through the headsets or speakers. Cross Country/Cross Country Tour Audio System NAV MP3 Navigation MP3 Introduction Please read this manual and the GARMIN ZUMO 660 NAV MP3 information provided with your player to use the audio system. The unit is the active source. The audio integration kit must set too low. Volume settings in the motorcycle's audio system control NAV MP3 volume, but...

Owners Manual
Page 132
... will automatically turn the audio system on the headset controls to raise or lower volume. 3. Menu Titles: When this zone contains menu choice. NAV is active in the driver's Bluetooth headset. Track or Station Information / Menu Choices: When a menu is not running, power will display now playing information or an error / prompt. 4. Tip: To prevent battery drain when the engine is...
... will automatically turn the audio system on the headset controls to raise or lower volume. 3. Menu Titles: When this zone contains menu choice. NAV is active in the driver's Bluetooth headset. Track or Station Information / Menu Choices: When a menu is not running, power will display now playing information or an error / prompt. 4. Tip: To prevent battery drain when the engine is...

Owners Manual
Page 157
...32 Fluid Change, Engine Oil ...55 Fluid Level Engine Oil ...36 Front Brake ...37 Front Brake Fluid ...72 Rear Brake ...38 Rear Brake Fluid ...71 Fork Inspection ...66 Fuel Cap ...33 Fuel Gauge ...22 Fuel Handling Safety ...14 Fuel Level ...36 Fuel Recommendation ...106 Fuel System Inspection ...67 Fuel System, Priming ...43 Fuel Tank Installation ...58-59 Fuel Tank Removal...56-57 Fueling ...43 Fuse Recommendations ...84 Fuse Replacement ...84 L Labels, Information...Labels, Safety ...Leather, Rubber and Vinyl Care ...Lock Lubrication ...Locking Saddlebags ...Locking the Trunk ...Luggage Rack...
...32 Fluid Change, Engine Oil ...55 Fluid Level Engine Oil ...36 Front Brake ...37 Front Brake Fluid ...72 Rear Brake ...38 Rear Brake Fluid ...71 Fork Inspection ...66 Fuel Cap ...33 Fuel Gauge ...22 Fuel Handling Safety ...14 Fuel Level ...36 Fuel Recommendation ...106 Fuel System Inspection ...67 Fuel System, Priming ...43 Fuel Tank Installation ...58-59 Fuel Tank Removal...56-57 Fueling ...43 Fuse Recommendations ...84 Fuse Replacement ...84 L Labels, Information...Labels, Safety ...Leather, Rubber and Vinyl Care ...Lock Lubrication ...Locking Saddlebags ...Locking the Trunk ...Luggage Rack...

Owners Manual
Page 158
...-66 Suspension Inspection, Rear ...40 Swing Arm Inspection ...65 Switches Audio Switches...27 Emergency Flasher Switch ...27 Engine Starter Switch ...28 Engine Stop/Run Switch...28 Hand Grip Heater Switch ...26 Hazard Switch...27 High Beam/Low Beam Switch ...27 Horn Button ...27 Ignition Switch ...21 Ignition Switch Lubrication ...78 Mode Button ...27 Seat Heater Switches ...21 Starter Interlock Switch ...27 Turn Signal Switch ...27 Switches, Console ...26 Switches, Left Handlebar ...27 Switches, Right Handlebar ...28 O Odometer ...26 Oil Change, Engine Oil/Filter ...55 Oil Level, Engine Oil...
...-66 Suspension Inspection, Rear ...40 Swing Arm Inspection ...65 Switches Audio Switches...27 Emergency Flasher Switch ...27 Engine Starter Switch ...28 Engine Stop/Run Switch...28 Hand Grip Heater Switch ...26 Hazard Switch...27 High Beam/Low Beam Switch ...27 Horn Button ...27 Ignition Switch ...21 Ignition Switch Lubrication ...78 Mode Button ...27 Seat Heater Switches ...21 Starter Interlock Switch ...27 Turn Signal Switch ...27 Switches, Console ...26 Switches, Left Handlebar ...27 Switches, Right Handlebar ...28 O Odometer ...26 Oil Change, Engine Oil/Filter ...55 Oil Level, Engine Oil...